本文实例为大家分享了Android实现相册中图片上传或下载的具体代码,供大家参考,具体内容如下
目标效果:
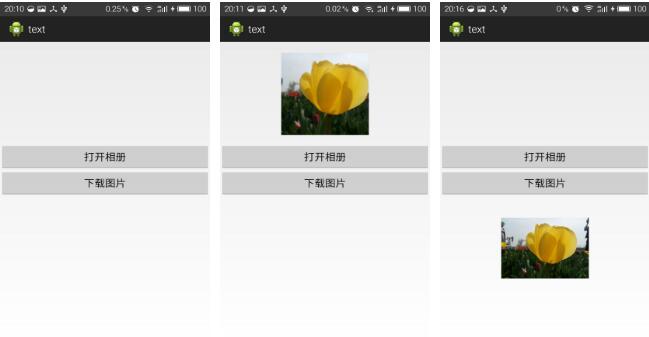
打开相册选择一张图片,会显示到上方的ImageView中并存储到Bmob中,存储后进入Bmob后台,复制刚才添加的数据的objectId,粘贴到代码指定出,然后运行,点击下载会在下方的ImageView显示刚才上传的图片,这里的下载是指定objectId,可以进行动态获取objectId进行下载。
1.activity_main.xml页面设置布局。
activity_main.xml页面:
<RelativeLayout xmlns:android="http://schemas.android.com/apk/res/android"
  xmlns:tools="http://schemas.android.com/tools"
  android:layout_width="match_parent"
  android:layout_height="match_parent"
  tools:context=".MainActivity" >

 <ImageView
   android:id="@+id/ivHead"
   android:layout_marginTop="20dp"
   android:layout_centerHorizontal="true"
   android:layout_width="150dp"
   android:layout_height="150dp"/>

 <Button
   android:id="@+id/btnSelectImage"
   android:layout_width="match_parent"
   android:layout_height="wrap_content"
   android:layout_alignParentLeft="true"
   android:layout_below="@+id/ivHead"
   android:layout_marginTop="16dp"
   android:text="打开相册" />

 <Button
   android:id="@+id/btnDownloadImage"
   android:layout_width="match_parent"
   android:layout_height="wrap_content"
   android:layout_alignParentLeft="true"
   android:layout_below="@+id/btnSelectImage"
   android:text="下载图片" />

 <ImageView
   android:id="@+id/ivDownload"
   android:layout_width="150dp"
   android:layout_height="150dp"
   android:layout_marginTop="20dp"
   android:layout_centerHorizontal="true"
   android:layout_below="@+id/btnDownloadImage" />

</RelativeLayout>
2.MainActivity.java页面定义上传与下载方法。
MainActivity.java页面:
package com.example.text;

import java.io.File;

import cn.bmob.v3.Bmob;
import cn.bmob.v3.BmobQuery;
import cn.bmob.v3.datatype.BmobFile;
import cn.bmob.v3.listener.DownloadFileListener;
import cn.bmob.v3.listener.GetListener;
import cn.bmob.v3.listener.UploadBatchListener;
import cn.bmob.v3.listener.UploadFileListener;

import com.android.volley.toolbox.ImageLoader;
import com.example.text.MainActivity;

import entity.Person;

import android.net.Uri;
import android.os.Bundle;
import android.os.Environment;
import android.provider.MediaStore;
import android.app.Activity;
import android.content.Intent;
import android.database.Cursor;
import android.graphics.Bitmap;
import android.graphics.BitmapFactory;
import android.graphics.drawable.BitmapDrawable;
import android.graphics.drawable.Drawable;
import android.view.View;
import android.view.View.OnClickListener;
import android.widget.Button;
import android.widget.ImageView;
import android.widget.Toast;

public class MainActivity extends Activity implements OnClickListener {

 private ImageView ivHead, ivDownload;
 private Button btnSelectImage, btnDownloadImage;

 private static final int IMAGE_CODE = 0;// 打开相册
 private static final int RESIZE_CODE = 2;// 调整大小

 private static final String IMAGE_NAME = " ";// 图片字符串

 @Override
 protected void onCreate(Bundle savedInstanceState) {
 super.onCreate(savedInstanceState);
 setContentView(R.layout.activity_main);

 Bmob.initialize(this, "8ef8a4752f48682eadb32d3c8c8e398f");// 初始化Bmob

 // 初始化控件
 init();

 // 绑定点击事件
 bindClick();
 }

 // 初始化控件
 private void init() {
 ivHead = (ImageView) findViewById(R.id.ivHead);
 ivDownload = (ImageView) findViewById(R.id.ivDownload);
 btnSelectImage = (Button) findViewById(R.id.btnSelectImage);
 btnDownloadImage = (Button) findViewById(R.id.btnDownloadImage);
 }

 // 绑定点击事件
 private void bindClick() {
 btnSelectImage.setOnClickListener(this);
 btnDownloadImage.setOnClickListener(this);
 }

 @Override
 public void onClick(View view) {
 switch (view.getId()) {
 case R.id.btnSelectImage:
  Intent galleryIntent = new Intent(Intent.ACTION_GET_CONTENT);
  galleryIntent.addCategory(Intent.CATEGORY_OPENABLE);
  galleryIntent.setType("image/*");//图片
  startActivityForResult(galleryIntent, IMAGE_CODE);  //跳转,传递打开相册请求码
  break;
 case R.id.btnDownloadImage:
  BmobQuery<Person> query=new BmobQuery<Person>();
  query.getObject(this,"ef292ff6ef",new GetListener<Person>() { //第二个参数为想要下载的BmobFile数据的objectId

  @Override
  public void onSuccess(Person person) {
   Toast.makeText(MainActivity.this,"获取成功",Toast.LENGTH_SHORT).show();

   //下载图片
   downloadImage(person);
  }

  @Override
  public void onFailure(int arg0, String arg1) {
   Toast.makeText(MainActivity.this,"获取失败",Toast.LENGTH_SHORT).show();
  }
  });
  break;
 default:
  break;
 }

 }

 @Override
 protected void onActivityResult(int requestCode, int resultCode, Intent data) {
 if (resultCode != RESULT_OK) {
  return;
 } else {
  switch (requestCode) {
  case IMAGE_CODE:
  Uri uri = data.getData();
  resizeImage(uri);
  // 将获取到的uri转换为String型
  String[] images = { MediaStore.Images.Media.DATA };// 将图片URI转换成存储路径
  Cursor cursor = this
   .managedQuery(uri, images, null, null, null);
  int index = cursor
   .getColumnIndexOrThrow(MediaStore.Images.Media.DATA);
  cursor.moveToFirst();
  String img_url = cursor.getString(index);
  upload(img_url);
  break;

  case RESIZE_CODE:
  if (data != null) {
   showResizeImage(data);
  }
  break;
  }
 }
 super.onActivityResult(requestCode, resultCode, data);
 }

 // 判断SD卡是否存在
 private boolean isSdcardExisting() {
 final String state = Environment.getExternalStorageState();
 if (state.equals(Environment.MEDIA_MOUNTED)) {
  return true;
 } else {
  return false;
 }
 }

 // 重塑图片大小
 public void resizeImage(Uri uri) {
 Intent intent = new Intent("com.android.camera.action.CROP");
 intent.setDataAndType(uri, "image/*");
 intent.putExtra("crop", "true");// 可以裁剪
 intent.putExtra("aspectX", 1);
 intent.putExtra("aspectY", 1);
 intent.putExtra("outputX", 150);
 intent.putExtra("outputY", 150);
 intent.putExtra("return-data", true);
 startActivityForResult(intent, RESIZE_CODE);// 跳转,传递调整大小请求码
 }

 // 获取路径
 private Uri getImageUri() {
 return Uri.fromFile(new File(Environment.getExternalStorageDirectory(),
  IMAGE_NAME));
 }

 // 显示图片
 private void showResizeImage(Intent data) {
 Bundle extras = data.getExtras();
 if (extras != null) {
  Bitmap photo = extras.getParcelable("data");
  Drawable drawable = new BitmapDrawable(photo);
  ivHead.setImageDrawable(drawable);
 }
 }

 // 图片上传
 private void upload(String imgpath) {
 final BmobFile icon = new BmobFile(new File(imgpath));
 icon.upload(this, new UploadFileListener() {

  @Override
  public void onSuccess() {
  Person person = new Person();
  person.setIcon(icon);
  person.save(MainActivity.this);
  Toast.makeText(MainActivity.this,"图片上传成功",Toast.LENGTH_SHORT).show();
  }

  @Override
  public void onFailure(int arg0, String arg1) {
  Toast.makeText(MainActivity.this,"图片上传失败",Toast.LENGTH_SHORT).show();
  }
 });
 }

 //下载图片
 private void downloadImage(Person person) {
 BmobFile icon=person.getIcon();
 icon.download(MainActivity.this,new DownloadFileListener() {

  @Override
  public void onSuccess(String url) {
  ivDownload.setImageBitmap(BitmapFactory.decodeFile(url));  //根据地址解码并显示图片

  }

  @Override
  public void onFailure(int arg0, String arg1) {
  Toast.makeText(MainActivity.this,"下载失败",Toast.LENGTH_SHORT).show();
  }
 });

 }
}
3.Person.java页面为实体类,运行自动生成一个Person表,这个表只有一个字段存储图片。
Person.java页面:
package entity;

import cn.bmob.v3.BmobObject;
import cn.bmob.v3.datatype.BmobFile;

public class Person extends BmobObject{

 private BmobFile icon;

 public BmobFile getIcon() {
 return icon;
 }

 public void setIcon(BmobFile icon) {
 this.icon = icon;
 }

}
4.因为使用了Bmob,所以需要添加权限。
AndroidManifest.xml页面:
<?xml version="1.0" encoding="utf-8"?>
<manifest xmlns:android="http://schemas.android.com/apk/res/android"
  package="com.example.text"
  android:versionCode="1"
  android:versionName="1.0" >

  <uses-sdk
    android:minSdkVersion="8"
    android:targetSdkVersion="18" />
  <uses-permission android:name="android.permission.WRITE_CONTACTS"/>
  <uses-permission android:name="android.permission.READ_EXTERNAL_STORAGE"/>
  <uses-permission android:name="android.permission.INTERNET"/>

  <!-- 允许联网 -->
  <uses-permission android:name="android.permission.INTERNET" />
  <!-- 获取GSM(2g)、WCDMA(联通3g)等网络状态的信息 -->
  <uses-permission android:name="android.permission.ACCESS_NETWORK_STATE" />
  <!-- 获取wifi网络状态的信息 -->
  <uses-permission android:name="android.permission.ACCESS_WIFI_STATE" />
  <!-- 保持CPU 运转,屏幕和键盘灯有可能是关闭的,用于文件上传和下载 -->
  <uses-permission android:name="android.permission.WAKE_LOCK" />
  <!-- 获取sd卡写的权限,用于文件上传和下载 -->
  <uses-permission android:name="android.permission.WRITE_EXTERNAL_STORAGE" />
  <!-- 允许读取手机状态 用于创建BmobInstallation -->
  <uses-permission android:name="android.permission.READ_PHONE_STATE" />

  <application
    android:allowBackup="true"
    android:icon="@drawable/ic_launcher"
    android:label="@string/app_name"
    android:theme="@style/AppTheme" >
    <activity
      android:name="com.example.text.MainActivity"
      android:label="@string/app_name" >
      <intent-filter>
        <action android:name="android.intent.action.MAIN" />

        <category android:name="android.intent.category.LAUNCHER" />
      </intent-filter>
    </activity>
  </application>

</manifest>
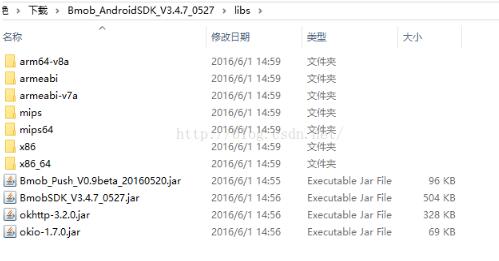
5.注意之前讲过使用Bmob需要下载第三方SDK,将libs文件夹中的所有内容都复制到项目libs目录下,然后Properties->Java Build Path->Libraries->Add JARs...添加刚复制的四个jar包
以上就是本文的全部内容,希望对大家的学习有所帮助,也希望大家多多支持靠谱客。
最后
以上就是炙热萝莉最近收集整理的关于Android实现相册中图片上传或下载的全部内容,更多相关Android实现相册中图片上传或下载内容请搜索靠谱客的其他文章。
本图文内容来源于网友提供,作为学习参考使用,或来自网络收集整理,版权属于原作者所有。


发表评论 取消回复