一、前言
在某些场景下,单一文字的ListView Item已不适合当前需求,因此需要我们自定义Item布局来满足需求。下面我们来实现一个带图标和文字的Item。
二、代码展示
1.定义包含ListView的布局文件activity_main.xml,Activity在onCreate()时加载。
<?xml version="1.0" encoding="utf-8"?>
<androidx.constraintlayout.widget.ConstraintLayout xmlns:android="http://schemas.android.com/apk/res/android"
    xmlns:tools="http://schemas.android.com/tools"
    android:layout_width="match_parent"
    android:layout_height="match_parent"
    android:background="#FFE4C4"
    tools:context=".MainActivity">

    <LinearLayout
        android:layout_width="match_parent"
        android:layout_height="match_parent"
        android:layout_marginTop="10dp"
        android:layout_marginLeft="10dp"
        android:layout_marginRight="10dp"
        android:layout_marginBottom="10dp"
        android:background="#E4DDDD">

        <ListView
            android:id="@+id/listview"
            android:layout_width="match_parent"
            android:layout_height="match_parent"/>
    </LinearLayout>

</androidx.constraintlayout.widget.ConstraintLayout>
2.定义Item布局文件listview_item.xml,创建SimpleAdapter对象时使用。
<?xml version="1.0" encoding="utf-8"?>
<LinearLayout xmlns:android="http://schemas.android.com/apk/res/android"
    android:layout_width="match_parent"
    android:layout_height="match_parent"
    android:orientation="horizontal"
    android:background="#F0FFF0">

    <ImageView
        android:id="@+id/imageview"
        android:layout_width="wrap_content"
        android:layout_height="wrap_content"
        android:layout_gravity="center"
        android:layout_weight="1"/>

    <TextView
        android:id="@+id/textview"
        android:layout_width="wrap_content"
        android:layout_height="wrap_content"
        android:layout_gravity="center"
        android:layout_weight="7"
        android:textColor="#FF6E40"
        android:textSize="24sp"
        android:textStyle="bold" />


</LinearLayout>
3.完善MainActivity.java代码。
package com.example.listviewdemo2;

import androidx.appcompat.app.AppCompatActivity;

import android.os.Bundle;
import android.widget.ListView;
import android.widget.SimpleAdapter;

import java.util.ArrayList;
import java.util.HashMap;
import java.util.List;
import java.util.Map;

public class MainActivity extends AppCompatActivity {

    private ListView mListView = null;
    private List<Map<String, Object>> mListItems = null;
    private Map<String, Object> mMap = null;

    private SimpleAdapter mAdapter = null;

    /* 图片ID数组 */
    private int[] mImageId = new int[] {R.drawable.num_0, R.drawable.num_1, R.drawable.num_2, R.drawable.num_3, R.drawable.num_4,
                                        R.drawable.num_5, R.drawable.num_6, R.drawable.num_7, R.drawable.num_8, R.drawable.num_9, };
    /* 文字列表数组 */
    private String[] mTitle = new String[] {"数字 0", "数字 1", "数字 2", "数字 3", "数字 4", "数字 5", "数字 6", "数字 7", "数字 8", "数字 9", };

    @Override
    protected void onCreate(Bundle savedInstanceState) {
        super.onCreate(savedInstanceState);
        setContentView(R.layout.activity_main);

        init();
    }

    private void init() {
        mListView = findViewById(R.id.listview);

        mListItems = new ArrayList<>();
        for (int i = 0; i < mImageId.length; i++) {
            mMap = new HashMap<>();
            mMap.put("image", mImageId[i]);
            mMap.put("title", mTitle[i]);
            mListItems.add(mMap);
        }

        mAdapter = new SimpleAdapter(this, mListItems, R.layout.listview_item, new String[]{"title", "image"}, new int[]{R.id.textview, R.id.imageview});
        mListView.setAdapter(mAdapter);
    }
}
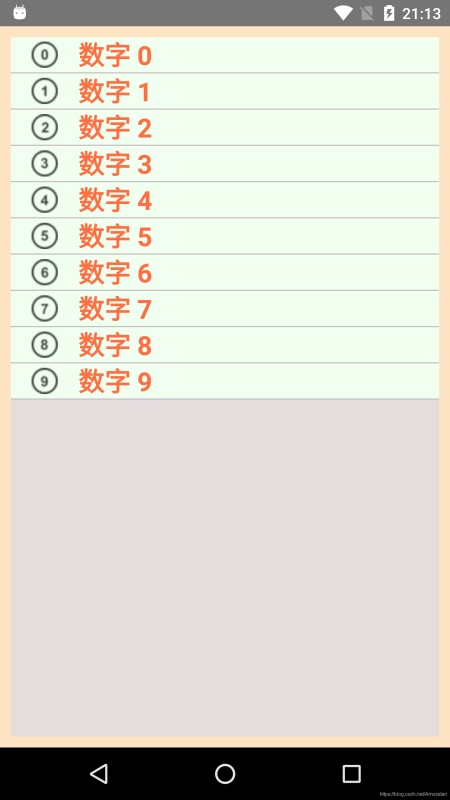
三、运行效果
运行效果如下图:
到此这篇关于Android ListView 实例讲解清晰易懂的文章就介绍到这了,更多相关Android ListView内容请搜索靠谱客以前的文章或继续浏览下面的相关文章希望大家以后多多支持靠谱客!
最后
以上就是单纯黑夜最近收集整理的关于Android ListView 实例讲解清晰易懂的全部内容,更多相关Android内容请搜索靠谱客的其他文章。
本图文内容来源于网友提供,作为学习参考使用,或来自网络收集整理,版权属于原作者所有。


发表评论 取消回复