一.首先看布局层次 看这么几张图

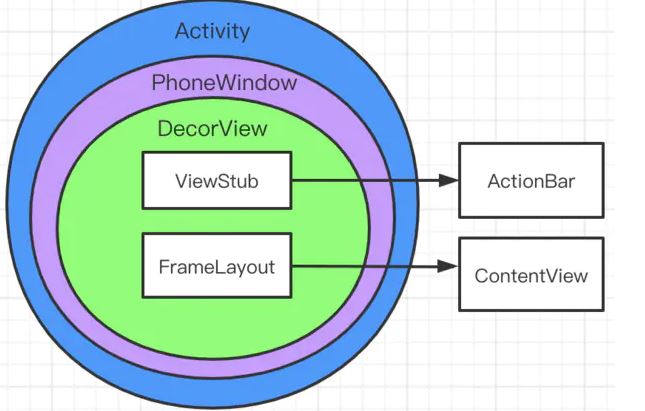
我们会发现DecorView里面包裹的内容可能会随着不同的情况而变化,但是在Decor之前的层次关系都是固定的。即Activity包裹PhoneWindow,PhoneWindow包裹DecorView。接下来我们首先看一下三者分别是如何创建的。
二.Activity是如何创建的
首先看到入口类ActivityThread的performLaunchActivity方法:
 private Activity performLaunchActivity(ActivityClientRecord r, Intent customIntent) {
		...
        ContextImpl appContext = createBaseContextForActivity(r);
        Activity activity = null;
        try {
            java.lang.ClassLoader cl = appContext.getClassLoader();
            activity = mInstrumentation.newActivity(
                    cl, component.getClassName(), r.intent);
            StrictMode.incrementExpectedActivityCount(activity.getClass());
            r.intent.setExtrasClassLoader(cl);
            r.intent.prepareToEnterProcess();
            if (r.state != null) {
                r.state.setClassLoader(cl);
            }
        } catch (Exception e) {
            ...
        }
有句特别关键的代码,即
activity = mInstrumentation.newActivity(cl, component.getClassName(), r.intent);
所以activity是Instrumentation类的newActivity方法创建的,追踪过去,源码如下
public Activity newActivity(ClassLoader cl, String className,
            Intent intent)
            throws InstantiationException, IllegalAccessException,
            ClassNotFoundException {
        String pkg = intent != null && intent.getComponent() != null
                ? intent.getComponent().getPackageName() : null;
        return getFactory(pkg).instantiateActivity(cl, className, intent);
    }
追踪源码,可知getFactory方法返回一个AppComponentFactory对象,然后调用AppComponentFactory的instantiateActivity方法,继续追踪
public @NonNull Activity instantiateActivity(@NonNull ClassLoader cl, @NonNull String className,
            @Nullable Intent intent)
            throws InstantiationException, IllegalAccessException, ClassNotFoundException {
        return (Activity) cl.loadClass(className).newInstance();
    }
到这里就结束了,我们可以发现Activity是通过反射创建的。
三.PhoneWindow的创建
我们还是回到ActivityThread的performLaunchActivity方法,在刚刚展示的那一段的下面有如下部分代码
		Window window = null;
        if (r.mPendingRemoveWindow != null && r.mPreserveWindow) {
            window = r.mPendingRemoveWindow;
            r.mPendingRemoveWindow = null;
            r.mPendingRemoveWindowManager = null;
        }

        // Activity resources must be initialized with the same loaders as the
        // application context.
        appContext.getResources().addLoaders(
                app.getResources().getLoaders().toArray(new ResourcesLoader[0]));

        appContext.setOuterContext(activity);
        activity.attach(appContext, this, getInstrumentation(), r.token,
                r.ident, app, r.intent, r.activityInfo, title, r.parent,
                r.embeddedID, r.lastNonConfigurationInstances, config,
                r.referrer, r.voiceInteractor, window, r.configCallback,
                r.assistToken);
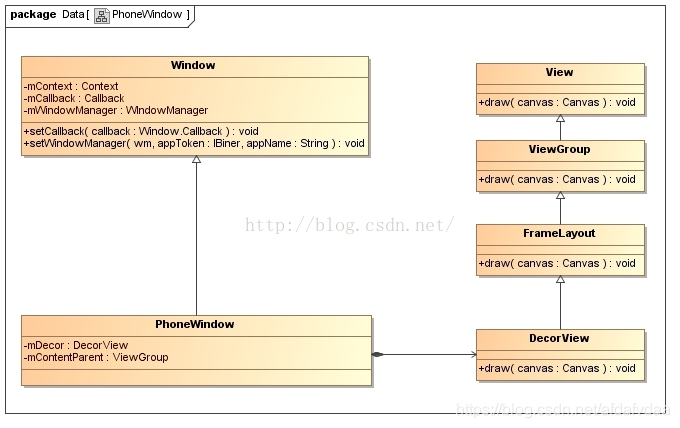
在activity.attach这个方法中,传入了一个Window对象,追踪这个attach方法,里面有一句关键代码
mWindow = new PhoneWindow(this, window, activityConfigCallback);
此时就创建了PhoneWindow。所以我们可以知道,在Activity创建完之后,会为当前的Activity创建一个PhoneWindow对象。
四.DecorView的创建
DecorView的创建就不是performLaunchActivity方法里面了,这次我们从Activity的setContentView的源码开始分析。下面的Activity的setContentView方法的内容。
public void setContentView(@LayoutRes int layoutResID) {
        getWindow().setContentView(layoutResID);
        initWindowDecorActionBar();
    }
我们发现,Activity的setContentView实际是调用了PhoneWindow的setContentView方法,跟踪源码。我们会首先进入Window抽象类,然后我们找其子类PhoneWindow,在里面找到setContentView方法
public void setContentView(int layoutResID) {
        if (mContentParent == null) {
            installDecor();
        } else if (!hasFeature(FEATURE_CONTENT_TRANSITIONS)) {
            mContentParent.removeAllViews();
        }
		...
当mContentParent为null时,会调用installDecor方法,追踪进入
private void installDecor() {
        mForceDecorInstall = false;
        if (mDecor == null) {
            mDecor = generateDecor(-1);
            mDecor.setDescendantFocusability(ViewGroup.FOCUS_AFTER_DESCENDANTS);
            mDecor.setIsRootNamespace(true);
            if (!mInvalidatePanelMenuPosted && mInvalidatePanelMenuFeatures != 0) {
                mDecor.postOnAnimation(mInvalidatePanelMenuRunnable);
            }
        } else {
            mDecor.setWindow(this);
        }
        ...
它调用了generateDecor方法,追踪进入
protected DecorView generateDecor(int featureId) {
        // System process doesn't have application context and in that case we need to directly use
        // the context we have. Otherwise we want the application context, so we don't cling to the
        // activity.
        Context context;
        if (mUseDecorContext) {
            Context applicationContext = getContext().getApplicationContext();
            if (applicationContext == null) {
                context = getContext();
            } else {
                context = new DecorContext(applicationContext, this);
                if (mTheme != -1) {
                    context.setTheme(mTheme);
                }
            }
        } else {
            context = getContext();
        }
        return new DecorView(context, featureId, this, getAttributes());
    }
会发现generateDecor方法会创建一个DecorView对象,并且作为返回值返回。再追踪DecorView
public class DecorView extends FrameLayout implements RootViewSurfaceTaker, WindowCallbacks
会发现DecorView其实是一个FrameLayout 。到这就介绍完DecorView是如何创建的了
五.布局加载流程
我们回到PhoneWindow的installDecor方法,再刚刚看的部分的下面,有(2692行)
if (mContentParent == null) {mContentParent = generateLayout(mDecor);
追踪进入
 protected ViewGroup generateLayout(DecorView decor) {
        // Apply data from current theme.

        TypedArray a = getWindowStyle();

        if (false) {
            System.out.println("From style:");
            String s = "Attrs:";
            for (int i = 0; i < R.styleable.Window.length; i++) {
                s = s + " " + Integer.toHexString(R.styleable.Window[i]) + "="
                        + a.getString(i);
            }
            System.out.println(s);
        }

        mIsFloating = a.getBoolean(R.styleable.Window_windowIsFloating, false);
        int flagsToUpdate = (FLAG_LAYOUT_IN_SCREEN|FLAG_LAYOUT_INSET_DECOR)
                & (~getForcedWindowFlags());
        if (mIsFloating) {
            setLayout(WRAP_CONTENT, WRAP_CONTENT);
            setFlags(0, flagsToUpdate);
        } else {
            setFlags(FLAG_LAYOUT_IN_SCREEN|FLAG_LAYOUT_INSET_DECOR, flagsToUpdate);
            getAttributes().setFitInsetsSides(0);
            getAttributes().setFitInsetsTypes(0);
        }

        if (a.getBoolean(R.styleable.Window_windowNoTitle, false)) {
            requestFeature(FEATURE_NO_TITLE);
        } else if (a.getBoolean(R.styleable.Window_windowActionBar, false)) {
            // Don't allow an action bar if there is no title.
            requestFeature(FEATURE_ACTION_BAR);
        }

        if (a.getBoolean(R.styleable.Window_windowActionBarOverlay, false)) {
            requestFeature(FEATURE_ACTION_BAR_OVERLAY);
        }

        if (a.getBoolean(R.styleable.Window_windowActionModeOverlay, false)) {
            requestFeature(FEATURE_ACTION_MODE_OVERLAY);
        }

        if (a.getBoolean(R.styleable.Window_windowFullscreen, false)) {
            setFlags(FLAG_FULLSCREEN, FLAG_FULLSCREEN & (~getForcedWindowFlags()));
        }

        if (a.getBoolean(R.styleable.Window_windowTranslucentStatus,
                false)) {
            setFlags(FLAG_TRANSLUCENT_STATUS, FLAG_TRANSLUCENT_STATUS
                    & (~getForcedWindowFlags()));
        }

        if (a.getBoolean(R.styleable.Window_windowTranslucentNavigation,
                false)) {
            setFlags(FLAG_TRANSLUCENT_NAVIGATION, FLAG_TRANSLUCENT_NAVIGATION
                    & (~getForcedWindowFlags()));
        }

        if (a.getBoolean(R.styleable.Window_windowShowWallpaper, false)) {
            setFlags(FLAG_SHOW_WALLPAPER, FLAG_SHOW_WALLPAPER&(~getForcedWindowFlags()));
        }

        if (a.getBoolean(R.styleable.Window_windowEnableSplitTouch,
                getContext().getApplicationInfo().targetSdkVersion
                        >= android.os.Build.VERSION_CODES.HONEYCOMB)) {
            setFlags(FLAG_SPLIT_TOUCH, FLAG_SPLIT_TOUCH&(~getForcedWindowFlags()));
        }

        a.getValue(R.styleable.Window_windowMinWidthMajor, mMinWidthMajor);
        a.getValue(R.styleable.Window_windowMinWidthMinor, mMinWidthMinor);
        if (DEBUG) Log.d(TAG, "Min width minor: " + mMinWidthMinor.coerceToString()
                + ", major: " + mMinWidthMajor.coerceToString());
        if (a.hasValue(R.styleable.Window_windowFixedWidthMajor)) {
            if (mFixedWidthMajor == null) mFixedWidthMajor = new TypedValue();
            a.getValue(R.styleable.Window_windowFixedWidthMajor,
                    mFixedWidthMajor);
        }
        if (a.hasValue(R.styleable.Window_windowFixedWidthMinor)) {
            if (mFixedWidthMinor == null) mFixedWidthMinor = new TypedValue();
            a.getValue(R.styleable.Window_windowFixedWidthMinor,
                    mFixedWidthMinor);
        }
        if (a.hasValue(R.styleable.Window_windowFixedHeightMajor)) {
            if (mFixedHeightMajor == null) mFixedHeightMajor = new TypedValue();
            a.getValue(R.styleable.Window_windowFixedHeightMajor,
                    mFixedHeightMajor);
        }
        if (a.hasValue(R.styleable.Window_windowFixedHeightMinor)) {
            if (mFixedHeightMinor == null) mFixedHeightMinor = new TypedValue();
            a.getValue(R.styleable.Window_windowFixedHeightMinor,
                    mFixedHeightMinor);
        }
        if (a.getBoolean(R.styleable.Window_windowContentTransitions, false)) {
            requestFeature(FEATURE_CONTENT_TRANSITIONS);
        }
        if (a.getBoolean(R.styleable.Window_windowActivityTransitions, false)) {
            requestFeature(FEATURE_ACTIVITY_TRANSITIONS);
        }

        mIsTranslucent = a.getBoolean(R.styleable.Window_windowIsTranslucent, false);

        final Context context = getContext();
        final int targetSdk = context.getApplicationInfo().targetSdkVersion;
        final boolean targetPreL = targetSdk < android.os.Build.VERSION_CODES.LOLLIPOP;
        final boolean targetPreQ = targetSdk < Build.VERSION_CODES.Q;

        if (!mForcedStatusBarColor) {
            mStatusBarColor = a.getColor(R.styleable.Window_statusBarColor, 0xFF000000);
        }
        if (!mForcedNavigationBarColor) {
            mNavigationBarColor = a.getColor(R.styleable.Window_navigationBarColor, 0xFF000000);
            mNavigationBarDividerColor = a.getColor(R.styleable.Window_navigationBarDividerColor,
                    0x00000000);
        }
        if (!targetPreQ) {
            mEnsureStatusBarContrastWhenTransparent = a.getBoolean(
                    R.styleable.Window_enforceStatusBarContrast, false);
            mEnsureNavigationBarContrastWhenTransparent = a.getBoolean(
                    R.styleable.Window_enforceNavigationBarContrast, true);
        }

        WindowManager.LayoutParams params = getAttributes();

        // Non-floating windows on high end devices must put up decor beneath the system bars and
        // therefore must know about visibility changes of those.
        if (!mIsFloating) {
            if (!targetPreL && a.getBoolean(
                    R.styleable.Window_windowDrawsSystemBarBackgrounds,
                    false)) {
                setFlags(FLAG_DRAWS_SYSTEM_BAR_BACKGROUNDS,
                        FLAG_DRAWS_SYSTEM_BAR_BACKGROUNDS & ~getForcedWindowFlags());
            }
            if (mDecor.mForceWindowDrawsBarBackgrounds) {
                params.privateFlags |= PRIVATE_FLAG_FORCE_DRAW_BAR_BACKGROUNDS;
            }
        }
        if (a.getBoolean(R.styleable.Window_windowLightStatusBar, false)) {
            decor.setSystemUiVisibility(
                    decor.getSystemUiVisibility() | View.SYSTEM_UI_FLAG_LIGHT_STATUS_BAR);
        }
        if (a.getBoolean(R.styleable.Window_windowLightNavigationBar, false)) {
            decor.setSystemUiVisibility(
                    decor.getSystemUiVisibility() | View.SYSTEM_UI_FLAG_LIGHT_NAVIGATION_BAR);
        }
        if (a.hasValue(R.styleable.Window_windowLayoutInDisplayCutoutMode)) {
            int mode = a.getInt(R.styleable.Window_windowLayoutInDisplayCutoutMode, -1);
            if (mode < LAYOUT_IN_DISPLAY_CUTOUT_MODE_DEFAULT
                    || mode > LAYOUT_IN_DISPLAY_CUTOUT_MODE_ALWAYS) {
                throw new UnsupportedOperationException("Unknown windowLayoutInDisplayCutoutMode: "
                        + a.getString(R.styleable.Window_windowLayoutInDisplayCutoutMode));
            }
            params.layoutInDisplayCutoutMode = mode;
        }

        if (mAlwaysReadCloseOnTouchAttr || getContext().getApplicationInfo().targetSdkVersion
                >= android.os.Build.VERSION_CODES.HONEYCOMB) {
            if (a.getBoolean(
                    R.styleable.Window_windowCloseOnTouchOutside,
                    false)) {
                setCloseOnTouchOutsideIfNotSet(true);
            }
        }

        if (!hasSoftInputMode()) {
            params.softInputMode = a.getInt(
                    R.styleable.Window_windowSoftInputMode,
                    params.softInputMode);
        }

        if (a.getBoolean(R.styleable.Window_backgroundDimEnabled,
                mIsFloating)) {
            /* All dialogs should have the window dimmed */
            if ((getForcedWindowFlags()&WindowManager.LayoutParams.FLAG_DIM_BEHIND) == 0) {
                params.flags |= WindowManager.LayoutParams.FLAG_DIM_BEHIND;
            }
            if (!haveDimAmount()) {
                params.dimAmount = a.getFloat(
                        android.R.styleable.Window_backgroundDimAmount, 0.5f);
            }
        }

        if (params.windowAnimations == 0) {
            params.windowAnimations = a.getResourceId(
                    R.styleable.Window_windowAnimationStyle, 0);
        }

        // The rest are only done if this window is not embedded; otherwise,
        // the values are inherited from our container.
        if (getContainer() == null) {
            if (mBackgroundDrawable == null) {

                if (mFrameResource == 0) {
                    mFrameResource = a.getResourceId(R.styleable.Window_windowFrame, 0);
                }

                if (a.hasValue(R.styleable.Window_windowBackground)) {
                    mBackgroundDrawable = a.getDrawable(R.styleable.Window_windowBackground);
                }
            }
            if (a.hasValue(R.styleable.Window_windowBackgroundFallback)) {
                mBackgroundFallbackDrawable =
                        a.getDrawable(R.styleable.Window_windowBackgroundFallback);
            }
            if (mLoadElevation) {
                mElevation = a.getDimension(R.styleable.Window_windowElevation, 0);
            }
            mClipToOutline = a.getBoolean(R.styleable.Window_windowClipToOutline, false);
            mTextColor = a.getColor(R.styleable.Window_textColor, Color.TRANSPARENT);
        }

        // Inflate the window decor.

        int layoutResource;
        int features = getLocalFeatures();
        // System.out.println("Features: 0x" + Integer.toHexString(features));
        if ((features & ((1 << FEATURE_LEFT_ICON) | (1 << FEATURE_RIGHT_ICON))) != 0) {
            if (mIsFloating) {
                TypedValue res = new TypedValue();
                getContext().getTheme().resolveAttribute(
                        R.attr.dialogTitleIconsDecorLayout, res, true);
                layoutResource = res.resourceId;
            } else {
                layoutResource = R.layout.screen_title_icons;
            }
            // XXX Remove this once action bar supports these features.
            removeFeature(FEATURE_ACTION_BAR);
            // System.out.println("Title Icons!");
        } else if ((features & ((1 << FEATURE_PROGRESS) | (1 << FEATURE_INDETERMINATE_PROGRESS))) != 0
                && (features & (1 << FEATURE_ACTION_BAR)) == 0) {
            // Special case for a window with only a progress bar (and title).
            // XXX Need to have a no-title version of embedded windows.
            layoutResource = R.layout.screen_progress;
            // System.out.println("Progress!");
        } else if ((features & (1 << FEATURE_CUSTOM_TITLE)) != 0) {
            // Special case for a window with a custom title.
            // If the window is floating, we need a dialog layout
            if (mIsFloating) {
                TypedValue res = new TypedValue();
                getContext().getTheme().resolveAttribute(
                        R.attr.dialogCustomTitleDecorLayout, res, true);
                layoutResource = res.resourceId;
            } else {
                layoutResource = R.layout.screen_custom_title;
            }
            // XXX Remove this once action bar supports these features.
            removeFeature(FEATURE_ACTION_BAR);
        } else if ((features & (1 << FEATURE_NO_TITLE)) == 0) {
            // If no other features and not embedded, only need a title.
            // If the window is floating, we need a dialog layout
            if (mIsFloating) {
                TypedValue res = new TypedValue();
                getContext().getTheme().resolveAttribute(
                        R.attr.dialogTitleDecorLayout, res, true);
                layoutResource = res.resourceId;
            } else if ((features & (1 << FEATURE_ACTION_BAR)) != 0) {
                layoutResource = a.getResourceId(
                        R.styleable.Window_windowActionBarFullscreenDecorLayout,
                        R.layout.screen_action_bar);
            } else {
                layoutResource = R.layout.screen_title;
            }
            // System.out.println("Title!");
        } else if ((features & (1 << FEATURE_ACTION_MODE_OVERLAY)) != 0) {
            layoutResource = R.layout.screen_simple_overlay_action_mode;
        } else {
            // Embedded, so no decoration is needed.
            layoutResource = R.layout.screen_simple;
            // System.out.println("Simple!");
        }

        mDecor.startChanging();
        mDecor.onResourcesLoaded(mLayoutInflater, layoutResource);

        ViewGroup contentParent = (ViewGroup)findViewById(ID_ANDROID_CONTENT);
        if (contentParent == null) {
            throw new RuntimeException("Window couldn't find content container view");
        }

        if ((features & (1 << FEATURE_INDETERMINATE_PROGRESS)) != 0) {
            ProgressBar progress = getCircularProgressBar(false);
            if (progress != null) {
                progress.setIndeterminate(true);
            }
        }

        // Remaining setup -- of background and title -- that only applies
        // to top-level windows.
        if (getContainer() == null) {
            mDecor.setWindowBackground(mBackgroundDrawable);

            final Drawable frame;
            if (mFrameResource != 0) {
                frame = getContext().getDrawable(mFrameResource);
            } else {
                frame = null;
            }
            mDecor.setWindowFrame(frame);

            mDecor.setElevation(mElevation);
            mDecor.setClipToOutline(mClipToOutline);

            if (mTitle != null) {
                setTitle(mTitle);
            }

            if (mTitleColor == 0) {
                mTitleColor = mTextColor;
            }
            setTitleColor(mTitleColor);
        }

        mDecor.finishChanging();

        return contentParent;
    }
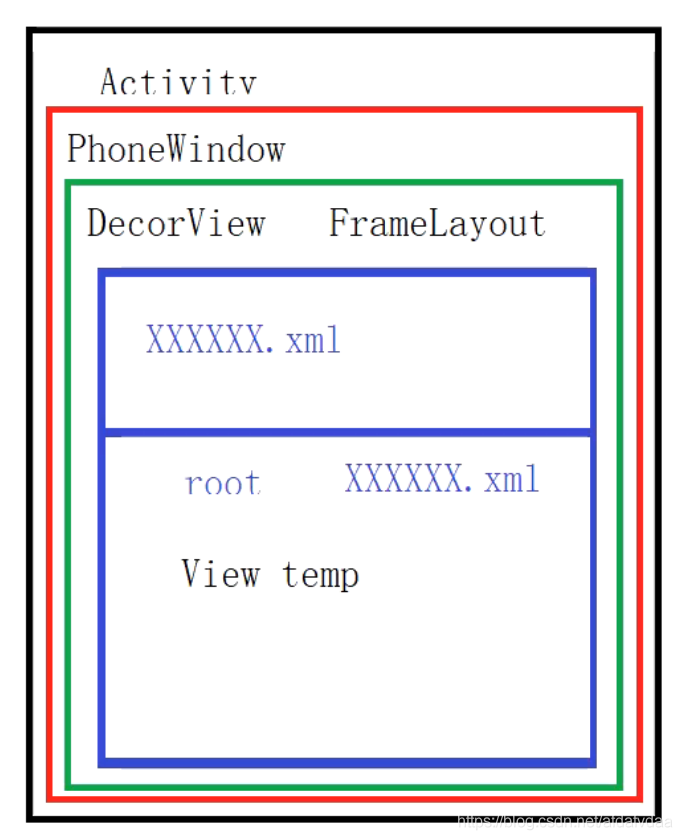
分析源码和源码注释可以看出generateLayout方法的核心功能是完成DecorView的布局加载,而且根据不同的主题样式会加载不同的系统默认布局。那么比如有FrameLayout布局,它如何加载到DecorView中呢?
在generateLayout方法中,有这么一句
mDecor.onResourcesLoaded(mLayoutInflater, layoutResource);
追踪进入
	void onResourcesLoaded(LayoutInflater inflater, int layoutResource) {
        if (mBackdropFrameRenderer != null) {
            loadBackgroundDrawablesIfNeeded();
            mBackdropFrameRenderer.onResourcesLoaded(
                    this, mResizingBackgroundDrawable, mCaptionBackgroundDrawable,
                    mUserCaptionBackgroundDrawable, getCurrentColor(mStatusColorViewState),
                    getCurrentColor(mNavigationColorViewState));
        }

        mDecorCaptionView = createDecorCaptionView(inflater);
        final View root = inflater.inflate(layoutResource, null);
        if (mDecorCaptionView != null) {
            if (mDecorCaptionView.getParent() == null) {
                addView(mDecorCaptionView,
                        new ViewGroup.LayoutParams(MATCH_PARENT, MATCH_PARENT));
            }
            mDecorCaptionView.addView(root,
                    new ViewGroup.MarginLayoutParams(MATCH_PARENT, MATCH_PARENT));
        } else {

            // Put it below the color views.
            addView(root, 0, new ViewGroup.LayoutParams(MATCH_PARENT, MATCH_PARENT));
        }
        mContentRoot = (ViewGroup) root;
        initializeElevation();
    }
关键在这里
mDecorCaptionView = createDecorCaptionView(inflater);
final View root = inflater.inflate(layoutResource, null);
if (mDecorCaptionView != null) {
    ...
    mDecorCaptionView.addView(root,
            new ViewGroup.MarginLayoutParams(MATCH_PARENT, MATCH_PARENT));
}
可以看到layoutResource作为参数,通过inflate方法进行解析加载。然后作为参数,传入addView方法,将布局挂载到上面。至此完成了DecorView的默认布局加载。如果是我们自己编写的布局是如何加载呢?再回到generateLayout的
mDecor.onResourcesLoaded(mLayoutInflater, layoutResource);
,在此之后,有这么一句
ViewGroup contentParent = (ViewGroup)findViewById(ID_ANDROID_CONTENT);
在DecorView执行onResourcesLoaded方法加载完默认布局后,会查找Id为ID_ANDROID_CONTENT的控件(默认布局中的FrameLayout控件)并作为generateLayout方法的返回值,我们回到setContentView方法中,可观察到以下代码:
mLayoutInflater.inflate(layoutResID, mContentParent);
所以,我们自己编写的布局是被加载到DecorView中Id为ID_ANDROID_CONTENT的控件上
六.总结
当Activity创建后会创建出一个PhoneWindow对象,当在Activity中调用setContentView时,实际上是调用了PhoneWindow的setContentView方法,此时PhoneWindow会创建根布局DecorView,并根据主题样式,为DecorView加载对应的默认系统布局,在默认的系统布局中包含了一个Id为ID_ANDROID_CONTENT的控件,而我们自己编写的布局就是加载到这个控件中的。
以上就是详解Android布局加载流程源码的详细内容,更多关于Android布局加载流程源码分析的资料请关注靠谱客其它相关文章!
最后
以上就是清爽中心最近收集整理的关于详解Android布局加载流程源码的全部内容,更多相关详解Android布局加载流程源码内容请搜索靠谱客的其他文章。


发表评论 取消回复