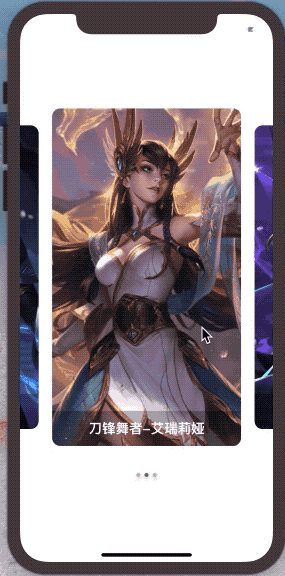
走马灯是一种常见的效果,本文讲一下如何用 PageView 在 Flutter 里实现一个走马灯, 效果如下,当前页面的高度比其它页面高,切换页面的时候有一个高度变化的动画。实现这样的效果主要用到的是 PageView.builder 部件。
开发
创建首页
首先创建一个 IndexPage 部件,这个部件用来放 PageView ,因为需要使用 setState 方法更新 UI,所以它是 stateful 的。
import 'package:flutter/material.dart';

class IndexPage extends StatefulWidget {
 @override
 _IndexPageState createState() => _IndexPageState();
}

class _IndexPageState extends State<IndexPage> {
 @override
 Widget build(BuildContext context) {
 return Scaffold(
 appBar: AppBar(
 elevation: 0.0,
 backgroundColor: Colors.white,
 ),
 body: Column(
 children: <Widget>[],
 ),
 );
 }
}
然后在部件内申明一个 _pageIndex 变量用来保存当前显示的页面的 index,在 initState 生命周期里面初始化一个 PageController 用来配置 PageView 部件。
在 body 的 Column 里面创建一个 PageView.builder ,使用一个 SizedBox 部件指定 PageView 的高度,将 controller 设置为 _pageController ,在 onPageChanged 事件里将当前显示页面的 index 值赋值给 _pageIndex 变量。
int _pageIndex = 0;
PageController _pageController;

@override
void initState() {
 super.initState();
 _pageController = PageController(
 initialPage: 0,
 viewportFraction: 0.8,
 );
}

body: Column(
 children: <Widget>[
 SizedBox(
 height: 580.0,
 child: PageView.builder(
 itemCount: 3,
 pageSnapping: true,
 controller: _pageController,
 onPageChanged: (int index) {
  setState(() {
  _pageIndex = index;
  });
 },
 itemBuilder: (BuildContext ctx, int index) {
  return _buildItem(_pageIndex, index);
 },
 ),
 ),
 ],
),
关键点: 设置 PageController 的 viewportFraction 参数小于 1,这个值是用来设置每个页面在屏幕上显示的比例,小于 1 的话,就可以在当前页面同时显示其它页面的内容了。
/// The fraction of the viewport that each page should occupy.
/// Defaults to 1.0, which means each page fills the viewport in the scrolling direction.
final double viewportFraction;
实现 _buildItem
接着实现 _buildItem 方法,这个方法就是返回 PageView.builder 里每一个页面渲染的内容,第一个参数 activeIndex 是当前显示在屏幕上页面的 index ,第二个参数 index 是每一项自己的 index 。
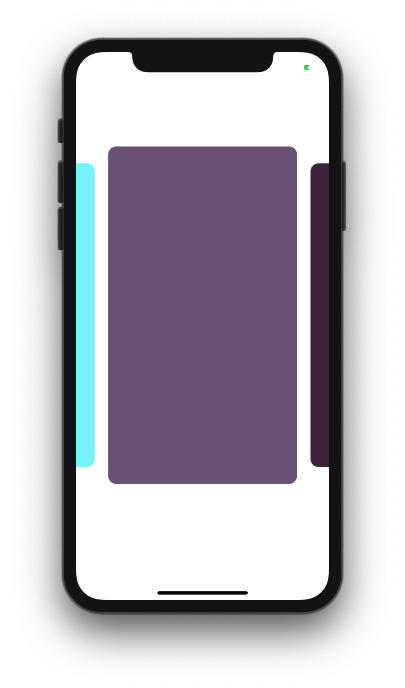
使用一个 Center 部件让内容居中显示,然后用一个 AnimatedContainer 添加页面切换时的高度变化的动画效果,切换页面的时候使用了 setState 方法改变了 _pageIndex , Flutter 重新绘制每一项。关键点在于判断当前页面是否为正在显示的页面,是的话它的高度就是 500 不是的话就是 450。
_buildItem(activeIndex, index) {
 return Center(
 child: AnimatedContainer(
 curve: Curves.easeInOut,
 duration: Duration(milliseconds: 300),
 height: activeIndex == index ? 500.0 : 450.0,
 margin: EdgeInsets.symmetric(vertical: 20.0, horizontal: 10.0),
 decoration: BoxDecoration(
 color: heroes[index].color,
 borderRadius: BorderRadius.all(Radius.circular(12.0)),
 ),
 child: Stack(),
 ),
 );
}
添加内容
然后给 AnimatedContainer 添加每一项的内容
child: Stack(
 fit: StackFit.expand,
 children: <Widget>[
 ClipRRect(
 borderRadius: BorderRadius.all(
 Radius.circular(12.0),
 ),
 child: Image.network(
 heroes[index].image,
 fit: BoxFit.cover,
 ),
 ),
 Align(
 alignment: Alignment.bottomCenter,
 child: Row(
 children: <Widget>[
  Expanded(
  child: Container(
  padding: EdgeInsets.all(12.0),
  decoration: BoxDecoration(
  color: Colors.black26,
  borderRadius: BorderRadius.only(
   bottomRight: Radius.circular(12.0),
   bottomLeft: Radius.circular(12.0),
  ),
  ),
  child: Text(
  heroes[index].title,
  textAlign: TextAlign.center,
  style: TextStyle(
   fontSize: 20.0,
   fontWeight: FontWeight.bold,
   color: Colors.white,
  ),
  ),
  ),
  )
 ],
 ),
 ),
 ],
),
实现指示器
然后实现页面的指示器,创建一个 PageIndicator 部件,需要传入 pageCount 表示总页数,以及 currentIndex 表示当前显示的页数索引。把所有指示器放在一个 Row 部件里,判断当前指示器的 index 是否为正在显示页面的 index ,是的话显示较深的颜色。
class PageIndicator extends StatelessWidget {
 final int pageCount;
 final int currentIndex;

 const PageIndicator(this.currentIndex, this.pageCount);

 Widget _indicator(bool isActive) {
 return Container(
 width: 6.0,
 height: 6.0,
 margin: EdgeInsets.symmetric(horizontal: 3.0),
 decoration: BoxDecoration(
 color: isActive ? Color(0xff666a84) : Color(0xffb9bcca),
 shape: BoxShape.circle,
 boxShadow: [
  BoxShadow(
  color: Colors.black12,
  offset: Offset(0.0, 3.0),
  blurRadius: 3.0,
  ),
 ],
 ),
 );
 }

 List<Widget> _buildIndicators() {
 List<Widget> indicators = [];
 for (int i = 0; i < pageCount; i++) {
 indicators.add(i == currentIndex ? _indicator(true) : _indicator(false));
 }
 return indicators;
 }

 @override
 Widget build(BuildContext context) {
 return Row(
 mainAxisAlignment: MainAxisAlignment.center,
 children: _buildIndicators(),
 );
 }
}
添加 PageIndicator 到 SizedBox 下面
封装 Carousel
最后的最后优化一下代码,把部件封装一下,让它成为一个单独的部件,创建一个 Carousel 部件,对外暴露 items 和 height 两个属性,分别配置数据和高度。
class Carousel extends StatefulWidget {
 final List items;
 final double height;

 const Carousel({
 @required this.items,
 @required this.height,
 });

 @override
 _CarouselState createState() => _CarouselState();
}

class _CarouselState extends State<Carousel> {
 int _pageIndex = 0;
 PageController _pageController;

 Widget _buildItem(activeIndex, index) {
 final items = widget.items;

 return Center(
 child: AnimatedContainer(
 curve: Curves.easeInOut,
 duration: Duration(milliseconds: 300),
 height: activeIndex == index ? 500.0 : 450.0,
 margin: EdgeInsets.symmetric(vertical: 20.0, horizontal: 10.0),
 decoration: BoxDecoration(
  color: items[index].color,
  borderRadius: BorderRadius.all(Radius.circular(12.0)),
 ),
 child: Stack(
  fit: StackFit.expand,
  children: <Widget>[
  ClipRRect(
  borderRadius: BorderRadius.all(
  Radius.circular(12.0),
  ),
  child: Image.network(
  items[index].image,
  fit: BoxFit.cover,
  ),
  ),
  Align(
  alignment: Alignment.bottomCenter,
  child: Row(
  children: <Widget>[
   Expanded(
   child: Container(
   padding: EdgeInsets.all(12.0),
   decoration: BoxDecoration(
   color: Colors.black26,
   borderRadius: BorderRadius.only(
    bottomRight: Radius.circular(12.0),
    bottomLeft: Radius.circular(12.0),
   ),
   ),
   child: Text(
   items[index].title,
   textAlign: TextAlign.center,
   style: TextStyle(
    fontSize: 20.0,
    fontWeight: FontWeight.bold,
    color: Colors.white,
   ),
   ),
   ),
   )
  ],
  ),
  ),
  ],
 ),
 ),
 );
 }

 @override
 void initState() {
 super.initState();
 _pageController = PageController(
 initialPage: 0,
 viewportFraction: 0.8,
 );
 }

 @override
 Widget build(BuildContext context) {
 return Column(
 children: <Widget>[
 Container(
  height: widget.height,
  child: PageView.builder(
  pageSnapping: true,
  itemCount: heroes.length,
  controller: _pageController,
  onPageChanged: (int index) {
  setState(() {
  _pageIndex = index;
  });
  },
  itemBuilder: (BuildContext ctx, int index) {
  return _buildItem(_pageIndex, index);
  },
  ),
 ),
 PageIndicator(_pageIndex, widget.items.length),
 ],
 );
 }
}
之后在 IndexPage 部件里就只用实例化一个 Carousel 了,同时由于 IndexPage 不用管理部件状态了,可以将它变成 StatelessWidget 。
完整代码
import 'package:flutter/material.dart';

class Hero {
 final Color color;
 final String image;
 final String title;

 Hero({
 @required this.color,
 @required this.image,
 @required this.title,
 });
}

List heroes = [
 Hero(
 color: Color(0xFF86F3FB),
 image: "https://game.gtimg.cn/images/lol/act/img/skin/big22009.jpg",
 title: '寒冰射手-艾希',
 ),
 Hero(
 color: Color(0xFF7D6588),
 image: "https://game.gtimg.cn/images/lol/act/img/skin/big39006.jpg",
 title: '刀锋舞者-艾瑞莉娅',
 ),
 Hero(
 color: Color(0xFF4C314D),
 image: "https://game.gtimg.cn/images/lol/act/img/skin/big103015.jpg",
 title: '九尾妖狐-阿狸',
 ),
];

class Carousel extends StatefulWidget {
 final List items;
 final double height;

 const Carousel({
 @required this.items,
 @required this.height,
 });

 @override
 _CarouselState createState() => _CarouselState();
}

class _CarouselState extends State<Carousel> {
 int _pageIndex = 0;
 PageController _pageController;

 Widget _buildItem(activeIndex, index) {
 final items = widget.items;

 return Center(
 child: AnimatedContainer(
 curve: Curves.easeInOut,
 duration: Duration(milliseconds: 300),
 height: activeIndex == index ? 500.0 : 450.0,
 margin: EdgeInsets.symmetric(vertical: 20.0, horizontal: 10.0),
 decoration: BoxDecoration(
  color: items[index].color,
  borderRadius: BorderRadius.all(Radius.circular(12.0)),
 ),
 child: Stack(
  fit: StackFit.expand,
  children: <Widget>[
  ClipRRect(
  borderRadius: BorderRadius.all(
  Radius.circular(12.0),
  ),
  child: Image.network(
  items[index].image,
  fit: BoxFit.cover,
  ),
  ),
  Align(
  alignment: Alignment.bottomCenter,
  child: Row(
  children: <Widget>[
   Expanded(
   child: Container(
   padding: EdgeInsets.all(12.0),
   decoration: BoxDecoration(
   color: Colors.black26,
   borderRadius: BorderRadius.only(
    bottomRight: Radius.circular(12.0),
    bottomLeft: Radius.circular(12.0),
   ),
   ),
   child: Text(
   items[index].title,
   textAlign: TextAlign.center,
   style: TextStyle(
    fontSize: 20.0,
    fontWeight: FontWeight.bold,
    color: Colors.white,
   ),
   ),
   ),
   )
  ],
  ),
  ),
  ],
 ),
 ),
 );
 }

 @override
 void initState() {
 super.initState();
 _pageController = PageController(
 initialPage: 0,
 viewportFraction: 0.8,
 );
 }

 @override
 Widget build(BuildContext context) {
 return Column(
 children: <Widget>[
 Container(
  height: widget.height,
  child: PageView.builder(
  pageSnapping: true,
  itemCount: heroes.length,
  controller: _pageController,
  onPageChanged: (int index) {
  setState(() {
  _pageIndex = index;
  });
  },
  itemBuilder: (BuildContext ctx, int index) {
  return _buildItem(_pageIndex, index);
  },
  ),
 ),
 PageIndicator(_pageIndex, widget.items.length),
 ],
 );
 }
}

class PageIndicator extends StatelessWidget {
 final int currentIndex;
 final int pageCount;

 const PageIndicator(this.currentIndex, this.pageCount);

 Widget _indicator(bool isActive) {
 return Container(
 width: 6.0,
 height: 6.0,
 margin: EdgeInsets.symmetric(horizontal: 3.0),
 decoration: BoxDecoration(
 color: isActive ? Color(0xff666a84) : Color(0xffb9bcca),
 shape: BoxShape.circle,
 boxShadow: [
  BoxShadow(
  color: Colors.black12,
  offset: Offset(0.0, 3.0),
  blurRadius: 3.0,
  ),
 ],
 ),
 );
 }

 List<Widget> _buildIndicators() {
 List<Widget> indicators = [];
 for (int i = 0; i < pageCount; i++) {
 indicators.add(i == currentIndex ? _indicator(true) : _indicator(false));
 }
 return indicators;
 }

 @override
 Widget build(BuildContext context) {
 return Row(
 mainAxisAlignment: MainAxisAlignment.center,
 children: _buildIndicators(),
 );
 }
}

class IndexPage extends StatelessWidget {
 @override
 Widget build(BuildContext context) {
 return Scaffold(
 appBar: AppBar(
 elevation: 0.0,
 backgroundColor: Colors.white,
 ),
 body: Carousel(
 height: 540,
 items: heroes,
 ),
 backgroundColor: Colors.white,
 );
 }
}
至此,整个布局就完成了! :sunglasses:
以上就是本文的全部内容,希望对大家的学习有所帮助,也希望大家多多支持靠谱客。
最后
以上就是笑点低未来最近收集整理的关于使用Flutter实现一个走马灯布局的示例代码的全部内容,更多相关使用Flutter实现一个走马灯布局内容请搜索靠谱客的其他文章。


发表评论 取消回复