前言
面向切面编程,利用 AOP 可以对业务逻辑的各个部分进行隔离,从而使得业务逻辑各部分之间的耦合度降低,提高程序的可重用性,同时提高了开发的效率。
即不改变源代码而添加新功能,可插拔的.
提示:以下是本篇文章正文内容,下面案例可供参考
一.AOP底层原理
1.AOP底层使用动态代理
有接口:jdk动态代理,即创建接口实现类代理对象
无接口:CGLIB动态代理,即创建子类代理对象
jdk动态代理的实现

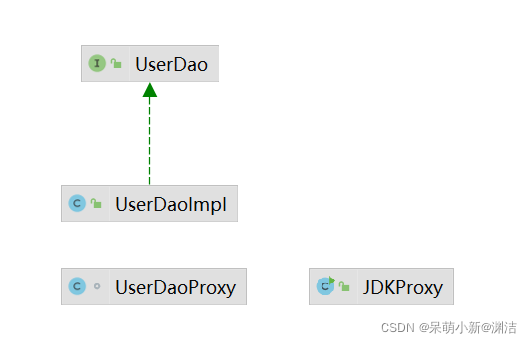
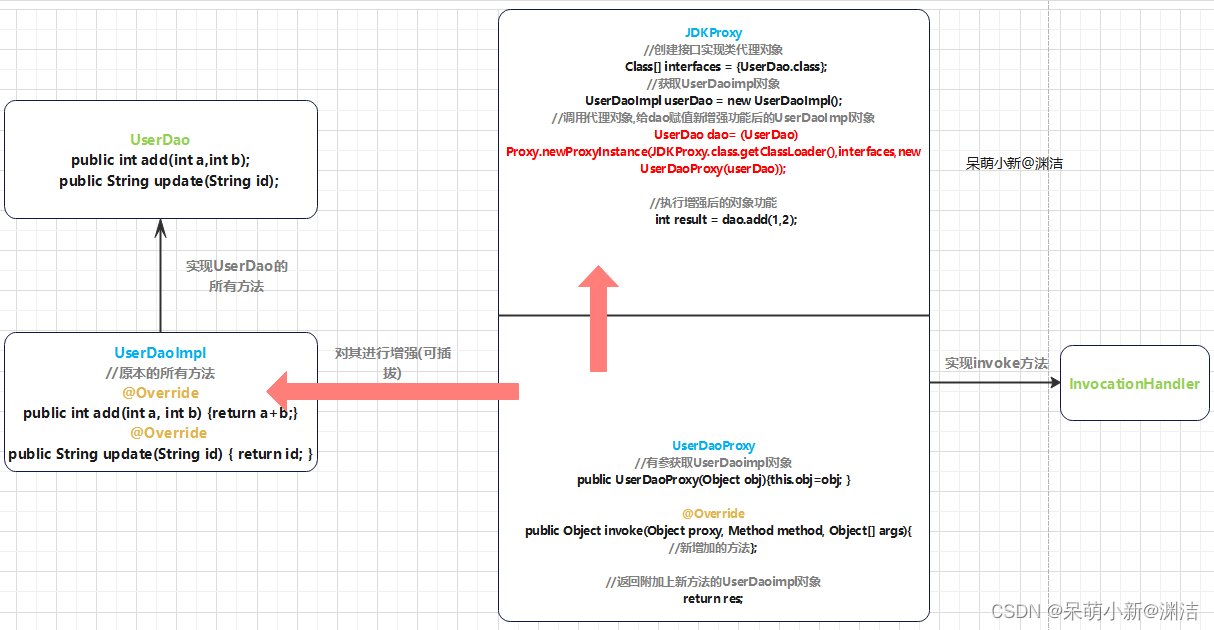
创建接口
package com.vector.spring5;

public interface UserDao {
    public int add(int a,int b);
    public String update(String id);
}
接口实现类
接口实现类的方法,属于源代码,用aop思想增添新功能时这里不能动!
package com.vector.spring5;

public class UserDaoImpl implements UserDao{

    @Override
    public int add(int a, int b) {
        return a+b;
    }

    @Override
    public String update(String id) {
        return id;
    }
}
使用JDK动态代理对象,增添新功能
package com.vector.spring5;

import java.lang.reflect.Array;
import java.lang.reflect.InvocationHandler;
import java.lang.reflect.Method;
import java.lang.reflect.Proxy;
import java.util.Arrays;

public class JDKProxy {
    public static void main(String[] args) {
        //创建接口实现类代理对象
        Class[] interfaces = {UserDao.class};
        UserDaoImpl userDao = new UserDaoImpl();
        UserDao dao= (UserDao) Proxy.newProxyInstance(JDKProxy.class.getClassLoader(),interfaces,new UserDaoProxy(userDao));
        int result = dao.add(1,2);
        System.out.println("result: "+result);
    }
}

//创建代理对象
class UserDaoProxy implements InvocationHandler{
    //有参构造传递增强对象
    private Object obj;
    public UserDaoProxy(){};
    public UserDaoProxy(Object obj){
        this.obj=obj;
    }
    //增强的逻辑
    @Override
    public Object invoke(Object proxy, Method method, Object[] args) throws Throwable {
        //方法之前
        System.out.println("方法之前执行: "+method.getName()+":传递的参数: "+ Arrays.toString(args));
        //被增强的方法执行
        //可以根据method.getName()判断选择增强
        Object res = method.invoke(obj,args);
        //方法之后
        System.out.println("方法之后执行: "+obj);
        return res;
    }
}

jdk代理图像解析
二.AOP术语
1.连接点
类里可以被增强的方法,称为连接点.
2.切入点
类中实际被增强的方法,成为切入点.
3.通知(增强)
(1)实际被增强的方法中的逻辑部分称为通知(增强).
(2)通知包含:前置通知,后置通知,环绕通知,异常通知,最终通知
4.切面
把增强应用到切入点的过程称为切面
三.AOP 操作(准备工作)
Spring 框架一般都是基于 AspectJ 实现 AOP 操作
(1)AspectJ 不是 Spring 组成部分,独立 AOP 框架,一般把 AspectJ 和 Spirng 框架一起使用,进行 AOP 操作
maven准备
<dependency>
            <groupId>org.aspectj</groupId>
            <artifactId>aspectjweaver</artifactId>
            <version>1.9.8.RC1</version>
        </dependency>
方式一:使用Spring的接口实现增添功能
实现组合crud和日志功能结合
applicationContext.xml
    <context:component-scan base-package="com.vector"/>
    <aop:config>
<!--        切入点: expression:表达式 execution(要执行的位置!* * * * *)-->
        <aop:pointcut id="pointcut" expression="execution(* com.vector.service.UserServiceImpl.*(..))"/>

<!--        执行环绕增加!-->
        <aop:advisor advice-ref="log" pointcut-ref="pointcut"/>
        <aop:advisor advice-ref="afterLog" pointcut-ref="pointcut"/>
    </aop:config>
log.java
package com.vector.log;
import org.springframework.aop.MethodBeforeAdvice;
import org.springframework.stereotype.Component;
import java.lang.reflect.Method;
@Component("log")
public class Log implements MethodBeforeAdvice {
//method: 要执行的目标对象的方法
//args: 参数
//target: 目标对象
@Override
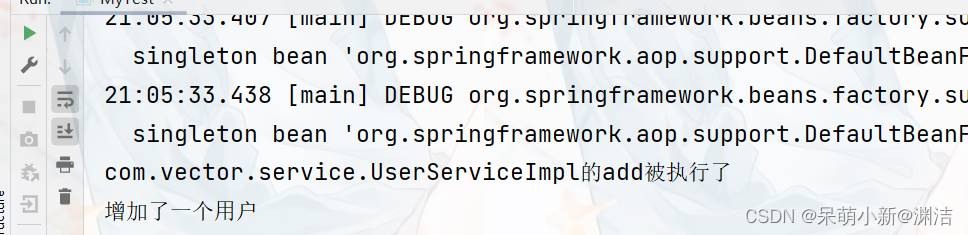
public void before(Method method, Object[] args, Object target) throws Throwable {
System.out.println(target.getClass().getName()+"的"+method.getName()+"被执行了");
}
}
userService.java
package com.vector.service;


public interface UserService {
    public void add();
    public void delete();
    public void update();
    public void query();
}
userServiceImpl.java
package com.vector.service;

import org.springframework.stereotype.Service;

@Service("userService")
public class UserServiceImpl implements UserService{
    @Override
    public void add() {
        System.out.println("增加了一个用户");
    }
}
MyTest.java
public class MyTest {
    public static void main(String[] args) {
        ApplicationContext context = new ClassPathXmlApplicationContext("applicationContext.xml");
        //动态代理的是接口
        UserService userService = (UserService) context.getBean("userService");
        userService.add();
    }
}
方式二:自定义类
DiyPoint.java
package com.vector.diy;
import org.springframework.stereotype.Component;
@Component("diyPointCut")
public class DiyPointCut {
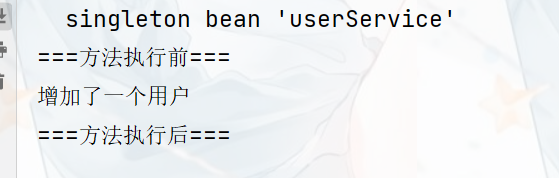
public void before(){
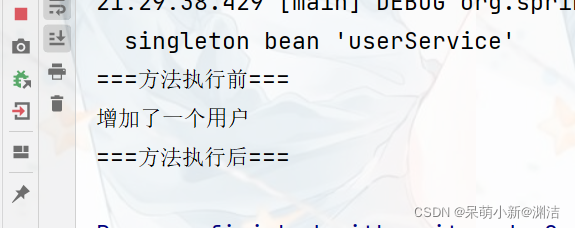
System.out.println("===方法执行前===");
}
public void after(){
System.out.println("===方法执行后===");
}
}
UserServiceImpl.java
package com.vector.service;

import org.springframework.stereotype.Service;

@Service("userService")
public class UserServiceImpl implements UserService{
    @Override
    public void add() {
        System.out.println("增加了一个用户");
    }
}
applicationContext.xml
    <aop:config>
<!--        自定义切面,ref要引用的类-->
        <aop:aspect ref="diyPointCut">
<!--            切入点-->
            <aop:pointcut id="pointcut" expression="execution(* com.vector.service.UserServiceImpl.*(..))"/>
<!--            通知-->
            <aop:before method="before" pointcut-ref="pointcut"/>
            <aop:after method="after" pointcut-ref="pointcut"/>
        </aop:aspect>
    </aop:config>
MyTest.java
public class MyTest {
    public static void main(String[] args) {
        ApplicationContext context = new ClassPathXmlApplicationContext("applicationContext.xml");
        //动态代理的是接口
        UserService userService = (UserService) context.getBean("userService");
        userService.add();
    }
}
方式三:全注解配置实现
UserServiceImpl.java
package com.vector.service;

import org.springframework.stereotype.Service;

@Service("userService")
public class UserServiceImpl implements UserService{
    @Override
    public void add() {
        System.out.println("增加了一个用户");
    }
}
AnnotationPointCut.java
package com.vector;

import org.aspectj.lang.annotation.After;
import org.aspectj.lang.annotation.Aspect;
import org.aspectj.lang.annotation.Before;
import org.springframework.context.annotation.EnableAspectJAutoProxy;
import org.springframework.stereotype.Component;

//标注这个类是一个切面
@Aspect
@Component("annotationPointCut")
//开启aop注解驱动
@EnableAspectJAutoProxy
public class AnnotationPointCut {
    @Before("execution(* com.vector.service.UserServiceImpl.*(..))")
    public void before(){
        System.out.println("===方法执行前===");
    }
    @After("execution(* com.vector.service.UserServiceImpl.*(..))")
    public void after(){
        System.out.println("===方法执行后===");
    }
}
MyTest.java
public class MyTest {
    public static void main(String[] args) {
        ApplicationContext context = new ClassPathXmlApplicationContext("applicationContext.xml");
        //动态代理的是接口
        UserService userService = (UserService) context.getBean("userService");
        userService.add();
    }
}
总结
本篇文章就到这里了,希望能够给你带来帮助,也希望您能够多多关注靠谱客的更多内容!
最后
以上就是任性抽屉最近收集整理的关于详解Java Spring AOP的全部内容,更多相关详解Java 内容请搜索靠谱客的其他文章。


发表评论 取消回复