实现InitializingBean接口或使用@PostConstruct注解
实现InitializingBean如下
public class AnotherExampleBean implements InitializingBean {

    @Override
    public void afterPropertiesSet() {
        // 做一些初始化的工作
    }
}
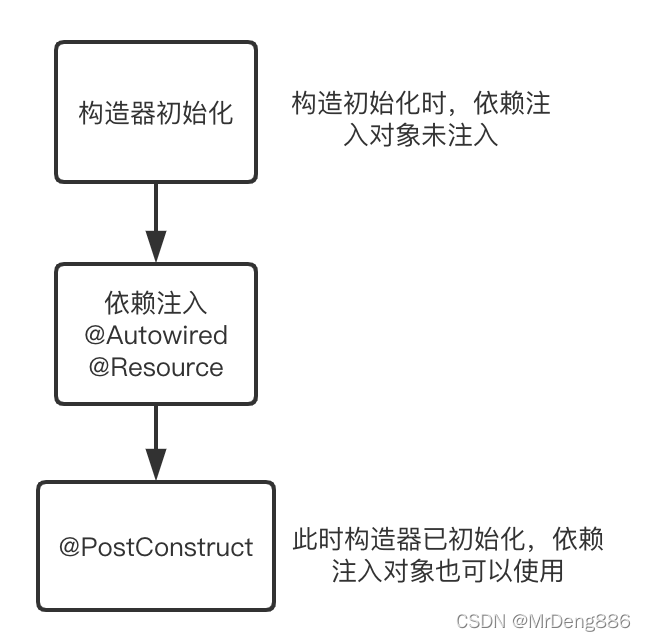
官方对其的解释是这样的:实现这个接口会让这个bean的所有必要的属性都被容器注入后(依赖注入),再去执行afterPropertiesSet()里的方法。
笔者再用一个简单的例子去实际演示一下(注意:使用@PostConstruct和实现接口是等价的,可以二选一)
我们在init方法上使用了@PostConstruct注解,并且方法里使用到了Chicken类,而这个Chicken类是通过依赖注入来设置的,所以印证了官方说的话,会在依赖注入完以后才会调用@PostConstruct注解的方法。那为什么不在构造器里往List里面方Chicken类呢,因为容器调用构造器方法的时候,Chicken类还没被注入,所以要写在@PostConstruct注解的方法里。
// 首先声明一个实体类
@Data
public class Chicken {
    private String name ;
}
// 将他注入容器
@Configuration
public class UserConfig {
    @Bean
    public Chicken putUser(){
        Chicken chinken = new Chicken();
        chinken.setName("普通鸡块");
        return chinken;
    }
}
// 在family 类中调用 注入chinken
@Component
public class Family {
    @Resource
    Chicken chicken;

    public static List<String> names;

    @PostConstruct
    public void init(){
        names.add(chicken.getName());
    }
    public Family() {
        names = new LinkedList<>();
    }
}
实现ApplicationListener接口
如果一个容器里的bean实现了ApplicationListener接口,那么在任何时候,如果有ApplicationEvent(事件)在ApplicationContext(容器)中被发布,该bean会收到通知,从而可以执行相应策略。
下面是Spring提供的几种常用的ApplicationEvent事件
| 事件名称 | 解释 |
|---|---|
| ContextRefreshedEvent | 当容器ApplicationContext容器正在初始化或refreshed时会发布这个事件。这里的初始化意味着所有的bean都被加载,并且有后置处理的bean都被检测到并激活了。 |
| ContextStartedEvent | 当容器启动调用start()方法是会发布这个事件,这里的开始是所有生命周期的bean都收到了一个开始的信号 |
| ContextStoppedEvent | 当容器调用stop方法时会发布这个事件 |
举一个简单的例子,下面的代码我实现ApplicationListener接口并监听ContextRefreshedEvent事件,所以当springboot启动并且初始化完成后,就能执行下面的方法了。
@Component
@Slf4j
public class MenuManage implements ApplicationListener<ContextRefreshedEvent> {

    @Override
    public void onApplicationEvent(ContextRefreshedEvent event) {
       //做一些事情
    }
}
实现CommandLineRunner或ApplicationRunner 接口
实现了CommandLineRunner的bean会被springboot监测到,并在项目启动后执行run方法,如果有多个bean实现了CommandLineRunner接口,那么可以使用order注解来指定执行顺序。
@Order(2)
@Component
public class ServerStartedReport implements CommandLineRunner{
    @Override
    public void run(String... args) throws Exception {
        //do something
    }
}
而实现ApplicationRunner接口与实现CommandLineRunner的唯一不同是,后者接收的参数是main方法传进去的原始参数,而ApplicationRunner接收的参数是封装过原始参数的,可以通过参数名字name来获取指定的参数。
@Component
public class MyApplicationRunner implements ApplicationRunner{

    @Override
    public void run(ApplicationArguments args) throws Exception {
        System.out.println("ApplicationRunner:"+ Arrays.asList(args.getSourceArgs()));
        System.out.println("getOptionNames:"+args.getOptionNames());
        System.out.println("getOptionValues:"+args.getOptionValues("foo"));
        System.out.println("getOptionValues:"+args.getOptionValues("log"));
    }
}
到此这篇关于Springboot启动执行特定代码的几种方式的文章就介绍到这了,更多相关Springboot启动执行代码内容请搜索靠谱客以前的文章或继续浏览下面的相关文章希望大家以后多多支持靠谱客!
最后
以上就是欣喜长颈鹿最近收集整理的关于Springboot启动执行特定代码的方式汇总的全部内容,更多相关Springboot启动执行特定代码内容请搜索靠谱客的其他文章。


发表评论 取消回复