本篇文章带大家了解一下node的path路径模块,介绍path内置模块的一些API,也准备了一个案例,用于练手,希望对大家有所帮助!

1.path路径模块初认识
path 模块是 Node.js 官方提供的、用来处理路径的模块。它提供了一系列的方法和属性,用来满足用户对路径的处理需求。
2.path模块的API
2.1 path.join()
path.join() 方法,用来将多个路径片段拼接成一个完整的路径字符串
语法格式为

…paths(string) 路径片段的序列 ,就是你需要拼接的所有路径系列
需要注意的是这个返回的值为string
//引入path模块
const path=require("path")
//书写要拼接的路径
const pathStr=path.join('/a','/b/c','../','./d','e')

console.log(pathStr)登录后复制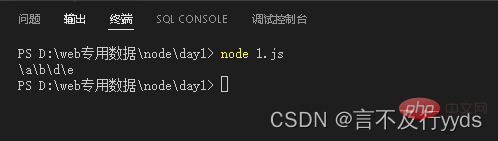
2.2 path.basename()
语法格式

- path 必选参数,表示一个路径的字符串
- 可选参数,表示文件扩展名
- 表示路径中的最后一部分
const path=require("path")

const  fpath='./a/b/c/index.html'

var fullname=path.basename(fpath)

console.log(fullname)
//获取指定后缀的文件名
const namepath=path.basename(fpath,'.html')

console.log(namepath)登录后复制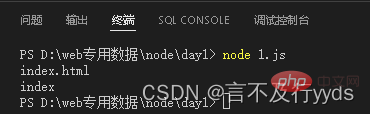
2.3 path.extname()
格式为

path 必选参数,表示一个路径的字符串
返回: 返回得到的扩展名字符串
const path=require("path")

const fpath='./a/b/c/d/index.html'

const ftext =path.extname(fpath)

console.log(ftext)登录后复制
3.时钟案例实践
将所提供的代码(一个文件同时拥有html,css,js)进行拆分
拆分成三个文件分别为index.html index.css index.js并将其存放到一个准备好的文件中
3.1实现步骤
3.1.1步骤1 - 导入需要的模块并创建正则表达式
const path=require('path')
const fs=require('fs')

const regStyle=/<style>[sS]*</style>/

const scriptruler=/<script>[sS]*</script>/
//需要读取的文件
fs.readFile(path.join(__dirname,'/static/index.html'),'utf-8',function(err,dateStr){
    if(err){
        return console.log("读取失败")
    }
   resolveCSS(dateStr)
   resolveHTML(dateStr)
   resolveJS (dateStr)
})登录后复制
3.1.2 自定义 resolveCSS resolveHTML resolveJS 方法
function resolveCSS(htmlStr){
    const r1=regStyle.exec(htmlStr)
    const newcss=r1[0].replace('<style>','').replace('</style>','')
    //将匹配的css写入到指定的index.css文件中
    fs.writeFile(path.join(__dirname,'/static/index.css'),newcss,function(err){
        if(err) return console.log("导入失败"+err.message)
        console.log("ojbk")
    })
}
function resolveJS(htmlStr){
    const r2=scriptruler.exec(htmlStr)
    const newcss=r2[0].replace('<script>','').replace('</script>','')
    //将匹配的css写入到指定的index.js文件中
    fs.writeFile(path.join(__dirname,'/static/index.js'),newcss,function(err){
        if(err) return console.log("导入失败"+err.message)
        console.log("ojbk")
    })
}
function  resolveHTML(htmlStr){
    const newhtml=htmlStr
    .replace(regStyle,'<link rel="stylesheet" href="./index.css">')
    .replace(scriptruler,'<script src="./index.js"></script>')
    //将匹配的css写入到指定的index.html文件中
    fs.writeFile(path.join(__dirname,'/static/index2.html'),newhtml,function(err){
        if(err) return console.log("导入失败"+err.message)
        console.log("ojbk")
    })
}登录后复制
最终的结果就是在指定的文件中将样式剥离开

最后
以上就是风趣翅膀最近收集整理的关于浅析node中path路径模块的一些API的全部内容,更多相关浅析node中path路径模块内容请搜索靠谱客的其他文章。
本图文内容来源于网友提供,作为学习参考使用,或来自网络收集整理,版权属于原作者所有。


发表评论 取消回复