CDH(Cloudera Distribution Hadoop)完全详细版安装,禁用SELINUX,http方式配置yum源,NTP时钟同步,配置数据库,安装CM,web界面操作,节点规划,参数配置,HDFS验证,Hive验证。HDFS不良:副本不足的块;Hive组件出现不良;无法接受Agent发出的检测该角色的进程启动失败;HDFS权限问题;spark-shell环境出错;引导界面中途误选版本,无法回退;
更多分类文章:
Python | Linux | 大数据 | 数据库 | Git | Nodejs | Golang | 电脑技巧 | 计算机技术
大数据:
- CDH详细安装步骤
- CDH集群完全卸载过程
- CDH6集群详细部署过程
- CDH6彻底删除清空
- kafka基本使用及命令
- sparkstreaming+kafka实时计算例子(一)结果写回kafka
- sparkstreaming+kafka实时计算例子(二)结果写回redis
一.前置部署
基本环境
192.168.0.230 192.168.0.231 192.168.0.232 账号:root/12345678
1.1 脚本使用
脚本依赖expect程序,需要在执行这些脚本的机器上安装expect,安装方式:yum install expect
batch_cmd.sh:批量执行命令脚本,如:sh batch_cmd.sh node.list "ls /"
batch_scp.sh: 批量拷贝文件命令,如:sh batch_scp.sh node.list src_path target_path
batch_rename.sh: 批量修改主机名,如: sh batch_rename_cmd.sh node.txt
(1) 文件传输工具
Linux上需要安装安装lrzsz工具包,如果没有安装请执行以下命令:
yum install lrzsz
xshell配置,如下图所示:
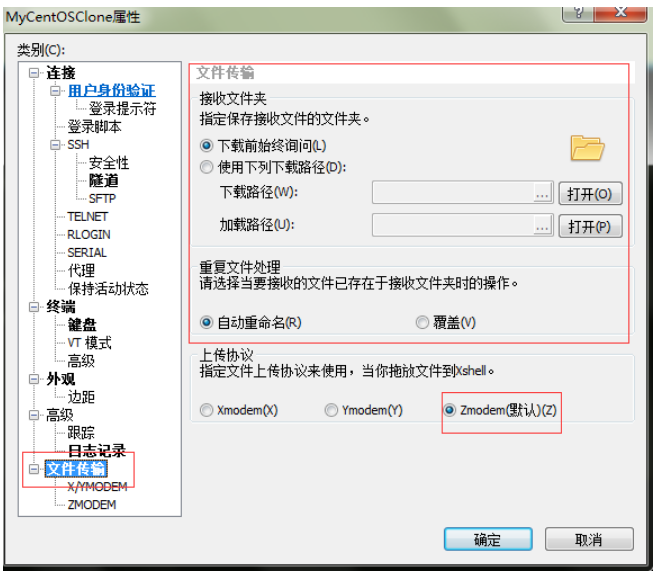
运行命令rz,即是接收文件(上传到Linux上),xshell就会弹出文件选择对话框,选好文件之后关闭对话框,文件就会上传到linux里的当前目录。
(2)脚本环境配置
配置batch_cmd.sh的用户密码,配置node有关的节点主机名与IP。
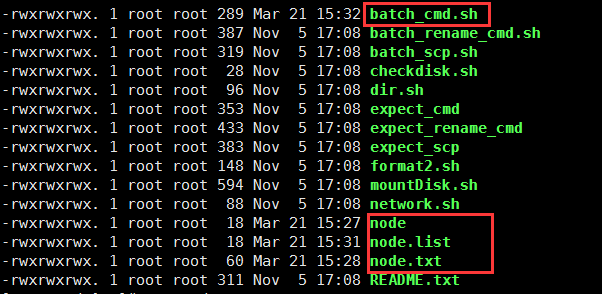
然后使用sh batch_cmd.sh node.list "ls /",进行批量命令。
1.2 初始配置
(1)禁用SELINUX
所有节点执行脚本:
sh ssh_do_all.sh node.list "sudo setenforce 0"
修改/etc/selinux/config文件如下:
SELINUX=disabled
SELINUXTYPE=targeted
(2)关闭防火墙
sh ssh_do_all.sh node.list "sudo systemctl stop firewalld"

sh ssh_do_all.sh node.list "sudo systemctl disable firewalld"

sh ssh_do_all.sh node.list "sudo systemctl status firewalld"
(3)使用cat /etc/redhat-release查看RedHat版本(如7.2)
(4)使用cat /proc/version查看Linux版本,对于2.6.32-303之后的版本,设置vm.swappiness=1,即
echo "vm.swappiness=1" >>/etc/sysctl.conf

echo 1 >> /proc/sys/vm/swappiness
(5)修改hosts和hostname(永久+临时)
1.3 配置yum源
(1)对于系统其它应用的安装需要配置yum源,进入/etc/yum.repos.d创建local_os.repo:
[local_iso]

name=CentOS-$releasever - Media

baseurl=file:///media/DVD1

gpgcheck=0

enabled=1
(2)对于cloudera组件的安装,需要创建cm.repo
[cmrepo]

name = cm_repo

baseurl = http://192.168.0.231/cm5.13.2/

enable = true

gpgcheck = false
(对于cloudera-scm-server的安装,删除cloudera-manager.repo,因为
baseurl = https://archive.cloudera.com/cm5/redhat/7/x86_64/cm/5.13.2/
指向网络,安装速度很慢)
1.4 http方式搭载yum源
安装httpd,并使用http方式,使得所有服务器都可访问该主机yum源
(1)建文件夹:mkdir /var/www/html/iso
(2)复制移动:sudo scp -r /media/DVD1/* /var/www/html/iso/
(3)在各子节点上配置yum,在/etc/yum.repos.d下创建os.repo,共同指向192.168.0.230 http目录下的yum源:
[osrepo]

name=os_repo

baseurl=http://192.168.0.230/iso/

enabled=true

gpgcheck=false
1.5 NTP时钟同步
(1)使用rpm -qa | grep ntp 查询是否安装NTP,若未安装则用安装NTP
(2)使用sudo systemctl start httpd开启服务
(3)主节点192.168.0.230保存不变,其他节点修改:执行sudo vim /etc/ntp.conf在后面加入:
server 127.127.1.0

fudge 127.127.1.0 stratum 10
(4)全部执行sudo systemctl restart ntpd
(5)使用ntpq -p 验证
1.6 配置数据库
(1)sudo yum -y install mariadb mariadb-server
(两个都要安装,若上次卸载,要同时卸载”/var/lib/mysql”文件夹删除库表等用户数据)
(2)先打开服务sudo systemctl start mariadb
(3)再初次配置数据库sudo /usr/bin/mysql_secure_installation
(安装mariadb mariadb-server之后出现)
(4)mysql -u-p 进入
(5)建CM和Hive所需表:
create database metastore default character set utf8;

CREATE USER 'hive'@'%' IDENTIFIED BY 'password';

GRANT ALL PRIVILEGES ON metastore. * TO 'hive'@'%';

FLUSH PRIVILEGES;

create database cm default character set utf8;

CREATE USER 'cm'@'%' IDENTIFIED BY 'password';

GRANT ALL PRIVILEGES ON cm. * TO 'cm'@'%';

FLUSH PRIVILEGES;

create database am default character set utf8;

CREATE USER 'am'@'%' IDENTIFIED BY 'password';

GRANT ALL PRIVILEGES ON am. * TO 'am'@'%';

FLUSH PRIVILEGES;

create database rm default character set utf8;

CREATE USER 'rm'@'%' IDENTIFIED BY 'password';

GRANT ALL PRIVILEGES ON rm. * TO 'rm'@'%';

FLUSH PRIVILEGES;
1.7 安装材料准备
(1)CM与 CDH下载
http://archive.cloudera.com/cm5/cm/5/
http://archive.cloudera.com/cdh5/parcels/5.10.0/
(2)在含有7个cm文件的文件夹目录向下使用:sudo createrepo(生成repodata),使用apache2,将上述cdh5.10.0/cm5.10.0 目录移动到/var/www/html 目录下,
使得用户可以通过 HTTP 访问这些 rpm 包。通过http://192.168.0.231/cm5.13.2/可访问到。(apache2的部署实现?)
(3)验证jdk
1.8 安装CM
(1)安装CM-server
sudo yum -y install cloudera-manager-server
(2)初始化数据库
Sudo /usr/share/cmf/schema/scm_prepare_database.sh mysql cm cm password
(3)启动CM-server
sudo systemctl start cloudera-scm-server
(4)检查端口是否监听(需要等待一段时间重启)
netstat -nltp | grep 7180
(5)访问 CM通过 http:// 192.168.0.230:7180/cmf/login
二.web界面操作
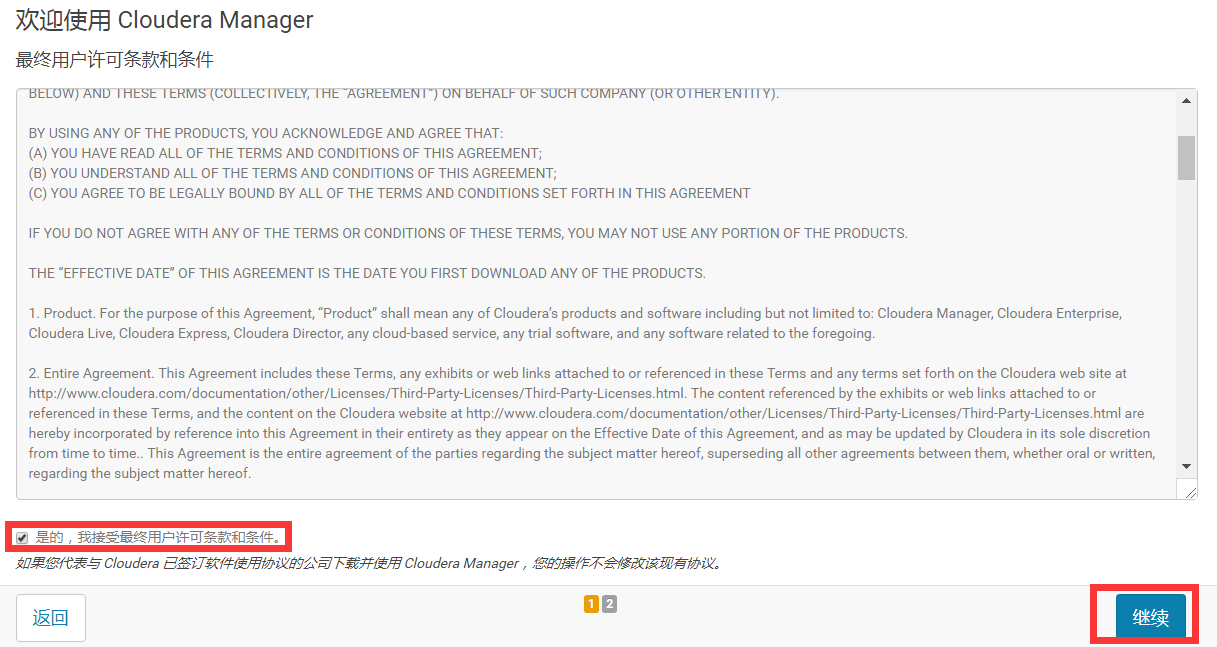
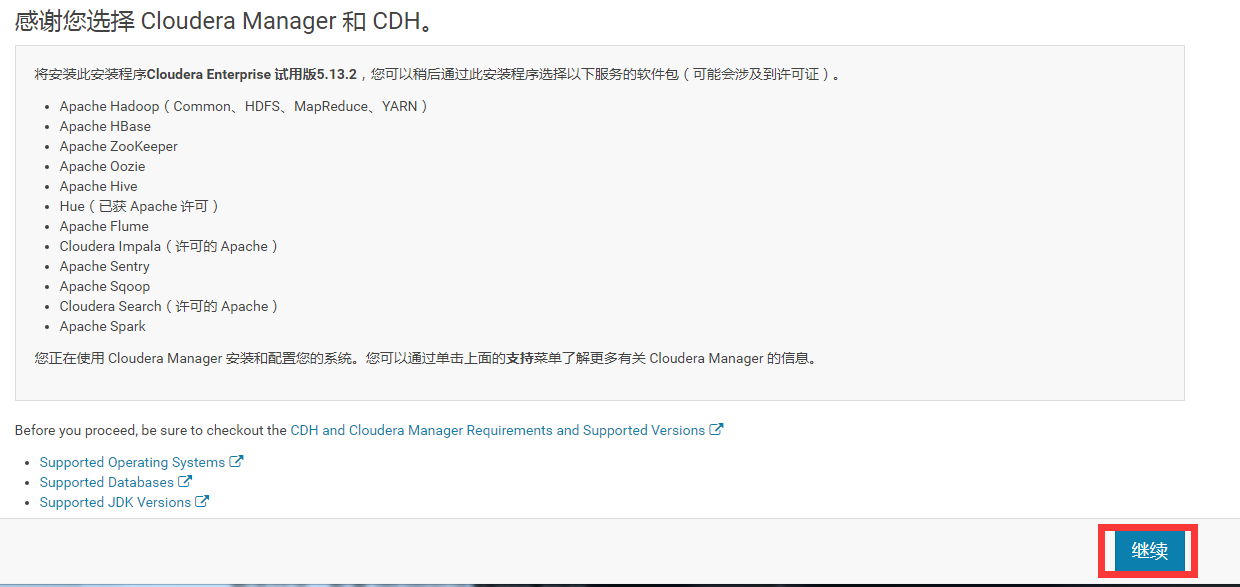
(1)同意协议,点击继续
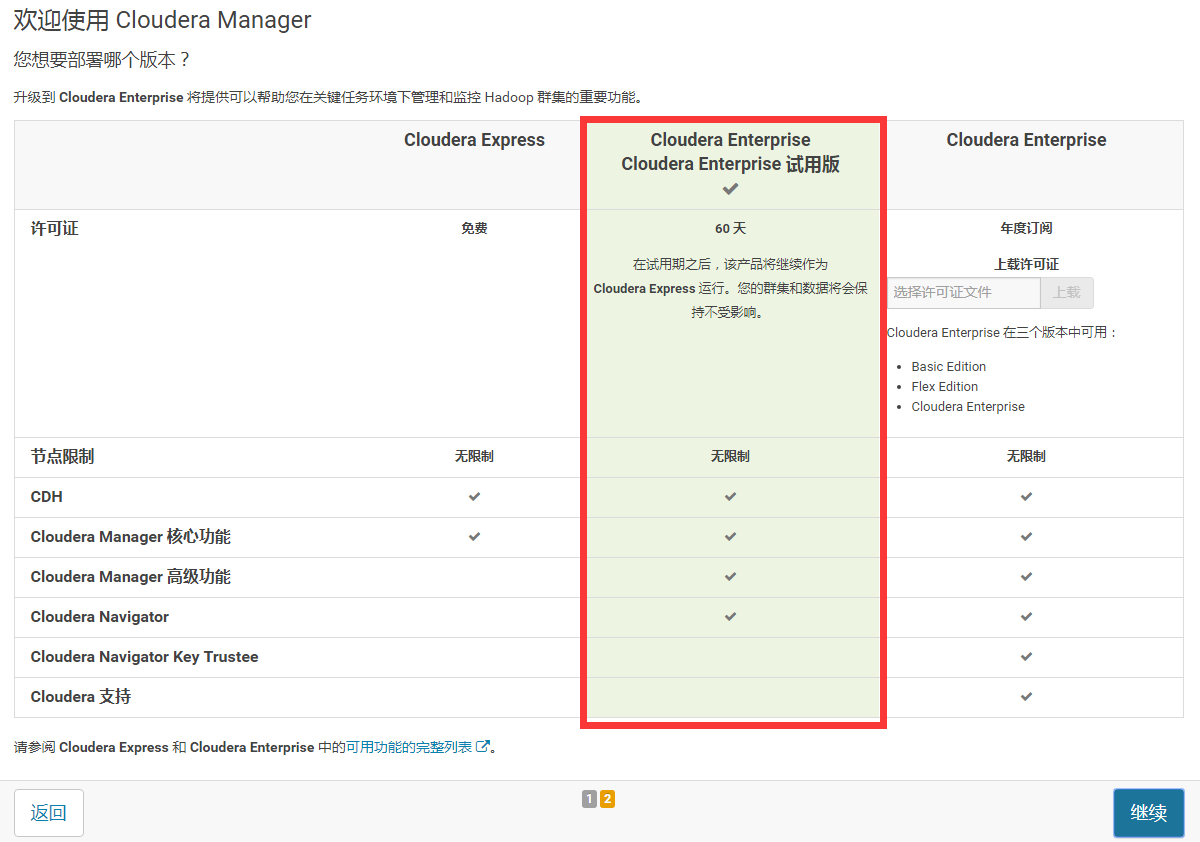
(2)选择60天试用版,点击继续
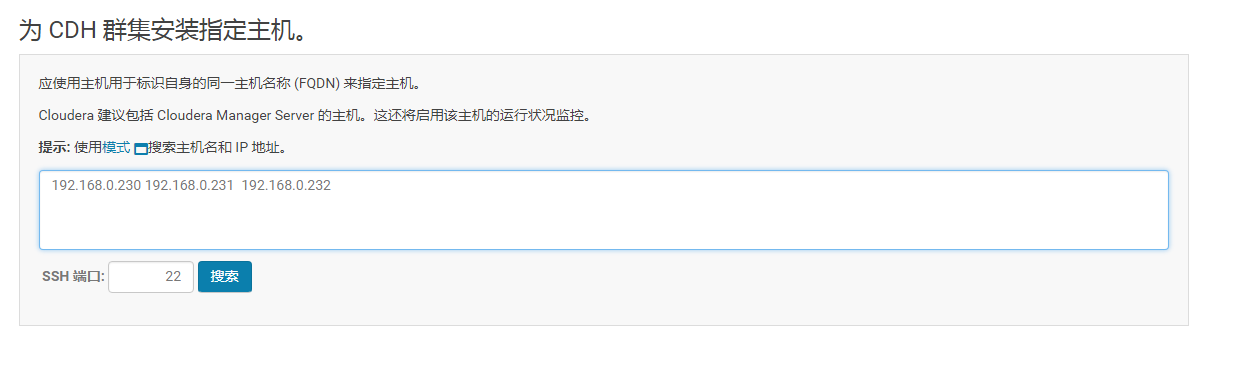
(3)输入所有节点的IP,搜索→继续

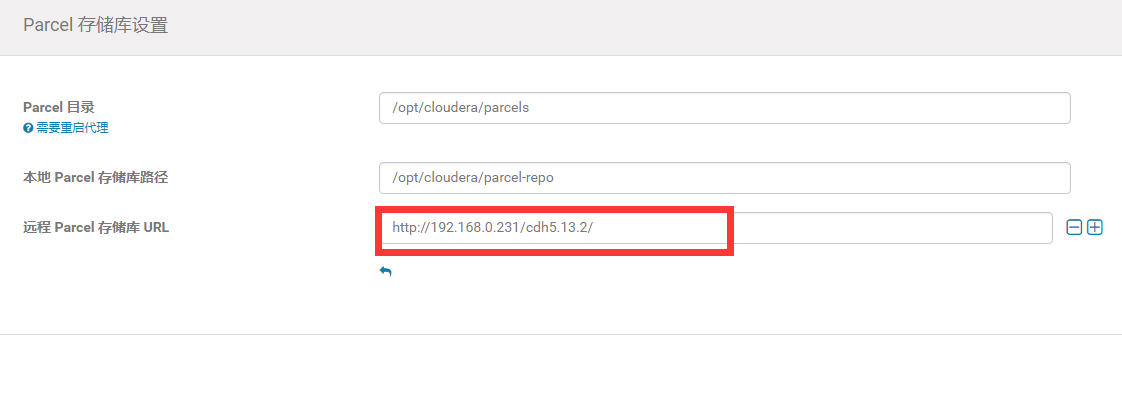
(4) 选择“更多选项”
填入CDH所在的服务器地址
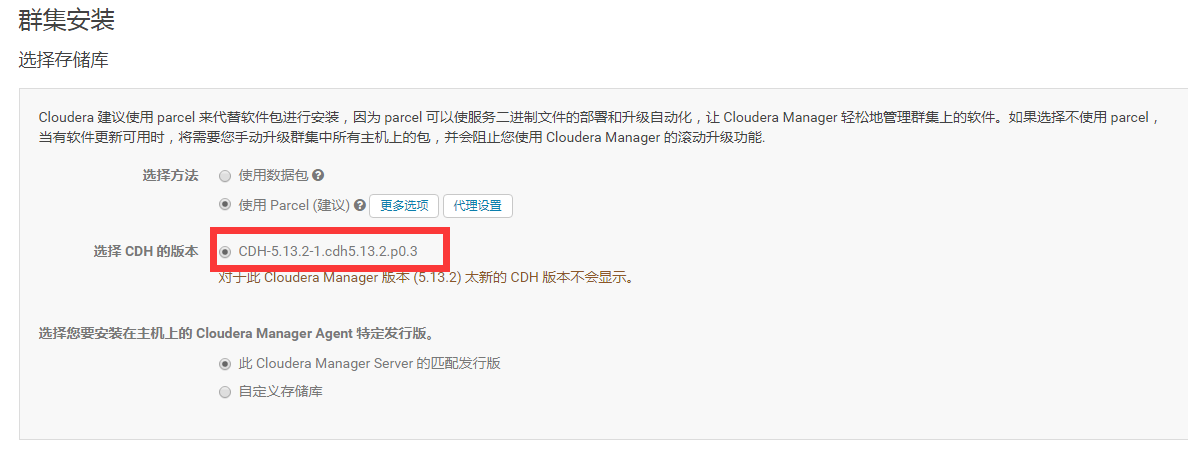
(5)选择相应的版本
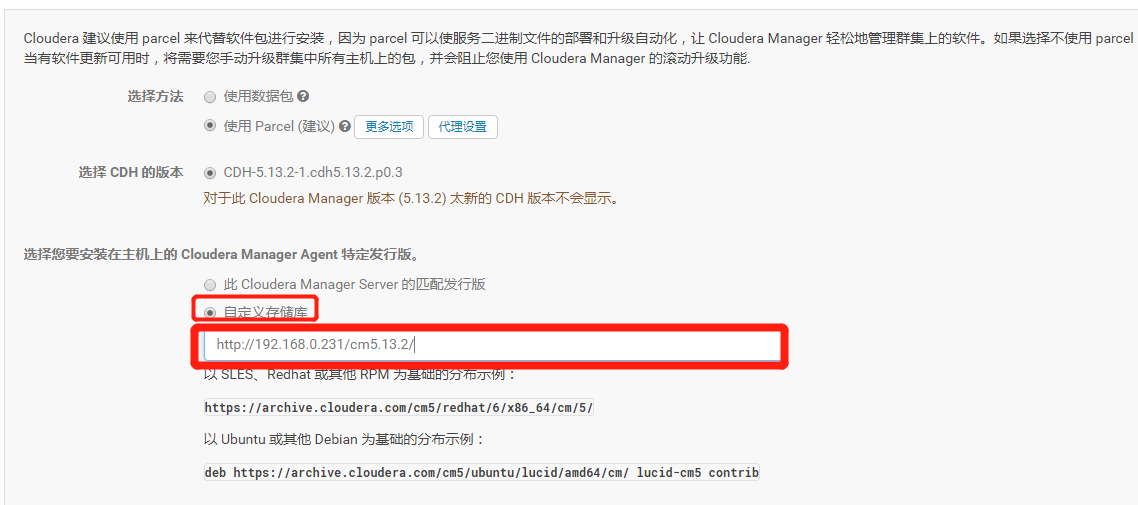
(6)“自定义存储库”,填入cm的地址http://192.168.0.231/cm5.13.2/,继续
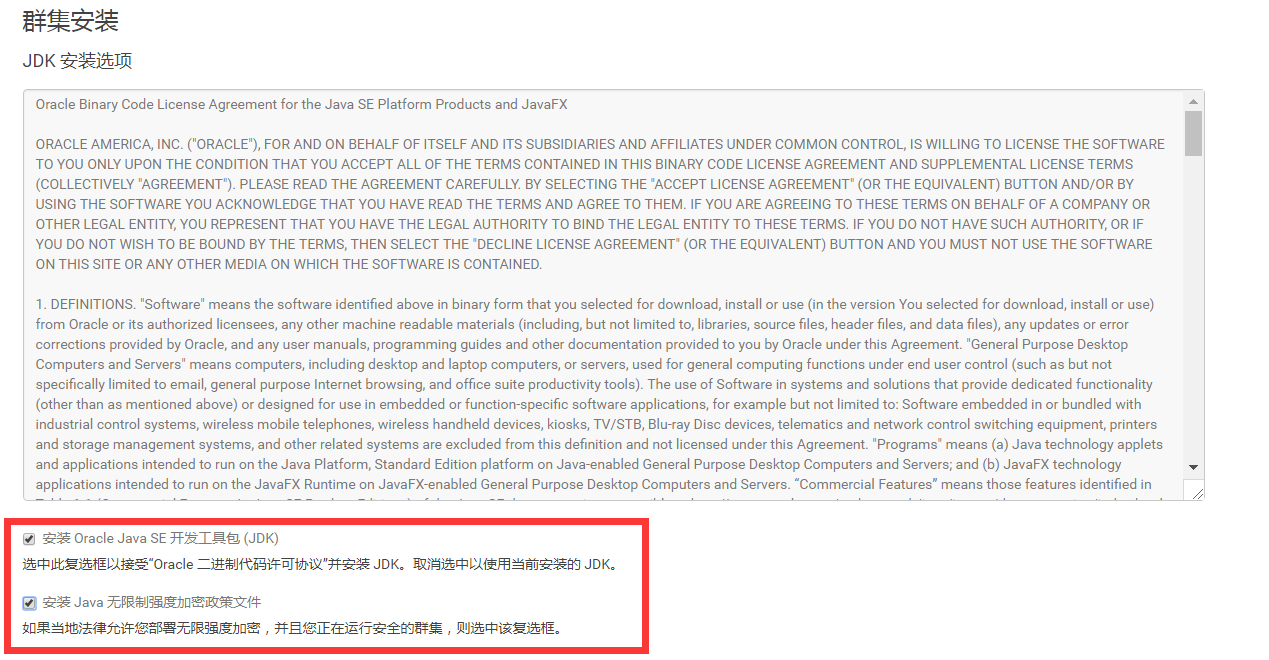
(7)选择安装jdk及其他,然后继续
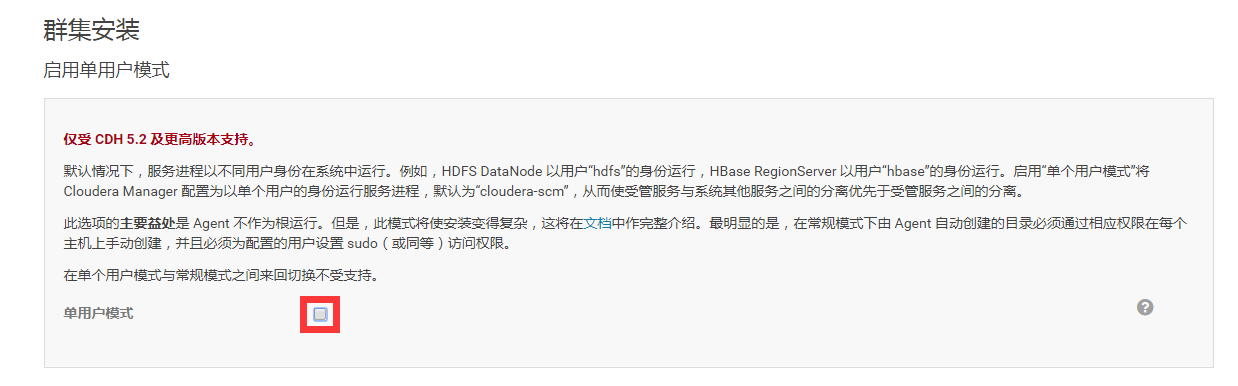
(8)去掉对勾,默认多用户模式
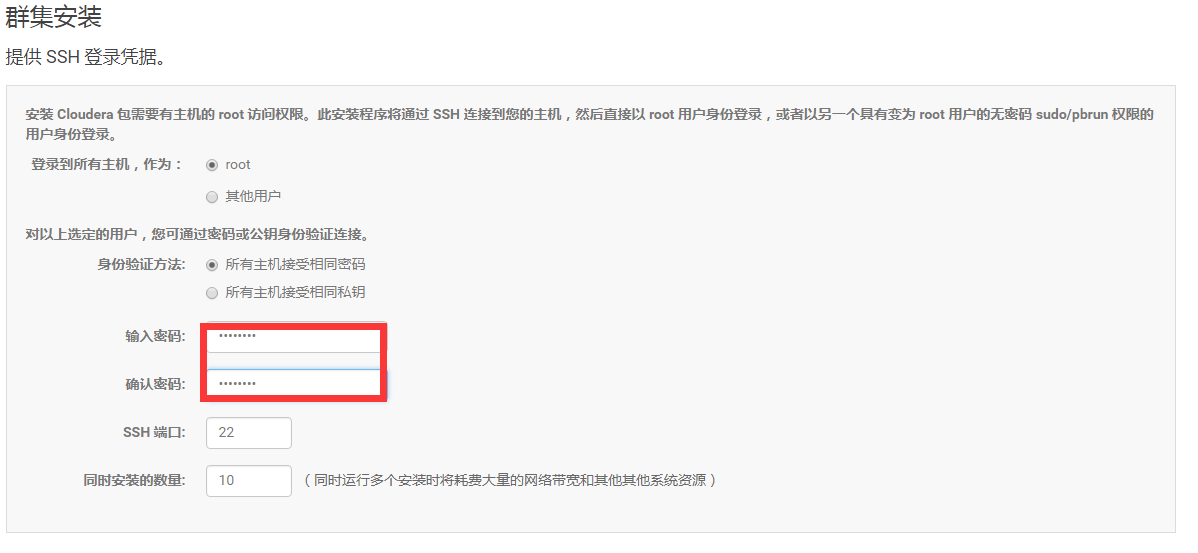
(9)配置ssh账号密码:root/12345678,点击继续。
(10)完成安装

三.组件安装
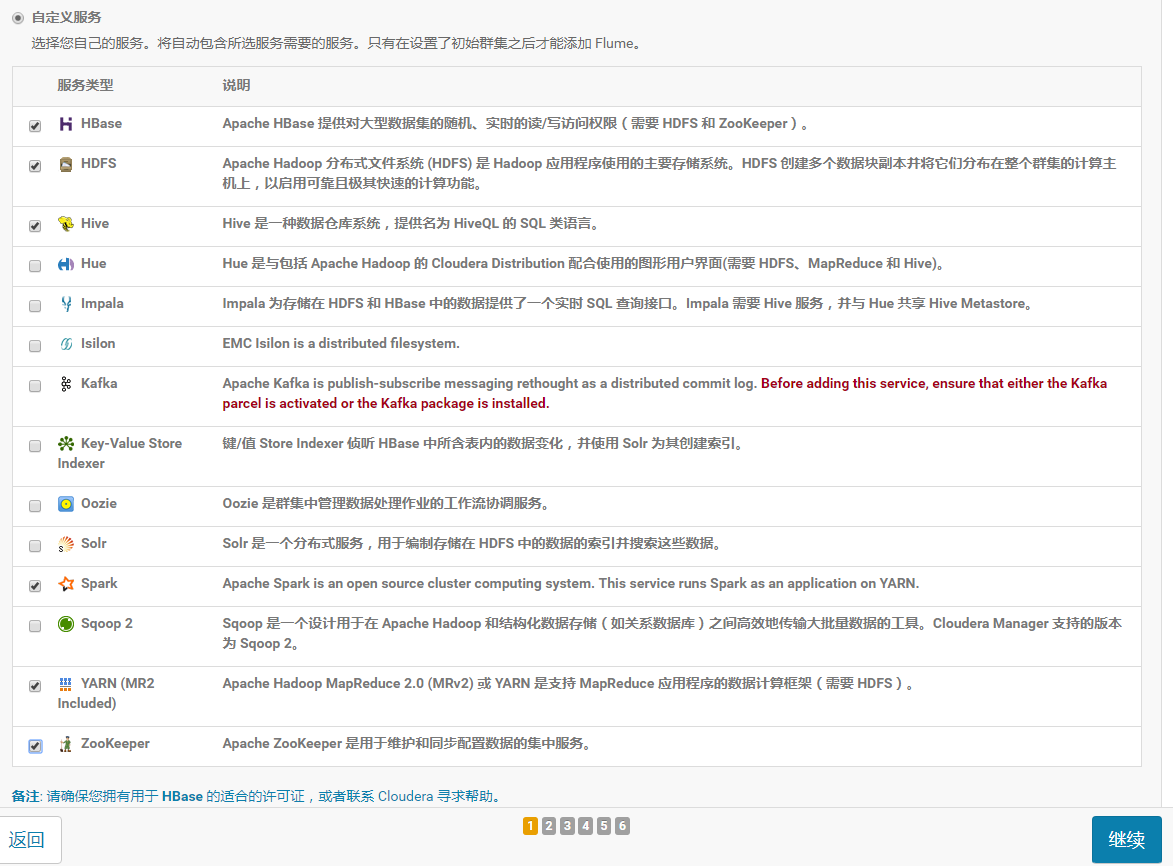
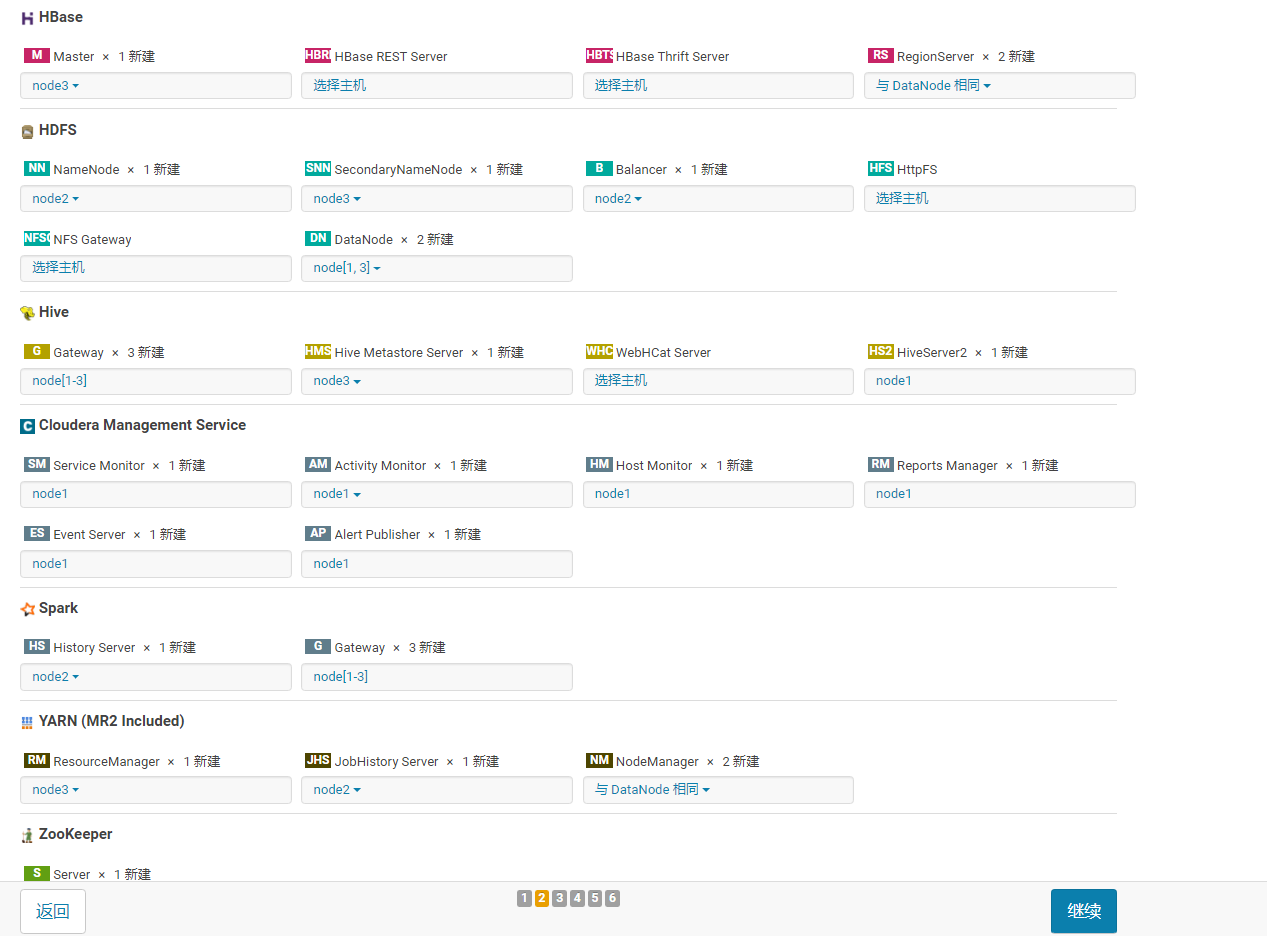
3.1 自定义服务
3.2 节点规划
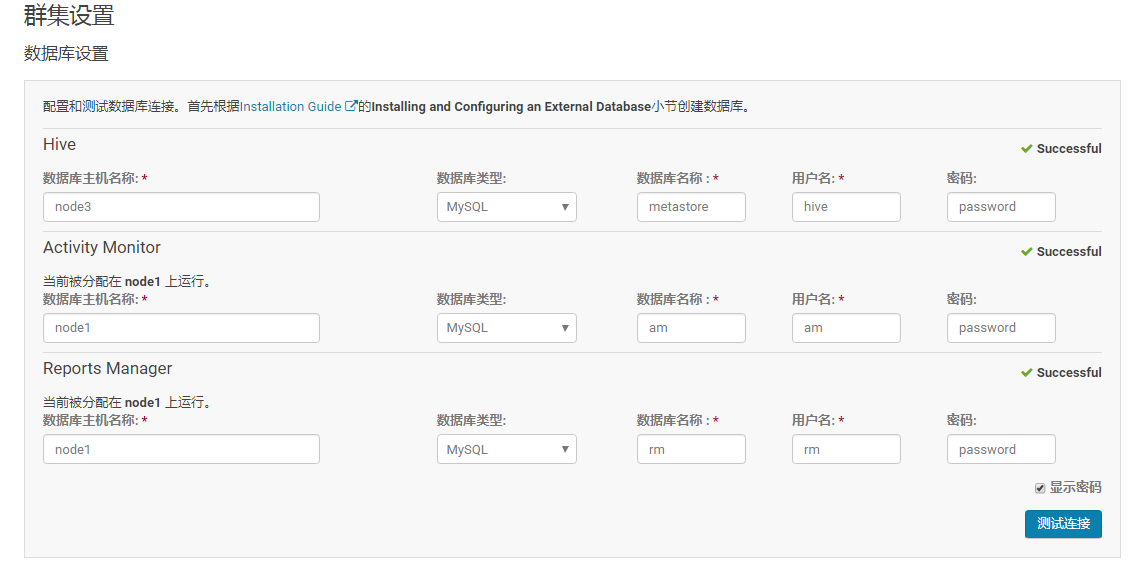
3.3 数据库设置
(由于将源数据库规划在node3上且node3没有该数据库,必须下载Mariadb然后建库metastore:
create database metastore default character set utf8;

CREATE USER 'hive'@'%' IDENTIFIED BY 'password';

GRANT ALL PRIVILEGES ON metastore. * TO 'hive'@'%';

FLUSH PRIVILEGES;
)
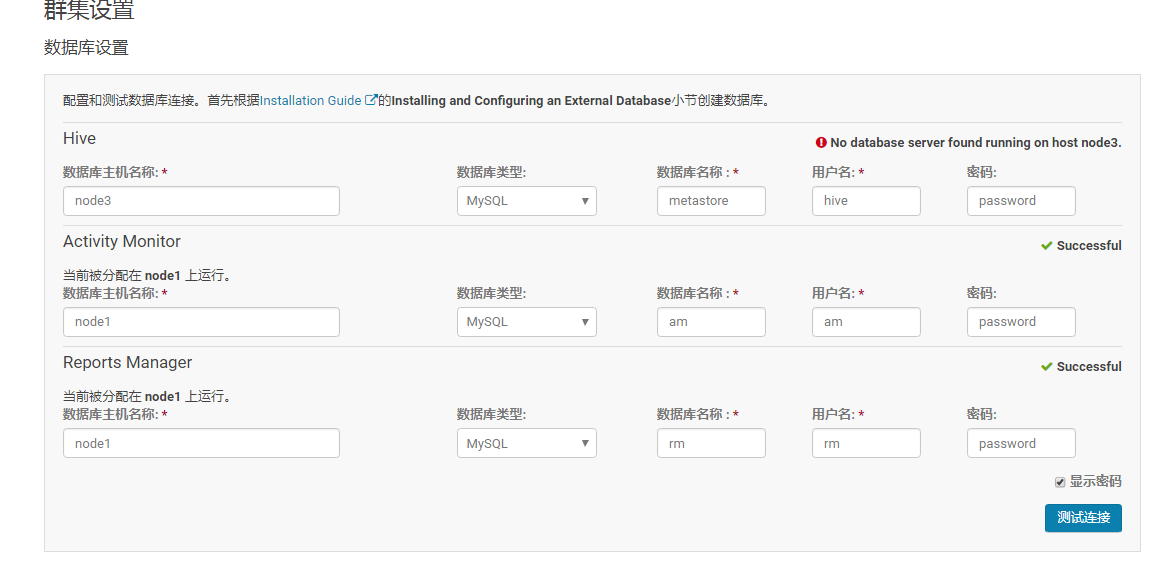
测试通过,继续
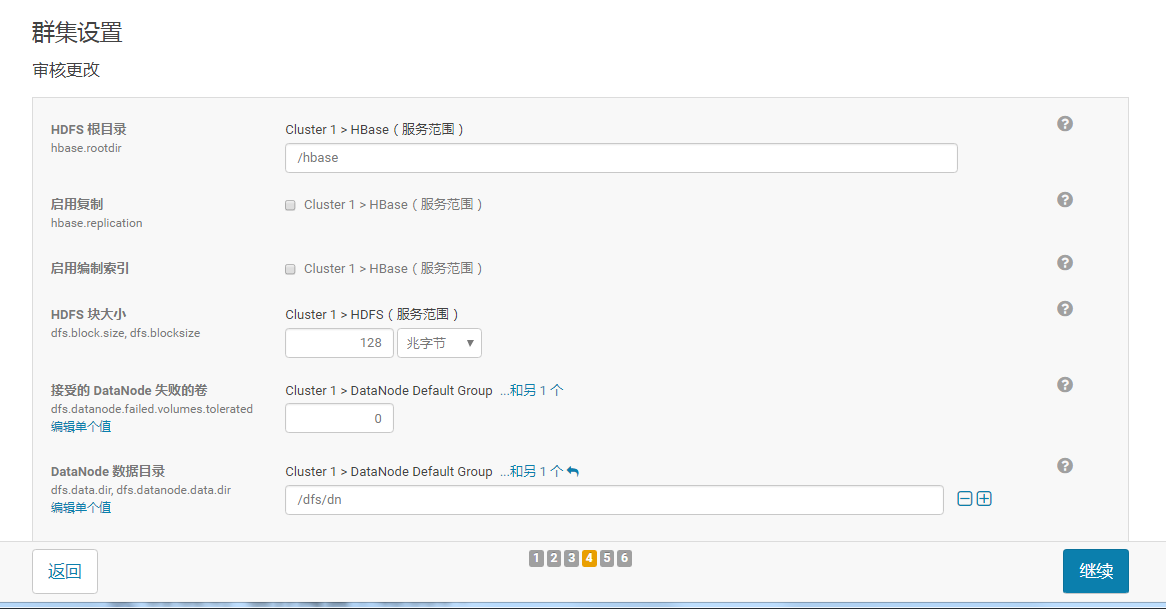
3.4 集群设置
保持默认(主要设置DataNode数据目录)
3.5.进入自动安装
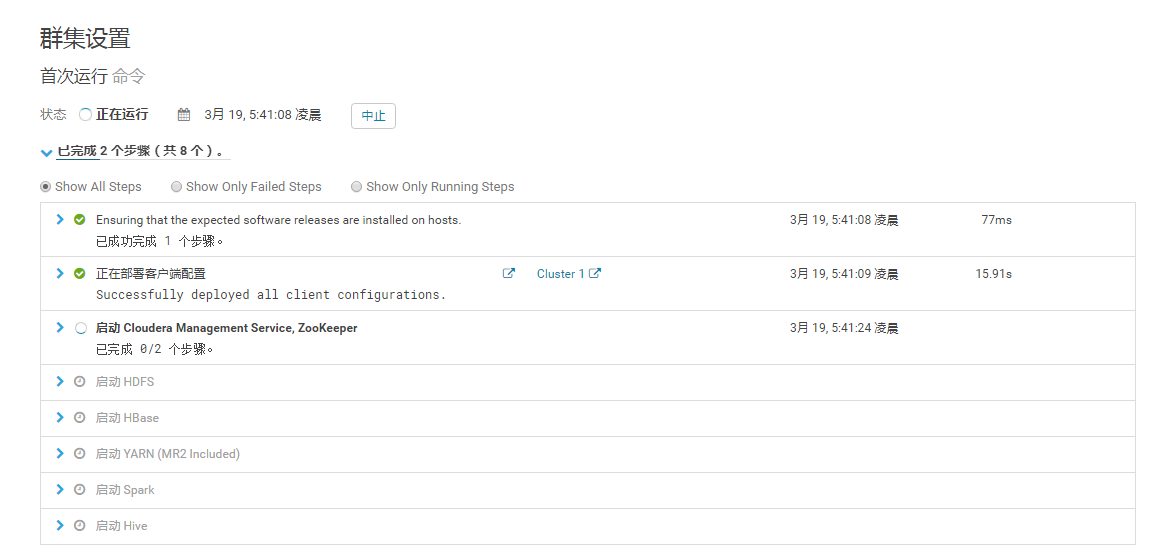
3.6 完成安装,进入主界面

3.7 几个参数配置
(1)配置dfs.replication值为2,并在NameNode所在执行以下命令:
su hdfs
hadoop fs -setrep 2 /
(2)dfs.pemissions中框中对号去掉。
(3)yarn.nodemanager.resource.memory-mb为1.375吉字节
yarn.scheduler.maximum-allocation-mb为1.375吉字节
(4)重启集群
四.验证
4.1 HDFS验证
(1)hadoop fs -mkdir -p /lilei/test_table
(2)cat > a.txt
1#2
c#d
我#你
(3)hadoop fs -put a.txt /lilei/test_table
(4)hadoop fs -cat /lilei/test_table/a.txt
显示:

4.2 Hive验证
(1)hive
(2)create external table test_table
(
s1 string,
s2 string
)
row format delimited fields terminated by '#'
stored as textfile location '/lilei/test_table';

(3)select * from test_table;

(4)select count(*) from test_table;
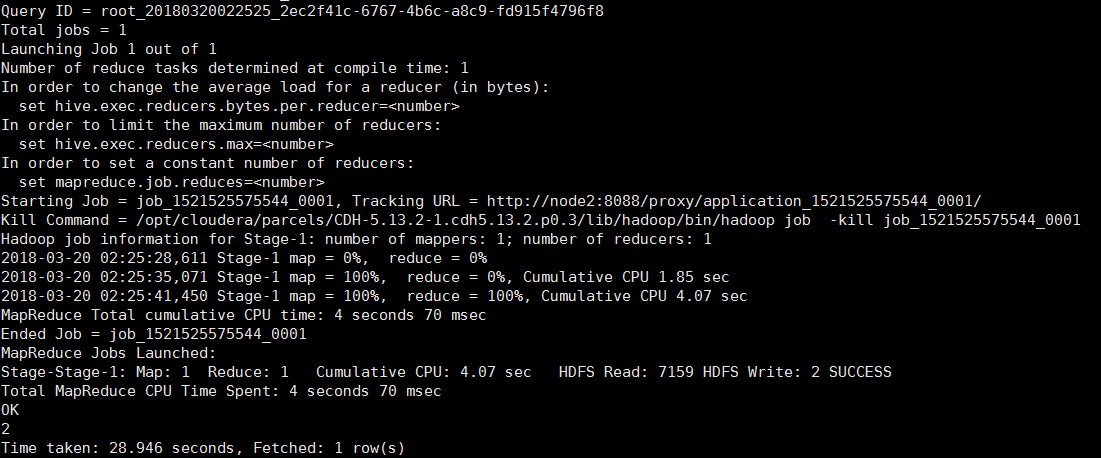
4.3 MapReduce验证
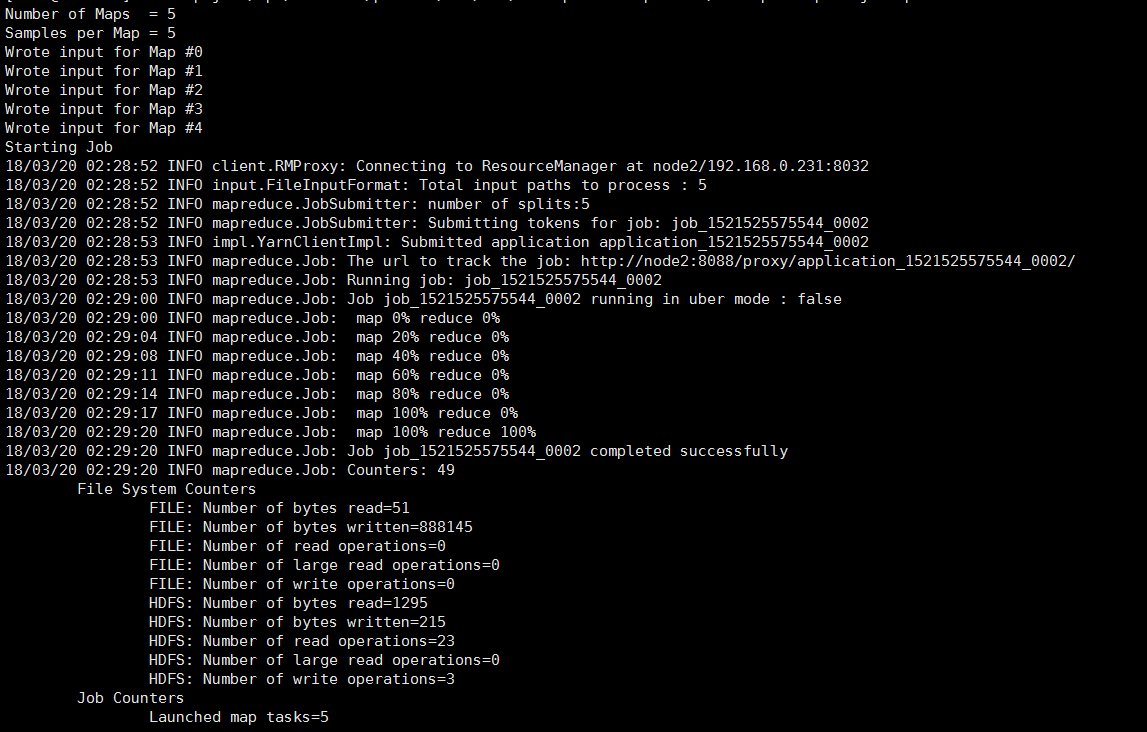
hadoop jar /opt/cloudera/parcels/CDH/lib/hadoop-0.20-mapreduce/hadoop-examples.jar pi 5 5

4.4 Spark验证
(1)spark-shell
(2)var textFile = sc.textFile("hdfs://node2:8020/lilei/test_table/a.txt")
(注:此处node2必须为NameNode所在节点)

(3)textFile.count()

错误排查
5.1 HDFS不良:副本不足的块
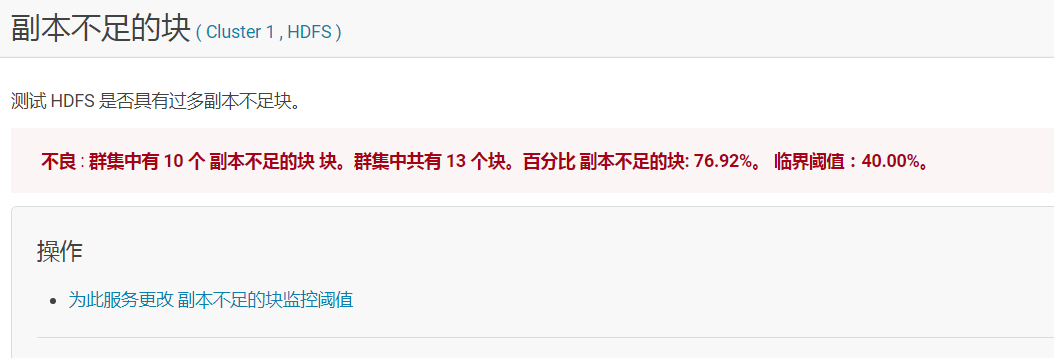
原因:是因为集群中DataNode节点只有2个,而安装过程中采用的都是默认配置,dfs.replication 设置的为3,所以导致次报警。
解决办法:
(1)配置dfs.replication值为2:

(2)在NameNode所在执行以下命令:
su hdfs
hadoop fs -setrep 2 /
(改变整个hdfs目录下文件的副本个数, 2为所设置的副本个数,-R选项可以对一个目录下的所有目录与文件递归执行操作)
(3)只重启HDFS,其余需要启动的会自动重启无需再干预
5.2 Hive组件出现不良 : 该角色的进程启动失败。
(1)报错界面如下:
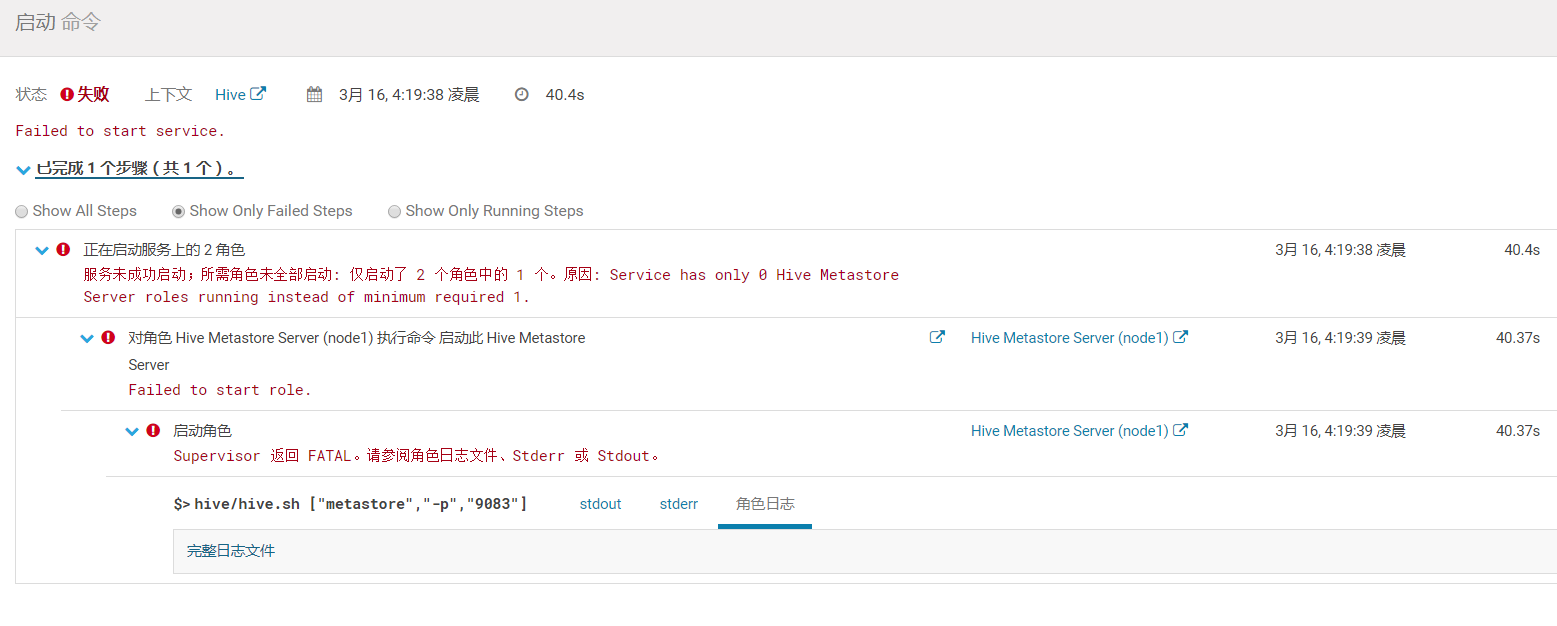
查看日志
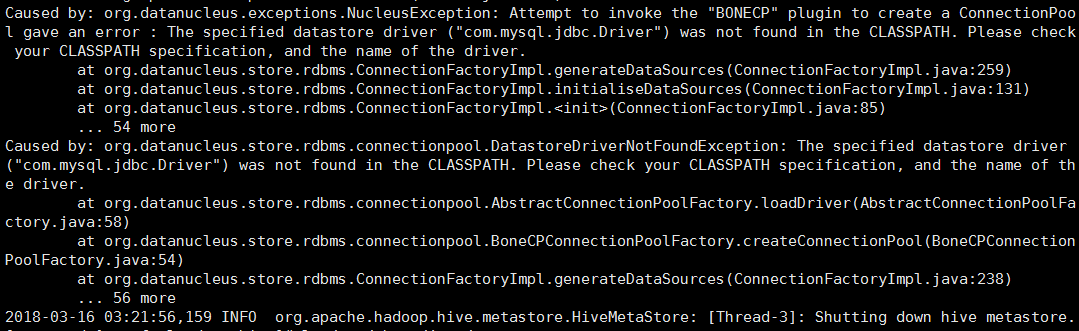
(2)解决方法:
创建jdbc的软连接并改名

5.3出现HDFS权限问题

解决:在CM界面将dfs.pemissions中框中对号去掉。

5.4 spark-shell环境出错


解决:
修改yarn容器将两个变量的值改为推荐值,并重启yarn。(这是Spark On Yarn执行中executor内存限制问题)
yarn.nodemanager.resource.memory-mb
yarn.scheduler.maximum-allocation-mb;


5.5 引导界面中途误选版本,无法回退
需要删除相关用户目录:
- 停掉服务
systemctl stop cloudera-scm-server
2. 删除相应的用户文件目录:
rm -rf /etc/cloudera* /var/run/cloudera* /var/lib/cloudera-scm-server
3. 开启服务
systemctl start cloudera-scm-server
4. 登录
http://192.168.0.230:7180/cmf/login
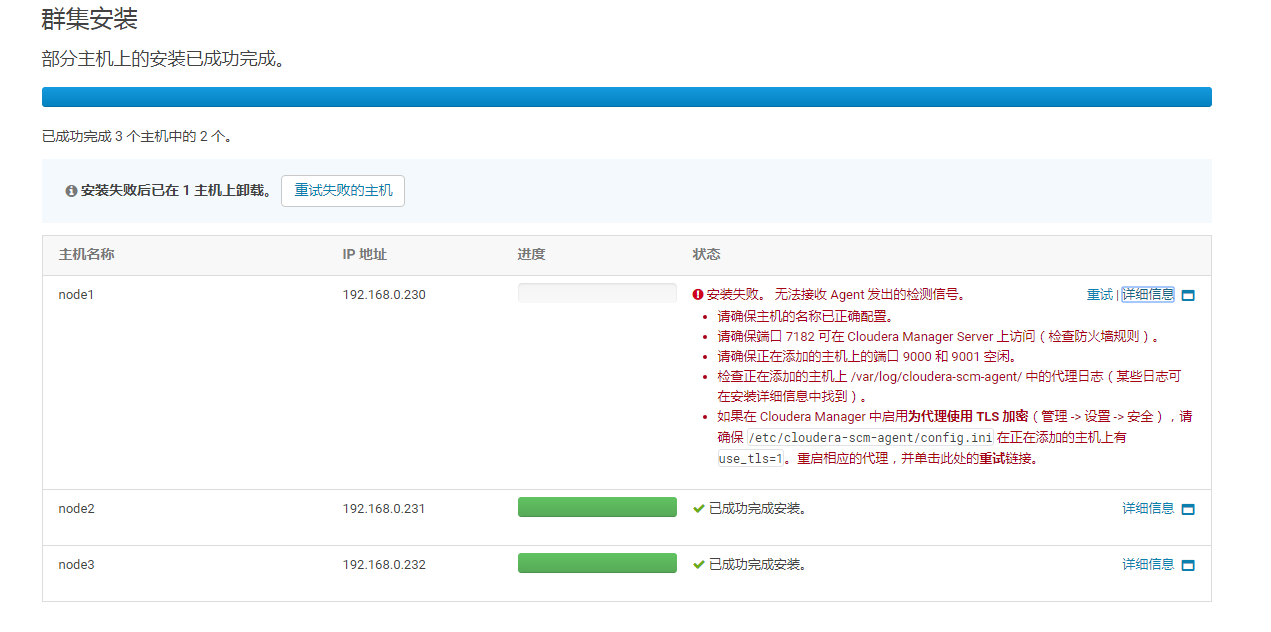
5.6无法接受Agent发出的检测
解决:
(1)利用ps -ef | grep supervisord查出PID
(2)然后kill -9 PID
(3) systemctl restart cloudera-scm-agent

5.7.主机运行状况不良
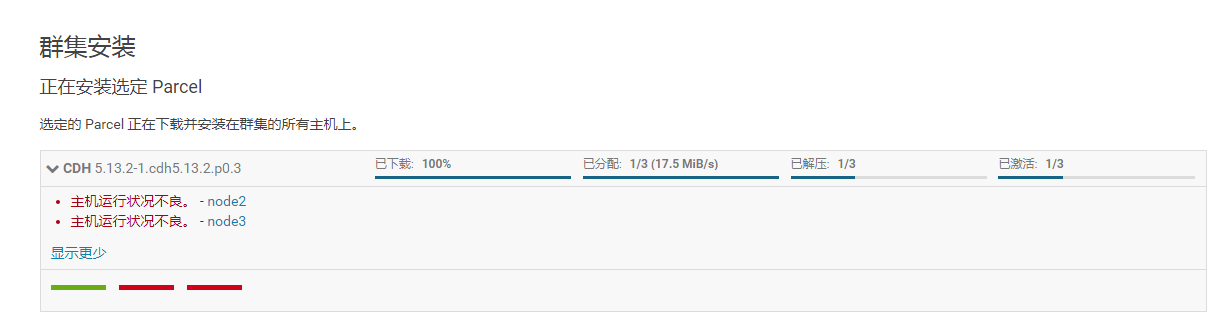
解决:分别删除两个不良节点上的cm_guid文件,然后重启agent服务,继续安装即可
(1)分别rm -f /var/lib/cloudera-scm-agent/cm_guid
(2)systemctl restart cloudera-scm-agent
5.8 运行mysql_secure_installation回车时出错
运行mysql配置/usr/bin/mysql_secure_installation出错时,切到cd ~ 或cd /目录下再次运行。
5.9 yum下载资源不全
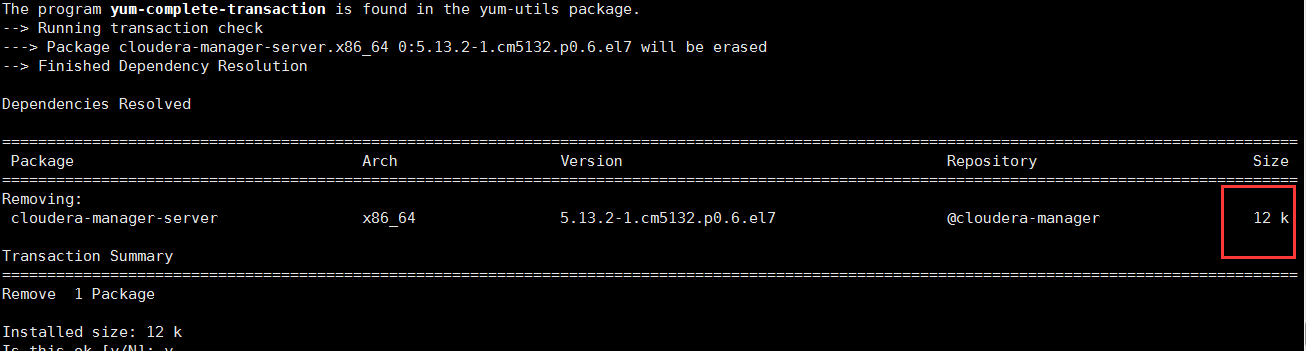
CM全部组件没有删除干净:

解决:
yum remove 'cloudera-manager-*'
(不能只删manager:yum remove cloudera-manager-server)
原文链接:CDH详细安装步骤
最后
以上就是耍酷狗最近收集整理的关于CDH详细安装步骤的全部内容,更多相关CDH详细安装步骤内容请搜索靠谱客的其他文章。


发表评论 取消回复