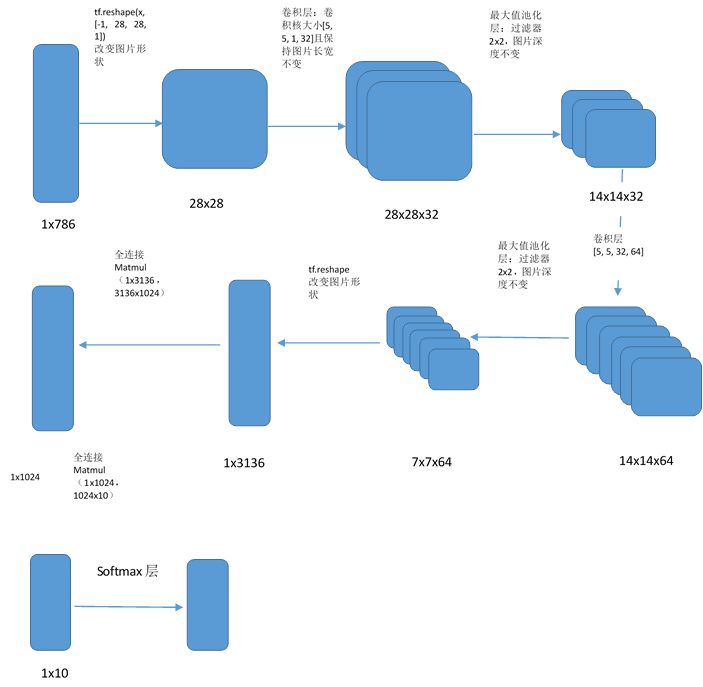
# coding=utf-8
from __future__ import absolute_import
from __future__ import division
from __future__ import print_function

import argparse
import sys
import tempfile

from tensorflow.examples.tutorials.mnist import input_data

import tensorflow as tf

import numpy

FLAGS = None


def deepnn(x):
    """deepnn builds the graph for a deep net for classifying digits.

    Args:
    x: an input tensor with the dimensions (N_examples, 784), where 784 is the
    number of pixels in a standard MNIST image.

    Returns:
    A tuple (y, keep_prob). y is a tensor of shape (N_examples, 10), with values
    equal to the logits of classifying the digit into one of 10 classes (the
    digits 0-9). keep_prob is a scalar placeholder for the probability of
    dropout.
    """
    # Reshape to use within a convolutional neural net.
    # Last dimension is for "features" - there is only one here, since images are
    # grayscale -- it would be 3 for an RGB image, 4 for RGBA, etc.
    """
    tf.reshape(tensor,shape,name=None)
    函数的作用是将tensor变换为参数shape形式,其中的shape为一个列表形式,‘-1’代表由
    python通过其他值推算出该值的大小--> 784=1x28x28x1
    把图片转换成28x28的二维矩阵
    """
    with tf.name_scope('reshape'):
        """
        x_image是指需要做卷积的图像:[训练时一个batch的图片数量, 图片高度, 图片宽度, 图像通道数]
        """
        x_image = tf.reshape(x, [-1, 28, 28, 1])
        tf.summary.image('input', x_image, 50)

    # First convolutional layer - maps one grayscale image to 32 feature maps.
    with tf.name_scope('conv1'):
        """
        W_conv1 卷积核:[卷积核的高度,卷积核的宽度,图像通道数,卷积核个数]
        该层的参数个数是5x5x32
        """
        W_conv1 = weight_variable([5, 5, 1, 32])
        variable_summaries(W_conv1)
        b_conv1 = bias_variable([32])
        variable_summaries(b_conv1)
        """
        conv2d接口的padding参数如果是‘SAME’(为了避免尺寸变化,在边界补充0),
        并且strides参数为[1,1,1,1]保证了卷积后矩阵大小不变
        """
        """
        tf.nn.relu激活函数,max(features,0)即小于0时输出一律为0,x大于0时输出就是x,提供网络的非线性建模能力
        """
        h_conv1 = tf.nn.relu(conv2d(x_image, W_conv1) + b_conv1)
        print(h_conv1.get_shape().as_list())
        """
        执行结束后会有32张28x28的图片,相当于28x28x1-->28x28x32
        """

    # Pooling layer - downsamples by 2X.
    with tf.name_scope('pool1'):
        """
        池化层:缩小矩阵尺寸,减少全连接层参数,这里使用最大值池化,池化层的过滤器大小
        为2x2,该层的参数个数是32x(1+1):每个滤波器路过的4个邻域的4个输入相加,乘以1个可
        训练参数w,再加上1个可训练偏置b(即一个滤波器对应两个参数)
        """
        h_pool1 = max_pool_2x2(h_conv1)
        print(h_pool1.get_shape().as_list())
        """
        执行结束后生成14x14x32的tensor
        """

    # Second convolutional layer -- maps 32 feature maps to 64.
    with tf.name_scope('conv2'):
        """
        该层的参数个数是5x5x64 (TODO)
        """
        W_conv2 = weight_variable([5, 5, 32, 64])
        variable_summaries(W_conv2)
        b_conv2 = bias_variable([64])
        variable_summaries(b_conv2)
        h_conv2 = tf.nn.relu(conv2d(h_pool1, W_conv2) + b_conv2)

    # Second pooling layer.
    with tf.name_scope('pool2'):
        """
        该层的参数个数是64x(1+1)
        """
        h_pool2 = max_pool_2x2(h_conv2)

    # Fully connected layer 1 -- after 2 round of downsampling, our 28x28 image
    # is down to 7x7x64 feature maps -- maps this to 1024 features.
    with tf.name_scope('fc1'):
        """
        该层的参数个数是1024x(64x7x7)
        """
        W_fc1 = weight_variable([7 * 7 * 64, 1024])
        variable_summaries(W_fc1)
        b_fc1 = bias_variable([1024])
        variable_summaries(b_fc1)

        h_pool2_flat = tf.reshape(h_pool2, [-1, 7 * 7 * 64])
        h_fc1 = tf.nn.relu(tf.matmul(h_pool2_flat, W_fc1) + b_fc1)

    # Dropout - controls the complexity of the model, prevents co-adaptation of
    # features.
    with tf.name_scope('dropout'):
        keep_prob = tf.placeholder(tf.float32)
        """
        tf.nn.dropout是TensorFlow里面为了防止或减轻过拟合而使用的函数,它一般用在全连接层,
        会忽略某些神经元得输出
        """
        h_fc1_drop = tf.nn.dropout(h_fc1, keep_prob)

    # Map the 1024 features to 10 classes, one for each digit
    with tf.name_scope('fc2'):
        """
        该层的参数个数是1024x10
        """
        W_fc2 = weight_variable([1024, 10])
        variable_summaries(W_fc2)
        b_fc2 = bias_variable([10])
        variable_summaries(b_fc2)

        y_conv = tf.matmul(h_fc1_drop, W_fc2) + b_fc2
        print(y_conv.get_shape().as_list())
    return y_conv, keep_prob


def conv2d(x, W):
    """conv2d returns a 2d convolution layer with full stride."""
    return tf.nn.conv2d(x, W, strides=[1, 1, 1, 1], padding='SAME')


def max_pool_2x2(x):
    """max_pool_2x2 downsamples a feature map by 2X."""
    return tf.nn.max_pool(x, ksize=[1, 2, 2, 1],
                          strides=[1, 2, 2, 1], padding='SAME')

def variable_summaries(var):
    with tf.name_scope('summaries'):
        mean = tf.reduce_mean(var)
        tf.summary.scalar('mean', mean)
        with tf.name_scope('stddev'):
            stddev = tf.sqrt(tf.reduce_mean(tf.square(var-mean)))
            tf.summary.scalar('stddev', stddev)
            tf.summary.scalar('max', tf.reduce_max(var))
            tf.summary.scalar('min', tf.reduce_min(var))
            tf.summary.histogram('histogram', var)

def weight_variable(shape):
    """weight_variable generates a weight variable of a given shape."""
    initial = tf.truncated_normal(shape, stddev=0.1)
    return tf.Variable(initial)


def bias_variable(shape):
    """bias_variable generates a bias variable of a given shape."""
    initial = tf.constant(0.1, shape=shape)
    return tf.Variable(initial)


def main(_):
    # Import data
    mnist = input_data.read_data_sets(FLAGS.data_dir)

    x = tf.placeholder(tf.float32, [None, 784])

    y_ = tf.placeholder(tf.int64, [None])

    # Build the graph for the deep net
    y_conv, keep_prob = deepnn(x)

    with tf.name_scope('loss'):
        """
        损失函数可以用来判断输出值和期望值之间的差异有多大,分类问题中主要使用
        交叉熵
        """
        cross_entropy = tf.losses.sparse_softmax_cross_entropy(
            labels=y_, logits=y_conv)
        """
        使用交叉熵的平均值作为衡量损失的指标
        """
        cross_entropy = tf.reduce_mean(cross_entropy)
        tf.summary.scalar('loss', cross_entropy)

    with tf.name_scope('adam_optimizer'):
        """
        使用adam算法的优化函数,学习率是0.0001
        """
        train_step = tf.train.AdamOptimizer(1e-4).minimize(cross_entropy)

    with tf.name_scope('accuracy'):
        """
        tf.argmax返回y_conv的最大值的索引,因为y_conv是两维大小是[none, 10]的数组,下标索引代表了
        该图片对应的值,并且y_conv中应该只有一个值是1,代表该图片对应的数字是1对应的索引值``
        """
        """
        tf.equal比较两个参数是否相等,A = [[1,3,4,5,6]] B = [[1,3,4,3,2]] --> [[ True  True  True False False]]
        """
        correct_prediction = tf.equal(tf.argmax(y_conv, 1), y_)
        """
        tf.cast主要做类型转换
        """
        correct_prediction = tf.cast(correct_prediction, tf.float32)
        accuracy = tf.reduce_mean(correct_prediction)

    graph_location = "/work/tensorflow_dir/pytest/mnist/board_dir"
    print('Saving graph to: %s' % graph_location)
    merged = tf.summary.merge_all()
    train_writer = tf.summary.FileWriter(graph_location)
    train_writer.add_graph(tf.get_default_graph())

    with tf.Session() as sess:
        sess.run(tf.global_variables_initializer())
        for i in range(2000):
            batch = mnist.train.next_batch(50)
            """
            next_batch返回50个输入值和50个输入值对应的标签,batch[0]表示50个输入值,batch[1]表示对应的标签
            """
            if i % 100 == 0:
                run_options = tf.RunOptions(trace_level=tf.RunOptions.FULL_TRACE)
                run_metadata = tf.RunMetadata()
                train_accuracy = accuracy.eval(feed_dict={
                    x: batch[0], y_: batch[1], keep_prob: 1.0})
                print('step %d, training accuracy %g' % (i, train_accuracy))
            validate_acc, sum = sess.run([train_step, merged], feed_dict={x: batch[0], y_: batch[1], keep_prob: 0.5})
            train_writer.add_run_metadata(run_metadata, 'step%03d' % i)
            train_writer.add_summary(sum, i)

        # compute in batches to avoid OOM on GPUs
        accuracy_l = []
        for _ in range(20):
            batch = mnist.test.next_batch(500, shuffle=False)
            accuracy_l.append(accuracy.eval(feed_dict={x: batch[0],
                                                       y_: batch[1],
                                                       keep_prob: 1.0}))
        print('test accuracy %g' % numpy.mean(accuracy_l))


if __name__ == '__main__':
    parser = argparse.ArgumentParser()
    parser.add_argument('--data_dir', type=str,
                        default='/root/work/tensorflow_dir/pytest/mnist/data/',
                        help='Directory for storing input data')
    FLAGS, unparsed = parser.parse_known_args()
    tf.app.run(main=main, argv=[sys.argv[0]] + unparsed)

最后
以上就是迷你凉面最近收集整理的关于tensorflow源代码分析(3)-mnist cnn卷积神经网络模型源代码的全部内容,更多相关tensorflow源代码分析(3)-mnist内容请搜索靠谱客的其他文章。
本图文内容来源于网友提供,作为学习参考使用,或来自网络收集整理,版权属于原作者所有。


发表评论 取消回复