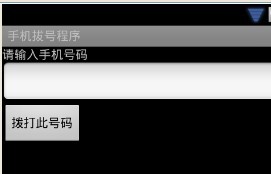
转载请注明出处(http://blog.csdn.net/cndrip)
手机拔号程序,对于手机来说是自带的,有必要开发吗?回答是肯定的,对于学习Android来说,也是有必须学习的。
在应用程序中,常用到联系人或公司,需要直接联系,就不需要记下号码,再切换到手机拔号,可以在应用程序中直接点击相应联系人,就完成拔号。
手机拔号程序,对于Android初学者,可以学到Andriod几个要点:
1.Andriod的权限
2.Intent的用法
3.按钮的监听setOnClickListener
4.不同模拟器之间的通信

main.xml
<?xml version="1.0" encoding="utf-8"?>
<LinearLayout xmlns:android="http://schemas.android.com/apk/res/android"
	android:orientation="vertical" android:layout_width="fill_parent"
	android:layout_height="fill_parent">
	<TextView android:layout_width="fill_parent"
		android:layout_height="wrap_content" android:text="@string/mobile" />
	<EditText android:id="@+id/mobile" android:layout_width="fill_parent"
		android:layout_height="wrap_content" />
	<Button android:id="@+id/button" android:layout_width="wrap_content"
		android:layout_height="wrap_content" android:text="@string/button" />
</LinearLayout>
string.xml
<?xml version="1.0" encoding="utf-8"?>
<resources>
    <string name="hello">Hello World, photoActivity!</string>
    <string name="app_name">手机拔号程序</string>
    <string name="mobile">请输入手机号码</string>
    <string name="button">拨打此号码</string>
</resources>package com.drip.phone;
import android.app.Activity;
import android.content.Intent;
import android.net.Uri;
import android.os.Bundle;
import android.view.View;
import android.view.View.OnClickListener;
import android.widget.Button;
import android.widget.EditText;
public class PhoneActivity extends Activity {
/** Called when the activity is first created. */
@Override
public void onCreate(Bundle savedInstanceState) {
super.onCreate(savedInstanceState);
setContentView(R.layout.main);
Button button = (Button) this.findViewById(R.id.button);
button.setOnClickListener(new ButtonClickListener());
}
private class ButtonClickListener implements OnClickListener {
@Override
public void onClick(View v) {
EditText mobileText = (EditText) findViewById(R.id.mobile);
String mobile = mobileText.getText().toString();
Intent intent = new Intent("android.intent.action.CALL", Uri
.parse("tel:" + mobile));
startActivity(intent);
}
}
}其中
按钮的监听setOnClickListener看代码就行了,不作简介了。
下面说说Intent 。
Intent intent = new Intent("android.intent.action.CALL", Uri.parse("tel:" + mobile));startActivity(intent);
这句是本程序的核心部分
Intent 中文意思是意图,是Android程序的核心组件,在这里,用作拔号,
Intent (action,data)
action 包括 ACTION_VIEW, ACTION_EDIT, ACTION_MAIN 等,action则常用的是Uri
有如下用法:
-
ACTION_VIEWcontent://contacts/people/1 -
ACTION_DIALcontent://contacts/people/1 -
ACTION_VIEWtel:123 -
ACTION_DIALtel:123 -
ACTION_EDITcontent://contacts/people/1 -
ACTION_VIEWcontent://contacts/people/以上代码全完成后,程序照样不能正常运行。
鉴于Android安全考虑,对于的程序必须授权:
在AndroidManifest.xml中要说明<uses-permission android:name="android.permission.CALL_PHONE"></uses-permission><?xml version="1.0" encoding="utf-8"?> <manifest xmlns:android="http://schemas.android.com/apk/res/android" package="com.drip.phone" android:versionCode="1" android:versionName="1.0"> <uses-sdk android:minSdkVersion="8" /> <uses-permission android:name="android.permission.CALL_PHONE"></uses-permission> <application android:icon="@drawable/icon" android:label="@string/app_name"> <activity android:name=".PhoneActivity" android:label="@string/app_name"> <intent-filter> <action android:name="android.intent.action.MAIN" /> <category android:name="android.intent.category.LAUNCHER" /> </intent-filter> </activity> </application> </manifest>一切就绪,就等东风了。
因为在模拟器上测试,所以不能直接打电话,也只能在模拟器上测试。
这时需要来建立新的模拟器完成测试;建立模拟器有两种方式 -
通过DOS命令
在Android安装目录下的tools
emulator -data phone
注phone为用户数据文件文件,若不存在,则建立一个 -
通过工具(eclipse)
"Android SDK and AVD Manager"直接启动
启动后,就可以测试了,模拟器的号码即为“5556”四位数
点击拔号:如下图
接通后的状态

本文源码(http://download.csdn.net/detail/cndrip/3991655)
最后
以上就是俭朴鞋子最近收集整理的关于Android手机拔号程序的全部内容,更多相关Android手机拔号程序内容请搜索靠谱客的其他文章。


发表评论 取消回复