docker镜像管理与镜像制作
文章目录
- docker镜像管理与镜像制作
- 1:镜像制作
- 2:commit制作镜像
- 3: 镜像上传dockerhub
- 4:dockerfile制作镜像
1:镜像制作
制作属于自己的Docker镜像,一般有两种方式:
第一种为commit方式,利用已有的镜像,运行为容器后安装定制自己需要的环境,然后由容器生成镜像;
另一种就是build方式,通过编写Dockerfile文件添加构建镜像指令生成镜像。
2:commit制作镜像
下载centos镜像
[root@localhost ~]# docker pull centos
[root@localhost ~]# docker images
REPOSITORY   TAG       IMAGE ID       CREATED         SIZE
centos       latest    5d0da3dc9764   10 months ago   231MB
创建容器
[root@localhost ~]# docker run -it --name centos -p 80:80 -d centos /bin/bash
[root@localhost ~]# docker ps -a
CONTAINER ID   IMAGE     COMMAND       CREATED          STATUS          PORTS                               NAMES
b732f4c6bef0   centos    "/bin/bash"   42 seconds ago   Up 42 seconds   0.0.0.0:80->80/tcp, :::80->80/tcp   centos
将本地的apache和其依赖包的包拷贝到容器里面去
[root@localhost ~]# ls
公共  模板  视频  图片  文档  下载  音乐  桌面  anaconda-ks.cfg  apr-1.6.5.tar.bz2  apr-util-1.6.1.tar.bz2  httpd-2.4.54.tar.bz2  initial-setup-ks.cfg
[root@localhost ~]# docker cp apr-1.6.5.tar.bz2 centos:/
[root@localhost ~]# docker cp apr-util-1.6.1.tar.bz2 centos:/
[root@localhost ~]# docker cp httpd-2.4.54.tar.bz2 centos:/
进入容器中查看
[root@localhost ~]# docker exec -it centos /bin/bash
[root@b732f4c6bef0 /]# ls
apr-1.6.5.tar.bz2       bin  etc   httpd-2.4.54.tar.bz2  lib64       media  opt   root  sbin  sys  usr
apr-util-1.6.1.tar.bz2  dev  home  lib                   lost+found  mnt    proc  run   srv   tmp  var
解压我们上传上去的压缩包发现没有zip2下载发现yum源无法使用,所以换个能用的yum源
[root@b732f4c6bef0 /]# rm -rf /etc/yum.repos.d/*
[root@b732f4c6bef0 /]# curl -o /etc/yum.repos.d/CentOS-Base.repo https://mirrors.aliyun.com/repo/Centos-vault-8.5.2111.repo
  % Total    % Received % Xferd  Average Speed   Time    Time     Time  Current
                                 Dload  Upload   Total   Spent    Left  Speed
100  2495  100  2495    0     0   2871      0 --:--:-- --:--:-- --:--:--  2867
[root@b732f4c6bef0 /]# sed -i -e '/mirrors.cloud.aliyuncs.com/d' -e '/mirrors.aliyuncs.com/d' /etc/yum.repos.d/CentOS-Base.repo
下载编译安装所需的组包和运行库
[root@b732f4c6bef0 apr-1.6.5]# yum -y groupinstall "Development Tools"
yum -y install gcc openssl openssl-devel zlib zlib-devel pcre-devel
下载bzip2
[root@b732f4c6bef0 /]# yum -y install bzip2
Failed to set locale, defaulting to C.UTF-8
CentOS-8.5.2111 - Base - mirrors.aliyun.com                                                                                   459 kB/s | 4.6 MB     00:10
CentOS-8.5.2111 - Extras - mirrors.aliyun.com                                                                                  22 kB/s |  10 kB     00:00
CentOS-8.5.2111 - AppStream - mirrors.aliyun.com                                                                              586 kB/s | 8.4 MB     00:14
Dependencies resolved.
==============================================================================================================================================================
 Package                             Architecture                         Version                                    Repository                          Size
==============================================================================================================================================================
Installing:
.................
.................
解压安装包
[root@b732f4c6bef0 /]# tar -xf apr-1.6.5.tar.bz2
开始编译安装前要对配置文件进行修改不然编译会报错
[root@b732f4c6bef0 apr-1.6.5]# vim configure
 #  $RM "$cfgfile"
编译安装apr
[root@b732f4c6bef0 apr-1.6.5]# ./configure --prefix=/usr/local/apr
[root@b732f4c6bef0 apr-1.6.5]# make && make install
[root@b732f4c6bef0 apr-1.6.5]# ls /usr/local/
apr  bin  etc  games  include  lib  lib64  libexec  sbin  share  src
编译安装apr-util
[root@b732f4c6bef0 /]# tar xf apr-util-1.6.1.tar.bz2
[root@b732f4c6bef0 /]# cd apr-util-1.6.1/
[root@b732f4c6bef0 apr-util-1.6.1]# ./configure --prefix=/usr/local/apr-util --with-apr=/usr/local/apr
[root@b732f4c6bef0 apr-util-1.6.1]# make && make install
[root@b732f4c6bef0 apr-util-1.6.1]# ls /usr/local/
apr  apr-util  bin  etc  games  include  lib  lib64  libexec  sbin  share  src
编译安装httpd
[root@b732f4c6bef0 /]# tar xf httpd-2.4.54.tar.bz2
[root@b732f4c6bef0 /]# cd httpd-2.4.54/
[root@b732f4c6bef0 httpd-2.4.54]# ./configure  --with-apr=/usr/local/apr --with-apr-util=/usr/local/apr-util
[root@b732f4c6bef0 httpd-2.4.54]# make && make install
[root@92e95fd9da90 httpd-2.4.54]# ls /usr/local/
apache  apr  apr-util  bin  etc  games  include  lib  lib64  libexec  sbin  share  src
编写脚本让在容器里跑的服务制作成镜像后,再通过镜像部署的容器里的服务放在前台运行
[root@92e95fd9da90 /]# vim httpd.sh
[root@92e95fd9da90 /]# chmod +x httpd.sh
[root@92e95fd9da90 /]# cat httpd.sh
#!/bin/bash
/usr/local/apache/bin/apache
sleep 10d
再开启一台终端制作镜像,因为在制作镜像时,需要保证容器处于运行状态
[root@localhost ~]# docker commit -c 'CMD ["./servicer.sh"]' -p  centos centos:d1
sha256:5a14bf737610d92efff53d31bf9353d10fd8b382612ae9a3a2a4109996a7dfbd
[root@localhost ~]# docker images
REPOSITORY   TAG       IMAGE ID       CREATED          SIZE
centos       d1        5a14bf737610   26 seconds ago   1.13GB
centos       latest    5d0da3dc9764   10 months ago    231MB
使用该镜像创建一个容器可以看见所创建的容器第一条命令为执行脚本启动我们部署的httpd服务
[root@localhost ~]# docker run --name httpd -d -p 90:80 centos:d1
730b6ff9d46fba37ccfa827f678c8fc899948f8299dbcca3a2ee7860476625f1
d[root@localhost ~]# docker ps -a
CONTAINER ID   IMAGE       COMMAND           CREATED         STATUS          PORTS                               NAMES
730b6ff9d46f   centos:d1   "./servicer.sh"   2 seconds ago   Up 2 seconds    0.0.0.0:90->80/tcp, :::90->80/tcp   httpd
92e95fd9da90   centos      "/bin/bash"       22 hours ago    Up 41 minutes   0.0.0.0:80->80/tcp, :::80->80/tcp   centos
[root@localhost ~]# curl http://192.168.226.139:90
<html><body><h1>It works!</h1></body></html>
再尝试使用服务自带的命令使服务被制作为镜像后部署容器能够部署直接开启服务
[root@localhost ~]# docker commit -c 'CMD ["/usr/local/apache/bin/apachectl","-D","FOREGROUND"]' centos centos:d1
docker run --name httpd sha256:f1c2cdec234209507a1eb0e096484924af00f85e487b3f588535c957479e00e0
[root@localhost ~]# docker run --name httpd -d -p 90:80 centos:d1
ea30f92fa4c89cc3a62d879e59460627361d091eabb9e421615506668bbd863d
[root@localhost ~]# docker ps -a
CONTAINER ID   IMAGE       COMMAND                  CREATED         STATUS          PORTS                               NAMES
ea30f92fa4c8   centos:d1   "/usr/local/apache/b…"   3 seconds ago   Up 2 seconds    0.0.0.0:90->80/tcp, :::90->80/tcp   httpd
92e95fd9da90   centos      "/bin/bash"              22 hours ago    Up 54 minutes   0.0.0.0:80->80/tcp, :::80->80/tcp   centos
[root@localhost ~]# curl http://192.168.226.139:90
<html><body><h1>It works!</h1></body></html>
在大部分情况下,用commit制作磁盘设置容器服务不会使用使用服务自身命令去开启,基本都使用脚本
3: 镜像上传dockerhub
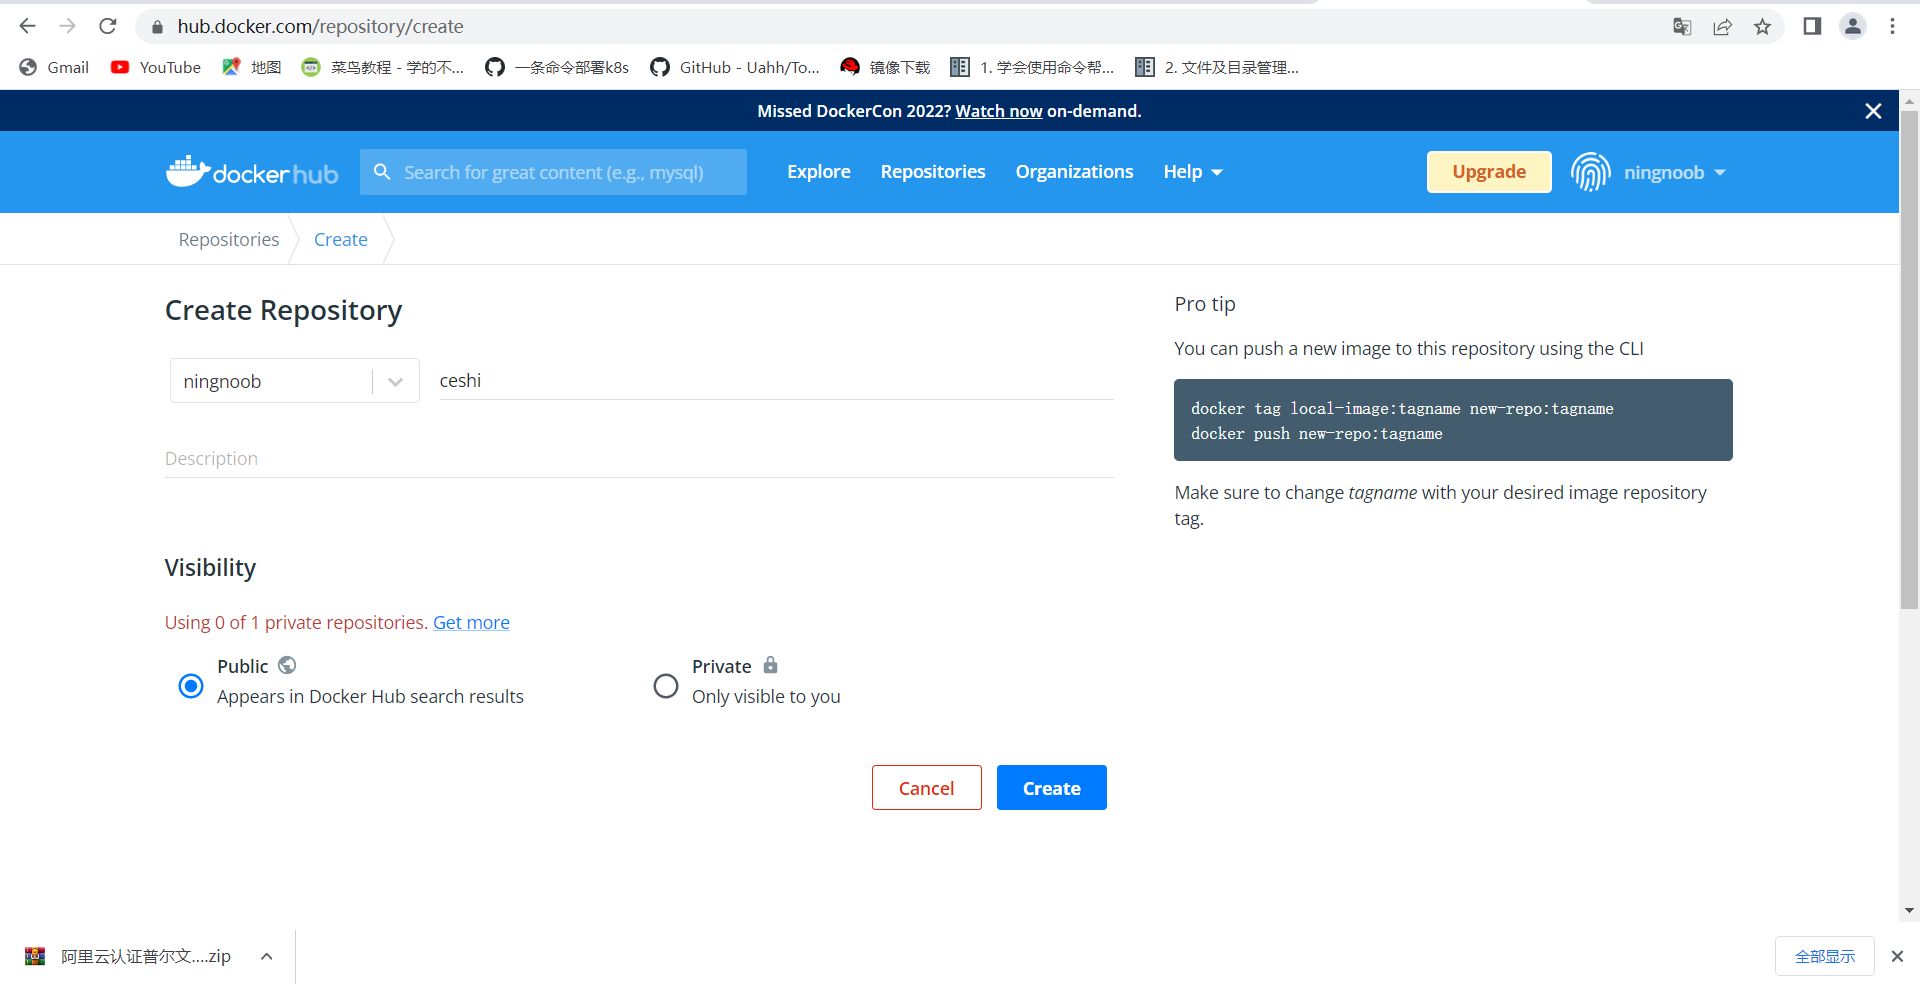
进入dockerhub官网创建仓库

将要上传的镜像修改名称
[root@localhost ~]# docker images
REPOSITORY   TAG       IMAGE ID       CREATED         SIZE
centos       d1        a1f62a3eaa05   4 seconds ago   1.13GB
centos       latest    5d0da3dc9764   10 months ago   231MB
[root@localhost ~]# docker t
tag    top    trust
[root@localhost ~]# docker tag centos:d1 ningnoob/ceshi:v1
验证身份
[root@localhost ~]# docker tag centos:d1 ningnoob/ceshi:v1
[root@localhost ~]# docker login
Login with your Docker ID to push and pull images from Docker Hub. If you don't have a Docker ID, head over to https://hub.docker.com to create one.
Username: ningnoob
Password:
WARNING! Your password will be stored unencrypted in /root/.docker/config.json.
Configure a credential helper to remove this warning. See
https://docs.docker.com/engine/reference/commandline/login/#credentials-store
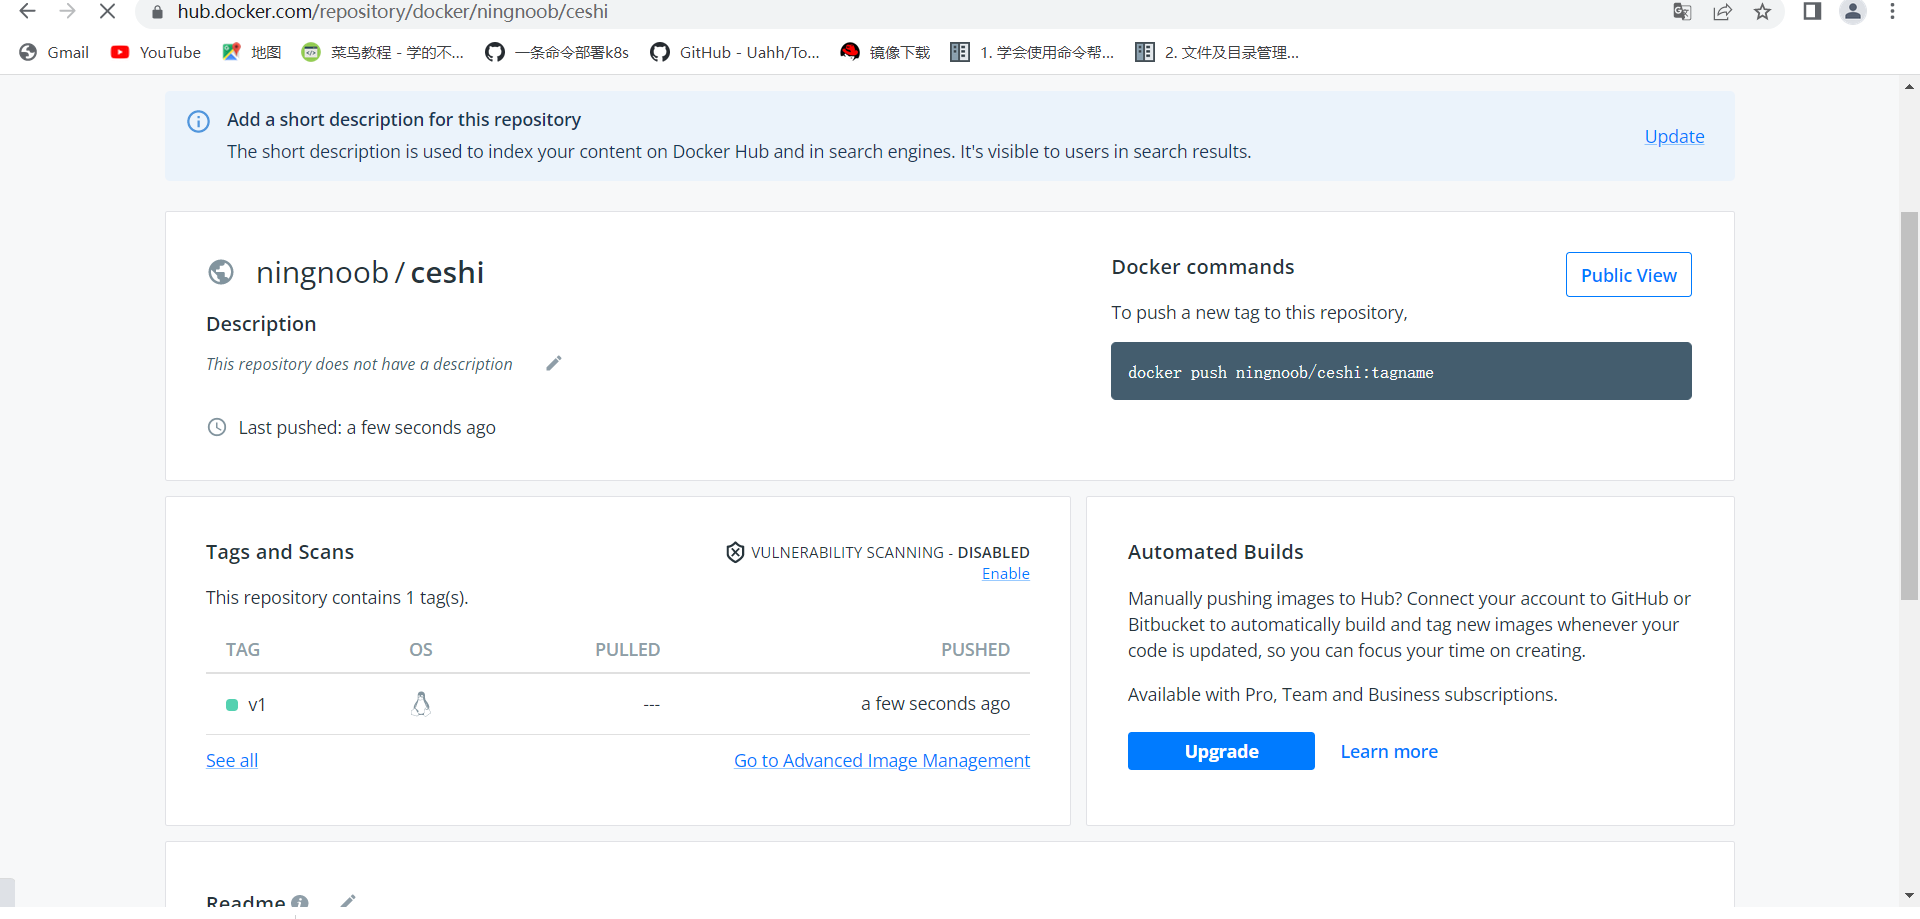
将镜像上传上去
[root@localhost gg]# docker push ningnoob/ceshi:v1
The push refers to repository [docker.io/ningnoob/ceshi]
5d4aed1fd454: Layer already exists
8400048724b1: Layer already exists
29a07f69a108: Layer already exists
54b695b6e31c: Layer already exists
84d67c6f4b1c: Layer already exists
fdf705907de1: Pushed
f0b973063296: Layer already exists
7f162e472527: Layer already exists
2cf32c8e6aea: Layer already exists
74ddd0ec08fa: Layer already exists
v1: digest: sha256:880065f58a7a92485d47bc8db63dd5a3527364c29737086a84e9e510e61dad2c size: 2396
[root@localhost gg]#

4:dockerfile制作镜像
Dockerfile 是一个用来构建镜像的文本文件,文本内容包含了一条条构建镜像所需的指令和说明;Docker 通过读取Dockerfile 中的指令自动生成镜像。
Dockerfile 是官方推荐的方式,这样可以让使用者更清晰地看到这个镜像的制作细节,逻辑清晰,便于管理。
实例:
制作一个镜像,基于此镜像创建的容器开启自动开启mariadb服务
编写Dockerfile文件第一个D一定要大写
[root@localhost gg]# vim Dockerfile
[root@localhost gg]# cat Dockerfile
FROM centos
RUN rm -rf /etc/yum.repos.d/*
RUN curl -o /etc/yum.repos.d/CentOS-Base.repo https://mirrors.aliyun.com/repo/Centos-vault-8.5.2111.repo
RUN sed -i -e '/mirrors.cloud.aliyuncs.com/d' -e '/mirrors.aliyuncs.com/d' /etc/yum.repos.d/CentOS-Base.repo
RUN yum -y install mariadb.x86_64
RUN touch mysql.sh
RUN echo '#!/bin/bash' > mysql.sh
RUN echo systemctl start mariadb.service >> mysql.sh
RUN echo sleep 10d >> mysql.sh
RUN cat mysql.sh
RUN chmod +x mysql.sh
CMD  ["./mysql.sh"]
使用build制作镜像
. 在当前目录寻找Dockerfile文件
-t指定制作后镜像的名字与版本号
[root@localhost gg]# docker build -t centos:d1 .
Sending build context to Docker daemon  2.048kB
Step 1/12 : FROM centos
 ---> 5d0da3dc9764
Step 2/12 : RUN rm -rf /etc/yum.repos.d/*
 ---> Running in 8e5dd7cd31d7
Removing intermediate container 8e5dd7cd31d7
 ---> 130945322d1c
Step 3/12 : RUN curl -o /etc/yum.repos.d/CentOS-Base.repo https://mirrors.aliyun.com/repo/Centos-vault-8.5.2111.repo
 ---> Running in 455325160ff9
  % Total    % Received % Xferd  Average Speed   Time    Time     Time  Current
                                 Dload  Upload   Total   Spent    Left  Speed
100  2495  100  2495    0     0  19341      0 --:--:-- --:--:-- --:--:-- 19341
Removing intermediate container 455325160ff9
 ---> 601ccb9ac91e
Step 4/12 : RUN sed -i -e '/mirrors.cloud.aliyuncs.com/d' -e '/mirrors.aliyuncs.com/d' /etc/yum.repos.d/CentOS-Base.repo
 ---> Running in d9eff3729549
查看可以看见创建成功
[root@localhost gg]# docker images
REPOSITORY   TAG       IMAGE ID       CREATED          SIZE
centos       d1        3a6336d7c304   17 seconds ago   355MB
centos       latest    5d0da3dc9764   10 months ago    231MB
创建容器查看是否是自动启动mariadb服务
[root@localhost gg]# docker ps -a
CONTAINER ID   IMAGE       COMMAND        CREATED         STATUS         PORTS                               NAMES
2427e57d349a   centos:d1   "./mysql.sh"   2 seconds ago   Up 2 seconds                                       mysql
镜像的导入与导出
假如有2台主机,我们在主机1上做了一个镜像,主机2想用这个镜像怎么办呢?
我们可以在主机1上push镜像到镜像仓库中,然后在主机2上pull把镜像拉下来使用,这种方式就显得比较麻烦,假如我只是测试用的,在一台主机上做好镜像后在另一台主机上跑一下就行了,没必要推到仓库上然后又把它拉到本地来。
此时我们可以在已有镜像的基础上把镜像打包成一个压缩文件,然后拷贝到另一台主机上将其导入,这就是镜像的导入和导出功能。
docker中我们使用docker save进行导出,使用docker load进行导入。
在已生成镜像的主机上执行docker save导出镜像
docker save -o xxx.gz ningnoob/ceshi:v1
在另一台没有镜像的主机上执行docker load导入镜像
docker load -i xxx.gz
最后
以上就是还单身薯片最近收集整理的关于docker镜像管理与镜像制作docker镜像管理与镜像制作的全部内容,更多相关docker镜像管理与镜像制作docker镜像管理与镜像制作内容请搜索靠谱客的其他文章。


发表评论 取消回复