annotation-config
标签解析入口
org.springframework.context.annotation.AnnotationConfigBeanDefinitionParser我们只看核心部分
		// Obtain bean definitions for all relevant BeanPostProcessors.
		Set<BeanDefinitionHolder> processorDefinitions =
				AnnotationConfigUtils.registerAnnotationConfigProcessors(parserContext.getRegistry(), source);
这个方法里会注入一系列的后置处理器
| ConfigurationClassPostProcessor | 处理 @Configuration 标签表注的类 |
| AutowiredAnnotationBeanPostProcessor | 处理 @Autowired 标签 |
| RequiredAnnotationBeanPostProcessor | 处理 @Required 标签 |
| CommonAnnotationBeanPostProcessor | 处理 @Resource、@WebServiceRef、@EJB |
| PersistenceAnnotationBeanPostProcessor | 处理 @PersistenceUnit @PersistenceContext |
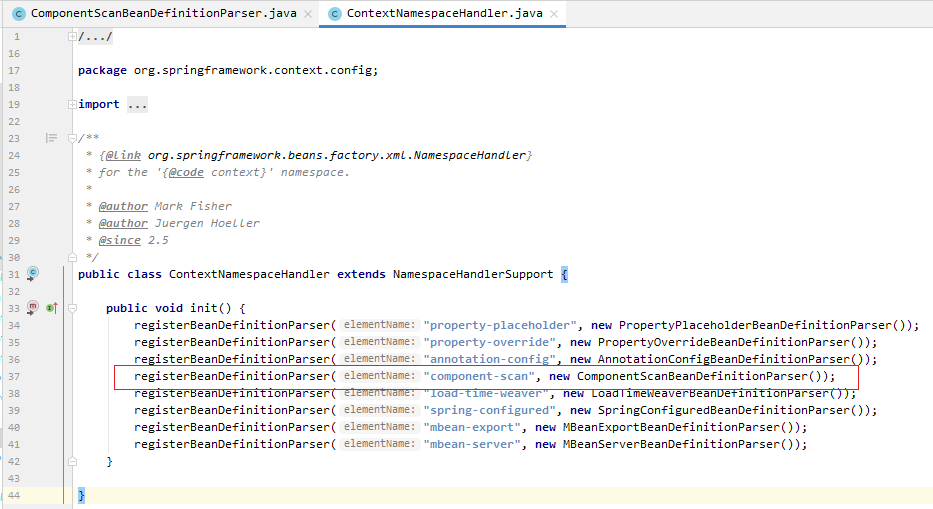
component-scan
标签解析入口
org.springframework.context.annotation.ComponentScanBeanDefinitionParser
主方法很简洁,如下
	public BeanDefinition parse(Element element, ParserContext parserContext) {
		String[] basePackages = StringUtils.tokenizeToStringArray(element.getAttribute(BASE_PACKAGE_ATTRIBUTE),
				ConfigurableApplicationContext.CONFIG_LOCATION_DELIMITERS);

		// Actually scan for bean definitions and register them.
		ClassPathBeanDefinitionScanner scanner = configureScanner(parserContext, element);
		Set<BeanDefinitionHolder> beanDefinitions = scanner.doScan(basePackages);
		registerComponents(parserContext.getReaderContext(), beanDefinitions, element);

		return null;
	}
1、获得需要扫描的路径集合,这个是根据base-package配置来计算出来的
2、实例化一个扫描器,这里返回的实例是:ClassPathBeanDefinitionScanner 对象
3、扫描获得bean定义
4、向容器中注册这些bean定义
我们看看ClassPathBeanDefinitionScanner的创建过程:
protected ClassPathBeanDefinitionScanner createScanner(XmlReaderContext readerContext, boolean useDefaultFilters) {
		return new ClassPathBeanDefinitionScanner(readerContext.getRegistry(), useDefaultFilters);
	}
再看看父类(ClassPathScanningCandidateComponentProvider)构造方法里做了什么
protected void registerDefaultFilters() {
		this.includeFilters.add(new AnnotationTypeFilter(Component.class));
		ClassLoader cl = ClassPathScanningCandidateComponentProvider.class.getClassLoader();
		try {
			this.includeFilters.add(new AnnotationTypeFilter(
					((Class<? extends Annotation>) ClassUtils.forName("javax.annotation.ManagedBean", cl)), false));
			logger.debug("JSR-250 'javax.annotation.ManagedBean' found and supported for component scanning");
		}
		catch (ClassNotFoundException ex) {
			// JSR-250 1.1 API (as included in Java EE 6) not available - simply skip.
		}
		try {
			this.includeFilters.add(new AnnotationTypeFilter(
					((Class<? extends Annotation>) ClassUtils.forName("javax.inject.Named", cl)), false));
			logger.debug("JSR-330 'javax.inject.Named' annotation found and supported for component scanning");
		}
		catch (ClassNotFoundException ex) {
			// JSR-330 API not available - simply skip.
		}
	}
这里向 includeFilters 里添加了一个 TypeFilter
this.includeFilters.add(new AnnotationTypeFilter(Component.class));也就是说这个扫描器会默认扫描带有Component注解的类或者带有Component的组合注解类(例如:@Repository,@Controller @Service,@Configuration等)
两者关系
我们来到注册组件的方法
org.springframework.context.annotation.ComponentScanBeanDefinitionParser#registerComponents这个方法主要作用是将扫描到的bean定义注册到容器中,另一个重要作用是引入annotation-config操作相关的后置处理器
protected void registerComponents(
			XmlReaderContext readerContext, Set<BeanDefinitionHolder> beanDefinitions, Element element) {

		Object source = readerContext.extractSource(element);
		CompositeComponentDefinition compositeDef = new CompositeComponentDefinition(element.getTagName(), source);

		for (BeanDefinitionHolder beanDefHolder : beanDefinitions) {
			compositeDef.addNestedComponent(new BeanComponentDefinition(beanDefHolder));
		}

		// Register annotation config processors, if necessary.
		boolean annotationConfig = true;
		if (element.hasAttribute(ANNOTATION_CONFIG_ATTRIBUTE)) {
			annotationConfig = Boolean.valueOf(element.getAttribute(ANNOTATION_CONFIG_ATTRIBUTE));
		}
//这里是两者关系的关键代码,与annotation-config标签做了相同的事情
		if (annotationConfig) {
			Set<BeanDefinitionHolder> processorDefinitions =
					AnnotationConfigUtils.registerAnnotationConfigProcessors(readerContext.getRegistry(), source);
			for (BeanDefinitionHolder processorDefinition : processorDefinitions) {
				compositeDef.addNestedComponent(new BeanComponentDefinition(processorDefinition));
			}
		}

		readerContext.fireComponentRegistered(compositeDef);
	}
也就是说component-scan 首先会扫描到自己需要管理的Component组件,再向容器中注入annotation-config相关的后置处理器;这也就是两者之间的关系了。
最后
以上就是哭泣长颈鹿最近收集整理的关于annotation-config 与 component-scan 标签的全部内容,更多相关annotation-config内容请搜索靠谱客的其他文章。
本图文内容来源于网友提供,作为学习参考使用,或来自网络收集整理,版权属于原作者所有。


发表评论 取消回复