要使用的话,在build.gradle 里要添加
dependencies {
testImplementation 'org.junit.jupiter:junit-jupiter:5.+';
}
test {
useJUnitPlatform();
}
看一下几个注解在junit4和junit5版本不同的写法:
| junit4 | junit5 | 使用场景 |
| @BeforeClass | @BeforeAll | 在当前类的所有测试方法之前执行。注解在【静态方法】上 |
| @AfterClass | @AfterAll | 在当前类中的所有测试方法之后执行。注解在【静态方法】上 |
| @Before | @BeforeEach | 在每个测试方法之前执行。注解在【非静态方法】上 |
| @After | @AfterEach | 在每个测试方法之后执行。注解在【非静态方法】上 |
使用方式如下:
import org.junit.*;
public class TestJunitAnnotation {
@BeforeClass
public static void beforeClass(){
System.out.println("before class:begin this class*************");
}
@AfterClass
public static void afterClass(){
System.out.println("after class:end this class--------------");
}
@Before
public void before(){
System.out.println("before:begin test");
}
@After
public void after(){
System.out.println("after:end test");
}
@Test
public void Test(){
System.out.println("[this is a test!]");
}
@Test
public void Test2(){
System.out.println("[this is another test!]");
}
}
@test测试先后顺序
以下是junit4的使用,在类声明上加
1.从上到下 执行@Test,这个不靠谱
@FixMethodOrder(MethodSorters.JVM)
2.按方法名字顺序执行
@FixMethodOrder(MethodSorters.NAME_ASCENDING)
3.默认方法,不可预期
@FixMethodOrder(MethodSorters.DEFAULT)
以下是junit5的使用方式
//按照数字顺序
@TestMethodOrder (MethodOrderer.OrderAnnotation.class)
public class OOXXTest {
@Test
@Order(1)
public void one() throws Exception {
}
@Test
@Order(2)
public void two() throws Exception {
}
//字母数字顺序
@TestMethodOrder (MethodOrderer.Alphanumeric.class)
//随机排序
@TestMethodOrder (MethodOrderer.Random.class)
@DisplayName可以让测试结果显示更加nice
可以对类和方法做注释
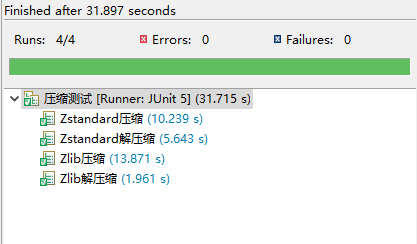
@DisplayName("压缩测试")
@TestMethodOrder (MethodOrderer.OrderAnnotation.class)
public class CompressTest {...}
@Test
@DisplayName("Zstandard解压缩")
@Order(2)
public void zstandarDecompress() throws Exception
{...}
对某个方法进行重复测试
@RepeatedTest(value = 3, name = "{displayName} 第 {currentRepetition}/{totalRepetitions} 次")
public void zlibDecompress() throws Exception {}
参数化测试,可以用于很多不同参数的数据测试
@ParameterizedTest
@ValueSource(strings = {"one", "two", "three"})
@DisplayName("参数化测试")
public void parameterizedTest(String string) {
System.out.println(string);
Assertions.assertTrue(StringUtils.isNotBlank(string));
}
最后看下效果:

对同一个方法进行多次测试
@RepeatedTest(10000)如何进行多线程测试,首先要在resources目录下创建文件junit-platform.properties,内容如下:
junit.jupiter.execution.parallel.enabled=true
#类内部方法并行
junit.jupiter.execution.parallel.mode.default = concurrent
#类之间串行
junit.jupiter.execution.parallel.mode.classes.default = same_thread
# the maximum pool size can be configured using a ParallelExecutionConfigurationStrategy
junit.jupiter.execution.parallel.config.strategy=fixed
junit.jupiter.execution.parallel.config.fixed.parallelism=8
然后,在想要多线程执行的类的方法上加上注解:
@Execution(ExecutionMode.CONCURRENT)参考:
该升级你的JUnit版本了——JUnit5基本介绍
最后
以上就是玩命萝莉最近收集整理的关于JUnit5使用总结的全部内容,更多相关JUnit5使用总结内容请搜索靠谱客的其他文章。
本图文内容来源于网友提供,作为学习参考使用,或来自网络收集整理,版权属于原作者所有。


发表评论 取消回复