canvas 图片处理(缩放、旋转、裁剪、合并、文字)
- 图片旋转
- 以图片中心作旋转
- 示例
- 图片缩放
- 示例
- 图片裁剪
- 示例
- 图片合并
- 示例
- canvas 透明处理
图片旋转
tupian图片旋转主要调用的是canvas的rotate()方法
rotate()旋转当前的绘图。
语法:context.rotate(angle)
参数:angle旋转角度,以弧度计(n*Math.PI)
举例:假如想要旋转60度,可以context.rotate(Math.PI/3)进行表示;
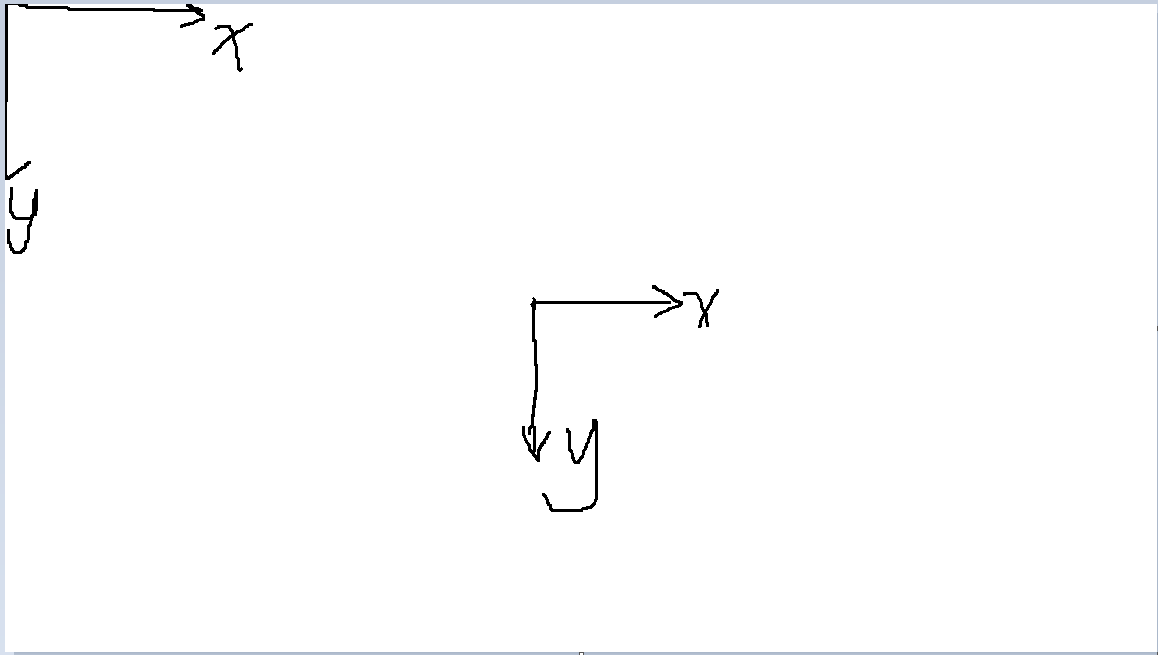
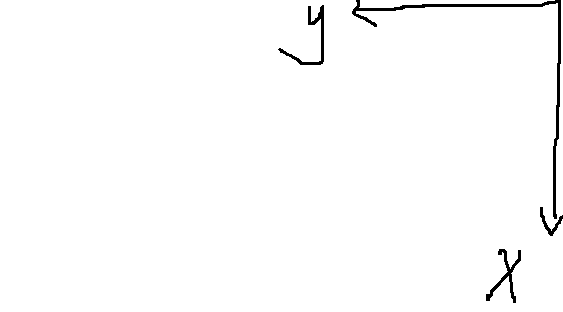
旋转的中心是在整个画布的左上角(0,0),旋转的正方向是顺时针,旋转的反方向是逆时针
重点:canvas中的rotate方法是绕画布左上角(0,0)进行旋转的,而且会受到translate的影响
以图片中心作旋转
想要以图片中心旋转,首先要使用translate()方法将画布的中心移至图片的中心
示例
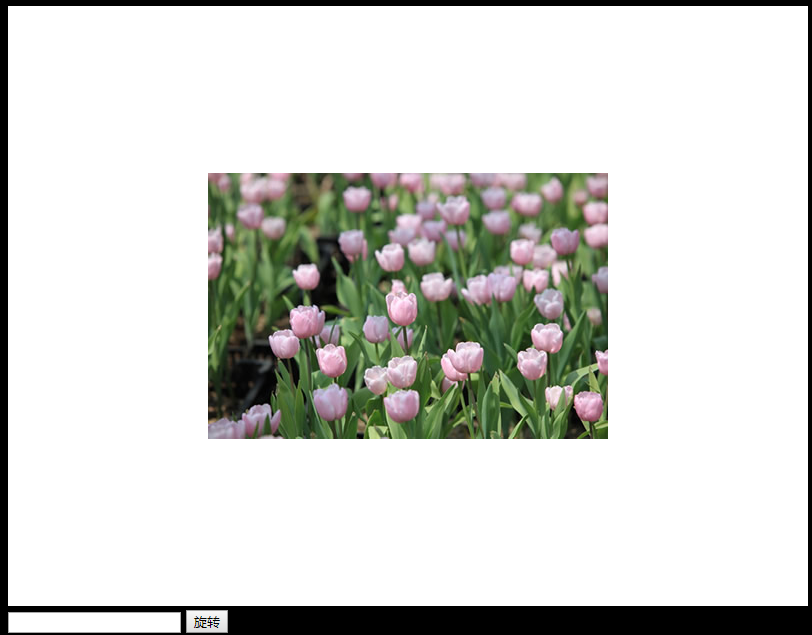
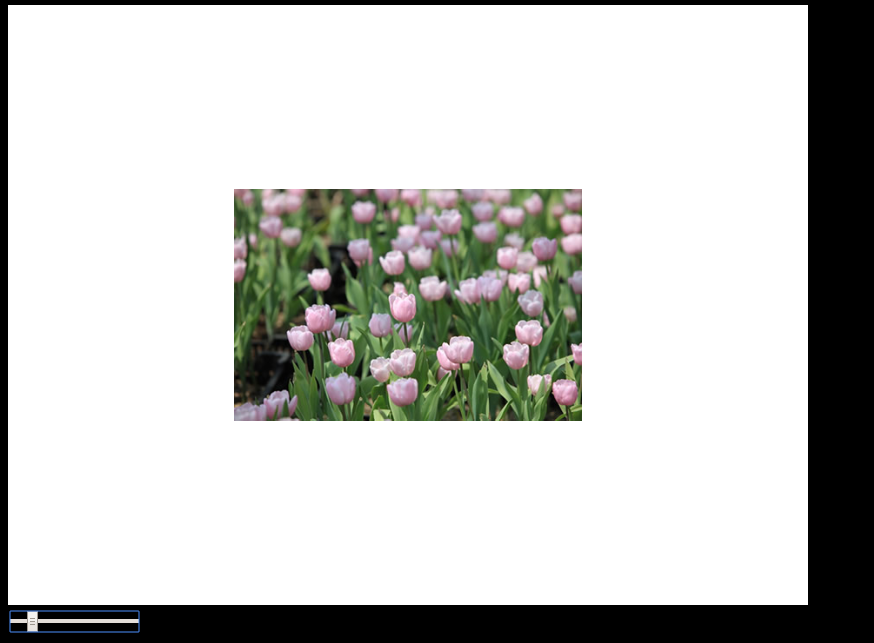
旋转前
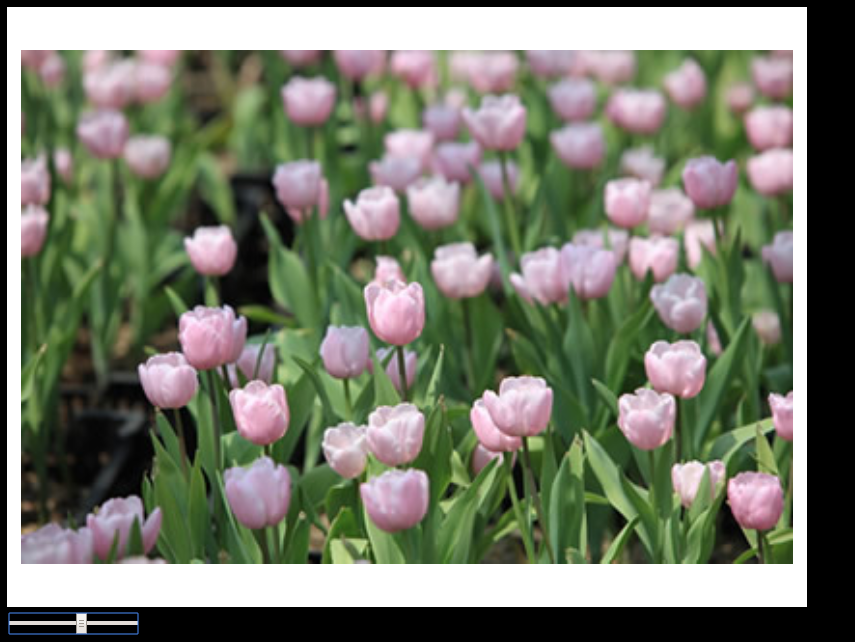
旋转后
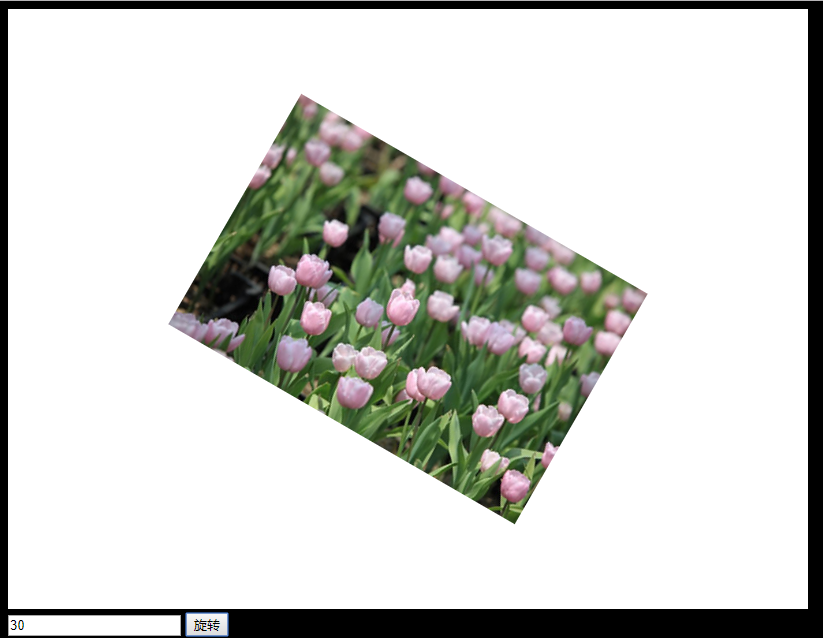
先贴代码
html:
<!DOCTYPE html>
<html lang="en">
<head>
    <meta charset="UTF-8">
    <title>Title</title>
    <script type="text/javascript" src="js/jquery-1.11.1.min.js"></script>
    <script type="text/javascript" src="js/test.js"></script>
 <style>
       body{
            background-color: black;
        }
    </style>
</head>
<body>
<canvas id="myCanvas" width="800" height="600" style="background-color: white"></canvas>

<div class="square">
    <input type="text" id="rotateDegree">
    <button id="rotateBtn" class="icon rotate-icon">旋转</button>
</div>
</body>
</html>
js
let myImage;
let ctx;
let img;
window.onload = function () {
    myImage = document.getElementById("myCanvas");
    ctx = myImage.getContext("2d");

    img = new Image();
    img.src = "eg_tulip.jpg";
    img.onload = function () {
        ctx.drawImage(img, myImage.width / 2 - img.width / 2, myImage.height / 2 - img.height / 2);
    };

    let degree = 0;
    $("#rotateBtn").click(function () {
        let rotateInput = $("#rotateDegree").val();
        degree += parseInt(rotateInput);
        degree %= 360;

        ctx.save();
        ctx.clearRect(0, 0, myImage.width, myImage.height);
        ctx.translate(myImage.width / 2, myImage.height / 2);
        ctx.rotate(degree / 180 * Math.PI);
        ctx.translate(-myImage.width / 2, -myImage.height / 2);
        ctx.drawImage(img, myImage.width / 2 - img.width / 2, myImage.height / 2 - img.height / 2);
        ctx.restore();
    });
};
代码解释:
ctx.drawImage(img, myImage.width / 2 - img.width / 2, myImage.height / 2 - img.height / 2);
这一行代码将图片画在了画布中心
ctx.save();
ctx.clearRect(0, 0, myImage.width, myImage.height);        ctx.translate(myImage.width / 2, myImage.height / 2);        ctx.rotate(degree / 180 * Math.PI);
ctx.translate(-myImage.width / 2, -myImage.height / 2);
ctx.drawImage(img, myImage.width / 2 - img.width / 2, myImage.height / 2 - img.height / 2);
ctx.restore();
在这一部分我们可以看到,我们先是使用translate将画布中心从(0,0)移至(myImage.width / 2, myImage.height / 2)
然后将画布旋转degree度
再将画布中心从(myImage.width / 2, myImage.height / 2)移至(0,0)
然后将图片画在画布中间就可以看到图片旋转了degree度,并且可以接着输入,接着旋转
假设myImage.width = 800 myImage.height = 600 img.width = 400 myImage.height = 300
ctx.translate(myImage.width / 2, myImage.height / 2);
 ctx.rotate(degree / 180 * Math.PI);
 ctx.translate(-myImage.width / 2, -myImage.height / 2);
 为什么坐标系会往右上跑呢?
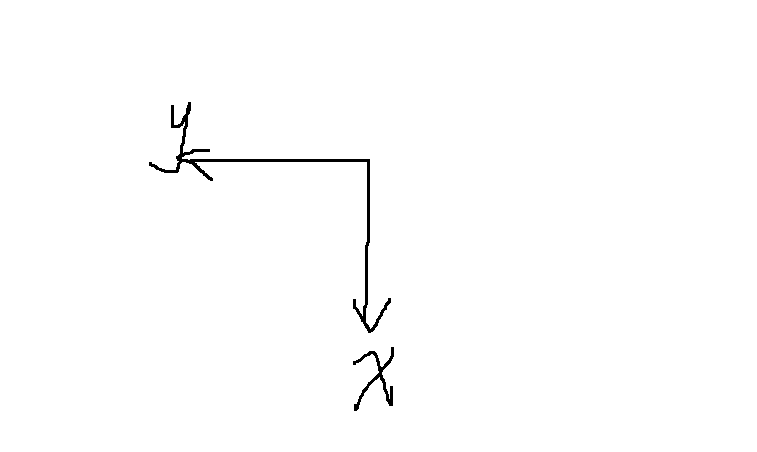
因为此时向下为x正轴,则向上为负,向左为y正轴,则向右为y负轴,我们传递的是负数参数,所以会往右上跑。
这时候,当我们调用drawImage的时候,被画出来的图片就会跟着坐标系旋转相应的度数
因为这只是一部分,所以使用restore(),save()让图片其他的操作不受影响
Reference:
- translate()和rotate()的相互影响可以参考这篇文章https://segmentfault.com/a/1190000013969871?utm_source=tag-newest
- 实现图片旋转以及对canvas旋转的探究可以参考这篇文章http://www.php.cn/css-tutorial-384975.html
- 程序的编写参考的是这篇https://blog.csdn.net/XIAOZHUXMEN/article/details/50732038
图片缩放
图片缩放是所有操作中最简单的一个,调用的主要是canvas的scale()方法
示例
缩放前
拖动下面的input框进行缩放
 先贴上代码
先贴上代码
html
<!DOCTYPE html>
<html lang="en">
<head>
    <meta charset="UTF-8">
    <title>Title</title>
    <script type="text/javascript" src="jquery-1.11.1.min.js"></script>
    <script type="text/javascript" src="test.js"></script>

    <style>
       body{
            background-color: black;
        }
    </style>
</head>
<body>
<canvas id="myCanvas" width="800" height="600" style="background-color: white"></canvas>
<div class="rangeContainer">
    <input type="range" id="scale-range" min="0.5" max="3.0" step="0.01" value="1.0" style="display: block;">
</div>
</body>
</html>
js
let myImage;
let ctx;
let img;
window.onload = function () {
    myImage = document.getElementById("myCanvas");
    ctx = myImage.getContext("2d");

    img = new Image();
    img.src = "eg_tulip.jpg";
    img.onload = function () {
        ctx.drawImage(img, myImage.width / 2 - img.width / 2, myImage.height / 2 - img.height / 2);
    };

    $("#scale-range").mousemove(function () {
        let scaleInput = $("#scale-range").val();
        ctx.clearRect(0, 0, myImage.width, myImage.height);
        ctx.save();
        ctx.translate(myImage.width / 2 - img.width / 2 * scaleInput, myImage.height / 2 - img.height / 2 * scaleInput);
        ctx.scale(scaleInput, scaleInput);
        ctx.drawImage(img, 0, 0);
        ctx.restore();
    });
};
因为canvas的scale()像rotate()一样,会影响画布,所有为了实现围绕图片的中心进行缩放,我们先使用translate将画布中心放在画布中间。
Reference:
画布缩放和图片缩放可以参考这篇文章,横纵坐标都会同时被scale相同的倍数,所以drawImage()时,即使传进去的参数是一样的,在画布上的位置也会不一样https://blog.csdn.net/dayewandou/article/details/78242964?locationNum=5&fps=1
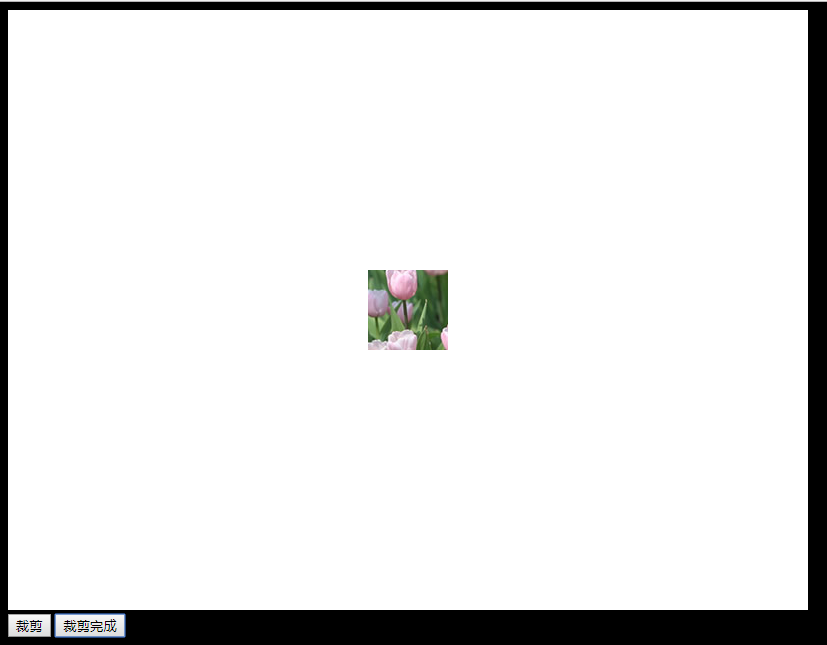
图片裁剪
图片裁剪的代码借鉴于一位博主,在canvas图片上会出现一个矩形框,通过拖拽这个矩形框可以选择要裁剪的图片的大小,最后再使用drawImage的第三个重载方法,将裁剪后的图片画在画布上
context.drawImage(img,sx,sy,swidth,sheight,x,y,width,height);
重点:sx,sy是相对于图片的坐标,即图片左上角为sx,sy的坐标系,而不是画布左上角(0,0)为坐标系
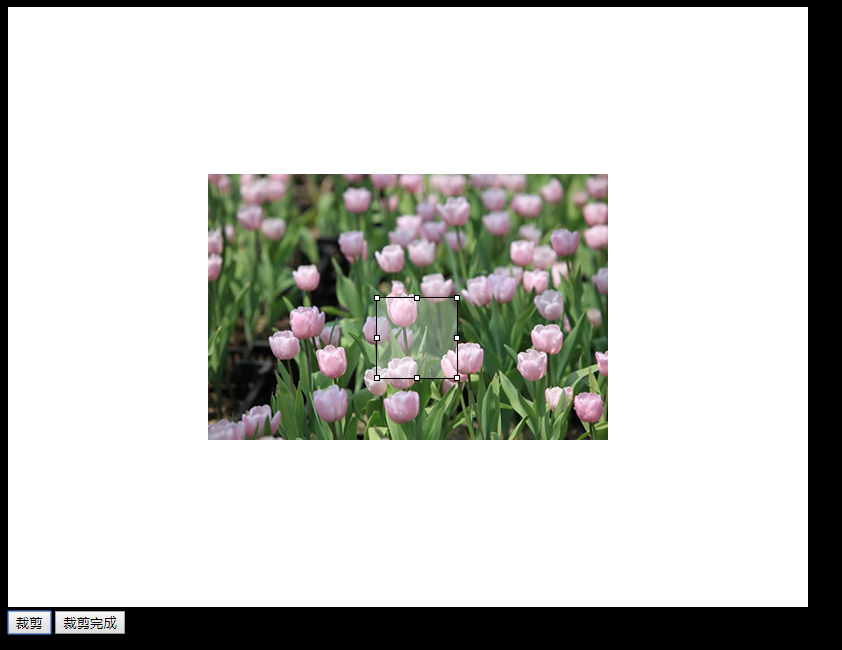
示例
裁剪前
裁剪后
html
<!DOCTYPE html>
<html lang="en">
<head>
    <meta charset="UTF-8">
    <title>Title</title>
    <script type="text/javascript" src="jquery-1.11.1.min.js"></script>
    <script type="text/javascript" src="test.js"></script>

    <style>
       body{
            background-color: black;
        }
    </style>
</head>
<body>
<canvas id="myCanvas" width="800" height="600" style="background-color: white"></canvas>
<div class="square">
    <button id="clipBtn" class="icon clip-icon">裁剪</button>
    <button type="button" id="clipEndBtn">裁剪完成</button>
</div>
</body>
</html>
let myImage;
let ctx;
let img;
let orignWidth;
let orignHeight;
window.onload = function () {
    myImage = document.getElementById("myCanvas");
    ctx = myImage.getContext("2d");

    img = new Image();
    img.src = "eg_tulip.jpg";
    img.onload = function () {
        ctx.drawImage(img, myImage.width / 2 - img.width / 2, myImage.height / 2 - img.height / 2);
        orignWidth = img.naturalWidth;
        orignHeight = img.naturalHeight;
    };

    const ID = function (id) {
        return document.getElementById(id);
    };

    //拖拽与拉伸方法
    //拖拽拉伸所需参数
    let params = {
        left: 0,
        top: 0,
        width: 0,
        height: 0,
        currentX: 0,
        currentY: 0,
        flag: false,
        kind: "drag"
    };
    //获取相关CSS属性方法
    let getCss = function (o, key) {
        return o.currentStyle ? o.currentStyle[key] : document.defaultView.getComputedStyle(o, false)[key];
    };

    document.getElementById("clipBtn").onclick = function () {
        var clickFlag = false;

        var iCurWidth = img.width;
        var iCurHeight = img.height;

        var oRelDiv = document.createElement("div");
        oRelDiv.style.position = "absolute";
        oRelDiv.style.width = iCurWidth + "px";
        oRelDiv.style.height = iCurHeight + 30 + "px";
        oRelDiv.style.top = "30px";
        oRelDiv.id = "cropContainer";

        var iOrigWidth = orignWidth, iOrigHeight = orignHeight;
        var scaleX = iCurWidth / iOrigWidth;
        var scaleY = iCurHeight / iOrigHeight;

        myImage.parentNode.insertBefore(oRelDiv, myImage);

        //初始化坐标与剪裁高宽
        var cropW = 80, cropH = 80;
        var posX = (myImage.offsetLeft + myImage.width / 2 - cropW / 2),
            posY = myImage.offsetTop + myImage.height / 2 - cropH / 2;
        var sInnerHtml =
            '<div id="zxxCropBox" style="height:' + cropH + 'px; width:' + cropW + 'px; position:absolute; left:' + posX + 'px; top:' + posY + 'px; border:1px solid black;">' +
            '<div id="zxxDragBg" style="height:100%; background:white; opacity:0.3; filter:alpha(opacity=30); cursor:move"></div>' +
            '<div id="dragLeftTop" style="position:absolute; width:4px; height:4px; border:1px solid #000; background:white; overflow:hidden; left:-3px; top:-3px; cursor:nw-resize;"></div>' +
            '<div id="dragLeftBot" style="position:absolute; width:4px; height:4px; border:1px solid #000; background:white; overflow:hidden; left:-3px; bottom:-3px; cursor:sw-resize;"></div>' +
            '<div id="dragRightTop" style="position:absolute; width:4px; height:4px; border:1px solid #000; background:white; overflow:hidden; right:-3px; top:-3px; cursor:ne-resize;"></div>' +
            '<div id="dragRightBot" style="position:absolute; width:4px; height:4px; border:1px solid #000; background:white; overflow:hidden; right:-3px; bottom:-3px; cursor:se-resize;"></div>' +
            '<div id="dragTopCenter" style="position:absolute; width:4px; height:4px; border:1px solid #000; background:white; overflow:hidden; top:-3px; left:50%; margin-left:-3px; cursor:n-resize;"></div>' +
            '<div id="dragBotCenter" style="position:absolute; width:4px; height:4px; border:1px solid #000; background:white; overflow:hidden; bottom:-3px; left:50%; margin-left:-3px; cursor:s-resize;"></div>' +
            '<div id="dragRightCenter" style="position:absolute; width:4px; height:4px; border:1px solid #000; background:white; overflow:hidden; right:-3px; top:50%; margin-top:-3px; cursor:e-resize;"></div> ' +
            '<div id="dragLeftCenter" style="position:absolute; width:4px; height:4px; border:1px solid #000; background:white; overflow:hidden; left:-3px; top:50%; margin-top:-3px; cursor:w-resize;"></div>' +
            '</div>' +
            '<input type="hidden" id="cropPosX" value="' + posX / scaleX + '" />' +
            '<input type="hidden" id="cropPosY" value="' + posY / scaleY + '" />' +
            '<input type="hidden" id="cropImageWidth" value="' + cropW / scaleX + '" />' +
            '<input type="hidden" id="cropImageHeight" value="' + cropH / scaleY + '" />';

        oRelDiv.innerHTML = sInnerHtml;

        var startDrag = function (point, target, kind) {
            //point是拉伸点,target是被拉伸的目标,其高度及位置会发生改变
            //此处的target与上面拖拽的target是同一目标,故其params.left,params.top可以共用,也必须共用
            //初始化宽高
            params.width = getCss(target, "width");
            params.height = getCss(target, "height");
            //初始化坐标
            if (getCss(target, "left") !== "auto") {
                params.left = getCss(target, "left");
            }
            if (getCss(target, "top") !== "auto") {
                params.top = getCss(target, "top");
            }
            //target是移动对象
            point.onmousedown = function (event) {
                params.kind = kind;
                params.flag = true;
                clickFlag = true;
                if (!event) {
                    event = window.event;
                }
                var e = event;
                params.currentX = e.clientX;
                params.currentY = e.clientY;
                //防止IE文字选中,有助于拖拽平滑
                point.onselectstart = function () {
                    return false;
                };

                document.onmousemove = function (event) {
                    let e = event ? event : window.event;
                    clickFlag = false;
                    if (params.flag) {
                        var nowX = e.clientX, nowY = e.clientY;
                        var disX = nowX - params.currentX, disY = nowY - params.currentY;
                        if (params.kind === "n") {
                            //上拉伸
                            //高度增加或减小,位置上下移动
                            target.style.top = parseInt(params.top) + disY + "px";
                            target.style.height = parseInt(params.height) - disY + "px";
                        } else if (params.kind === "w") {//左拉伸
                            target.style.left = parseInt(params.left) + disX + "px";
                            target.style.width = parseInt(params.width) - disX + "px";
                        } else if (params.kind === "e") {//右拉伸
                            target.style.width = parseInt(params.width) + disX + "px";
                        } else if (params.kind === "s") {//下拉伸
                            target.style.height = parseInt(params.height) + disY + "px";
                        } else if (params.kind === "nw") {//左上拉伸
                            target.style.left = parseInt(params.left) + disX + "px";
                            target.style.width = parseInt(params.width) - disX + "px";
                            target.style.top = parseInt(params.top) + disY + "px";
                            target.style.height = parseInt(params.height) - disY + "px";
                        } else if (params.kind === "ne") {//右上拉伸
                            target.style.top = parseInt(params.top) + disY + "px";
                            target.style.height = parseInt(params.height) - disY + "px";
                            target.style.width = parseInt(params.width) + disX + "px";
                        } else if (params.kind === "sw") {//左下拉伸
                            target.style.left = parseInt(params.left) + disX + "px";
                            target.style.width = parseInt(params.width) - disX + "px";
                            target.style.height = parseInt(params.height) + disY + "px";
                        } else if (params.kind === "se") {//右下拉伸
                            target.style.width = parseInt(params.width) + disX + "px";
                            target.style.height = parseInt(params.height) + disY + "px";
                        } else {//移动
                            target.style.left = parseInt(params.left) + disX + "px";
                            target.style.top = parseInt(params.top) + disY + "px";
                        }
                    }

                    document.onmouseup = function () {

                        params.flag = false;
                        if (getCss(target, "left") !== "auto") {
                            params.left = getCss(target, "left");
                        }
                        if (getCss(target, "top") !== "auto") {
                            params.top = getCss(target, "top");
                        }
                        params.width = getCss(target, "width");
                        params.height = getCss(target, "height");

                        //给隐藏文本框赋值
                        posX = parseInt(target.style.left);
                        posY = parseInt(target.style.top);
                        cropW = parseInt(target.style.width);
                        cropH = parseInt(target.style.height);
                        if (posX < 0) {
                            posX = 0;
                        }
                        if (posY < 0) {
                            posY = 0;
                        }
                        if ((posX + cropW) > iCurWidth) {
                            cropW = iCurWidth - posX;
                        }
                        if ((posY + cropH) > iCurHeight) {
                            cropH = iCurHeight - posY;
                        }
                        //赋值
                        ID("cropPosX").value = posX;
                        ID("cropPosY").value = posY;
                        ID("cropImageWidth").value = parseInt(ID("zxxCropBox").style.width);
                        ID("cropImageHeight").value = parseInt(ID("zxxCropBox").style.height);

                    };
                }
            };


        };


        //绑定拖拽
        startDrag(ID("zxxDragBg"), ID("zxxCropBox"), "drag");
        //绑定拉伸
        startDrag(ID("dragLeftTop"), ID("zxxCropBox"), "nw");
        startDrag(ID("dragLeftBot"), ID("zxxCropBox"), "sw");
        startDrag(ID("dragRightTop"), ID("zxxCropBox"), "ne");
        startDrag(ID("dragRightBot"), ID("zxxCropBox"), "se");
        startDrag(ID("dragTopCenter"), ID("zxxCropBox"), "n");
        startDrag(ID("dragBotCenter"), ID("zxxCropBox"), "s");
        startDrag(ID("dragRightCenter"), ID("zxxCropBox"), "e");
        startDrag(ID("dragLeftCenter"), ID("zxxCropBox"), "w");


        //图片不能被选中,目的在于使拖拽顺滑
        ID("myCanvas").onselectstart = function () {
            return false;
        };
        img.onselectstart = function () {
            return false;
        };
    };

    $("#clipEndBtn").click(function () {
        console.log("clipend......");
        var tx = myImage.offsetLeft + (myImage.width - img.width) / 2;
        var ty = myImage.offsetTop + (myImage.height - img.height) / 2;

        var x = parseInt(ID("zxxCropBox").style.left) - tx,
            y = ID("zxxCropBox").offsetTop + ID("zxxCropBox").parentNode.offsetTop - ty,
            w = document.getElementById("cropImageWidth").value,
            h = document.getElementById("cropImageHeight").value;


        cropImage(img, x, y, parseInt(w), parseInt(h));

    });

    function cropImage(img, cropPosX, cropPosY, width, height) {
        var cropContainer = ID("cropContainer");
        cropContainer.parentNode.removeChild(cropContainer);
        ctx.clearRect(0, 0, myImage.width, myImage.height);
        //sx,sy 是相对于图片的坐标。巨坑

        ctx.drawImage(img, cropPosX, cropPosY, width, height, myImage.width / 2 - width / 2, myImage.height / 2 - height / 2, width, height);

        img.src = myImage.toDataURL("image/png");
    }
};
难点在于在canvas画布上制作一个矩形框,并可对其进行拖拽
图片合并
图片合成拖拽部分基本和图片剪辑一致,只是增加了可以旋转的中心,旋转时通过js控制
style.transform 可以得到旋转的度数
document.getElementById("rotateCenter").onclick = function (ev) {
               var oldY = null;
               var isdown = true;
               oldY = ev.clientY;
               $("html").mousemove(function (e) {
                   if (isdown) {
                       $("#zxxCropBox").css("transform", "rotate(" + (e.clientY - oldY) + "deg)");
                   }
               });
               $("html").mouseup(function (e) {
                   isdown = false;
                   oldY = null;
               });
           }
示例
合并前
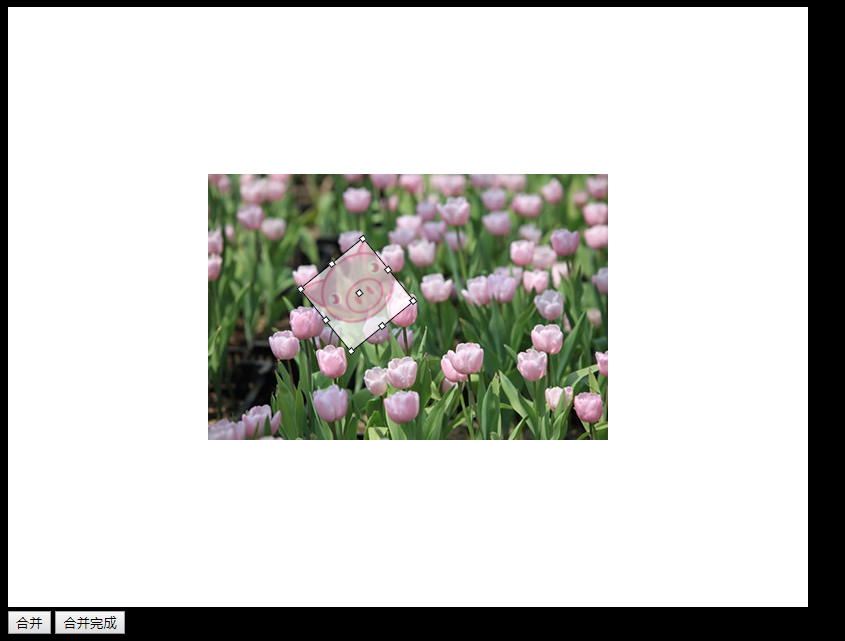
合并后
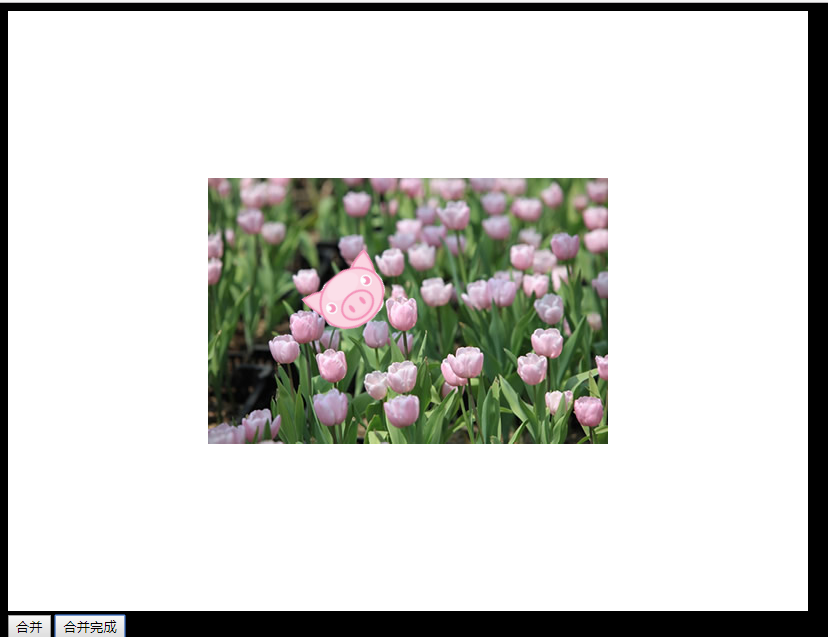
重要js代码:
$("#meldEndBtn").click(function () {
       //旋转度数
       var rotateDegree = ID("zxxCropBox").style.transform;
       rotateDegree = rotateDegree.substring(7, rotateDegree.indexOf('d'));

       var zxxCropBox = ID("zxxCropBox");
       //放大倍数
       var orignWidth = 80;
       var orignHeight = 80;
       var curWidth = parseInt(zxxCropBox.style.width);
       var curHeight = parseInt(zxxCropBox.style.height);

       var scaleWidthRate = curWidth / orignWidth;
       var scaleHeightRate = curHeight / orignHeight;

       //当前位置
       var posX = zxxCropBox.offsetLeft;
       var posY = zxxCropBox.offsetTop;//zxxCropBox.parentNode.offsetTop;
       //中心位置
       var centerX = ID("rotateCenter").offsetLeft + posX;
       var centerY = ID("rotateCenter").offsetTop + posY;

       var newImg = new Image();
       newImg.src = meldImg.src;

       newImg.onload = function () {
           ctx.save();
           ctx.translate(centerX, centerY);
           ctx.rotate(rotateDegree / 180 * Math.PI);
           ctx.drawImage(newImg, -ID("rotateCenter").offsetLeft, -ID("rotateCenter").offsetTop, newImg.width * scaleWidthRate, newImg.height * scaleHeightRate);
           ctx.restore();

           var meldContainer = ID("meldContainer");
           meldContainer.parentNode.removeChild(meldContainer);
       }
   });
首先要计算放大倍数,这里要注意style.width得到的是string类型,所以要转为int类型,不然运算后就变成NAN
把新元素加上去的时候要先translate到旋转中心,因为其他点的位置都因为旋转而变得不精确,但是旋转时rotateCenter这个点的坐标是不变的。
然后rotate旋转相应度数
最后drawImg时,ID(“rotateCenter”).offsetLeft/Top即矩形框的左上角的坐标。
这样就可以把新元素画在自己想画的位置上
summary:中心点不变,那么就可以作为画新元素的坐标基点
canvas 透明处理
此处记录一下透明处理,得到context的imageData,然后遍历,将每一个data的第四个值置为0,将前三个值置为255,就可以变成透明的
var imageData = ctx.getImageData(0, 0, canvas.width, canvas.height);
var data = imageData.data;
for (var i = 0; i < imageData.width * imageData.height * 4; i += 4)
	if (data[i] >= 250 && data[i + 1] >= 250 && data[i + 2] >= 250) {
		data[i + 3] = 0;
        }
}
ctx.putImageData(imageData, 0, 0);
因为最近半年都在忙着其他事,所以很少看CSDN,对没能及时帮上忙的各位感到抱歉。以下放出github链接。
https://github.com/Vendredimatin/imgEdit.git
注:因为这是一个课设,而图片编辑只是课设的一部分,所以里面的代码不仅仅有图片编辑的,建议只看./public/imageEdit.js就好;另外,因为当时赶时间,所以只关注了实现效果,代码易读性极差并且非常冗余,写的很垃圾。所以不一定能帮到各位。。。
最后
以上就是丰富白云最近收集整理的关于canvas 图片处理(缩放、旋转、裁剪、合并、文字)图片旋转图片缩放图片裁剪图片合并canvas 透明处理的全部内容,更多相关canvas内容请搜索靠谱客的其他文章。


发表评论 取消回复