1.0 命令行运行流程
1.1、运行流程图
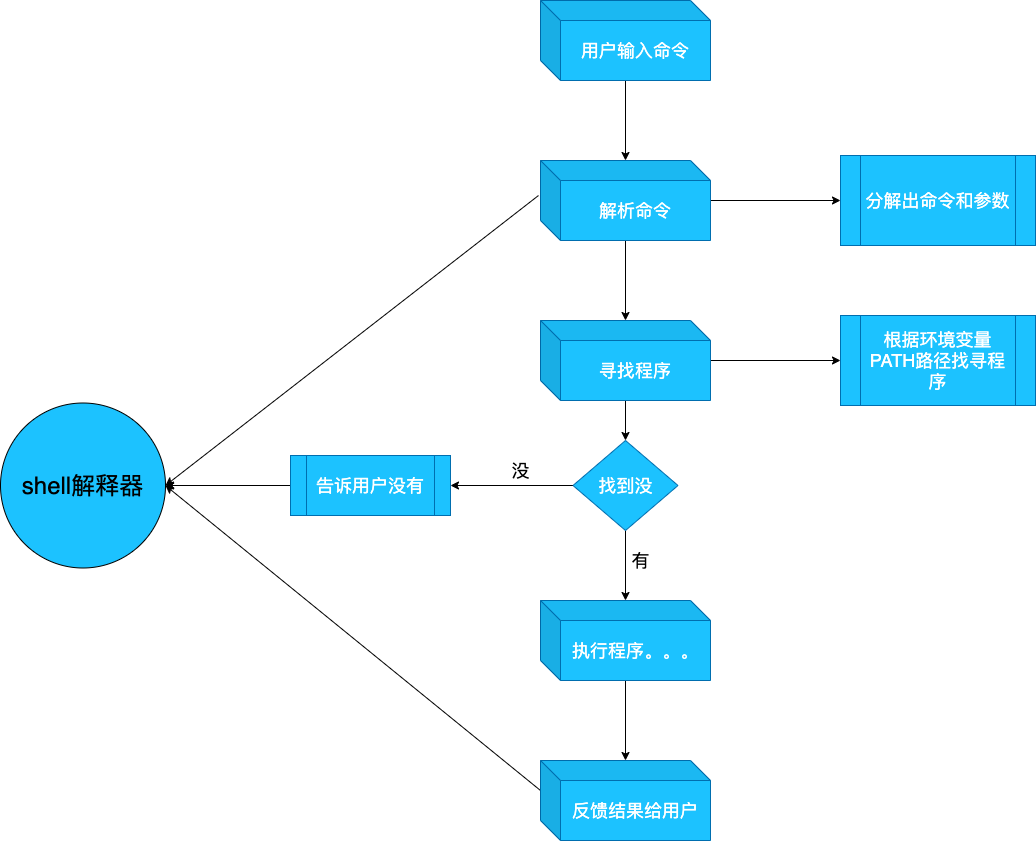
1.2、shell 解释器
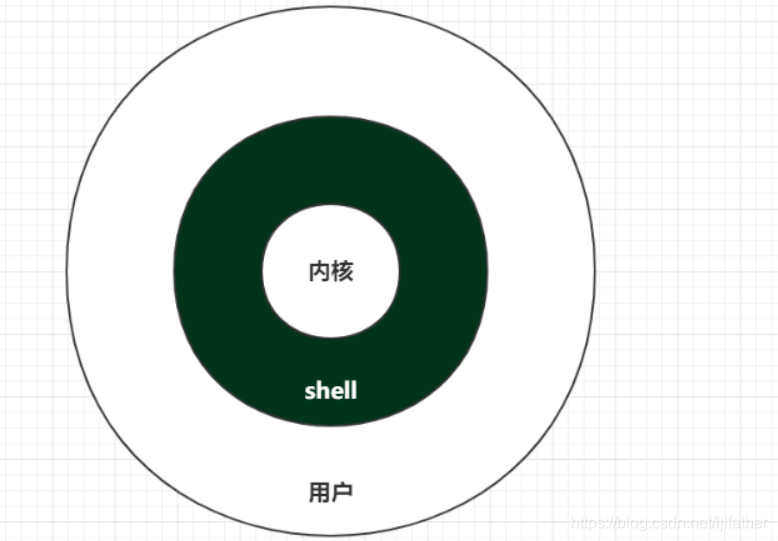
- shell解释器,用户和操作系统内核之间的桥梁
- shell介于操作系统内核与用户之间,负责接收用户输入的操作指令(命令),并运行和解释,将需要执行的操作传递给操作系统内核并执行
- shell程序在系统中充当了一个”命令解释“的角色
2.0 运行脚本
2.1、 node demo
-
脚本文件
- name:demo.js
console.log('hello world');
- name:demo.js
-
命令行执行
node demo
hello world
2.2、 ./demo.js
-
脚本文件
- name:demo.js
// 告诉操作系统,脚本用node执行
#!/usr/bin/env node
console.log('hello world');
- name:demo.js
-
命令行执行
- 没有权限
./demo.js permission denied: ./demo.js- 修改权限
chmod 755 demo.js- 运行
./demo.js
hello world
2.3、demo
-
脚本文件
- name:demo.js
#!/usr/bin/env node
console.log('hello world');
- name:demo.js
-
配置文件
-
name:package.json
{
    "name": "node-command-line",
    "bin": {
      "demo": "demo.js"
    }
}
-
-
链接到全局
npm link // 项目下运行,将包链接至全局 -
运行脚本
demo hello world -
探索
- npm link 干了什么?
- 官方解释:https://docs.npmjs.com/cli/v8/commands/npm-link/
- 我的理解:
- 1、会在全局的node_modules中创建链接符号. // 这样我们就可以在任意项目中使用
- 2、会根据bin配置在/usr/local/bin,创建可执行脚本链接 // 这样我们就可以在此电脑上任何地方运行
-
mac举例:- /usr/bin // 系统预装的可执行命令
- /usr/local/bin // 用户放置自己的可执行程序的地方
-
为什么叫创建可执行脚本链接呢?
- 并不会创建脚本副本,更像是一个指针,会跟随本地文件改变
-
- 3、
npm link package-name 可以在其他项目中把链接到全局的项目作为依赖使用
- npm link 干了什么?
3.0 命令行参数
3.1、原始方法(process.argv)
-
脚本文件
-
name:demo.js
#!/usr/bin/env node console.log('hello world!'); console.log(process.argv) -
命令行执行
- process.argv返回值
- 第一个:启动Node.js进程的可执行文件所在的绝对路径
- 第二个:执行的脚本文件的路径
- 剩余的:命令行输入的参数
demo hello hello world! [ '/usr/local/bin/node', '/usr/local/bin/demo', 'hello' ] ./demo.js hello [ '/usr/local/bin/node', '/Users/admins/zlldemo/node-command-line/demo.js', 'hello' ] node demo hello hello world! [ '/usr/local/bin/node', '/Users/admins/zlldemo/node-command-line/demo', 'hello' ] - process.argv返回值
-
3.2、其他的解析库
-
minimist -
nopt -
mri -
yargs -
commander - 等。。。
3.3、从命令行接收输入
-
process-
process.stdout:标准输出流 (终端显示)// console.log() 内部使用 -
process.stdin:标准输入流 (终端键盘输入) -
都是 net.Socket 实例 它也是 EventEmitter - 脚本代码
-
name:inquirer.js
// 控制台输出
process.stdout.write('你叫什么名字?')
const socket = process.stdin
// 设置可读流的字符编码是 utf-8 ;默认是 Buffer
socket.setEncoding('utf-8')
// 监听data事件
socket.on('data',(data)=>{
  console.log('你好,' + data)
  // 关闭
  socket.emit('end')
})
-
- 运行脚本
node inquirer
你叫什么名字?cjy // cjy 用户输入
你好,cjy
-
-
readline- 脚本代码
- name:inquirer.js
const readline = require('readline').createInterface({
    input: process.stdin,
    output: process.stdout
  })

  readline.question(`你叫什么名字?`, name => {
    console.log(`你好, ${name}!`)
    readline.close()
  })
- name:inquirer.js
- 运行脚本
node inquirer
你叫什么名字?cjy // cjy 用户输入
你好, cjy!
- 脚本代码
-
inquirer- 脚本代码
-
name:inquirer.js
const inquirer = require('inquirer')
var questions = [
    {
      type: 'input',
      name: 'name',
      message: "你叫什么名字?"
    },
    {
      type: 'number',
      name: 'age',
      message: "你的年龄?"
    },
    {
      type: 'password',
      name: 'password',
      message: "你的密码是多少?"
    },
    {
      type: 'list', // rawlist
      name: 'gender',
      message: "你的性别?",
      choices:['男','女'],
      default:'男'
    },
    {
      type: 'checkbox', // rawlist
      name: 'hobby',
      message: "你的爱好有哪些?",
      choices:[
          {name:'羽毛球',value:'1'},
          {name:'滑雪',value:'2'},
          {name:'打游戏',value:'3'},
      ]
    },

  ]

  inquirer.prompt(questions).then(answers => {
    console.log(answers)
  })
-
- 运行脚本
node inquirer
? 你叫什么名字? 张三
? 你的年龄? 18
? 你的密码是多少? [hidden]
? 你的性别? 男
? 你的爱好有哪些? 羽毛球, 滑雪, 打游戏
{
  name: '张三',
  age: 18,
  password: 'hahaha',
  gender: '男',
  hobby: [ '1', '2', '3' ]
}
- 脚本代码
4.0 脚本内调用命令(child_process)
4.1、child_process
- 运行我们自己的脚本
- 脚本文件
- name:demo.js
#!/usr/bin/env node console.log('hello world!'); console.log(process.argv) - name:child_process.js
#!/usr/bin/env node
var name = process.argv[2];
var exec = require('child_process').exec;

exec(' demo ' + name, function(err, stdout, stderr) {
    if (err) throw err;
    console.log(stdout);
  });
- name:demo.js
- 命令行执行
node child_process.js cjy
hello world!
[ '/usr/local/bin/node', '/usr/local/bin/demo', 'cjy' ]
- 脚本文件
- 运行shell命令
- 运行echo输出字符串
-
脚本代码
-
name:child_process.js
#!/usr/bin/env node
var name = process.argv[2];
var exec = require('child_process').exec;
exec('echo hello!',function(err, stdout, stderr) {
    if (err) throw err;
    console.log(stdout);
})
-
-
命令行执行
node child_process.js cjy
hello!
-
- 运行echo输出字符串
4.2、shelljs
- https://www.npmjs.com/package/shelljs
- 本地模式
-
脚本代码
-
name:shelljs.js
var shell = require('shelljs');

shell.echo('hello')
shell.exec('echo hello')

shell.exec('demo wqe')
-
-
运行脚本
node shelljs
hello
hello
hello world!
[ '/usr/local/bin/node', '/usr/local/bin/demo', 'wqe' ]
-
- 全局模式
- 脚本代码
-
name:shellGlobal.js
#!/usr/bin/env node
require('shelljs/global');

echo('hello')

exec('demo')
-
- 运行脚本
chmod 755 shellGlobal.js
./shellGlobal.js
hello
hello world!
[ '/usr/local/bin/node', '/usr/local/bin/demo' ]
- 脚本代码
5.0 修改颜色
5.1、转义字符
-
代码
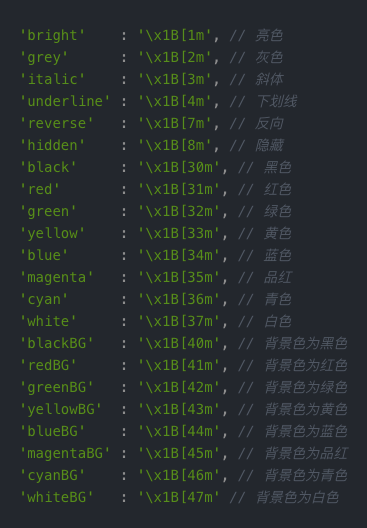
const str = 'Hello node-command-line' console.log('u001b[31m %s u001b[0m',str); console.log('u001b[32m %s u001b[0m',str); console.log('u001b[33m %s u001b[0m',str); console.log('u001b[34m %s u001b[0m',str); console.log('u001b[41m %s u001b[0m',str); console.log('u001b[42m %s u001b[0m',str); console.log('u001b[43m %s u001b[0m',str); console.log('u001b[44m %s u001b[0m',str); -
运行
-

-
部分颜色对照表
-
5.2、其他的库
- chalk
- cli-color
- colors
6.0 自动补全(搞会了,再补充)
6.1、库
- omelette
7.0 npm run scripts 流程
7.1、为什么 package.json 中 scripts选项写一些脚本名称,npm run就可以运行 ?
- npm 脚本的原理非常简单。每当执行
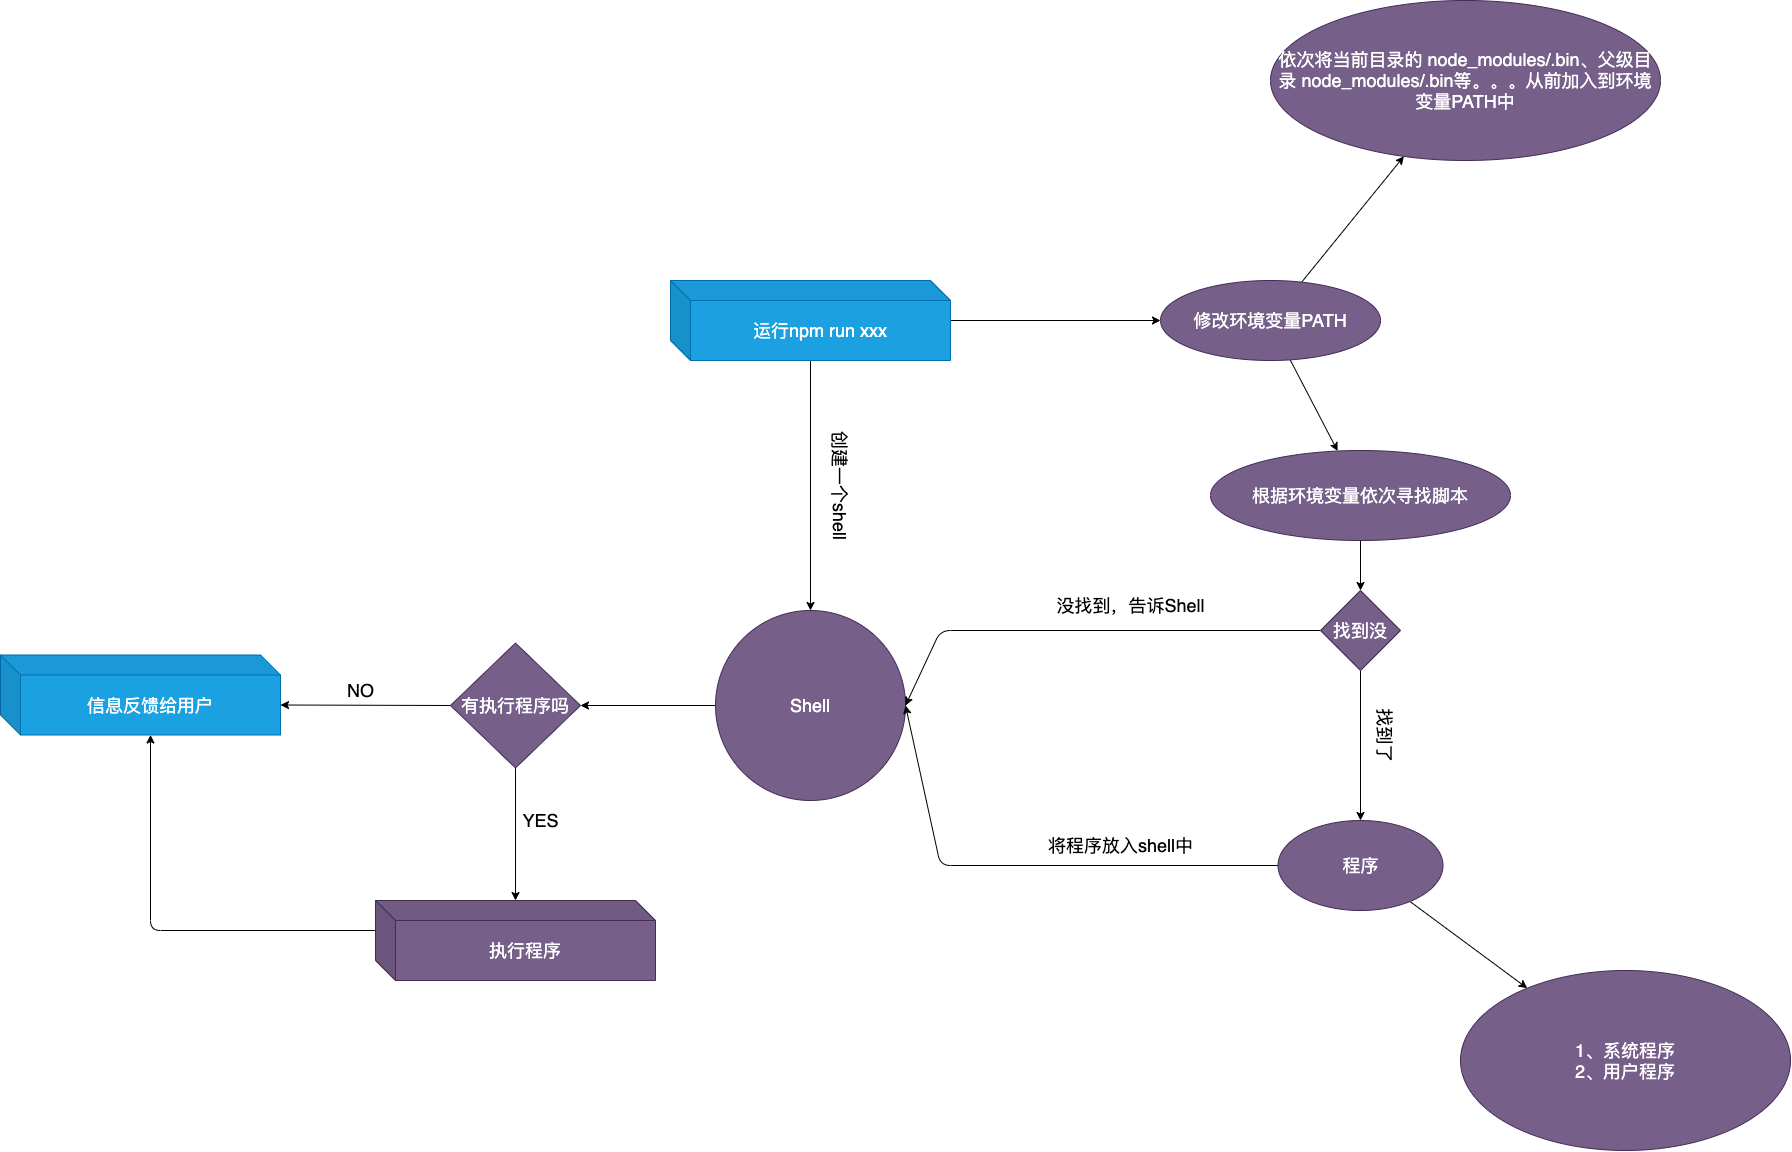
npm run,就会自动新建一个 Shell,在这个 Shell 里面执行指定的脚本命令。因此,只要是 Shell(一般是 Bash)可以运行的命令,就可以写在 npm 脚本里面。
7.2、正常项目里我们没有写脚本,scripts选项中写 fes、webpack 却能跑起来,为什么?
- 当我们
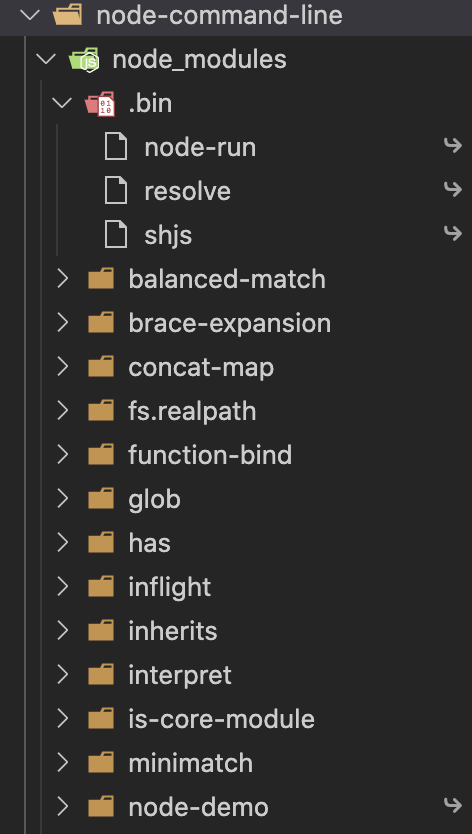
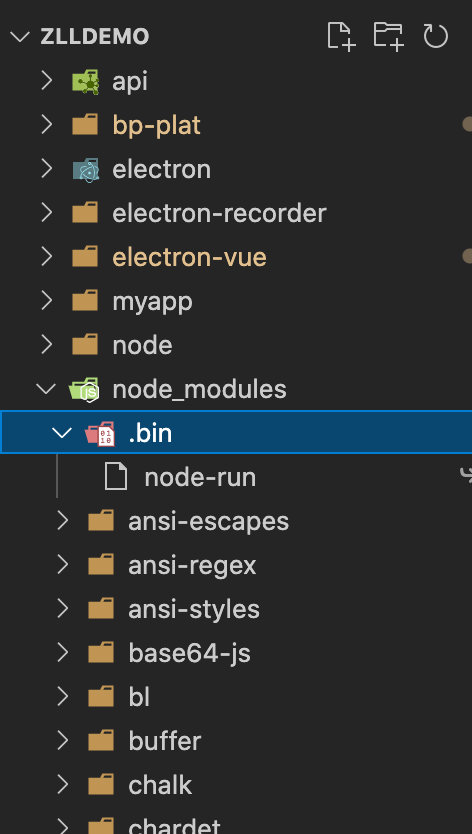
npm install package-name , 会检查package.json 里的 bin 选项,如果有,会在 node_modules/.bin 下创建对应的脚本; - 然后 我们
npm run xxx 时,会修改环境变量PATH,会依次将当前目录的node_modules/.bin、父级目录node_modules/.bin等。。。加入到环境变量PATH中。 - 然后 根据环境变量找到对应的脚本并执行,等执行结束后,再还原PATH。
7.3、验证 (环境变量的修改和运行的是哪块的脚本)
-
process.argv 返回值第二项可以得到执行的脚本文件的路径 -
process.env 属性返回包含用户环境的对象 - 上代码
- 准本一个我们的脚本
-
项目名称:node
-
脚本文件
-
name:node-demo.js
-
内容:
#!/usr/bin/env node
console.log(process.argv)
console.log(process.env.PATH)
-
-
package.json
{ "name": "node-demo", "bin": { "node-run": "node-demo.js" } } -
npm link 到全局
-
- 测试项目
-
项目名称:node-command-line
-
package.json
{ "scripts": { "serve": "node-run" }, } -
直接运行 node-run
node-run [ '/usr/local/bin/node', '/usr/local/bin/node-run' ] /usr/local/bin :/usr/bin :/bin :/usr/sbin :/sbin -
当依赖在本项目中时,通过
npm run 运行- 目录截图
- 运行
npm run serve
> serve
> node-run

[
  '/usr/local/bin/node',
  '/Users/admins/zlldemo/node-command-line/node_modules/.bin/node-run'
]
/Users/admins/zlldemo/node-command-line/node_modules/.bin
:/Users/admins/zlldemo/node_modules/.bin
:/Users/admins/node_modules/.bin
:/Users/node_modules/.bin
:/node_modules/.bin
:/usr/local/lib/node_modules/npm/node_modules/@npmcli/run-script/lib/node-gyp-bin
:/usr/local/bin
:/usr/bin
:/bin
:/usr/sbin
:/sbin
-
当依赖在父级时
- 目录截图
- 运行
npm run serve
> serve
> node-run

[
  '/usr/local/bin/node',
  '/Users/admins/zlldemo/node_modules/.bin/node-run'
]
/Users/admins/zlldemo/node-command-line/node_modules/.bin
:/Users/admins/zlldemo/node_modules/.bin
:/Users/admins/node_modules/.bin
:/Users/node_modules/.bin
:/node_modules/.bin
:/usr/local/lib/node_modules/npm/node_modules/@npmcli/run-script/lib/node-gyp-bin
:/usr/local/bin
:/usr/bin
:/bin
:/usr/sbin
:/sbin
-
当依赖在全局时
-
运行
npm run serve
> serve
> node-run

[ '/usr/local/bin/node', '/usr/local/bin/node-run' ]
/Users/admins/zlldemo/node-command-line/node_modules/.bin
:/Users/admins/zlldemo/node_modules/.bin
:/Users/admins/node_modules/.bin
:/Users/node_modules/.bin
:/node_modules/.bin
:/usr/local/lib/node_modules/npm/node_modules/@npmcli/run-script/lib/node-gyp-bin
:/usr/local/bin
:/usr/bin
:/bin
:/usr/sbin
:/sbin
-
-
- 准本一个我们的脚本
7.4、npm run 运行的流程图
最后
以上就是英勇水池最近收集整理的关于node命令行开发的全部内容,更多相关node命令行开发内容请搜索靠谱客的其他文章。
本图文内容来源于网友提供,作为学习参考使用,或来自网络收集整理,版权属于原作者所有。


发表评论 取消回复