Elasticsearch是一个分布式可扩展的实时搜索和分析引擎。
它不仅包括了全文搜索功能,还可以进行以下工作:
·分布式实时文件存储,并将每一个字段都编入索引,使其可以被搜索
·实时分析的分布式搜索引擎
·可以扩展到上百台服务器,处理PB级别的结构化或非结构化数据
其主要索引为:倒排索引
倒排索引以字或词为关键字进行索引,索引中关键字所对应的记录表项记录了出现这个字或词的所有文档,一个表项就是一个字表段,它记录该文档的 ID 和字符在该文档中出现的位置情况。
Docker搭建ES集群
集群部署结构
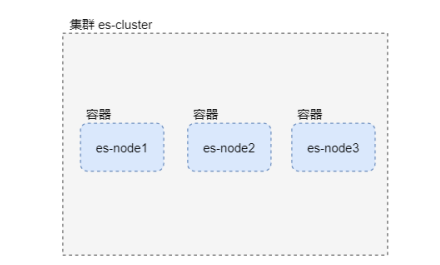
在一台服务器上,使用Docker部署三个ES容器组成的集群
部署步骤:
1.关闭防火墙
# 关闭防火墙
systemctl stop firewalld.service

# 禁用防火墙
systemctl disable firewalld.service
2.安装docker,此处省略。
3.下载Elastic Search镜像
docker pull elasticsearch:7.9.3
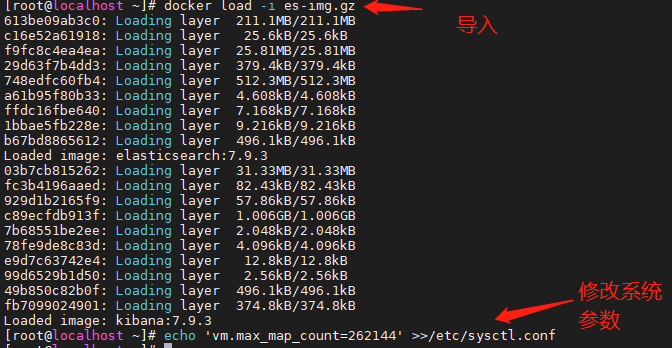
有的话直接导入使用即可
docker load -i es-img.gz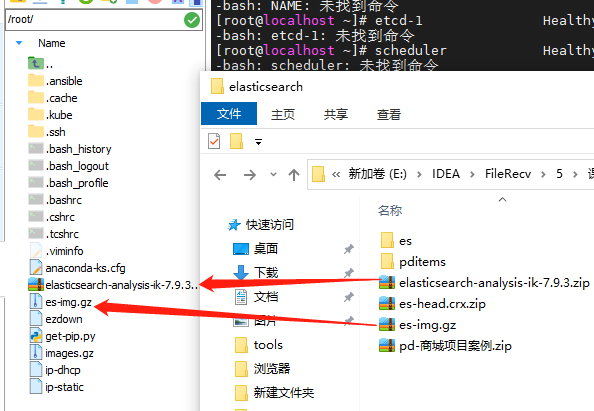
4.设置max_map_count
必须修改系统参数 max_map_count,否则 Elasticsearch 无法启动:
在 /etc/sysctl.conf 文件中添加 vm.max_map_count=262144
echo 'vm.max_map_count=262144' >>/etc/sysctl.conf
需要重新启动服务器!
确认参数配置:
cat /etc/sysctl.conf
5.创建虚拟网络,并将部署的三个es集群进行挂载
# 创建虚拟网络
docker network create es-net

# node1 的挂载目录
mkdir -p -m 777 /var/lib/es/node1/plugins
mkdir -p -m 777 /var/lib/es/node1/data

# node2 的挂载目录
mkdir -p -m 777 /var/lib/es/node2/plugins
mkdir -p -m 777 /var/lib/es/node2/data

# node3 的挂载目录
mkdir -p -m 777 /var/lib/es/node3/plugins
mkdir -p -m 777 /var/lib/es/node3/data

6.配置ES集群运行的参数:启动并配置
9200是连接客户端服务的端口,用此端口进行增删改查
9300是集群内部通信的一个端口
执行node1:
docker run -d
  --name=node1
  --restart=always
  --net es-net
  -p 9200:9200
  -p 9300:9300
  -v /var/lib/es/node1/plugins:/usr/share/elasticsearch/plugins
  -v /var/lib/es/node1/data:/usr/share/elasticsearch/data
  -e node.name=node1
  -e node.master=true
  -e network.host=node1
  -e discovery.seed_hosts=node1,node2,node3
  -e cluster.initial_master_nodes=node1
  -e cluster.name=es-cluster
  -e "ES_JAVA_OPTS=-Xms256m -Xmx256m"
  elasticsearch:7.9.3
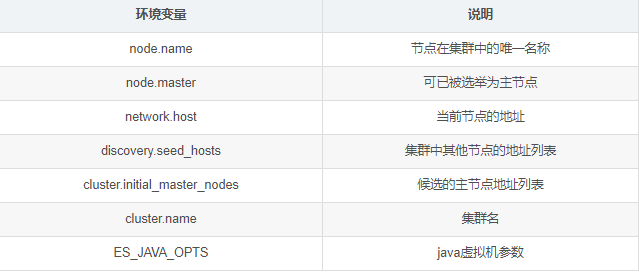
环境变量说明:
执行node2:
docker run -d
  --name=node2
  --restart=always
  --net es-net
  -p 9201:9200
  -p 9301:9300
  -v /var/lib/es/node2/plugins:/usr/share/elasticsearch/plugins
  -v /var/lib/es/node2/data:/usr/share/elasticsearch/data
  -e node.name=node2
  -e node.master=true
  -e network.host=node2
  -e discovery.seed_hosts=node1,node2,node3
  -e cluster.initial_master_nodes=node1
  -e cluster.name=es-cluster
  -e "ES_JAVA_OPTS=-Xms256m -Xmx256m"
  elasticsearch:7.9.3
执行node3:
docker run -d
  --name=node3
  --restart=always
  --net es-net
  -p 9202:9200
  -p 9302:9300
  -v /var/lib/es/node3/plugins:/usr/share/elasticsearch/plugins
  -v /var/lib/es/node3/data:/usr/share/elasticsearch/data
  -e node.name=node3
  -e node.master=true
  -e network.host=node3
  -e discovery.seed_hosts=node1,node2,node3
  -e cluster.initial_master_nodes=node1
  -e cluster.name=es-cluster
  -e "ES_JAVA_OPTS=-Xms256m -Xmx256m"
  elasticsearch:7.9.3
查看启动结果
http://192.168.64.191:9200

http://192.168.64.191:9200/_cat/nodes 查看启动的三个节点

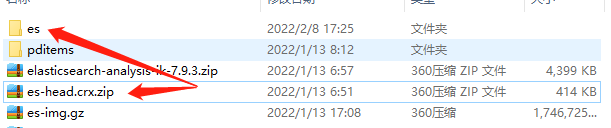
解压es-head.crx.zip
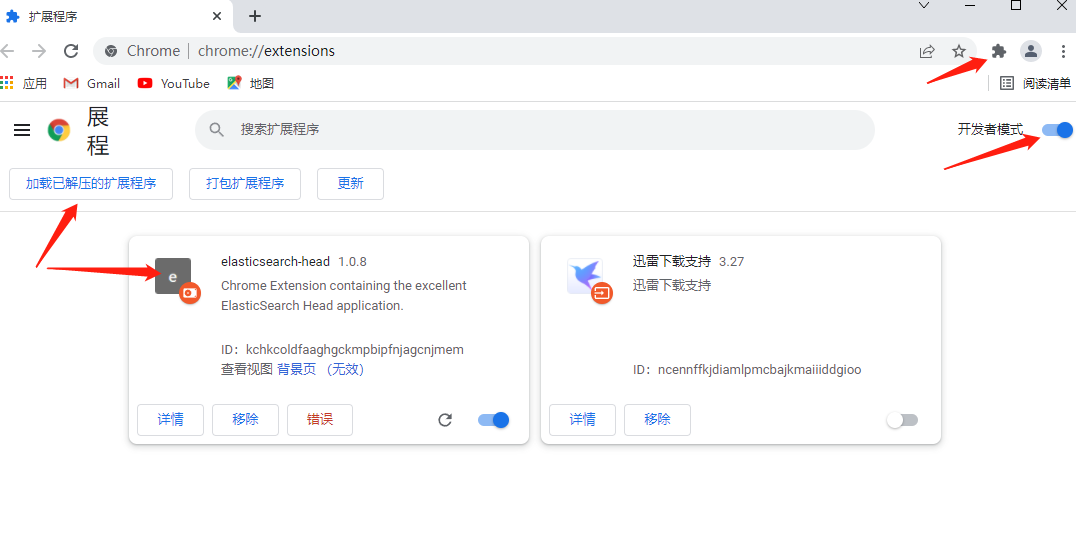
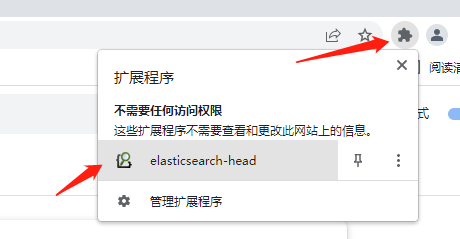
在谷歌页面中找到扩展程序,打开开发者模式并进行添加

安装ik分词器
下载 elasticsearch-analysis-ik-7.9.3.zip 复制到 /root/ 目录下
在三个节点上安装 ik 分词器
cd ~/

# 复制 ik 分词器到三个 es 容器
docker cp elasticsearch-analysis-ik-7.9.3.zip node1:/root/
docker cp elasticsearch-analysis-ik-7.9.3.zip node2:/root/
docker cp elasticsearch-analysis-ik-7.9.3.zip node3:/root/

# 在 node1 中安装 ik 分词器
docker exec -it node1 elasticsearch-plugin install file:///root/elasticsearch-analysis-ik-7.9.3.zip

# 在 node2 中安装 ik 分词器
docker exec -it node2 elasticsearch-plugin install file:///root/elasticsearch-analysis-ik-7.9.3.zip

# 在 node3 中安装 ik 分词器
docker exec -it node3 elasticsearch-plugin install file:///root/elasticsearch-analysis-ik-7.9.3.zip

# 重启三个 es 容器
docker restart node1 node2 node3
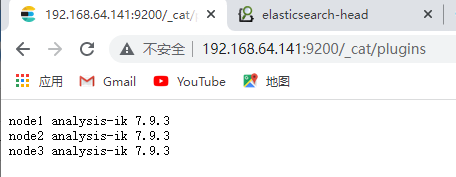
查看安装结果
在浏览器中访问 http://192.168.64.141:9200/_cat/plugins
如果插件不可用,可以卸载后重新安装:
docker exec -it node1 elasticsearch-plugin remove analysis-ik
docker exec -it node2 elasticsearch-plugin remove analysis-ik
docker exec -it node3 elasticsearch-plugin remove analysis-ik
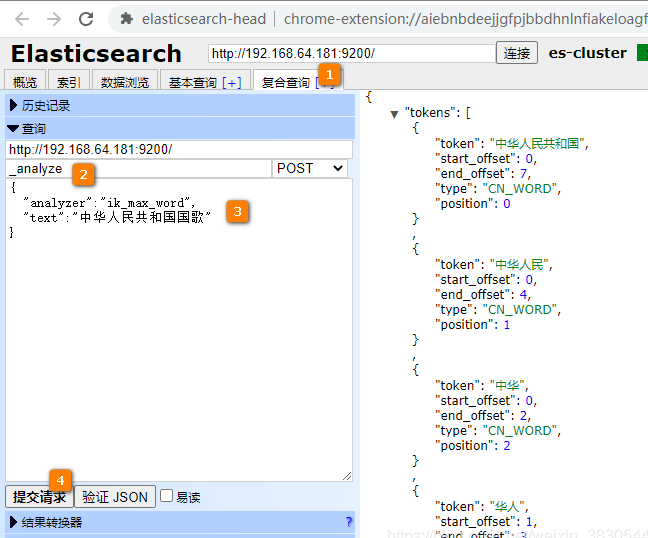
ik_max_word 分词测试
ik_smart 分词测试

使用Kibana镜像操作ES
下载镜像
docker pull kibana:7.9.3
有的直接用,没有的下载
启动Kibana容器
docker run
-d
--name kibana
--net es-net
-p 5601:5601
-e ELASTICSEARCH_HOSTS='["http://node1:9200","http://node2:9200","http://node3:9200"]'
--restart=always
kibana:7.9.3

启动后,浏览器访问Kibana,进入Dec Tools中进行操作:
http://192.168.64.191:5601/
索引、分片和副本
索引:索引用来存储我们要搜索的数据,以倒排索引结构进行存储
分片:在一个索引中存储大量数据会造成性能下降,这时可以对数据进行分片存储,每个片上一段数据,搜索时会同时搜索多个分片,并将搜索结果进行汇总
副本:对分片创建多个副本,那么即使一个节点宕机,其他节点中的副本分片还可以继续工作,不会造成数据不可用
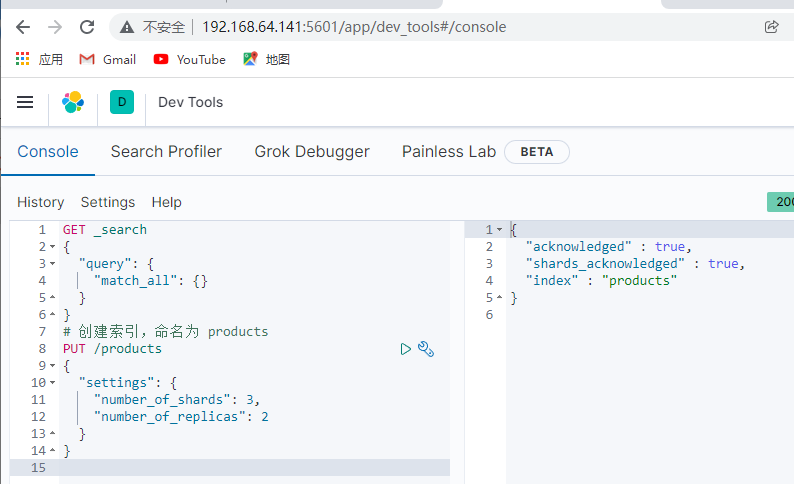
创建索引:
分片和副本参数说明:
number_of_shards:分片数量,默认值是 5number_of_replicas:副本数量,默认值是 1
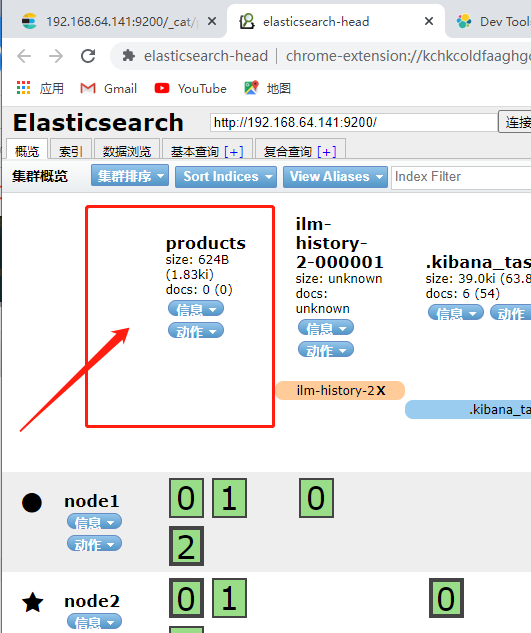
我们有三个节点,在每个节点上都创建一个分片。每个分片在另两个节点上各创建一个副本
# 创建索引,命名为 products
PUT /products
{
  "settings": {
    "number_of_shards": 3,
    "number_of_replicas": 2
  }
}
查看创建的索引:
映射:设置数据类型和其他属性。映射,是对索引中字段结构的定义和描述。
字段的数据类型
常用类型:
···数字类型:
byte、short、integer、long
float、double
unsigned_long
···字符串类型:
text : 会进行分词
keyword : 不会进行分词,适用于email、主机地址、邮编等
···日期和时间类型:
date
创建映射
分词器设置:
analyzer:在索引中添加文档时,text类型通过指定的分词器分词后,再插入倒排索引
search_analyzer:使用关键词检索时,使用指定的分词器对关键词进行分词
查询时,关键词优先使用 search_analyzer 设置的分词器,如果 search_analyzer 不存在则使用 analyzer 分词器。
# 定义mapping,数据结构
PUT /products/_mapping
{
  "properties": {
    "id": {
      "type": "long"
    },
    "title": {
      "type": "text",
      "analyzer": "ik_max_word",
      "search_analyzer": "ik_smart"
    },
    "category": {
      "type": "text",
      "analyzer": "ik_smart",
      "search_analyzer": "ik_smart"
    },
    "price": {
      "type": "float"
    },
    "city": {
      "type": "text",
      "analyzer": "ik_smart",
      "search_analyzer": "ik_smart"
    },
    "barcode": {
      "type": "keyword"
    }
  }
}
查看映射
GET /products/_mapping
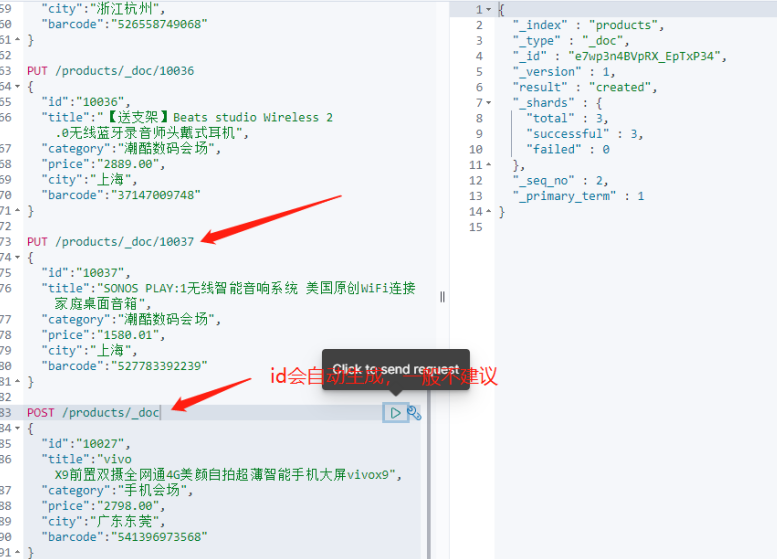
添加文档
添加的文档会有一个名为_id的文档id,这个文档id可以自动生成,也可以手动指定,通常可以使用数据的id作为文档id。
# 添加文档
PUT /products/_doc/10033
{
  "id":"10033",
  "title":"SONOS PLAY:5(gen2) 新一代PLAY:5无线智能音响系统 WiFi音箱家庭,潮酷数码会场",
  "category":"潮酷数码会场",
  "price":"3980.01",
  "city":"上海",
  "barcode":"527848718459"
}


PUT /products/_doc/10034
{
  "id":"10034",
  "title":"天猫魔盒 M13网络电视机顶盒 高清电视盒子wifi 64位硬盘播放器",
  "category":"潮酷数码会场",
  "price":"398.00",
  "city":"浙江杭州",
  "barcode":"522994634119"
}


PUT /products/_doc/10035
{
  "id":"10035",
  "title":"BOSE SoundSport耳塞式运动耳机 重低音入耳式防脱降噪音乐耳机",
  "category":"潮酷数码会场",
  "price":"860.00",
  "city":"浙江杭州",
  "barcode":"526558749068"
}


PUT /products/_doc/10036
{
  "id":"10036",
  "title":"【送支架】Beats studio Wireless 2.0无线蓝牙录音师头戴式耳机",
  "category":"潮酷数码会场",
  "price":"2889.00",
  "city":"上海",
  "barcode":"37147009748"
}


PUT /products/_doc/10037
{
  "id":"10037",
  "title":"SONOS PLAY:1无线智能音响系统 美国原创WiFi连接 家庭桌面音箱",
  "category":"潮酷数码会场",
  "price":"1580.01",
  "city":"上海",
  "barcode":"527783392239"
}
也可以自动生成 _id 值:
POST /products/_doc
{
  "id":"10027",
  "title":"vivo X9前置双摄全网通4G美颜自拍超薄智能手机大屏vivox9",
  "category":"手机会场",
  "price":"2798.00",
  "city":"广东东莞",
  "barcode":"541396973568"
}
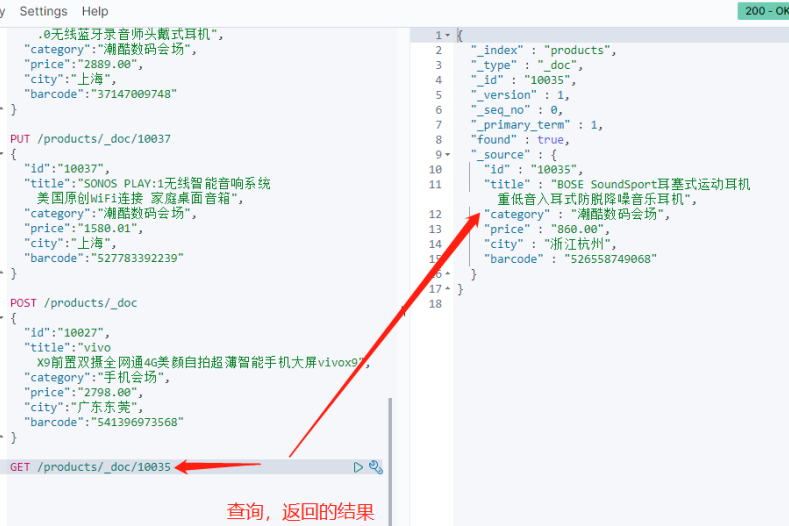
查看文档:
GET /products/_doc/10037
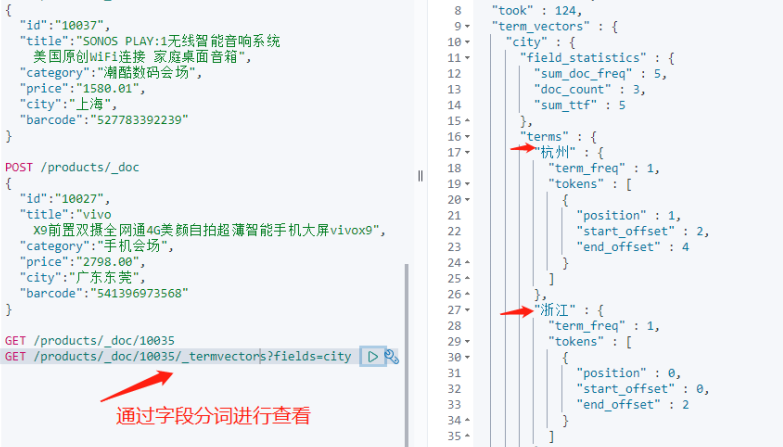
查看指定文档title自带的分词结果:
GET /products/_doc/10037/_termvectors?fields=title
修改文档
底层索引数据无法修改,修改数据实际上是先删除再重新添加。
两种修改方式:
- PUT:对文档进行完整的替换
- POST:可以修改一部分字段
修改价格字段的值:
# 修改文档 - 替换
PUT /products/_doc/10037
{
  "id":"10037",
  "title":"SONOS PLAY:1无线智能音响系统 美国原创WiFi连接 家庭桌面音箱",
  "category":"潮酷数码会场",
  "price":"9999.99",
  "city":"上海",
  "barcode":"527783392239"
}
修改价格和城市字段的值:
# 修改文档 - 更新部分字段
POST /products/_update/10037
{
  "doc": {
    "price":"8888.88",
    "city":"深圳"
  }
}
删除文档
DELETE /products/_doc/10037
清空:
POST /products/_delete_by_query
{
  "query": {
    "match_all": {}
  }
}
删除索引
# 删除 products 索引
DELETE /products
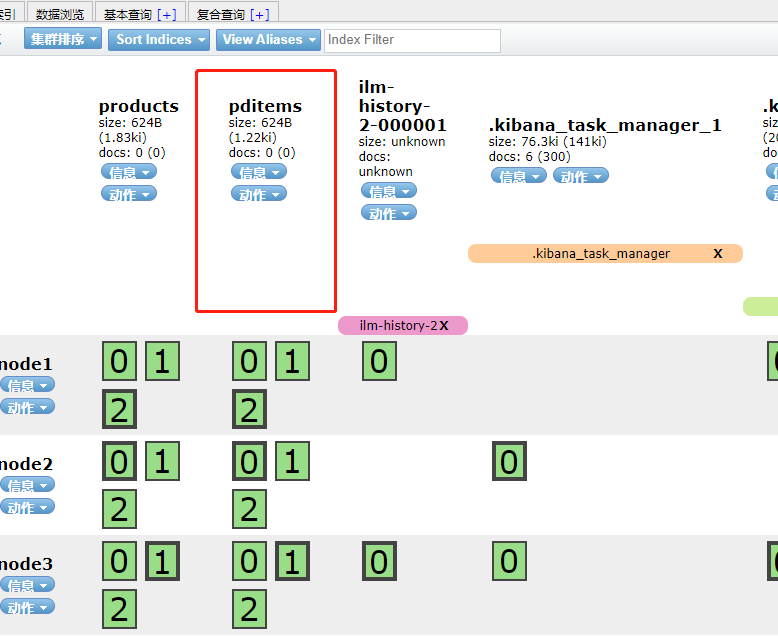
与数据库进行连接
Es也要存储一份数据 为了方便进行关键字查询。
创建索引并规定对应的存档方式 创建索引和映射
PUT /pditems
{
  "settings": {
    "number_of_shards": 3,
    "number_of_replicas": 2
  },
  "mappings": {
    "properties": {
      "id": {
        "type": "long"
      },
      "brand": {
        "type": "text",
        "analyzer": "ik_smart"
      },
      "title": {
        "type": "text",
        "analyzer": "ik_max_word"
      },
      "sell_point": {
        "type": "text",
        "analyzer": "ik_max_word",
        "search_analyzer": "ik_smart"
      },
      "price": {
        "type": "float"
      },
      "image": {
        "type": "keyword"
      },
      "cid": {
        "type": "long"
      },
      "status": {
        "type": "byte"
      },
      "created": {
        "type": "date",
        "format": "yyyy-MM-dd HH:mm:ss"
      },
      "updated": {
        "type": "date",
        "format": "yyyy-MM-dd HH:mm:ss"
      }
    }
  }
}
进行查看:
导入数据
在服务器上,进入 pditems.json 所在的文件夹,执行批量数据导入:
curl -XPOST 'localhost:9200/pditems/_bulk'
    -H 'Content-Type:application/json'
    --data-binary @pditems.json
查看数据
搜索 pditems 索引中全部 数据:
# 搜索 pditems 索引中全部数据
POST /pditems/_search
{
  "query": {
    "match_all": {}
  },
"size": 3160 #也可根据数据具体数量进行查询

}
关键词搜索
# 查询 pditems 索引中title中包含"电脑"的商品
POST /pditems/_search
{
  "query": {
    "match": {
      "title": "电脑"
    }
  }
}
搜索结果过滤器
# 价格大于2000,并且title中包含"电脑"的商品
POST /pditems/_search
{
  "query": {
    "bool": {
      "must": [
        {
          "match": {
            "title": "电脑"
          }
        }
      ],

      "filter": [
        {
          "range": {
            "price": {
              "gte": "2000"
            }
          }
        }
      ]
    }
  }
}
搜索结果高亮显示
POST /pditems/_search
{
	"query": {
		"multi_match":{
			"query": "手机",
			"fields": ["title", "sell_point"]
		}
	},
	"highlight" : {
        "pre_tags" : ["<i class="highlight">"],
        "post_tags" : ["</i>"],
        "fields" : {
            "title" : {},
            "sell_point" : {
              "pre_tags": "<em>",
              "post_tags": "</em>"
            }
        }
    }
}
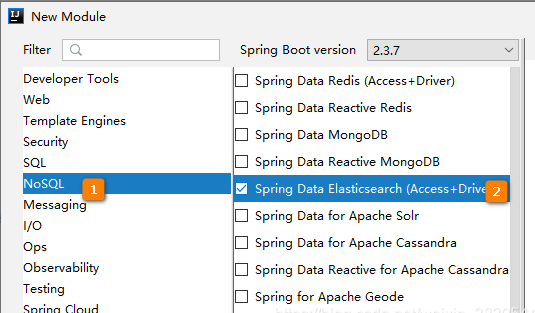
Spring 中进行es增删改查
Spring Data Elasticsearch 是 Elasticsearch 搜索引擎开发的解决方案。它提供:
模板对象,用于存储、搜索、排序文档和构建聚合的高级API。
例如,Repository 使开发者能够通过定义具有自定义方法名称的接口来表达查询。
添加相关依赖:
<?xml version="1.0" encoding="UTF-8"?>
<project xmlns="http://maven.apache.org/POM/4.0.0" xmlns:xsi="http://www.w3.org/2001/XMLSchema-instance"
	xsi:schemaLocation="http://maven.apache.org/POM/4.0.0 https://maven.apache.org/xsd/maven-4.0.0.xsd">
	<modelVersion>4.0.0</modelVersion>
	<parent>
		<groupId>org.springframework.boot</groupId>
		<artifactId>spring-boot-starter-parent</artifactId>
		<version>2.3.6.RELEASE</version>
		<relativePath/> <!-- lookup parent from repository -->
	</parent>
	<groupId>cn.tedu</groupId>
	<artifactId>es-springboot</artifactId>
	<version>0.0.1-SNAPSHOT</version>
	<name>es-springboot</name>
	<description>Demo project for Spring Boot</description>

	<properties>
		<java.version>1.8</java.version>
	</properties>

	<dependencies>
		<dependency>
			<groupId>org.springframework.boot</groupId>
			<artifactId>spring-boot-starter-data-elasticsearch</artifactId>
		</dependency>

		<dependency>
			<groupId>org.springframework.boot</groupId>
			<artifactId>spring-boot-starter-test</artifactId>
			<scope>test</scope>
			<exclusions>
				<exclusion>
					<groupId>org.junit.vintage</groupId>
					<artifactId>junit-vintage-engine</artifactId>
				</exclusion>
			</exclusions>
		</dependency>
	</dependencies>

	<build>
		<plugins>
			<plugin>
				<groupId>org.springframework.boot</groupId>
				<artifactId>spring-boot-maven-plugin</artifactId>
			</plugin>
		</plugins>
	</build>

</project>
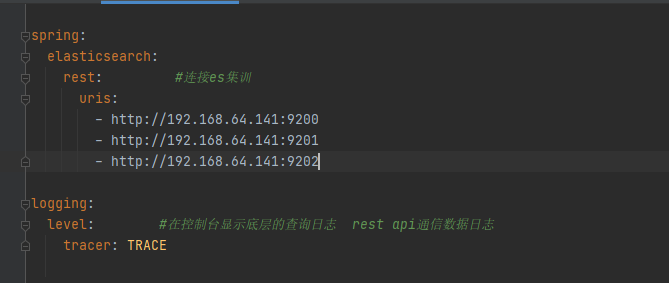
application.yml 配置
logging.level.tracer=TRACE 作用是在控制台中显示底层的查询日志
pojo需要进行索引的类。添加相关注解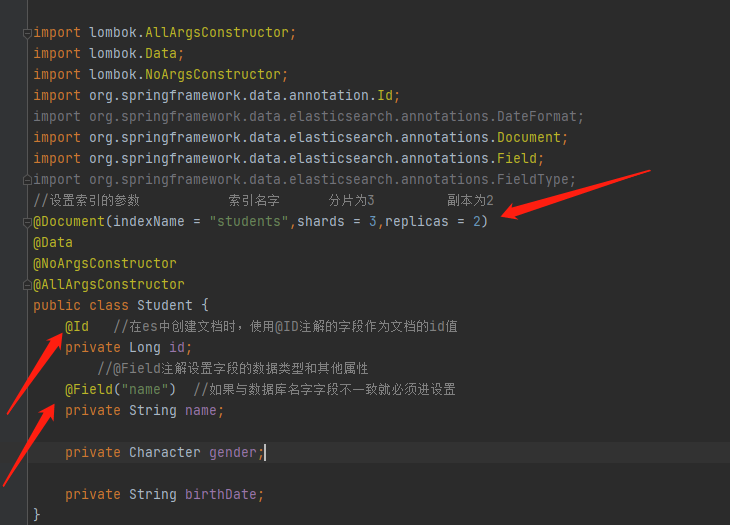
@Document 注解
@Documnet注解对索引的参数进行设置。
上面代码中,把 students 索引的分片数设置为3,副本数设置为2。
@Id 注解
在 Elasticsearch 中创建文档时,使用 @Id 注解的字段作为文档的 _id 值
@Field 注解
通过 @Field 注解设置字段的数据类型和其他属性。
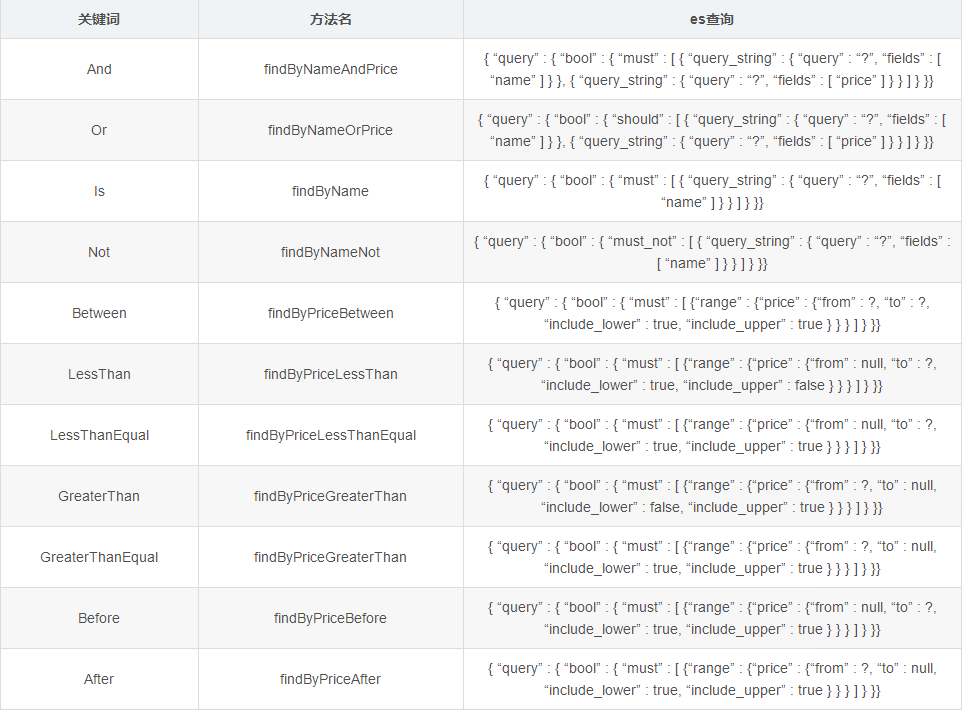
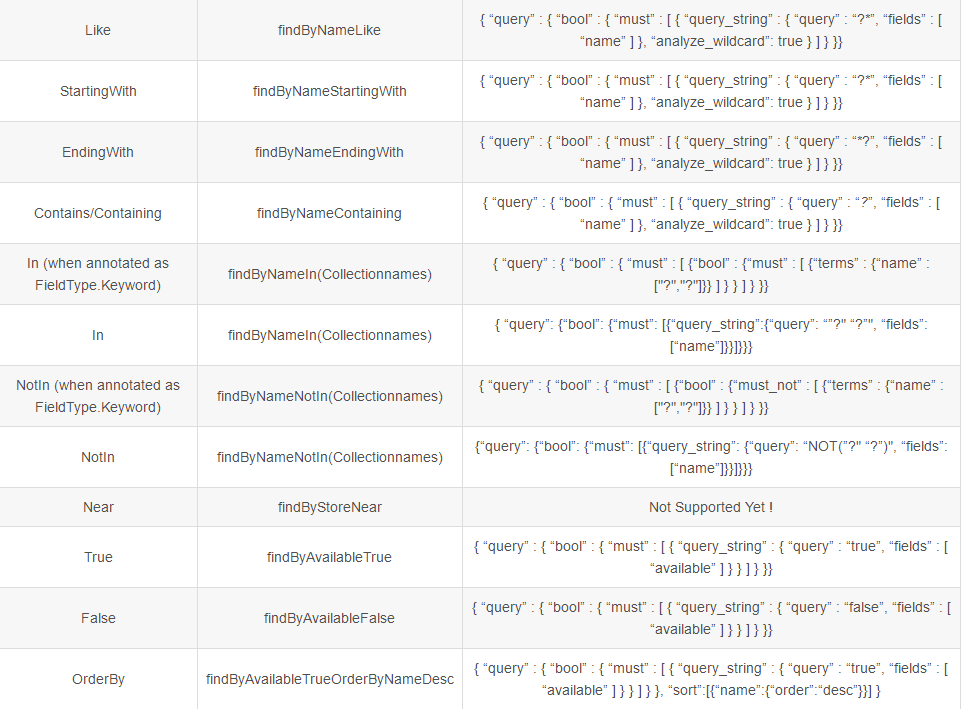
Repository 方法命名规范
自定义数据操作方法需要遵循 Repository 规范,示例如下:
继承Repository方法,进行增删改查
import org.springframework.data.elasticsearch.annotations.Highlight;
import org.springframework.data.elasticsearch.annotations.HighlightField;
import org.springframework.data.elasticsearch.annotations.HighlightParameters;
import org.springframework.data.elasticsearch.core.SearchHit;
import org.springframework.data.elasticsearch.repository.ElasticsearchRepository;

import java.util.List;

/**
 * Repository 接口
 * Spring Data的数据访问模范接口
 * 声明式数据访问接口,不需要自己写实现类
 * 访问ES服务器,需要继承Spring Data ES的ElasticsearchRepository
 * 不需要自己写代码,直接调用即可
 */                                                //必须标明要进行索引的类名 和 ID的类型
public interface StudentRepository extends ElasticsearchRepository<Student,Long> {

    //在name中搜索关键字      并进行高亮显示              指定高亮的参数,高亮前后加什么标签
    @Highlight(parameters = @HighlightParameters(preTags = "<em>",postTags = "</em>"),
    fields = {
            @HighlightField(name = "name") //哪个自动来进行高亮显示
    })
    List<SearchHit<Student>> findByName(String k);
}
使用save进行增加数据:
    @Autowired
    private StudentRepository s;
    @Test
    public void tests1(){

        Student h2 = new Student(9L,"华中f ",null,"2000-12-10");
        Student h3 = new Student(5L,"华中f a",null,"2000-12-10");
        Student h4 = new Student(6L,"华中f ",null,"2000-12-10");
        Student h5 = new Student(7L,"华中ds ",null,"2000-12-10");
        Student h6 = new Student(8L,"华中f ",null,"2000-12-10");

        s.save(h2);
        s.save(h3);
        s.save(h4);
        s.save(h5);
        s.save(h6);


    }
进行名字关键字查询:
    @Test
    public void tests(){
        List<SearchHit<Student>> list = s.findByName("华");

        //需要将得到的高亮集合进行转成普通集合
        List<Object> stulist = new ArrayList<>();
        for (SearchHit<Student> sh : list){

            Student stu = sh.getContent();

            List<String> h1 = sh.getHighlightField("name");

            StringBuilder sb = new StringBuilder();
            for (String s1 : h1){
                sb.append(s1);
            }
            stu.setName(sb.toString());
            stulist.add(stu);
        }
        System.out.println(stulist);
    }
使用Criteria进行构建查询
根据名字
根据日期
import org.springframework.beans.factory.annotation.Autowired;
import org.springframework.data.domain.Pageable;
import org.springframework.data.elasticsearch.core.ElasticsearchOperations;
import org.springframework.data.elasticsearch.core.SearchHit;
import org.springframework.data.elasticsearch.core.SearchHits;
import org.springframework.data.elasticsearch.core.query.Criteria;
import org.springframework.data.elasticsearch.core.query.CriteriaQuery;
import org.springframework.stereotype.Component;

import java.util.ArrayList;
import java.util.List;

/**
 * Criteria
 *         用来封装搜索条件
 * CriteriaQuery
 *          封装上面的条件对象,分页参数
 * ElasticsearchOperations
 *          操作对象,用来执行上面查询的工具对象
 */
@Component
public class StudentSearcher {

    @Autowired
    private ElasticsearchOperations op;

    //姓名中所有锁关键词
    public List<Student> findByName(String k){
        Criteria c = new Criteria("name");
        c.is(k);
        return exec(c,null);
    }


    //出生日期范围查询
    public List<Student> findByBirthDate(String from, String to, Pageable pageable){
        Criteria c = new Criteria("birthDate");
        c.between(from,to);
        return exec(c,pageable);
    }
    private List<Student> exec(Criteria c, Pageable pageable) {
        //把条件封装到查询对象
        CriteriaQuery q = new CriteriaQuery(c);
        if (pageable != null){
            q.setPageable(pageable);
        }
        SearchHits<Student> shs = op.search(q, Student.class);
        //转换成list集合
        List<Student> list = new ArrayList<>();
        for (SearchHit<Student> sh : shs){
            list.add(sh.getContent());
        }
        return list;
    }


}
进行分页操作
添加依赖:
   <dependency>
            <groupId>org.springframework.boot</groupId>
            <artifactId>spring-boot-starter-data-elasticsearch</artifactId>
        </dependency>

        <dependency>
            <groupId>org.elasticsearch.client</groupId>
            <artifactId>elasticsearch-rest-high-level-client</artifactId>
        </dependency>
    //进行实现分页显示
    @Override
    public Map<String, Object> search(Map searchMap) {//使用map集合才能装下数据

        HashMap<String, Object> dataMap = new HashMap<>();

        List<User> admin = userMapper.findByUserName("admins"); //进行模糊查询
        System.out.println(admin);

        int pageTotal = admin.size();//得到查询的总数
        System.out.println(pageTotal);
        int size = Math.round(pageTotal / 3);//向上取整得到所有的分页数
        System.out.println(size);

        dataMap.put("pageTatol",pageTotal);

        SearchSourceBuilder searchSourceBuilder = new SearchSourceBuilder();  //使用es中的此方法进行分页操作

        Integer pageNo = Integer.valueOf((String) searchMap.get("pageNo")) ;//定义索引中的分页查询参数

        if (pageNo<=0){//当页数为0时,页数赋值等于1
            pageNo=1;
        }
        Integer pageSize = 3; //设置为3条
        pageNo = (pageNo-1)*pageSize;//因为上面设置为1,所以要变成初始值,并且显示多少页
        searchSourceBuilder.from(pageNo);
        searchSourceBuilder.size(pageSize); 索引中的from与size参数直接进行调用设置


        return dataMap;
    }
最后
以上就是端庄老师最近收集整理的关于ElasticsearchDocker搭建ES集群安装ik分词器 使用Kibana镜像操作ES添加文档修改文档删除文档删除索引 与数据库进行连接Spring 中进行es增删改查application.yml 配置进行分页操作的全部内容,更多相关ElasticsearchDocker搭建ES集群安装ik分词器 使用Kibana镜像操作ES添加文档修改文档删除文档删除索引 与数据库进行连接Spring内容请搜索靠谱客的其他文章。


发表评论 取消回复