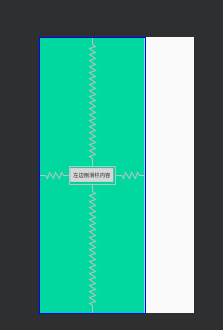
DrawerLayout 实现侧滑栏非常简单 支持左滑动以及右滑动 默认滑动出来侧滑栏
DrawerLayout 需要引入support:appcompat 库,一般创建项目的时候自带的有,这个库就不用管了
DrawerLayout 需要使用 android.support.v4.widget.DrawerLayout 作为父类布局
侧滑栏的内容都是在2测所以需要使用的android:layout_gravity="start" 或者 android:layout_gravity="end"
start 使得侧滑栏位于左侧,end 使得侧滑栏位于右侧
侧滑栏打开的方法
drawerLayout.openDrawer(Gravity.START); //打开左侧侧滑栏drawerLayout.closeDrawer(Gravity.START); //关闭左侧侧滑栏drawerLayout.openDrawer(Gravity.END);//代开右侧侧滑栏drawerLayout.closeDrawer(Gravity.END);//关闭右侧侧滑栏主布局代码
<?xml version="1.0" encoding="utf-8"?>
<android.support.v4.widget.DrawerLayout xmlns:android="http://schemas.android.com/apk/res/android"
    xmlns:app="http://schemas.android.com/apk/res-auto"
    xmlns:tools="http://schemas.android.com/tools"
    android:layout_width="match_parent"
    android:layout_height="match_parent"
    android:id="@+id/drawer"
    tools:context=".MainActivity">

    <RelativeLayout
        android:layout_width="match_parent"
        android:layout_height="match_parent">

        <Button
            android:id="@+id/left_btn"
            android:layout_width="wrap_content"
            android:layout_height="wrap_content"
            android:layout_centerVertical="true"
            android:text="左边" />

        <Button
            android:id="@+id/right_btn"
            android:layout_width="wrap_content"
            android:layout_height="wrap_content"
            android:layout_alignParentRight="true"
            android:layout_centerVertical="true"
            android:text="右边" />
    </RelativeLayout>


    <include
        layout="@layout/left_layout"/>


    <include
        layout="@layout/right_layout"/>


</android.support.v4.widget.DrawerLayout>
代码使用了include 插入布局,另外在写一个布局,这样方便自己写布局的时候查看布局样式
left_layout 布局代码<?xml version="1.0" encoding="utf-8"?>
<RelativeLayout xmlns:android="http://schemas.android.com/apk/res/android"
android:layout_width="280dp"
android:layout_height="match_parent"
android:layout_gravity="start"
android:background="#00d8a0">
<Button
android:id="@+id/left_child_btn"
android:layout_width="wrap_content"
android:layout_height="wrap_content"
android:layout_centerInParent="true"
android:text="左边侧滑栏内容"/>
</RelativeLayout>这样写样式,查看比较方便

right_layout 布局内容<?xml version="1.0" encoding="utf-8"?>
<RelativeLayout xmlns:android="http://schemas.android.com/apk/res/android"
android:layout_width="280dp"
android:layout_height="match_parent"
android:layout_gravity="end"
android:background="@color/colorPrimary">
<Button
android:id="@+id/right_child_btn"
android:layout_width="wrap_content"
android:layout_height="wrap_content"
android:layout_centerInParent="true"
android:text="右边侧滑栏内容" />
</RelativeLayout>
代码
package com.hly.drawerlayout;

import android.support.v4.widget.DrawerLayout;
import android.support.v7.app.AppCompatActivity;
import android.os.Bundle;
import android.view.Gravity;
import android.view.View;

public class MainActivity extends AppCompatActivity {
    private DrawerLayout drawerLayout;
    @Override
    protected void onCreate(Bundle savedInstanceState) {
        super.onCreate(savedInstanceState);
        setContentView(R.layout.activity_main);
        drawerLayout = findViewById(R.id.drawer);

        findViewById(R.id.left_btn).setOnClickListener(new View.OnClickListener() {
            @Override
            public void onClick(View v) {
                drawerLayout.openDrawer(Gravity.START);
            }
        });

        findViewById(R.id.left_child_btn).setOnClickListener(new View.OnClickListener() {
            @Override
            public void onClick(View v) {
                drawerLayout.closeDrawer(Gravity.START);
            }
        });

        findViewById(R.id.right_btn).setOnClickListener(new View.OnClickListener() {
            @Override
            public void onClick(View v) {
                drawerLayout.openDrawer(Gravity.END);
            }
        });

        findViewById(R.id.right_child_btn).setOnClickListener(new View.OnClickListener() {
            @Override
            public void onClick(View v) {
                drawerLayout.closeDrawer(Gravity.END);
            }
        });
    }
}
虽说代码简单,但是复习这里,我还是写了一个demo 地址连接
最后
以上就是愉快老师最近收集整理的关于Android 侧滑栏 (DrawerLayout)的全部内容,更多相关Android内容请搜索靠谱客的其他文章。
本图文内容来源于网友提供,作为学习参考使用,或来自网络收集整理,版权属于原作者所有。


发表评论 取消回复