依赖注入
Spring的依赖注入,是一个老生常谈的知识点,正常开发时候基本没卵用,毕竟2020年了,都习惯了注解方式来注入其它依赖,但面试时候或许会问到这个知识。
这个知识点网上有很多,百度看了几篇,发现很多文章关于这块讲解都是重复且错误的,给人一种很混乱的感觉。说一下我的理解吧,有不对的地方还请直接指出来,一起提高技术水平。
控制反转(IOC)是程序设计的一种思想,它解决了对象之间的耦合问题,使代码的扩展性更高,Spring也是通过这一种思想来管理Bean之间的依赖关系的。
而要实现IOC这一思想,依赖注入(DI)和依赖查找就是其中两种有效的方式。依赖查找在早期Spring版本使用过,后期因为对用户太不友好,基本停止了这种方式。所以DI依赖注入成了实现IOC的最佳实现,这也就是IOC和DI之间的关系。
Spring应用层面上有几种依赖注入的方式
这个问题本质其实就是说如何让程序知道两个bean之间的依赖关系,如何确定这种关系?
从时间轴来说可能会更好理解点,早期的Spring是基于xml来让程序知道对象间的依赖关系的,那时候还没有注解。
所以仅通过xml如何让程序知道对象间的依赖关系呢?
不考虑Spring,我们先自己想想Java层面上要让两个对象产生依赖关系,从类的组成(属性/构造器/方法)上无非也就这么三种入口。
- 构造器的参数
- 属性(通过setter方法的参数)
- 方法参数(通过普通常规方法的参数,和属性类似,都是通过方法参数产生依赖)
Spring其实也是从这三个方向处理bean之间的依赖,先看看官网(Version 5.2.7.RELEASE)的介绍。

其中标记的地方也就是Spring去实现依赖注入的方式。不过这三种方式其实是早期的Spring通过XML这种配置文件来定义bean的。
- 构造器参数
- 工厂方法参数
- 构造器或者工厂方法创建对象后,通过类似setter方法注入依赖
最后的标记表示依赖注入相对于用户来讲,最主要的方式就是构造器和setter方式。
分别举一个简单的示例吧。
Constructor-based Dependency Injection
普通bean,对象StudentDao通过构造器传入TeacherDao,使两个类产生依赖的关系。
public class StudentDao {

	private TeacherDao teacherDao;

	public StudentDao(TeacherDao teacherDao) {
		this.teacherDao = teacherDao;
	}

	public void getStudentInfo() {
		teacherDao.getTeacher();
	}
}

public class TeacherDao {

	public void getTeacher() {
		System.out.println("TeacherDao#getTeacher");
	}
}
配置类导入xml配置文件
@Configuration
@Component
@ComponentScan("com.binghuazheng.springioc.beaninit")
@ImportResource("/SpringConfig.xml")
public class AppConfig {

}
xml配置文件
<?xml version="1.0" encoding="UTF-8"?>
<beans xmlns="http://www.springframework.org/schema/beans"
       xmlns:xsi="http://www.w3.org/2001/XMLSchema-instance"
       xmlns:abc="http://www.springframework.org/schema/context"
       xsi:schemaLocation="http://www.springframework.org/schema/beans http://www.springframework.org/schema/beans/spring-beans.xsd
       http://www.springframework.org/schema/context  http://www.springframework.org/schema/context/spring-context.xsd">

		<bean id="studentDao" class="com.binghuazheng.springioc.beaninit.bean.StudentDao">
			<constructor-arg ref="teacherDao"/>
		</bean>

		<bean id="teacherDao" class="com.binghuazheng.springioc.beaninit.bean.TeacherDao"/>

</beans>
测试类
public class Test {

	public static void main(String[] args) {
		AnnotationConfigApplicationContext context = new AnnotationConfigApplicationContext();
		context.register(AppConfig.class);
		context.refresh();
		StudentDao studentDao = context.getBean("studentDao", StudentDao.class);
		studentDao.getStudentInfo();
	}
}
Setter-based Dependency Injection
一定要注意这种setter的方式注入依赖,被注入的bean一定要有setter方法,并且setXXX方法的XXX名字(首字母小写)一定要和xml中配置的property元素的属性name相匹配。
也就是说此示例中的xml中的studentDao依赖属性teacherDao名称要和StudentDao类中的setTeacherDao方法相匹配。他和成员变量private TeacherDao teacher;中的属性名没有关系。
public class StudentDao {

	private TeacherDao teacher;

	public TeacherDao getTeacherDao() {
		return teacher;
	}

	public void setTeacherDao(TeacherDao teacher) {
		this.teacher = teacher;
	}

	public void getStudentInfo() {
		teacher.getTeacher();
	}
}

public class TeacherDao {

	public void getTeacher() {
		System.out.println("TeacherDao#getTeacher");
	}
}
配置类
@Configuration
@Component
@ComponentScan("com.binghuazheng.springioc.beaninit")
@ImportResource("/SpringConfig.xml")
public class AppConfig {
}
xml配置
<?xml version="1.0" encoding="UTF-8"?>
<beans xmlns="http://www.springframework.org/schema/beans"
       xmlns:xsi="http://www.w3.org/2001/XMLSchema-instance"
       xmlns:abc="http://www.springframework.org/schema/context"
       xsi:schemaLocation="http://www.springframework.org/schema/beans http://www.springframework.org/schema/beans/spring-beans.xsd
       http://www.springframework.org/schema/context  http://www.springframework.org/schema/context/spring-context.xsd">

		<bean id="studentDao" class="com.binghuazheng.springioc.beaninit.bean.StudentDao">
			<property name="teacherDao" ref="teacherDao"/>
		</bean>

		<bean id="teacherDao" class="com.binghuazheng.springioc.beaninit.bean.TeacherDao"/>

</beans>
测试类
public class Test {

	public static void main(String[] args) {
		AnnotationConfigApplicationContext context = new AnnotationConfigApplicationContext();
		context.register(AppConfig.class);
		context.refresh();
		StudentDao studentDao = context.getBean("studentDao", StudentDao.class);
		studentDao.getStudentInfo();
	}
}
Factory Method Dependency Injection
工厂方法创建对象,下面的示例用的是静态工厂方法(factoroy-method),需要指定静态方法。
还有一个factory-bean方式,暂时不做示例了,这种可以指定一个其它对象的非静态方法产生bean.
StudentDao类需要指定一个静态方法作为产生bean的工厂方法。
public class StudentDao {

	private TeacherDao teacherDao;

	public static StudentDao createInstance(TeacherDao teacherDao) {
		StudentDao studentDao = new StudentDao();
		studentDao.setTeacherDao(teacherDao);
		return studentDao;
	}

	public void setTeacherDao(TeacherDao teacherDao) {
		this.teacherDao = teacherDao;
	}

	public void getStudentInfo(){
		teacherDao.getTeacher();
	}
}

public class TeacherDao {

	public void getTeacher() {
		System.out.println("TeacherDao#getTeacher");
	}
}
配置类
@Configuration
@Component
@ComponentScan("com.binghuazheng.springioc.beaninit")
@ImportResource("/SpringConfig.xml")
public class AppConfig {
}
xml配置
<?xml version="1.0" encoding="UTF-8"?>
<beans xmlns="http://www.springframework.org/schema/beans"
       xmlns:xsi="http://www.w3.org/2001/XMLSchema-instance"
       xmlns:abc="http://www.springframework.org/schema/context"
       xsi:schemaLocation="http://www.springframework.org/schema/beans http://www.springframework.org/schema/beans/spring-beans.xsd
       http://www.springframework.org/schema/context  http://www.springframework.org/schema/context/spring-context.xsd">

    <bean id="studentDao" class="com.binghuazheng.springioc.beaninit.bean.StudentDao" factory-method="createInstance">
		<constructor-arg ref="teacherDao"/>
	</bean>
	<bean id="teacherDao" class="com.binghuazheng.springioc.beaninit.bean.TeacherDao"/>

</beans>
测试类
public class Test {

	public static void main(String[] args) {
		AnnotationConfigApplicationContext context = new AnnotationConfigApplicationContext();
		context.register(AppConfig.class);
		context.refresh();
		StudentDao studentDao = context.getBean("studentDao", StudentDao.class);
		studentDao.getStudentInfo();
	}
}
以上就是Spring在早先的xml时期实现IOC这一思想所用到的DI方式,是使用Spring框架的基础。
Spring的自动装配
提起自动装配,可能很多人会先想到@Autowired或者@Resource注解。其实这两个注解和自动装配没什么关系,这个后续再说。
Spring框架也是一点一点优化和进步的,早期的XML配置,过于麻烦。每个bean之间的依赖关系都要通过xml来表明,那对于用户来将也是一种折磨。Spring可能也感觉惭愧难当,于是乎推出了自动装配这一新思想。
所谓自动装配,顾名思义Spring会自动分析你bean之间的依赖关系,然后在创建bean的时候,从容器取出需要的bean依赖,注入到要创建的bean中。
那么问题来了,摒弃最早的用户在XML中通过setter和contructor这种指明bean的依赖关系这一方法,Spring自动装配如何让程序知道你bean之间的依赖关系呢?
Spring的自动装配模式

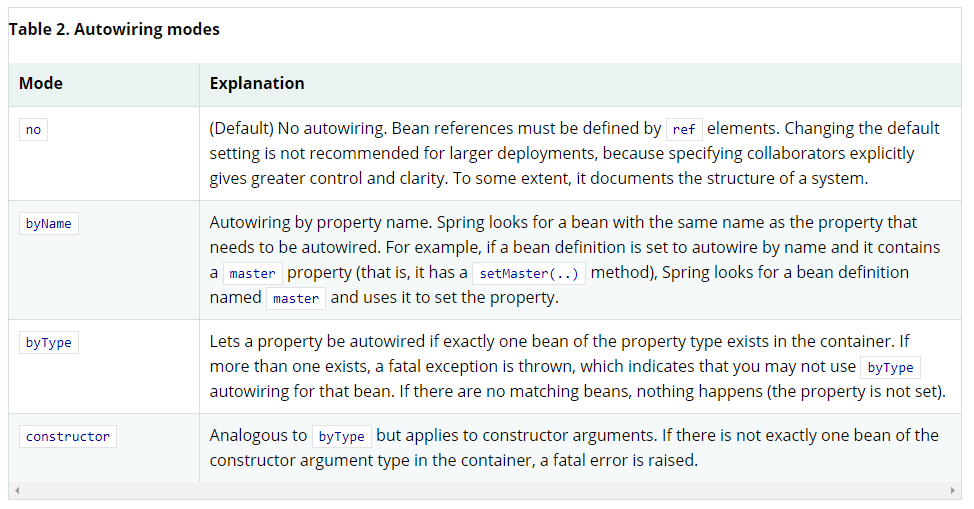
Spring Framework的AutowireCapableBeanFactory类中明确指定了Spring的自动装配模式。其中AUTOWIRE_AUTODETECT这种在Spring3不再支持。
	/**
	 * Constant that indicates no externally defined autowiring. Note that
	 * BeanFactoryAware etc and annotation-driven injection will still be applied.
	 * @see #createBean
	 * @see #autowire
	 * @see #autowireBeanProperties
	 */
	int AUTOWIRE_NO = 0;

	/**
	 * Constant that indicates autowiring bean properties by name
	 * (applying to all bean property setters).
	 * @see #createBean
	 * @see #autowire
	 * @see #autowireBeanProperties
	 */
	int AUTOWIRE_BY_NAME = 1;

	/**
	 * Constant that indicates autowiring bean properties by type
	 * (applying to all bean property setters).
	 * @see #createBean
	 * @see #autowire
	 * @see #autowireBeanProperties
	 */
	int AUTOWIRE_BY_TYPE = 2;

	/**
	 * Constant that indicates autowiring the greediest constructor that
	 * can be satisfied (involves resolving the appropriate constructor).
	 * @see #createBean
	 * @see #autowire
	 */
	int AUTOWIRE_CONSTRUCTOR = 3;

	/**
	 * Constant that indicates determining an appropriate autowire strategy
	 * through introspection of the bean class.
	 * @see #createBean
	 * @see #autowire
	 * @deprecated as of Spring 3.0: If you are using mixed autowiring strategies,
	 * prefer annotation-based autowiring for clearer demarcation of autowiring needs.
	 */
	@Deprecated
	int AUTOWIRE_AUTODETECT = 4;
篇幅有限,不从源码角度来说明这四种的工作原理了,直接点出它的意义和使用注意吧。
基于xml使用(可以在beans节点中设置全局自动配置属性)。
<?xml version="1.0" encoding="UTF-8"?>
<beans xmlns="http://www.springframework.org/schema/beans"
       xmlns:xsi="http://www.w3.org/2001/XMLSchema-instance"
       xmlns:abc="http://www.springframework.org/schema/context"
       xsi:schemaLocation="http://www.springframework.org/schema/beans http://www.springframework.org/schema/beans/spring-beans.xsd
       http://www.springframework.org/schema/context  http://www.springframework.org/schema/context/spring-context.xsd">

	<bean id="studentDao" class="com.binghuazheng.springioc.beaninit.bean.StudentDao" autowire="byType"/>

	<bean id="teacherDao" class="com.binghuazheng.springioc.beaninit.bean.TeacherDao"/>

</beans>
基于注解@Bean使用
	/**
	 * Are dependencies to be injected via convention-based autowiring by name or type?
	 * <p>Note that this autowire mode is just about externally driven autowiring based
	 * on bean property setter methods by convention, analogous to XML bean definitions.
	 * <p>The default mode does allow for annotation-driven autowiring. "no" refers to
	 * externally driven autowiring only, not affecting any autowiring demands that the
	 * bean class itself expresses through annotations.
	 * @see Autowire#BY_NAME
	 * @see Autowire#BY_TYPE
	 */
	Autowire autowire() default Autowire.NO;
- AUTOWIRE_NO,这种by no装配模式,也就是说该beanDefinition没有被设置为自动装配,前面提到的@Autowired注解就是这种装配模式,所以单纯的从定义上来说,现在我们经常用的注解装配并不是自动装配,这点和和很多博客都有出入,但源码中确实如此,关于@Autowired注解后续在我会在源码解析的博客单独再说。
- AUTOWIRE_BY_NAME,按照名称自动装配,这种装配方式,Spring在创建bean的时候,解析你的bean的class中的以set开头的方法,然后它会截取set后边的名称(首字母小写),比如setTeacherDao方法,那么Spring就会直接从解析到teacherDao这个名称,然后从容器中getBean这个依赖,然后通过反射执行setTeacherDao方法,将依赖注入到bean中。当然Spring会校验这个方法,找不到指定名称的bean,或者判断参数个数和类型是否匹配,不匹配的话,也不会执行。
- AUTOWIRE_BY_TYPE,按照类型自动装配,基于这种装配方式,Spring会查找当前bean中的写方法(writeMethod),也就是以set开头的方法,其次它不会管set后的名称是什么,直接获取该方法的参数,通过参数的类型和名称(类的名称,首字母小写)去容器中通过getBean方法去查找,如果没找到或者参数的个数不匹配,则不会执行此方法。找到后,也会通过暴力反射执行此方法。
下面是Spring中判断是byType还是byName自动注入的选择。
// spring默认的自动注入方式,默认就是AUTOWIRE_NO。所以一般不会进入下面的判断里。
		if (mbd.getResolvedAutowireMode() == AUTOWIRE_BY_NAME || mbd.getResolvedAutowireMode() == AUTOWIRE_BY_TYPE) {
			MutablePropertyValues newPvs = new MutablePropertyValues(pvs);
			// Add property values based on autowire by name if applicable.
			if (mbd.getResolvedAutowireMode() == AUTOWIRE_BY_NAME) {
				autowireByName(beanName, mbd, bw, newPvs);
			}
			// Add property values based on autowire by type if applicable.
			if (mbd.getResolvedAutowireMode() == AUTOWIRE_BY_TYPE) {
				autowireByType(beanName, mbd, bw, newPvs);
			}
			pvs = newPvs;
		}
-
AUTOWIRE_CONSTRUCTOR,按照构造器自动装配,这种自动装配模式相对复杂些。因为bean的构造器可以有多个,构造器的参数个数也没有限制。那Spring如何选取其中的构造器去创建对象呢?
首先Spring会通过AbstractAutowireCapableBeanFactory中的determineConstructorsFromBeanPostProcessors方法选取合适的构造器,这个方法选取构造器的策略如下: -
优先选择带有@Autowired注解的构造器去创建对象
-
如果有多个带有Autowired注解的构造器,spring无法做出优先级判断,抛出异常。
-
如果有多个带有@Autowired注解的构造器,但是它们的required属性是false,收集这些构造器,如果有默认无参构造器,同样加到集和内返回.
-
如果有多个普通构造器,spring无法做出判断,返回一个空回来。
第三种情况,spring会进入到autowireConstructor方法内,遍历这些构造器,然后进行筛选,筛选策略下面说.
第四种情况如果有多个普通构造器,Spring会返回一个空回来。如果不是自动装配,就会默认选择无参构造器创建对象。如果是自动装配,就会进入到autowireConstructor方法中,通过反射获取该bean的所有构造器,然后对这些构造器进行筛选,筛选的策略相对复杂,源码读的时候很痛苦,大概意思如下:
- 获取所有构造器,进行一个排序,排序的机制是按照public -> protected -> default -> private访问修饰权限和参数个数来降序排序。
- 顺序遍历这些构造器,通过调用createArgumentArray方法创建一个构造器包装类ArgumentsHolder对象,构造的过程中会getBean此构造器的参数,如果容器中没有此依赖bean。就会产生异常,但Spring会暂时接收此异常不抛出去,继续遍历下一个构造器。
- 如果全部遍历完都有异常信息,Spring就会正式抛出异常,程序停止。如果遍历后,有正常的ArgumentsHolder对象,就会将此对象暂存起来,然后和下一个正常创建的构造器的ArgumentsHolder对象做一个权重比较,具体的权重算法我还不太明白,结果就是选取最小比例因子的构造器,然后通过此构造器去正式创建对象。
源码中的判断入口方法如下。
		// Candidate constructors for autowiring?
		// 分析class对象中的构造器,选取合适的构造器。
		// 优先选择带有@Autowired注解的构造器,
		// 如果有多个带有Autowired注解的构造器,spring无法做出优先级判断,抛出异常。
		// 如果有多个普通构造器,spring无法做出判断,返回一个空回来,默认选择默认的无参构造器。
		Constructor<?>[] ctors = determineConstructorsFromBeanPostProcessors(beanClass, beanName);
		// 自动注入方式为构造器时会进入下面方法去选取构造器创建对象。
		if (ctors != null || mbd.getResolvedAutowireMode() == AUTOWIRE_CONSTRUCTOR ||
				mbd.hasConstructorArgumentValues() || !ObjectUtils.isEmpty(args)) {
			// 有构造器的时候,就通过autowireConstructor方法去初始化对象。
			// 都是通过Constructor.newInstance方法创建对象。
			return autowireConstructor(beanName, mbd, ctors, args);
		}

		// No special handling: simply use no-arg constructor.
		// 默认无参构造器时,就会通过instantiateBean去初始化对象。
		return instantiateBean(beanName, mbd);
以上就是Spring的自动装配的四种方式。我表达的可能不是很清晰,具体思想还是要自己看源码去理解。
Spring基于注解的依赖注入
继续随着时间轴去走,某一时间点,JDK某一版本出现了注解技术。
前面的XML配置的方式,一开始是要用户去声明出bean之间构造器和属性注入的依赖关系,后来自动装配省略了这种声明,大大减少了xml的繁琐配置。
但是这样依然满足不了广大程序员的懒人心理,Spring也不会坐吃山空,吃xml配置的老本。如果Spring这么干,没几年就会被其它框架占去市场。
终于Spring迎来了重要的时代,基于注解的bean的声明和注入开发模式。
尤其是@Autowired这个注解,当时的程序员终于从xml中解脱出来了,终于可以早点下班了。
步入正题,先说一下这个注解的使用方式和注意事项吧。
它可以标注在方法上,属性上和构造器上。虽然该注解的源码中还可以标注在方法参数和其它注解上,但我的使用中还没有发现标注在方法参数上的作用。
@Component
public class StudentDao {

	@Autowired
	private TeacherDao teacherDao;

	public StudentDao(){}

	@Autowired
	public StudentDao(TeacherDao teacherDao) {
		this.teacherDao  = teacherDao;
	}

	@Autowired
	public void setTeacherDao(TeacherDao teacherDao){
		this.teacherDao  = teacherDao;
	}

	public void getStudentInfo(){
		teacherDao.getTeacher();
	}
}
如上图,我们现在大量使用的就是
- 注解在属性上,这种方式不需要像早先时候还要有setter方法,省略了set/get方法,源码直接暴力反射,调用set方法去执行填充属性。
- 注解在构造器上,Spring就会通过此构造器去创建对象,但仅能有一个构造器被此注解标注,不然Spring无法区分用哪个构造器,抛出异常。
- 注解在方法上,Spring在实例化后,填充属性的时候,就会调用此方法注入依赖。
不论这三种方式,严格意义来讲,@Autowired注解注入算不上自动装配,或者说它的装配模式就是AUTOWIRE_NO。直接断点上图解释一波吧。

populateBean的时候,会到此处根据beanDefinition的自动装配模式,判断以什么模式来装配。

autowiredMode为0,而我们前面说到的 AUTOWIRE_NO就是0。
	/**
	 * Constant that indicates no externally defined autowiring. Note that
	 * BeanFactoryAware etc and annotation-driven injection will still be applied.
	 * @see #createBean
	 * @see #autowire
	 * @see #autowireBeanProperties
	 */
	int AUTOWIRE_NO = 0;
所以他不会进入if判断中,它会进入到后面的代码中去执行。
if (hasInstAwareBpps) {
				for (BeanPostProcessor bp : getBeanPostProcessors()) {
					if (bp instanceof InstantiationAwareBeanPostProcessor) {
						// 这里主要就是spring内部的CommonAnnotationBeanPostProcessor(处理@Resource注解注入bean)
						// AutowiredAnnotationBeanPostProcessor(处理@Autowired注解注入的bean)
						// 通过内部的后置处理器填充属性依赖
						InstantiationAwareBeanPostProcessor ibp = (InstantiationAwareBeanPostProcessor) bp;
						pvs = ibp.postProcessPropertyValues(pvs, filteredPds, bw.getWrappedInstance(), beanName);
						if (pvs == null) {
							return;
						}
					}
				}
			}
这里它会通过后置处理器AutowiredAnnotationBeanPostProcessor去执行@Autowired注解的依赖注入。
这块与现在很多博客有出入,很多人把@Autowired算入自动装配模式。个人觉得这是错误的观点。
然后再说说这个注解注入依赖的方式吧,网上很多解释让很多人只知道它是基于ByType方式自动注入,有点误导新人了。
- 首先,它会先根据类型去容器中查找此类型的bean,如果仅有一个符合条件,则注入到属性中。
- 其次如果有多个符合此类型的bean,这时候,就会按照此依赖的bean属性名称再次去查找,因为Spring的beanFactory中的bean都是存储在map中,key就是bean的名称。所以名称是具有唯一性的,如果通过属性名称找到了唯一bean,就会将此bean注入到属性中。
- 如果类型有多个,且找不到唯一的bean名称,就会抛出异常。这也就是我们平常的开发中,在面向接口开发时,接口下有多个实现类,我们在依赖其它bean时,肯定声明的是接口,这样Spring就会找到多个此接口类型的实现类。而名称很多人都直接用IDE自动生成,也就是接口类型的首字母小写。这个名称当然不存在与容器map中,报异常也是理所当然了。
基于上面的分析,其实我们有时候并不需要用@Qualifier这个注解去指定名称,直接修改属性名和想要注入的bean的id一致就可以了。
好了,到此Spirng的依赖注入也算是说完了。其实说到这,你会发现并没有什么卵用,开发时候根本不需要关心这些事,直接@Autowired全部搞定了,手动滑稽一波。
由于本人还只是Spring的初学者,可能有说的不清晰的地方,还请直接指出来,我们一起讨论,结对编程,一起提高 O.O。
最后
以上就是酷酷小霸王最近收集整理的关于对Spring依赖注入的理解的全部内容,更多相关对Spring依赖注入内容请搜索靠谱客的其他文章。


发表评论 取消回复