C++Win764x下做掉PatchGuard教程
C++于R3层干掉PG.我已经搞定很久了
但是一直也没有发出来.
因为做掉PG还有很多高深的办法,PG也不是那么难过掉的东西.我靠着一些资料埋头研究了半个月之久.成功的在win7 64位下干掉了PG.实现了64SSDT HOOK以及绕驱动签名强制
道理我都懂,没图你说个J8?上图
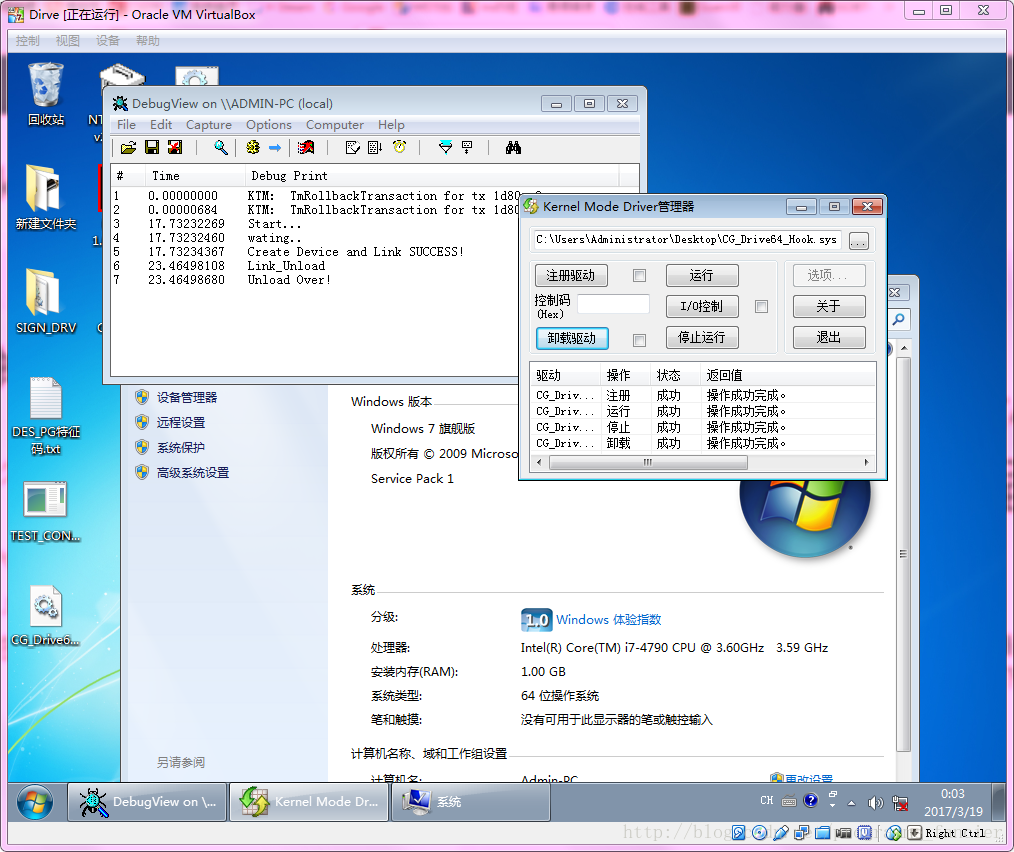
在开始之前,有几点是必须说的
第一.该方法应该是来自Fyyre
第二.我根本不懂其原理!…只是做绕过PG而已.让我讲清楚这玩意到底怎么回事不太可能.我没那水平!
第三.Tesla.Angela出了一份做掉PG的汇编教程,基本按照教程就没问题了!只不过需要自己实现,代码是汇编代码.不过问题是教程并不完整,少了最后一步.导致进入系统时蓝屏
有了Fyyre的英文原文.再加上Tesla.Angela的中文教程,我才得以成功绕过PG.不过还有一份东西很重要.最后再说
关于英文原文,我无法找到了.只找到了转载:http://www.m5home.com/bbs/forum.php?mod=viewthread&tid=6182&page=1
至于中文教程我就不放了.免得造成什么不愉快,我是在看雪找到的.
本来是不准备写教程的.因为我觉得这种技术以及出现很久了.而且过PG的方法太多,而我也是从别人那里学来的.这样的东西不值得写成博文!我认为写这种东西会相当小儿科
不过在基友的诱拐下,还是决定写出来.他说不会过PG,和被PG拦在外面的人很多很多
最后,容我先黑一波
VC++6.0是渣渣 MFC是垃圾!Java就不应该被发明!!!
好了,咱们开始吧…
在本教程的开头我就说过,WIN64 有两个内核保护机制,KPP 和 DSE。KPP 阻
止我们 PATCH 内核, DSE 拦截我们加载驱动。 当然 KPP 和 DSE 并不是不可战胜的,
WIN7X64 出来不久,FYYRE 就发布了破解内核的工具,后来有个叫做 Feryno 的人
又公开了源代码,接下来我结合 FYYRE 的文档 Feryno 的源码进行讲解。
要实现突破 DSE 和 PatchGuard,必须修改两个文件,winload.exe 以及
ntoskrnl.exe。首先把 WINLOAD.EXE 扔到 IDA 里,看看要修改哪些地方
OK.先动手winload!
winload.exe is the Windows loader for Vista & Windows 7. Along with this, he makes some verification of digital signatures and
checking to make sure the files have not been modified. If modification of ntoskrnl is detected, the result is winload refusing
to boot Windows and launching a WinPE looking “Recovery Mode”.
//PART I { additional }: new way for patch of winload.exe
//
//Function ImgpValidateImageHash - signature we locate: 8B C3 49 8B 5B 20 49 8B 73 28 49 8B 7B 30 4D 8B – you may play with this one to make him smaller. as for this
//patching, use of dUP2… size of not a concern. First bytes replaced with xor eax, eax (STATUS_SUCCESS) .. all validations successful.
自行翻译吧…我就不献丑了= =
先把winload丢进IDA Pro
最开始,我是按照Fyyre给出来的特征码.不过后来我自己又修改了定位.所以这里就不用他的定位了
显示winload的定位
xCCx48x8BxC4x53x55x57x41x54

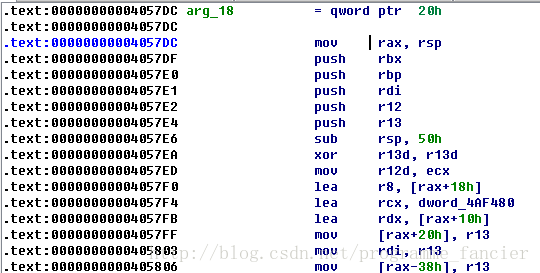
Starting from OslpMain, after loading the System registry hives(registry)… occurs a call to OslInitializeCodeIntegrity:
.text:00000000004016C3 call OslpLoadSystemHive
.text:00000000004016C3
.text:00000000004016C8 cmp eax, ebx
.text:00000000004016CA mov edi, eax
.text:00000000004016CC jl loc_401A08
.text:00000000004016CC
.text:00000000004016D2 mov ecx, ebp
.text:00000000004016D4 call OslInitializeCodeIntegrity <<– =(
48 8B C4 53
.text:00000000004057E8 mov rax, rsp
.text:00000000004057EB push rbx
.text:00000000004057EC push rbp
with: 0B0h, 01h, 0C3h, 090h … which produce:
mov al, 1
ret
nop
Fyyre的原文中说,需要修改此处四个字节.但是其实只需要修改3个字节即可!
要修改的是mov rax,rsp
也就是
48h,8Bh,C4h
mov rax, rsp
修改为
B0h,01h,C3h
mov al,1
ret
这么做的用途是跳过对 BlImgQueryCodeIntegrityBootOptions 的调用,据
我了解, 此函数 会判断 N NE TOSKRNL.EXE 的数字签名 有效性 ( 签名非法 的话就拒绝
加载 NTOSKRNL.EXE) ) 。所以这是一个难缠的家伙,直接跳过。
OK,winload搞定
Save as winload.exe as osloader.exe (or whatever..) & correct PE checksum (LordPE and/or CFF_Explorer will do).
Copy osloader.exe to WindowsSystem32
至于文件校对值,我们后面再说!
接下来是ntoskrnl
首先是第一处地址:x81xECx58x0Fx00x00x33xFFx39x3D

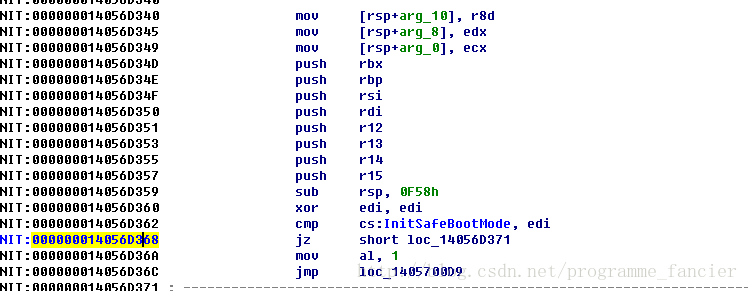
Part III: Skip Initialization of PatchGuard - - (driver not required)
As for this .txt, and PatchGuard… we are concerned with one function KiInitializePatchGuard(*1) which is called by KiFilterFiberContext.
KiInitializePatchGuard is a very large function located in the INIT section of ntoskrnl, you can easily locate him via two calls from
KiFilterFiberContext, by examination xrefs to exported dword InitSafeBootMode, searching for db 20h dup(90h) + db 044h … or 48 81 EC 58 0F 00 00 to name a few…
PatchGuard does not initialize if we boot into safe mode. So to disable we just patch one conditional jxx
如果我们进入安全模式,PG则不会初始化.所以我们用nop填充掉
74 07
jz short loc_140561371
90 90
nop nop
这是ntoskrnl的第一处,接下来还有一处.是关于驱动签名强制的.在v1版本的英文原文中,我似乎没有找到这部分内容
其特征码为:xE1xFFx0Fx85x94x00x00x00x33xC0

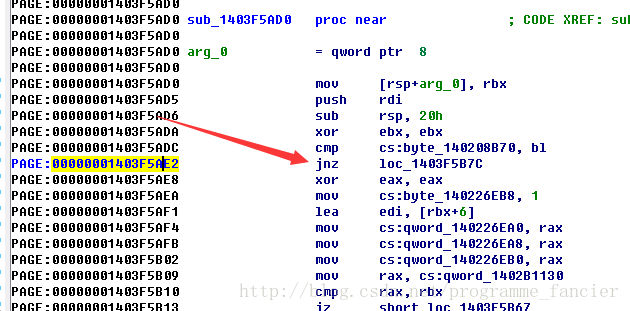
0Fh,85h,94h,00h,00h,00h
jnz loc_1403EAB0C
90 E9h,94h,00h,00h,00h
nop
jmp loc_1403EAB0C
这样做的目的是跳过“是否为 WINPE 模式”的判断,强行转入系统是 WINPE
模式的处理过程(loc_1403EAB0C) 。因为如果是 WINPE 模式的话就不会校验驱动
的数字签名。
OK,到此就已经完成了两份文件的修改
但是我们的任务还远远没有完成.当初我仅用了1,2天就搞定了这些,但实际上,真正搞定PG.我却花了半个月
至于文件校对我们最后说
先说说按照这样修改的结果
结果是在部分win64系统上完美的干掉了PG.驱动也不需要签名即可加载!
但仅仅是部分,随后我就遇到了麻烦
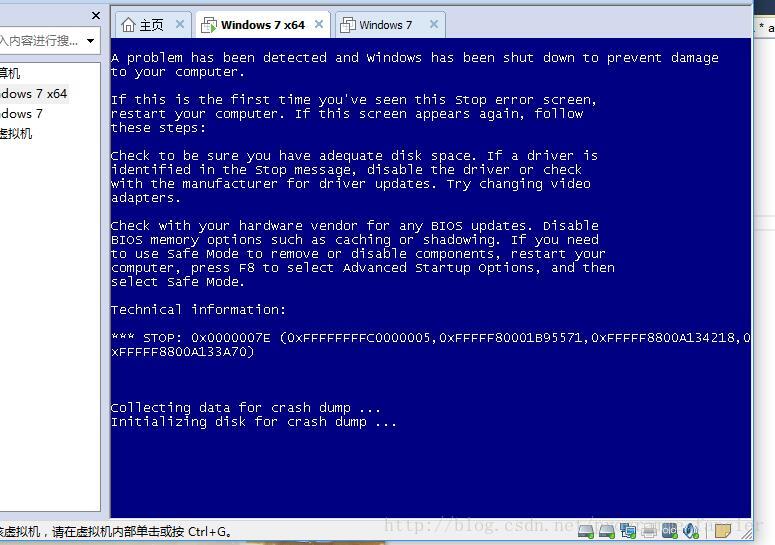
喜闻乐见
进入系统的时候蓝屏了
这是朋友返给我的截图 我从来不用VM.太他妈胖了…我用的是VirtualBox
当我第一次按照教程一步步来的时候,我成功的绕过了PG
那是在公司的时候,在公司的虚拟机上按照教程成功了.
但是当我回到家的时候,遇到了蓝屏…
无论我怎么校对,怎么测试.都没问题
也就是说,无论是V1版本的原文,还是中文的汇编过PG.都是不完整的!
我花了半个月研究这个问题.最终,我在网上找到一份过PG的补丁.其实
一直都在我硬盘里面…
那份补丁神奇的过掉了PG.于是我用了一个笨办法.二进制对比!
我捕捉了windows的日志,发现问题的来源.是ntoskrnl
我继续深入下去,发现问题出在3个地方
xC1xF8x30
ntoskrnl中,会出现三次这段字节码
将30改成2F之后,完美过PG
朋友返的图
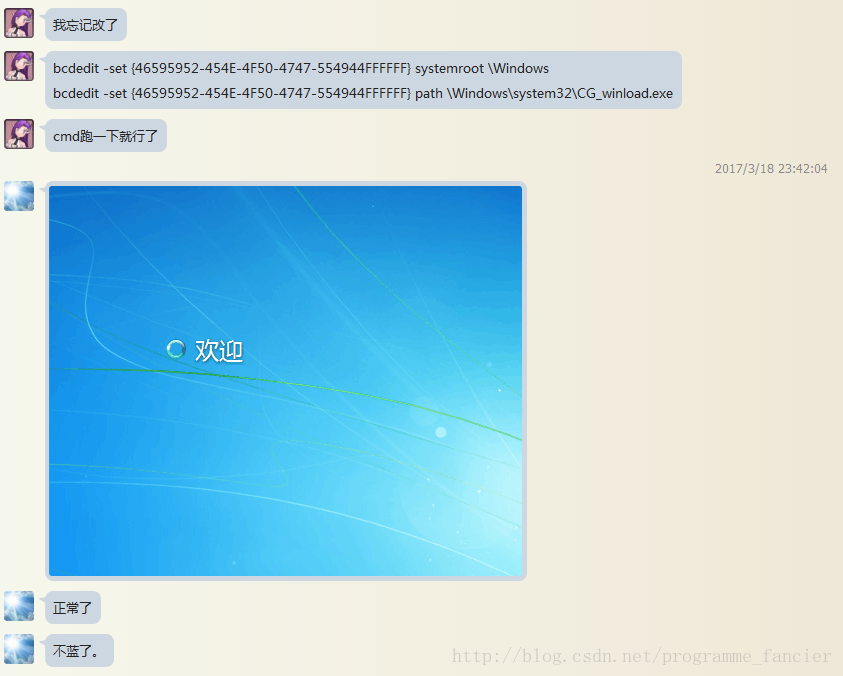
OK,也就说.ntoskrnl要修改的地方并不止2处.而是3处!
接下来,我们的任务还没结束.因为windows会校对文件的checksum
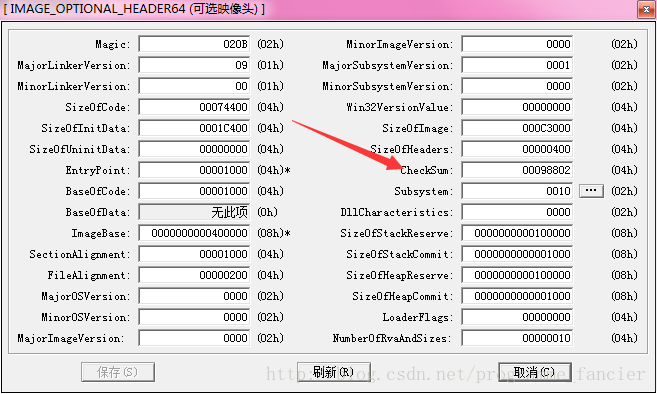
上段代码,自行研究.
- 1
- 2
- 3
- 1
- 2
- 3
接下来才是最后一步,修改BCD启动项.我的选择是新建一份
这份是来自中文教程的
@ECHO OFF
ECHO.
ECHO Creating patched copies of winload, ntkrnlmp/ntoskrnl…
ECHO.
patch.exe
ECHO.
ECHO Creating BCD Entry…
ECHO.
set ENTRY_GUID={46595952-454E-4F50-4747-554944FFFFFF}
bcdedit -create %ENTRY_GUID% -d “KPP & DSE Disabled” -application OSLOADER
bcdedit -set %ENTRY_GUID% device partition=%SYSTEMDRIVE%
bcdedit -set %ENTRY_GUID% osdevice partition=%SYSTEMDRIVE%
bcdedit -set %ENTRY_GUID% systemroot Windows
bcdedit -set %ENTRY_GUID% path Windowssystem32freeload.exe
bcdedit -set %ENTRY_GUID% kernel goodkrnl.exe
bcdedit -set %ENTRY_GUID% recoveryenabled 0
bcdedit -set %ENTRY_GUID% nx OptOut
bcdedit -set %ENTRY_GUID% nointegritychecks 1
bcdedit -set %ENTRY_GUID% testsigning 1
bcdedit -displayorder %ENTRY_GUID% -addlast
bcdedit -timeout 5
bcdedit -default %ENTRY_GUID%
ECHO.
ECHO Setting PEAUTH service to manual… (avoid BSOD at login screen)
ECHO.
sc config peauth start= demand
ECHO.
ECHO Complete!
ECHO.
PAUSE
shutdown /r /t 0
OK,接下来就是C++实现的部分了.我会在代码上进行注释.很早以前写的,一直也没有整理.所以看起来很乱,有的也是瞎J8写的
- 1
- 2
- 3
- 4
- 5
- 6
- 7
- 8
- 9
- 10
- 11
- 12
- 13
- 14
- 15
- 16
- 17
- 18
- 19
- 20
- 21
- 22
- 23
- 24
- 25
- 26
- 27
- 28
- 29
- 30
- 31
- 32
- 33
- 34
- 35
- 36
- 37
- 38
- 39
- 40
- 41
- 42
- 43
- 44
- 45
- 46
- 47
- 48
- 49
- 50
- 51
- 52
- 53
- 54
- 55
- 56
- 57
- 58
- 59
- 60
- 61
- 62
- 63
- 64
- 65
- 66
- 67
- 68
- 69
- 70
- 71
- 72
- 73
- 74
- 75
- 76
- 77
- 78
- 79
- 80
- 81
- 82
- 83
- 84
- 85
- 86
- 87
- 88
- 89
- 90
- 91
- 92
- 93
- 94
- 95
- 96
- 97
- 98
- 99
- 100
- 101
- 102
- 103
- 104
- 105
- 106
- 107
- 108
- 109
- 110
- 111
- 112
- 113
- 114
OK.到此就搞定了
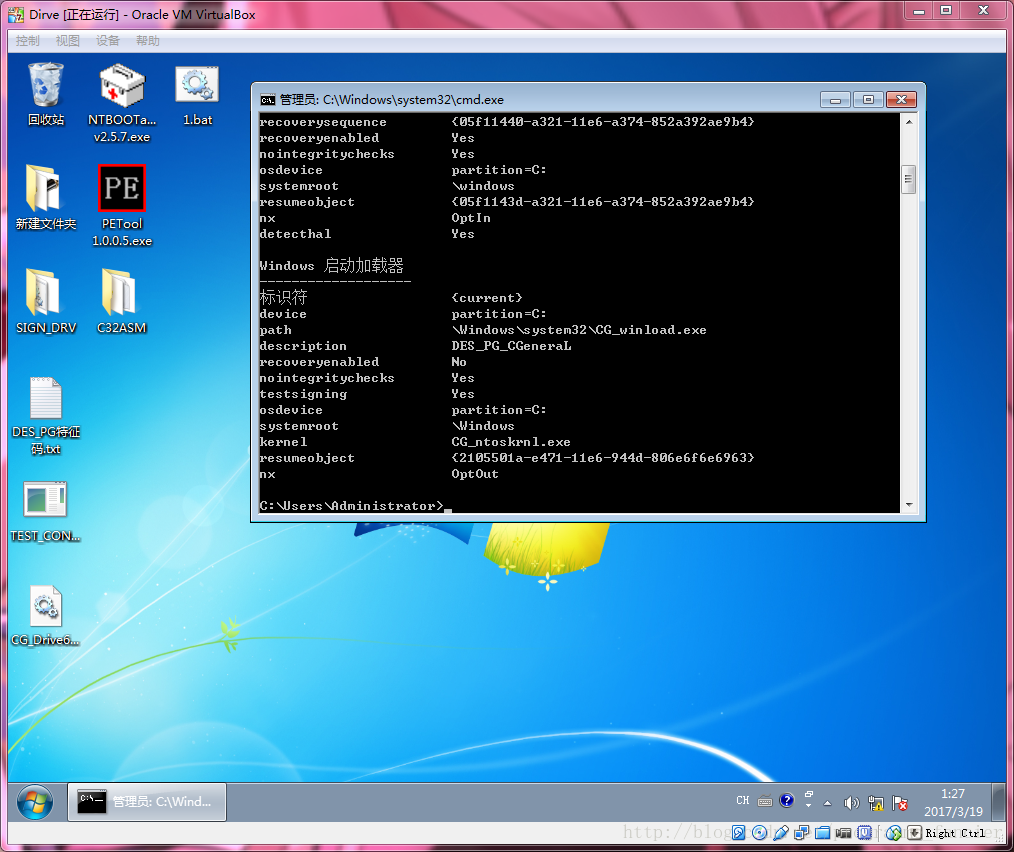
编译,运行.重启!
烦人的强行驱动签名和PG消失了!!!
最后
以上就是稳重裙子最近收集整理的关于C++Win764x下做掉PatchGuard教程 C++Win764x下做掉PatchGuard教程的全部内容,更多相关C++Win764x下做掉PatchGuard教程内容请搜索靠谱客的其他文章。


发表评论 取消回复