因为公司的需求,对比了线在很火的几款富文本编辑器,最终选定了quill,他够轻量,拓展性也比较高,除了文档是英文的阅读不方便之外,都很适合公司项目。故整理出来,也方便以后使用。
在网上找了一个中文文档,翻译不全面,不过基本语法已经足够用了。Quill官方中文文档
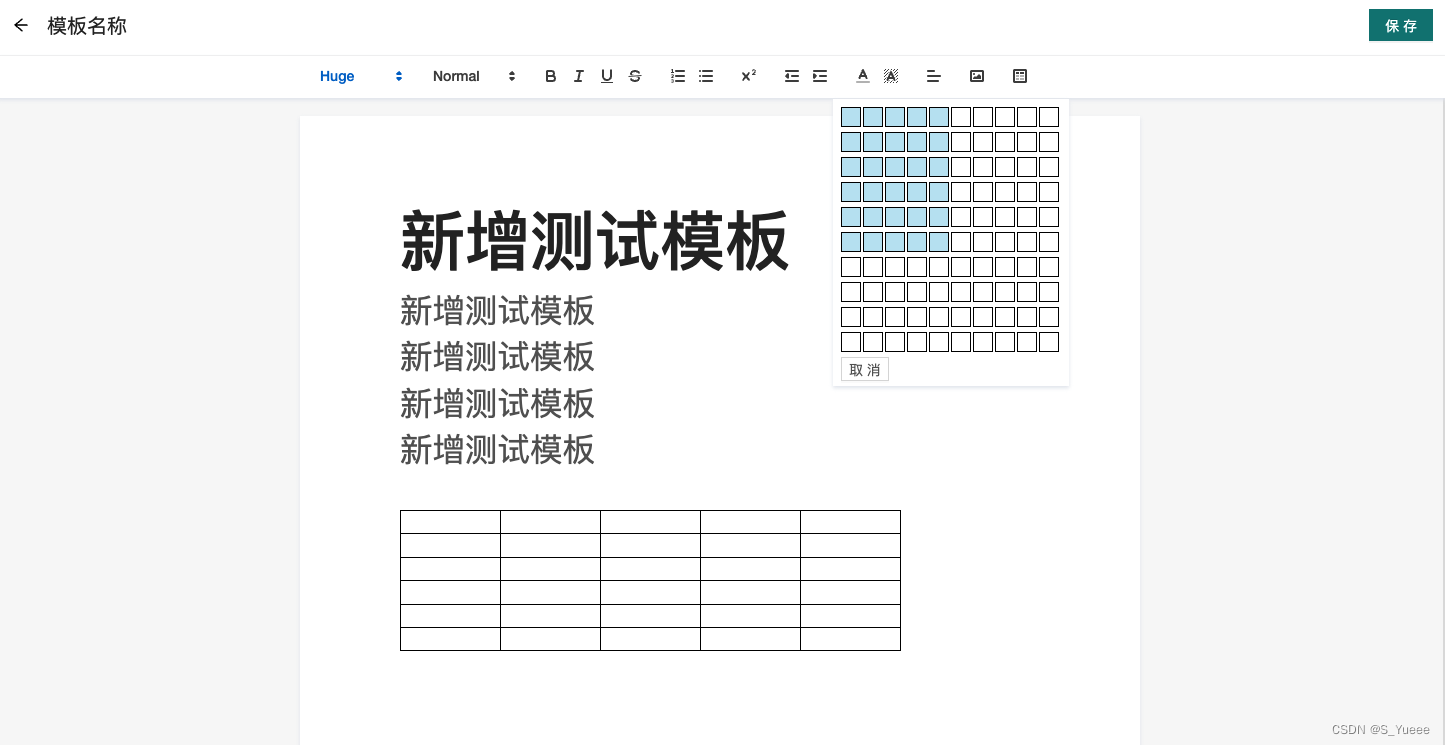
最终实现效果
安装
// 2.0的版本才支持安装table插件
npm install --save quill@2.0.0-dev.4

// table插件 支持新增行(列)、合并行(列)等功能
npm install --save quill-better-table

// 支持图片上传,拖拽插入,剪贴板图片插入等拓展功能
npm install --save quill-image-drop-module

// 支持图片调整大小插件
npm install --save quill-image-resize-module
使用
<template>
  <div
    :style="{ minHeight: minHeight + 'px' }"
    :class="['jg-edit', readOnly ? 'hidden-toolbar' : '']"
  >
    <div class="jg-edit-page">
      <!-- 新增table时的快捷操作框 start -->
      <div v-show="showChooseTable" class="jg-edit-table-choose">
        <div
          v-for="r in chooseRow"
          :key="r"
          class="jg-edit-table-choose-row"
          :style="{width:((chooseRow * 20) + 20) + 'px'}"
        >
          <div
            v-for="c in chooseCol"
            ref="chooseTableItem"
            :key="c"
            :row="r"
            :col="c"
            :class="['jg-edit-table-choose-col', r + '-' + c]"
            @mouseover="mouseoverCol(r, c)"
            @mouseleave="mouseleaveCol(r, c)"
            @click="clickCol(r, c)"
          />
        </div>
        <a-button size="small" @click="showChooseTable = false">取消</a-button>
      </div>
      <!-- 新增table时的快捷操作框 end -->

      <div class="editor" />
    </div>
  </div>
</template>
js部分
<script>
import Quill from 'quill'

import QuillBetterTable from 'quill-better-table' // 可编辑的table
import ImageResize from 'quill-image-resize-module' // 图片位置 以及 改变图片大小
import { ImageDrop } from 'quill-image-drop-module' // 粘贴剪贴板图片

Quill.register({
  'modules/better-table': QuillBetterTable,
  'modules/imageResize': ImageResize,
  'modules/imageDrop': ImageDrop
}, true)

export default {
  name: 'Editor',
  props: {
    value: { type: String, default: () => '' }, // 传入的html
    minHeight: { type: Number, default: () => 500 }, // 编辑器最小高度
    readOnly: { type: Boolean, default: () => false } // 只读模式
  },
  data() {
    return {
      quill: null,
      options: {
        theme: 'snow',
        modules: {
          toolbar: {
            container: [
              [{ 'size': ['small', false, 'large', 'huge'] }],
              [{ 'header': [1, 2, 3, 4, 5, 6, false] }],
              ['bold', 'italic', 'underline', 'strike'],
              [{ 'list': 'ordered' }, { 'list': 'bullet' }],
              [{ 'script': 'super' }],
              [{ 'indent': '-1' }, { 'indent': '+1' }],
              [{ 'color': [] }, { 'background': [] }],
              [{ 'align': [] }],
              // ['link',
              ['image'],
              ['table']
            ],
            handlers: {
              table: () => {
                this.showChooseTable = !this.showChooseTable
              }
            }
          },
          // 工具菜单栏配置
          table: false, // disable table module
          'better-table': { // 表格设置
            operationMenu: {
              items: { // 鼠标右键菜单设置,如将某一项设置false则右键菜单不会显示 如insertColumnRight: false
                insertColumnRight: { text: '右边插入一列' },
                insertColumnLeft: { text: '左边插入一列' },
                insertRowUp: { text: '上边插入一行' },
                insertRowDown: { text: '下边插入一行' },
                mergeCells: { text: '合并单元格' },
                unmergeCells: { text: '拆分单元格' },
                deleteColumn: { text: '删除列' },
                deleteRow: { text: '删除行' },
                deleteTable: { text: '删除表格' }
              },
              background: {
                color: '#333'
              },
              color: {
                colors: ['green', 'red', 'yellow', 'blue', 'white'],
                text: '背景颜色:'
              }
            }
          },
          imageDrop: true,
          // 下面是图片的扩展插件(图片支持调整大小)不需要可删掉
          imageResize: {
            displayStyles: {
              backgroundColor: 'black',
              border: 'none',
              color: 'white'
            },
            modules: ['Resize', 'DisplaySize', 'Toolbar']
          },
          keyboard: {
            bindings: QuillBetterTable.keyboardBindings
          }
        },
        placeholder: '请输入内容'
      },
      // 新增table时的快捷操作框
      showChooseTable: false,
      chooseCol: 10, // 展示列 个数
      chooseRow: 10 // 展示行 个数
    }
  },
  watch: {
    value(newVal) {
      if (newVal) {
        this.drawing(newVal) // 解析HTML
      }
    }
  },
  mounted() {
    // 初始化编辑器
    this.onEditorFocus()
  },
  cerated() {
  },
  methods: {
    // 新增table时的快捷操作框
    mouseoverCol(row, col) {
      this.$refs.chooseTableItem.forEach(array => {
        const r = array.attributes['row'].value
        const c = array.attributes['col'].value
        if (r <= row && c <= col) {
          array.style.backgroundColor = 'rgba(32, 165, 214, .3)'
        }
      })
    },
    mouseleaveCol() {
      this.$refs.chooseTableItem.forEach(array => {
        array.style.backgroundColor = '#fff'
      })
    },
    clickCol(row, col) {
      this.quill.getModule('better-table').insertTable(row, col)
      this.showChooseTable = false
    },
    onEditorFocus() {
      this.quill = new Quill('.editor', this.options)

      this.drawing(this.value) // 解析HTML

      if (this.readOnly) {
        // 界面不允许编辑
        this.quill.enable(false)
      } else {
        this.quill.on('selection-change', () => {
          // 我的理解为光标每落在编辑器上将执行
          if (this.quill.getSelection()) {
            const { index, length } = this.quill.getSelection()
            Object.assign(this, {
              indexCursor: index, // 字符在编辑器的下标
              lengthCursor: length// 选中的字符长度
            })
          }
        })
      }
    },
    drawing(html) {
      const delta = this.quill.clipboard.convert({ html })
      this.quill.setContents(delta)
    },
    getHtml() {
      const html = this.quill.root.innerHTML
      return html
    }
  }
}

</script>
因为我想要金山文档那个样式,所以自己写了个样式进行覆盖
.jg-edit {
  background-color: rgba(0, 0, 0, 0.03);
  overflow: auto;
  padding: 60px 0 20px;
  height: 100%;

  &-page {
    width: 840px;
    min-height: 100%;
    background: #fff;
    padding: 80px 100px;
    margin: 0 auto;
    box-shadow: 0 2px 4px 0 #e2e6ed;

    &::before {
      content: " ";
      display: block;
      position: absolute;
      background: #fff;
      height: 42px;
      width: 100%;
      left: 0;
      right: 0;
      top: 0;
      box-shadow: 0 2px 4px 0 #e2e6ed;
      z-index: 2;
    }

    .ql-toolbar {
      position: absolute;
      width: 840px;
      top: 0;
      border: none;
      left: 50%;
      margin-left: -420px;
      z-index: 3;
    }

    .ql-container {
      border: none;
      min-height: calc(100vh - 290px);

      .ql-editor {
        padding: 0;
        overflow-y: visible;
        min-height: calc(100vh - 290px);

        &.ql-blank::before {
          color: rgba(0, 0, 0, 0.3);
          left: 0;
        }

        .quill-better-table {
          // margin: 0 auto;
        }
      }
    }

    .qlbt-col-tool {
      // justify-content: center;
    }
  }

  &-table-choose {
    position: absolute;
    z-index: 2;
    background: #fff;
    padding: 8px 8px 5px 8px;
    box-shadow: 0 2px 4px 0 #e2e6ed;
    top: 43px;
    left: 50%;
    margin-left: 110px;

    &-row {
    }

    &-col {
      border: 1px solid black;
      width: 20px;
      height: 20px;
      display: inline-block;
      padding: 0;
      margin-right: 2px;
      transition: .3s;

      &:last-child {
        margin-right: 0px;
      }
    }
  }

  &.hidden-toolbar {
    padding: 20px 0;

    .jg-edit-page {
      &::before {
        display: none;
      }

      .ql-toolbar {
        display: none;
      }
    }
  }
}
最后
以上就是动人小熊猫最近收集整理的关于vue中使用quill富文本编辑器最终实现效果安装使用的全部内容,更多相关vue中使用quill富文本编辑器最终实现效果安装使用内容请搜索靠谱客的其他文章。
本图文内容来源于网友提供,作为学习参考使用,或来自网络收集整理,版权属于原作者所有。


发表评论 取消回复