取消系统自带的Toolbar
将themes.xml文件中
<style name="Theme.App" parent="Theme.MaterialComponents.DayNight.DarkActionBar.Bridge">
DarkActionBar修改为NoActionBar
<style name="Theme.App" parent="Theme.MaterialComponents.DayNight.NoActionBar.Bridge">
这样就没有Toolbar了
layout_width
宽度
android:layout_width="match_parent"
layout_height
高度最好是设置成actionBar高度
android:layout_height="?actionBarSize"
background
背景色
android:background="#FFFF00"
title
标题
app:title="回弹仪"
titleTextColor
标题颜色
app:titleTextColor="#FFFF00"
titleMarginTop
标题左边距
app:titleMarginTop="0dp"
subtitle
子标题
app:subtitle="beta"
subtitleTextColor
子标题颜色
navigationIcon
导航图标通常使用返回箭头
app:navigationIcon="@drawable/back"
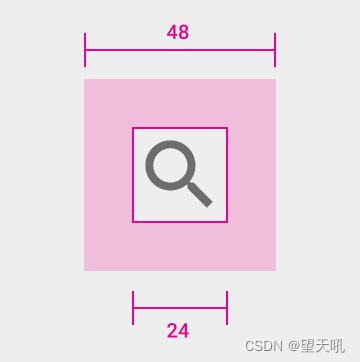
关于drawable内toolbarIcon尺寸建议使用以下设计规范
图标设计规范
根据Material Design的设计规范,Toolbar icon的尺寸应为24dp,触摸响应大小为48dp(Toolbar会自动进行设置),而在icon内部应有一定的留白,一般为2-4dp。因此对于一张96px的icon来说,图片内的四周应有12px左右的边距。
Toolbar的icon显示逻辑
与ImageView这样的控件相比,Toolbar显示icon的逻辑就显得比较简单粗暴。在Material Design中,Toolbar的推荐高度为56dp,其中icon的尺寸建议为24dp,那么icon在不同dpi下的实际像素尺寸如下:
| ldpi | 120dpi | 0.75 | 18px |
|---|---|---|---|
| mdpi | 160dpi | 1 | 24px |
| hdpi | 240dpi | 1.5 | 36px |
| xhdpi | 320dpi | 2 | 48px |
| xxhdpi | 480dpi | 3 | 72px |
| xxxhdpi | 640dpi | 4 | 96px |
这里的问题在于,Toolbar的MenuView在显示时读取图片资源后,不会检查是否应该缩放,而是直接居中显示。那么,如果你的图片资源经过屏幕像素密度换算后不是「恰好」24dp的话,最后显示的效果就会与期望的效果不一致。
例如,xhdpi文件夹存放的应该是48px的icon,如果放入了96px大小的icon的话在Toolbar上就会显得2倍大。反之,在xxxhdpi中放入48px的icon看上去就会额外小。这也是为什么MD图标库中的icon会给mdpi到xxxhdpi一套图标的原因。
解决方案
通常情况下Toolbar的icon都是纯色的png图片,体积非常小。以ic_search_white_24dp.png这个图标为例,mdpi文件夹内的图片大小为396字节,而xxxhdpi文件夹内的图片大小也只有915字节,即使全部使用最大尺寸的图标,对安装包体积的影响也微乎其微。
而且Toolbar的icon都是抽象的图标、细节不多,在低dip的设备上进行缩放时效果并没有太大差别,根据Google发布的设备屏幕尺寸分布情况,hdpi以上的设备也已经占了85%以上。所以如果想要减小安装包体积的话,Toolbar的icon是可以全部只使用一份96px*96px的图片资源,并存放在xxxhdpi中的。
至于其他只在ImageView等控件中显示的资源,如果只有一份的话,放在哪个文件夹内其实是无所谓的。
toolbar.xml
<?xml version="1.0" encoding="utf-8"?>
<androidx.constraintlayout.widget.ConstraintLayout
  xmlns:android="http://schemas.android.com/apk/res/android"
  xmlns:tools="http://schemas.android.com/tools"
  xmlns:app="http://schemas.android.com/apk/res-auto"
  android:layout_width="match_parent"
  android:layout_height="match_parent"
  tools:context=".ToolBar">
  <LinearLayout
    android:orientation="vertical"
    android:layout_width="match_parent"
    android:layout_height="match_parent">
    <androidx.appcompat.widget.Toolbar
      android:id="@+id/tb1"
      android:layout_width="match_parent"
      android:layout_height="?actionBarSize"
      android:layout_marginTop="10dp"
      android:background="#efefef"
      app:navigationIcon="@drawable/back"
      app:title="Toolbar1"
      app:titleTextColor="#000000"
      app:titleMarginTop="0dp"
      app:subtitle="beta"
      app:subtitleTextColor="#969797"
      tools:ignore="MissingConstraints"/>
    <androidx.appcompat.widget.Toolbar
      android:id="@+id/tb2"
      android:layout_width="match_parent"
      android:layout_height="?actionBarSize"
      android:layout_marginTop="10dp"
      android:background="#efefef"
      app:navigationIcon="@drawable/back"
      tools:ignore="MissingConstraints"/>
    <androidx.appcompat.widget.Toolbar
      android:id="@+id/tb3"
      android:layout_width="match_parent"
      android:layout_height="?actionBarSize"
      android:layout_marginTop="10dp"
      android:background="#efefef"
      app:navigationIcon="@drawable/back">
      <TextView
        android:text="@string/toolbar3"
        android:textColor="#000000"
        android:textSize="20sp"
        android:gravity="center"
        android:layout_gravity="center"
        android:layout_width="wrap_content"
        android:layout_height="wrap_content"/>
    </androidx.appcompat.widget.Toolbar>
  </LinearLayout>
</androidx.constraintlayout.widget.ConstraintLayout>
ToolBar.java
package com.weijun901.app;

import androidx.appcompat.app.AppCompatActivity;
import androidx.appcompat.widget.Toolbar;
//注意导包不要导错,不然程序会崩溃
import android.os.Bundle;
import android.util.Log;
import android.view.View;

public class ToolBar extends AppCompatActivity {

  @Override
  protected void onCreate(Bundle savedInstanceState) {
    super.onCreate(savedInstanceState);
    setContentView(R.layout.toolbar);

    Toolbar toolbar1 = findViewById(R.id.tb1);
    //当导航图标被点击输出文字
    toolbar1.setNavigationOnClickListener(new View.OnClickListener() {
      @Override
      public void onClick(View view) {
        Log.e("june", "onClick: 返回1被点击");
      }
    });

    //java设置toolbar
    Toolbar toolbar2 = findViewById(R.id.tb2);

    toolbar2.setNavigationIcon(R.drawable.back);
    toolbar2.setTitle("Toolbar2");
    toolbar2.setNavigationOnClickListener(new View.OnClickListener() {
      @Override
      public void onClick(View view) {
        Log.e("june", "onClick: 返回2被点击");
      }
    });
  }
}
最后
以上就是俊逸外套最近收集整理的关于Android 基础开发组件Toolbar取消系统自带的Toolbarlayout_widthlayout_heightbackgroundtitletitleTextColortitleMarginTopsubtitlesubtitleTextColornavigationIcon图标设计规范Toolbar的icon显示逻辑解决方案的全部内容,更多相关Android内容请搜索靠谱客的其他文章。


![Android Studio 约束布局[ConstraintLayout]](https://www.shuijiaxian.com/files_image/reation/bcimg5.png)


发表评论 取消回复