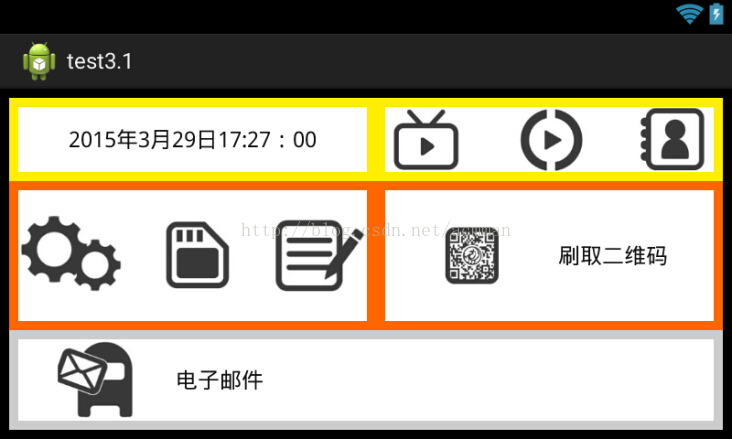
实现一个横屏的带有各种功能分类的主界面,效果如图:
素材:

实现代码:
MainActivity:
package com.example.test;


import android.app.Activity;
import android.os.Bundle;
import android.view.MotionEvent;
import android.view.View;
import android.view.View.OnTouchListener;
import android.widget.FrameLayout;


public class MainActivity extends Activity {

	@Override
	protected void onCreate(Bundle savedInstanceState) {
		super.onCreate(savedInstanceState);
		setContentView(R.layout.main);

	}
}
res/layout/main.xml:
<TableLayout xmlns:android="http://schemas.android.com/apk/res/android"
    xmlns:tools="http://schemas.android.com/tools"
    android:id="@+id/tableLayout1"
    android:layout_width="match_parent"
    android:layout_height="match_parent"
    android:background="#000000"
    android:padding="10px"
    android:screenOrientation="landscape" >


    <!-- 表格TableRow行的android:layout_weight属性均设为1,
                  表示这三行平均分配整个视图空间-->

    <!-- 第一行 -->


    <TableRow
        android:id="@+id/tableRow1"
        android:layout_width="fill_parent"
        android:layout_height="match_parent"
        android:layout_weight="1"
        android:background="#FFFFEE00" >

        <LinearLayout android:id="@+id/linearlayout1"
            android:layout_width="wrap_content"
            android:layout_height="fill_parent"
            android:layout_weight="1"
            android:layout_margin="10px"
            android:background="#FFFFFF">
            <TextView android:id="@+id/textView1"
                android:text="@string/time"
                android:layout_width="fill_parent"
                android:layout_height="fill_parent"
                android:gravity="center"
                style="@style/text"/>
        </LinearLayout>

        <LinearLayout android:id="@+id/linearlayout2"
            android:layout_height="fill_parent"
            android:layout_weight="1"
            android:layout_margin="10px"
            android:background="#FFFFFF">
            <ImageView android:id="@+id/imageView1"
                android:src="@drawable/img01"
                android:layout_weight="1"
                android:layout_width="wrap_content"
                android:layout_height="fill_parent"/>
            <ImageView android:id="@+id/imageView2"
                android:src="@drawable/img02"
                android:layout_weight="1"
                android:layout_marginLeft="50px"
                android:layout_width="wrap_content"
                android:layout_height="fill_parent"/>
            <ImageView android:id="@+id/imageView3"
                android:src="@drawable/img03"
                android:layout_weight="1"
                android:layout_marginLeft="50px"
                android:layout_width="wrap_content"
                android:layout_height="fill_parent"/>
        </LinearLayout>

    </TableRow>


    <!-- 第二行 -->
    <TableRow android:id="@+id/tableRow2"
        android:layout_width="fill_parent"
        android:layout_weight="1"
        android:background="#FFFF6600">

        <LinearLayout android:id="@+id/linearlayout3"
            android:layout_height="fill_parent"
            android:layout_weight="1"
            android:layout_margin="10px"
            android:background="#FFFFFF">
            <ImageView android:id="@+id/imageView4"
                android:src="@drawable/img04"
                android:layout_weight="1"
                android:layout_width="wrap_content"
                android:layout_height="fill_parent"/>
            <ImageView android:id="@+id/imageView5"
                android:src="@drawable/img05"
                android:layout_weight="1"
                android:layout_marginLeft="40px"
                android:layout_width="wrap_content"
                android:layout_height="fill_parent"/>
            <ImageView android:id="@+id/imageView6"
                android:src="@drawable/img06"
                android:layout_weight="1"
                android:layout_marginLeft="40px"
                android:layout_width="wrap_content"
                android:layout_height="fill_parent"/>
        </LinearLayout>

         <LinearLayout android:id="@+id/linearlayout4"
            android:layout_height="fill_parent"
            android:layout_weight="1"
            android:layout_margin="10px"
            android:background="#FFFFFF">
            <ImageView android:id="@+id/imageView7"
                android:src="@drawable/img07"
                android:layout_weight="1"
                android:layout_margin="40px"
                android:layout_width="wrap_content"
                android:layout_height="fill_parent"/>
             <TextView android:id="@+id/textView2"
                android:text="刷取二维码"
                android:layout_width="wrap_content"
                android:layout_height="fill_parent"
                android:gravity="center_vertical"
                android:layout_weight="3"
                style="@style/text"/>
        </LinearLayout>

    </TableRow>


    <!-- 第三行 -->
    <TableRow android:id="@+id/tableRow3"
        android:layout_width="fill_parent"
        android:layout_weight="1"
        android:background="#CCCCCC">

         <LinearLayout android:id="@+id/linearlayout5"
            android:layout_height="fill_parent"
            android:layout_weight="1"
            android:layout_margin="10px"
            android:background="#FFFFFF">
            <ImageView android:id="@+id/imageView8"
                android:src="@drawable/img08"
                android:layout_marginLeft="20px"
                android:layout_width="wrap_content"
                android:layout_height="fill_parent"/>
             <TextView android:id="@+id/textView3"
                android:text="电子邮件"
                android:layout_marginLeft="20px"
                android:layout_width="wrap_content"
                android:layout_height="fill_parent"
                android:gravity="center_vertical"
                style="@style/text"/>
        </LinearLayout>

    </TableRow>
</TableLayout>
res/values/strings.xml:
<?xml version="1.0" encoding="utf-8"?>
<resources>


    <string name="app_name">test3.1</string>
    <string name="hello_world">Hello world!</string>
    <string name="action_settings">Settings</string>
    <string name="time">2015年3月29日17:27:00</string>


</resources>
res/values/styles.xml:
<resources xmlns:android="http://schemas.android.com/apk/res/android">

     <style name="text">
       <item name="android:textSize">24px</item>
       <item name="android:textColor">#111111</item>
    </style>

    <style name="AppBaseTheme" parent="android:Theme.Light">
    </style>


    <style name="AppTheme" parent="AppBaseTheme">
    </style>
</resources>最后
以上就是无奈夏天最近收集整理的关于【Android开发】范例1-使用表格布局与线性布局实现分类工具栏的全部内容,更多相关【Android开发】范例1-使用表格布局与线性布局实现分类工具栏内容请搜索靠谱客的其他文章。
本图文内容来源于网友提供,作为学习参考使用,或来自网络收集整理,版权属于原作者所有。


发表评论 取消回复