ganglia的部署步骤
我是目录
- ganglia的部署步骤
- 1 简介ganglia
- 2 环境部署
- 3 第一个节点的部署
- 4 第二、三个节点的部署
- 5 web端的启动
1 简介ganglia
这块就长话短说,百度很多,ganglia分为三个组件,分别是gmetad,gmond,gweb。
gmetad:简单来说就是为了整合所有信息
gmond:类似与子节点,需要部署在每台主机上
gweb:进行可视化界面
在配置的时候请注意选择单播模式还是组播模式,不然很容易出错,这里部署采用单播模式。简单介绍一下单播和组播。
单播:代表主机之间一对一的通讯模式,也就说gmond的收集信息会直接反馈给gmetad。
组播:代表主机之间一对一组的通讯模式,一个gmetad可以接受多个gmod组成一组的信息
2 环境部署
在安装ganglia时,前提必要条件就是搭建所需的依赖,这块只需要复制粘贴即可。
yum进行安装
1 首先看一下自己主机上的EPEL源
rpm -qa | grep epel

如果没有出现依赖,则需要自己下载一个。
还需要下载一个httpd,用来进行web访问的
yum -y install httpd
安装依赖源
rpm -Uvh http://dl.fedoraproject.org/pub/epel/6/i386/epel-release-6-8.noarch.rpm
2 安装完依赖之后再进行查询,看看有没有ganglia包

必须要有,没有就不能进行安装!!!
如果安装了依赖也找不到的话,尝试下面的语句再进行查询
yum -y install epel-release
继续安装相应依赖包
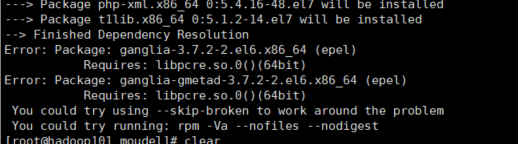
yum -y install httpd-devel automake autoconf libtool ncurses-devel libxslt groff pcre-devel pkgconfig php
3 第一个节点的部署
3 安装节点
我有三台服务器,分别是hadoop101 hadoop102 hadoo103,我将在hadoop101上进行安装gmetad,gmond,剩下两个节点则安装gmond即可。

①进行hadoop101上gmetad的安装
yum search ganglia
yum install -y ganglia-gmetad.x86_64 ganglia-web.x86_64
这个版本号就是search出来的,要复制对了,你的可能和我不一样
rpm -qa | grep ganglia
9.2日-补充:我今天又重新做了一遍,发现CentOS7在yum安装时会出现错误。
这是因为CentOS7默认安装的python版本是2.7,CentOS6则是2.6版本,2.6版本符合最新的ganglia,yum安装不会出错。
那这块只能采取编译安装了,编译安装我重新写一个文档,做个链接。
编译安装请看这里
编译安装请看这里
编译安装请看这里
ps:最近闹肚子,把公司的编译安装写了,不写这上面的了,直不起腰了。
进行配置,默认安装位置为/etc/ganglia/gmetad.conf

双引号里的是你监控集群的名字,集群名字后面的gmond都要用到,后面则是跟着你的IP地址,我写的是hostsname
②进行hadoop101上gmond的安装
yum search ganglia
yum install -y ganglia-gmond.x86_64
安装完成后进行gmond.conf的配置
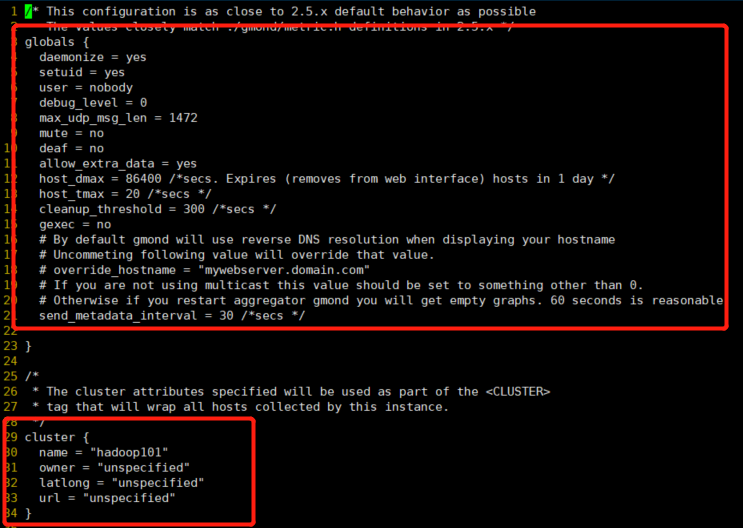
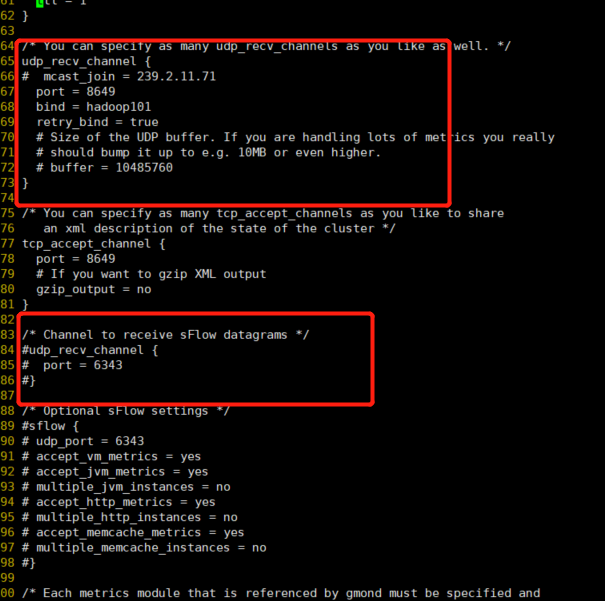
注意红框的配置,文本如下:
globals {
4 daemonize = yes
5 setuid = yes
6 user = nobody
7 debug_level = 0
8 max_udp_msg_len = 1472
9 mute = no
10 deaf = no
11 allow_extra_data = yes
12 host_dmax = 86400 /*secs. Expires (removes from web interface) hosts in 1 day */
13 host_tmax = 20 /*secs */
14 cleanup_threshold = 300 /*secs */
15 gexec = no
16 # By default gmond will use reverse DNS resolution when displaying your hostname
17 # Uncommeting following value will override that value.
18 # override_hostname = "mywebserver.domain.com"
19 # If you are not using multicast this value should be set to something other than 0.
20 # Otherwise if you restart aggregator gmond you will get empty graphs. 60 seconds is reasonable
21 send_metadata_interval = 30 /*secs */
22
23 }
24
25 /*
26 * The cluster attributes specified will be used as part of the <CLUSTER>
27 * tag that will wrap all hosts collected by this instance.
28 */
29 cluster {
30 name = "hadoop101"
31 owner = "unspecified"
32 latlong = "unspecified"
33 url = "unspecified"
34 }
35
36 #Hadoop集群监控,你们不需要配置这个
37 cluster{
38 name = "Hadoop"
39 owner = "umspecified"
40 latlong = "unspecified"
41 url = "unspecified"
42 }
43
44
45 /* The host section describes attributes of the host, like the location */
46 host {
47 location = "unspecified"
48 }
49
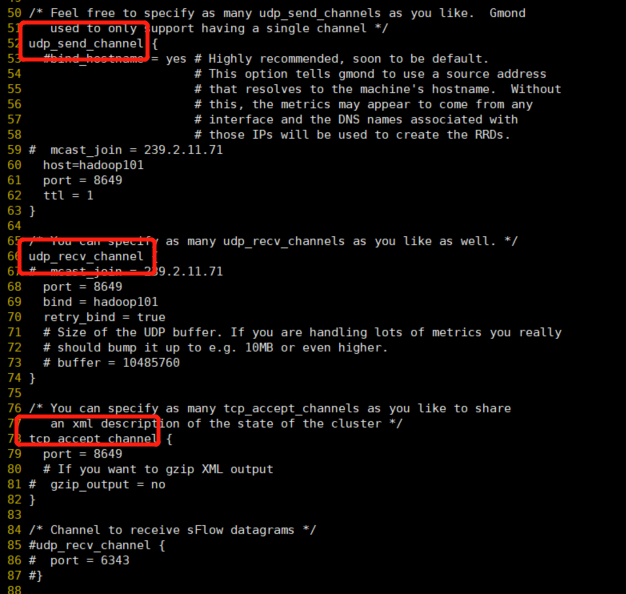
50 /* Feel free to specify as many udp_send_channels as you like. Gmond
51 used to only support having a single channel */
52 udp_send_channel { ----发送端
53 #bind_hostname = yes # Highly recommended, soon to be default.
54 # This option tells gmond to use a source address
55 # that resolves to the machine's hostname. Without
56 # this, the metrics may appear to come from any
57 # interface and the DNS names associated with
58 # those IPs will be used to create the RRDs.
59 # mcast_join = 239.2.11.71 删除组播
60 host=hadoop101
61 port = 8649
62 ttl = 1
65 /* You can specify as many udp_recv_channels as you like as well. */
66 udp_recv_channel {---接受端
67 # mcast_join = 239.2.11.71 把组播删除了
68 port = 8649
69 bind = hadoop101
70 retry_bind = true
71 # Size of the UDP buffer. If you are handling lots of metrics you really
72 # should bump it up to e.g. 10MB or even higher.
73 # buffer = 10485760
74 }
75
76 /* You can specify as many tcp_accept_channels as you like to share
77 an xml description of the state of the cluster */
78 tcp_accept_channel {---请求
79 port = 8649
80 # If you want to gzip XML output
81 # gzip_output = no
82 }
83
84 /* Channel to receive sFlow datagrams */
85 #udp_recv_channel {
86 # port = 6343
87 #}
安装gweb
yum search ganglia
yum install -y ganglia-gmetad.x86_64 ganglia-web.x86_64
rpm -qa | grep ganglia
至此hadoop101的ganglia就配置完成了
4 第二、三个节点的部署
同样的操作在hadoop102,hadoop103上,只需安装gmond即可
yum search ganglia
yum install -y ganglia-gmond.x86_64
/* This configuration is as close to 2.5.x default behavior as possible
  2    The values closely match ./gmond/metric.h definitions in 2.5.x */
  3 globals {
  4   daemonize = yes
  5   setuid = yes
  6   user = nobody
  7   debug_level = 0
  8   max_udp_msg_len = 1472
  9   mute = no
 10   deaf = yes
 11   allow_extra_data = yes
 12   host_dmax = 86400 /*secs. Expires (removes from web interface) hosts in 1 day */
 13   host_tmax = 20 /*secs */
 14   cleanup_threshold = 300 /*secs */
 15   gexec = no
 16   # By default gmond will use reverse DNS resolution when displaying your hostname
 17   # Uncommeting following value will override that value.
 18   # override_hostname = "mywebserver.domain.com"
 19   # If you are not using multicast this value should be set to something other than 0.
 20   # Otherwise if you restart aggregator gmond you will get empty graphs. 60 seconds is reasonable
 21   send_metadata_interval = 30 /*secs */
 22
 23 }
 24
 25 /*
 26  * The cluster attributes specified will be used as part of the <CLUSTER>
 27  * tag that will wrap all hosts collected by this instance.
 28  */
 29 cluster {
 30   name = "hadoop101"
 31   owner = "unspecified"
 32   latlong = "unspecified"
 33   url = "unspecified"
 34 }
 35
 36 #Hadoop集群监控
 37 cluster{
 38   name = "Hadoop"
 39   owner = "umspecified"
 40   latlong = "unspecified"
 41   url = "unspecified"
 42 }
 43
 44 /* The host section describes attributes of the host, like the location */
 45 host {
 46   location = "unspecified"
 47 }
 48
 49 /* Feel free to specify as many udp_send_channels as you like.  Gmond
 50    used to only support having a single channel */
 51 udp_send_channel {
 52   #bind_hostname = yes # Highly recommended, soon to be default.
 53                        # This option tells gmond to use a source address
 54                        # that resolves to the machine's hostname.  Without
 55                        # this, the metrics may appear to come from any
 56                        # interface and the DNS names associated with
 57                        # those IPs will be used to create the RRDs.
 58 #  mcast_join = 239.2.11.71
 59   host = hadoop101
 60   port = 8649
 61   ttl = 1
 62 }
 63
 64 /* You can specify as many udp_recv_channels as you like as well. */
 65 udp_recv_channel {
 66 #  mcast_join = 239.2.11.71
 67   port = 8649
 68   bind = hadoop101
 69   retry_bind = true
 70   # Size of the UDP buffer. If you are handling lots of metrics you really
 71   # should bump it up to e.g. 10MB or even higher.
 72   # buffer = 10485760
 73 }
 74
 75 /* You can specify as many tcp_accept_channels as you like to share
 76    an xml description of the state of the cluster */
 77 tcp_accept_channel {
 78   port = 8649
 79   # If you want to gzip XML output
 80   gzip_output = no
 81 }
 82
 83 /* Channel to receive sFlow datagrams */
 84 #udp_recv_channel {
 85 #  port = 6343
 86 #}
 87
主要改
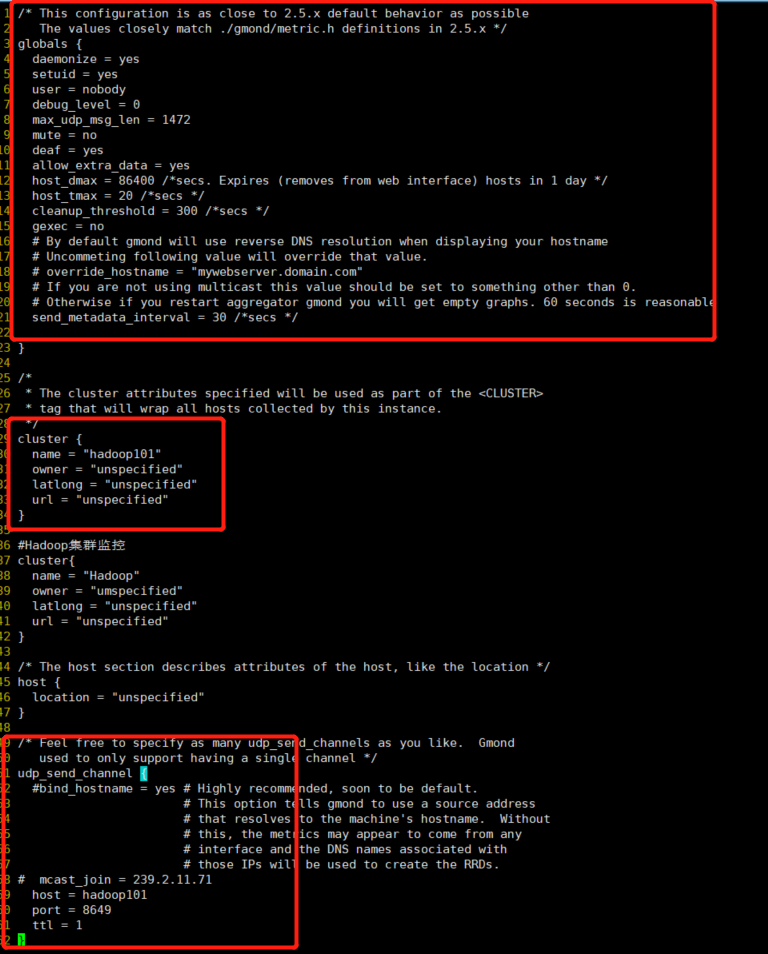
至此hadoop102,hadoop103的gmond节点修改完毕
5 web端的启动
在hadoop101上启动:
service gmetad start
service gmond start
service httpd start
service gmetad status    -------------------验证是否启动成功
service gmond status
在hadoop102,103上启动
service gmond start
访问web界面:(你的ip)/ganglia
如果操作正常应给就没问题,但是也会出现访问失败:
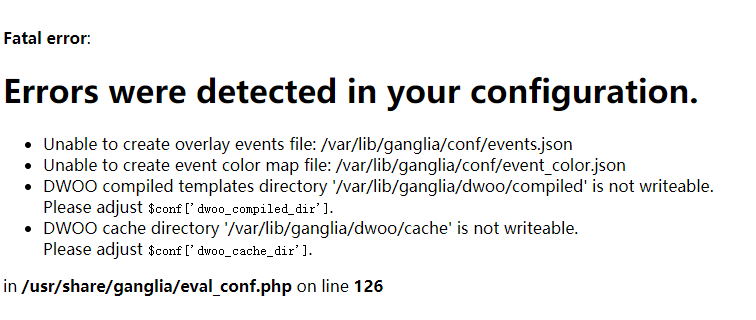
解决办法:
没有权限进行读写操作,执行一下代码
chmod 777 /var/lib/ganglia/dwod/compiled
chmod 777 /var/lib/ganglia/dwoo/cache
然后又出错了

说没有这两个文件,这说明在安装的时候出现了一点问题,不过不要紧,两个办法:
第一个办法,找一下看看这两个文件在哪,然后搜索出来后有一堆,你分别打开看看,
里面只有一对{},复制到报错的路径下就可以了。
find / -name events.json
find / -name enent_color.json
第二个办法,直接touch events.json,touch enent_color.json,在里面写入
{}即可
重新登录
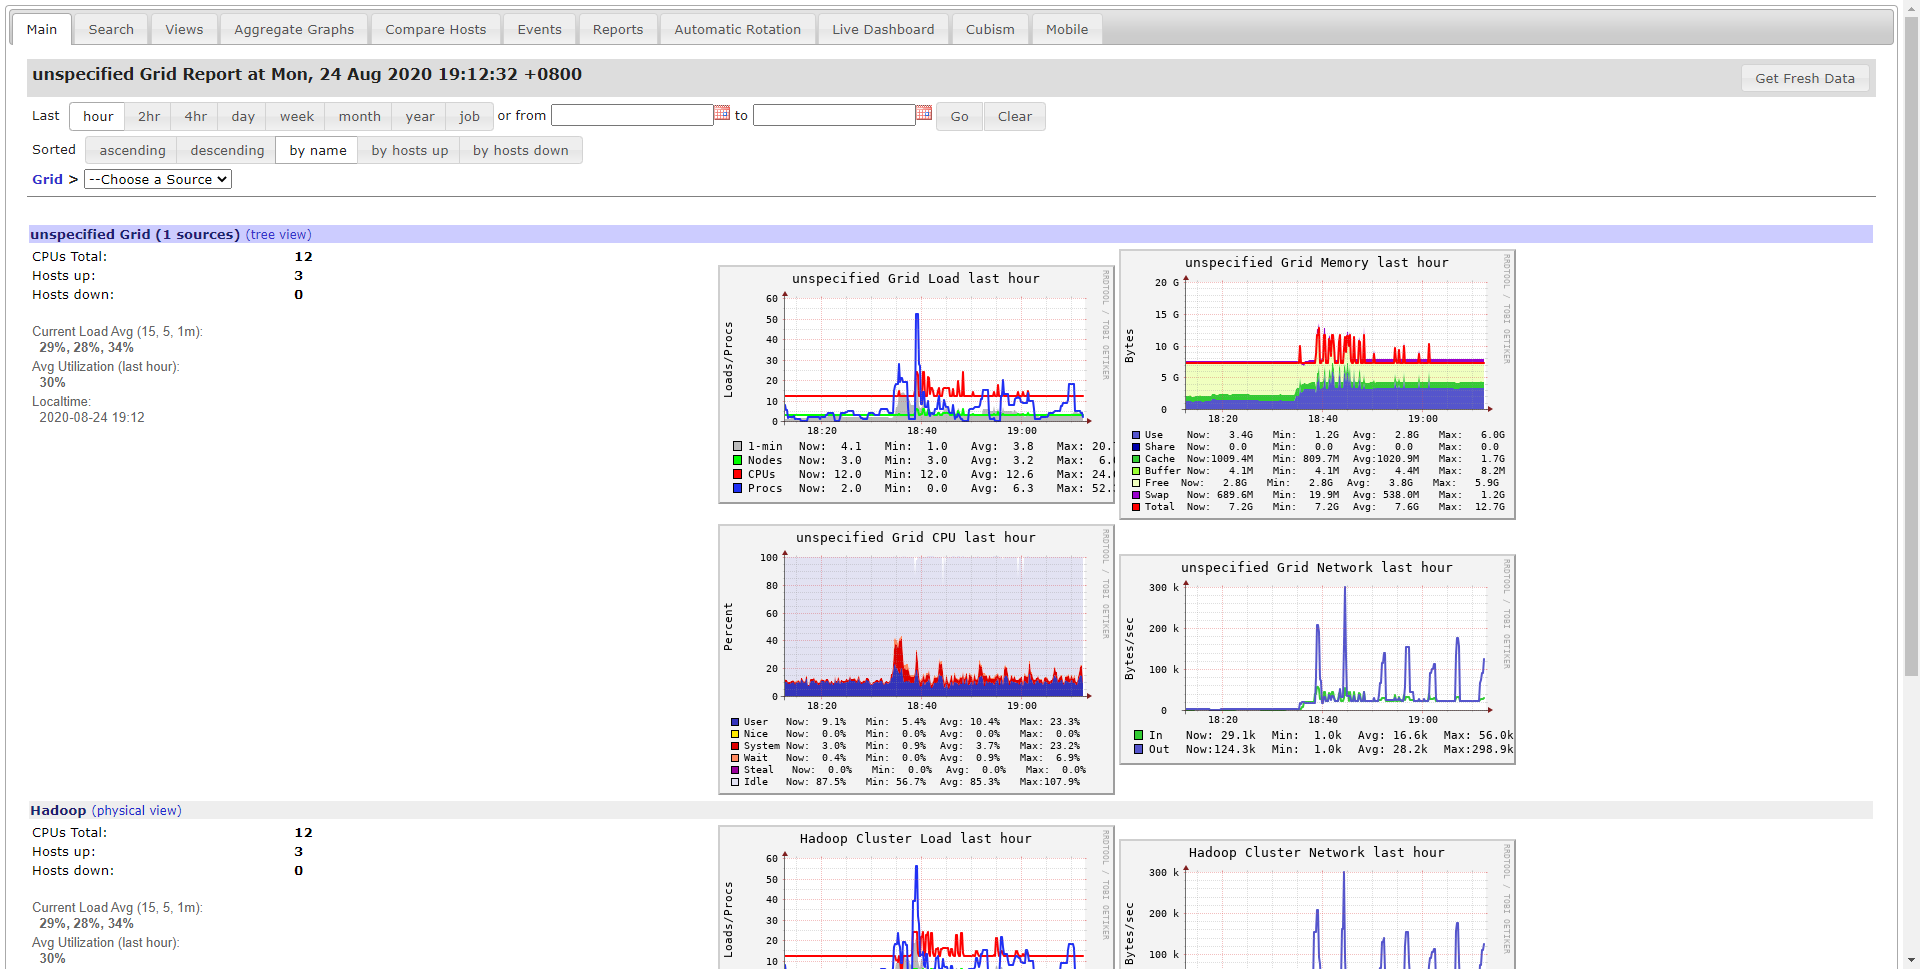
如果出现没有数据,则说明节点配置问题,在好好看看配置不要错了。本次配置为单播配置,比较简单。
祝你成功!如果有帮助请点个赞让我开心下!
最后
以上就是迷路灰狼最近收集整理的关于【亲测】部署ganglia进行监控--部署过程及Error解决ganglia的部署步骤的全部内容,更多相关【亲测】部署ganglia进行监控--部署过程及Error解决ganglia内容请搜索靠谱客的其他文章。


发表评论 取消回复