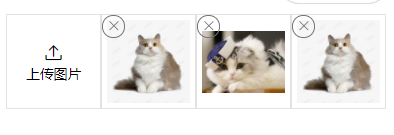
微信小程序上传图片+预览+删除

组件代码
HTML
<view class="uploadImg-wrap">
    <view class="upload-flex">
        <view wx:if="{{imgs.length!==total}}" bindtap='toUpload' class="upload-item" style="width:{{itemWidth}}px;height:{{itemWidth}}px">
            <view class="iconfont icon-upload"></view>
            <view class="upload-text">上传图片</view>
        </view>
        <view bindtap='preview' wx:for="{{imgs}}" wx:key="key" class="upload-item-1" style="width:{{itemWidth}}px;height:{{itemWidth}}px" data-url='{{item}}'>
            <image mode="aspectFit" style="width:100%;height:100%" src="{{item}}"></image>
            <view catchtap='del' data-url='{{item}}' class="upload-close">
                <view class="iconfont icon-close" style="font-size:28rpx"></view>
            </view>
        </view>
    </view>
</view>
CSS
@font-face {
    font-family: 'iconfont';  /* Project id 2580604 */
    src: url('//at.alicdn.com/t/font_2580604_kuvkydxjryh.woff2?t=1622731856871') format('woff2'),
         url('//at.alicdn.com/t/font_2580604_kuvkydxjryh.woff?t=1622731856871') format('woff'),
         url('//at.alicdn.com/t/font_2580604_kuvkydxjryh.ttf?t=1622731856871') format('truetype');
  }

  .iconfont {
    font-family: "iconfont" !important;
    font-size: 16px;
    font-style: normal;
    -webkit-font-smoothing: antialiased;
    -moz-osx-font-smoothing: grayscale;
  }

  .icon-close:before {
    content: "e668";
  }

  .icon-upload:before {
    content: "e682";
  }

  .icon-caps-lock:before {
    content: "e667";
  }

  .icon-switch:before {
    content: "e67f";
  }

  .icon-arrow-right:before {
    content: "e665";
  }

  .icon-search:before {
    content: "e67d";
  }

  .icon-arrow-left-bold:before {
    content: "e685";
  }
  .uploadImg-wrap {
      width: 100%;
  }
  .upload-item {
      border: 1rpx solid rgb(226, 226, 226);
      display: flex;
      justify-content: center;
      align-items: center;
      flex-direction: column;
      box-sizing: border-box;
  }
  .upload-text {
      font-size: 28rpx;
  }
  .upload-flex {
      display: flex;
      flex-wrap: wrap;
  }
  .upload-item-1 {
    border: 1rpx solid rgb(226, 226, 226);
    padding: 10rpx;
    display: flex;
    justify-content: center;
    align-items: center;
    flex-direction: column;
    box-sizing: border-box;
    position: relative;
}
.upload-close {
    width: 40rpx;
    height: 40rpx;
    border-radius: 50%;
    border: 1rpx solid rgb(116, 116, 116);
    position: absolute;
    top: 0;
    left: 0;
    display: flex;
    justify-content: center;
    align-items: center;
    color: rgb(116, 116, 116);
}
JS
Component({
  lifetimes: {
    attached: function () {
      // 在组件实例进入页面节点树时执行
    },
    ready: function () {
      let that = this
      this.createSelectorQuery().select('.uploadImg-wrap').boundingClientRect(rect => {
        that.setData({
          itemWidth: rect.width / 4
        })
        console.log(rect.width);
      }).exec();
    }
  },
  /**
   * 组件的属性列表
   */
  properties: {
  //上传图片接口
    uploadUrl: {
      type: String,
      value: 'https://example.weixin.qq.com/upload'
    },
    //最大一次性图片数
    count: {
      type: Number,
      value: 4
    },
    //总图片数
    total: {
      type: Number,
      value: 4
    }
  },

  /**
   * 组件的初始数据
   */
  data: {
    itemWidth: 0,
    imgs: []
  },

  /**
   * 组件的方法列表
   */
  methods: {
    //预览
    preview(options){
      let imgs = this.data.imgs
      //后端返回只有名字
      // let newimgs = []
      // imgs.forEach(value=>{
      //   newimgs.push('服务器url' +value)
      // })
      // wx.previewImage({
      //   current: '服务器url'+options.currentTarget.dataset.url,
      //   urls: newimgs
      // })

      //后端返回的图片具体路径
      wx.previewImage({
        current: options.currentTarget.dataset.url,
        urls: imgs
      })
    },
    //删除图片
    del(options){
      let url = options.currentTarget.dataset.url
      let oldimgs = this.data.imgs
      let imgs = oldimgs.filter(value=>{
        if(value!=url){
          return value
        }
      })
      this.setData({
        imgs
      })
    },
    //上传图片
    upload(tempFilePaths, i) {
      wx.showLoading({
        title: '上传中',
      })
      let that = this
      wx.uploadFile({
        url: that.data.uploadUrl,
        filePath: tempFilePaths[i],
        name: 'file',
        success(r) {
          //这里只需要修改JSON.parse(r.data).data.url 确保得到的是图片路径,取数据按实际返回结果
          let url = JSON.parse(r.data).data.url
          //end
          let imgs = that.data.imgs
          imgs.push(url)
          that.setData({
            imgs
          }, _ => {
            that.triggerEvent("action",that.data.imgs);
            if (i == tempFilePaths.length - 1) {
              wx.hideLoading()
              return
            }
            that.upload(tempFilePaths, i + 1)
          })
        }
      })
    },
    toUpload() {
      let that = this
      wx.chooseImage({
        count: that.data.count,
        sizeType: ['original', 'compressed'],
        sourceType: ['album', 'camera'],
        success(res) {
          let tempFilePaths = res.tempFilePaths
          that.upload(tempFilePaths, 0)
        }
      })
    },
  }
})
页面调用
<uploadImg uploadUrl='上传图片接口' bind:action='action'></uploadImg>
JS
const app = getApp()

Page({
  data: {
    show:'none'
  },
//组件上传文件图片后调用的当前页面方法
  action(data){
    console.log('图片路径',data.detail)
  },

  onLoad() {

  },
})
最后
以上就是欣喜芒果最近收集整理的关于微信小程序上传图片组件,多选+单选+预览+删除的全部内容,更多相关微信小程序上传图片组件内容请搜索靠谱客的其他文章。
本图文内容来源于网友提供,作为学习参考使用,或来自网络收集整理,版权属于原作者所有。


发表评论 取消回复