Sentinel是一款轻量级的流量控制、熔断降级的Java库。
熔断机制是应对雪崩效应的一种微服务链路保护机制。当某个微服务不可用或者响应时间太长时, 会进行服务降级,进而熔断该节点微服务的调用,快速返回“错误”的响应信息。当检测到该节点微服务调用响应正常后恢复调用链路。在SpringCloud框架里熔断机制通过Sentinel实现,Hystrix会监 控微服务间调用的状况,当失败的调用到一定阈值,就会启动熔断机制。
服务降级,一般是从整体负荷考虑。就是当某个服务熔断之后,服务器将不再被调用,此时客户端可以自己准备一个本地的fallback回调,返回一个缺省值。这样做,虽然水平下降,但好歹可用,比直接挂掉强。
参考:https://github.com/alibaba/Sentinel
一、项目中整合Sentinel
1.1、在pom.xml中添加依赖
<dependency>
    <groupId>org.springframework.cloud</groupId>
    <artifactId>spring-cloud-starter-alibaba-sentinel</artifactId>
</dependency>
<dependency>
    <groupId>org.springframework.boot</groupId>
    <artifactId>spring-boot-starter-actuator</artifactId>
</dependency>
1.2、在application.yml中添加属性配置
# 配置actuator和Sentinel联动
management:
  endpoints:
    web:
      exposure:
        include: '*'
  endpoint:
    health:
      show-details: always
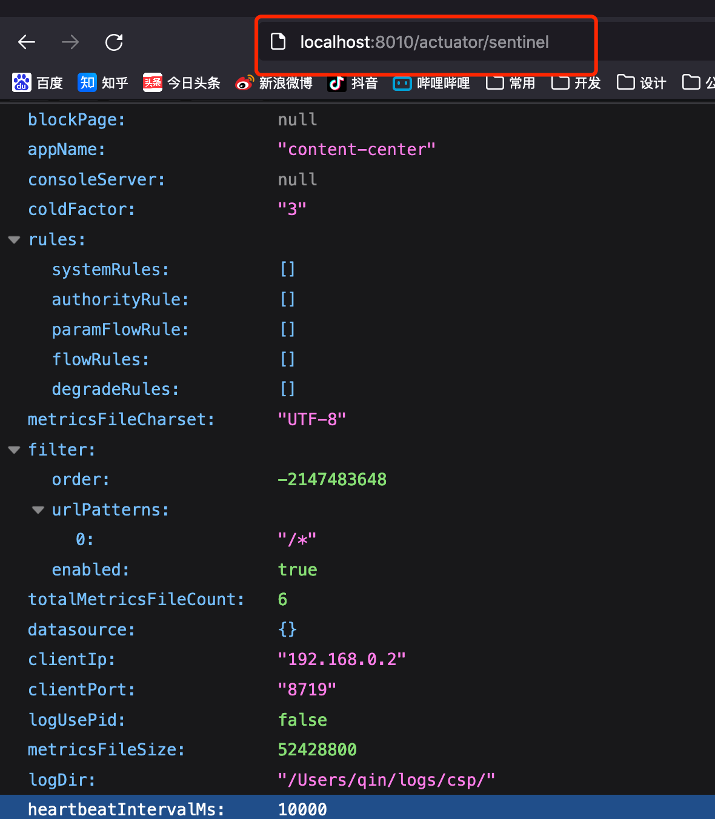
1.3、测试运行结果
浏览器输入:http://localhost:8010/actutator/sentinel
二、搭建Sentinel控制台
下载地址:https://github.com/alibaba/Sentinel/releases
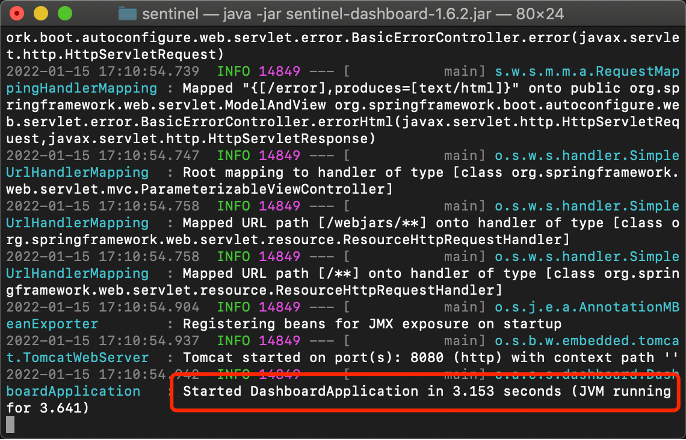
2.1、启动Sentinel控制台
打开终端窗口,输入启动命令:java -jar xxx

启动成功:
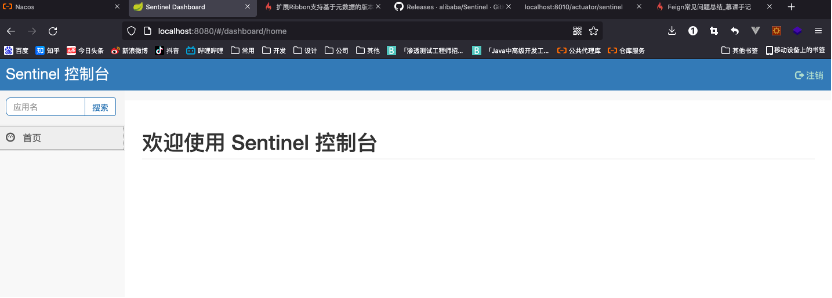
2.2、浏览器访问控制台
账号密码都是sentinel
地址:http://localhost:8080
三、整合微服务
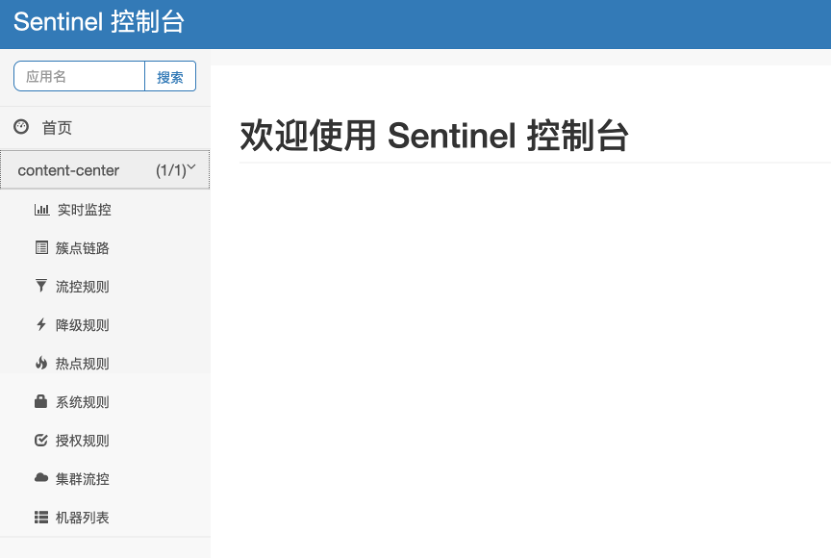
整合我们开发的微服务(内容中心content-center)到控制台
3.1、在application.yml中配置属性
spring:
  cloud:
    sentinel:
      transport:
        #指定sentin控制台的地址
        dashboard: localhost:8080
此时我们再次访问微服务(内容中心content-center),在Sentinel的控制台中就可以看到信息(刷新浏览器)
四、流控规则
4.1、控流效果(限流)
限流的目的是通过限制并发访问数或者限制一个窗口内允许处理的请求数量来保护系统,一旦达到限制流量,则对当前请求处理采取对应的的拒绝策略。如跳转错误页面、进行排队、服务降级等。
- 快速失败:直接抛出异常
- Warm Up:根据codeFactor(默认3)的值,从阈值/codeFactor,经过预热时长,才到达设置的QPS阈值
(关于WarmUp详情参考:https://github.com/alibaba/Sentinel/wiki/%E9%99%90%E6%B5%81---%E5%86%B7%E5%90%AF%E5%8A%A8) - 排队等待(单位毫秒):适用于应对突发情况(突然流量剧增)的场景,匀速排队,让请求以均匀的速度通过,阈值类型必须设成QPS,否则无效
五、降级规则(熔断)
服务熔断是指当前服务提供者无法正常为服务调用者提供服务时,比如请求超时、服务异常等,为了防止整个系统出现雪崩效应,暂时将出现故障的接口隔离出来,断绝与外部接口的联系,当触发熔断之后,后续一段时间内该服务调用者的请求都会直接失败,直到目标服务恢复正常。
参考官方文档:https://github.com/alibaba/Sentinel/wiki
5.1、降级-RT(单位:毫秒)
比如1秒内持续进入5个请求,对应时刻的平均响应时间均超过阈值,那么接下来在一个固定的时间窗口内,对这个方法的访问都会自动熔断。
平均响应时间(RT单位毫秒,时间窗口单位秒)
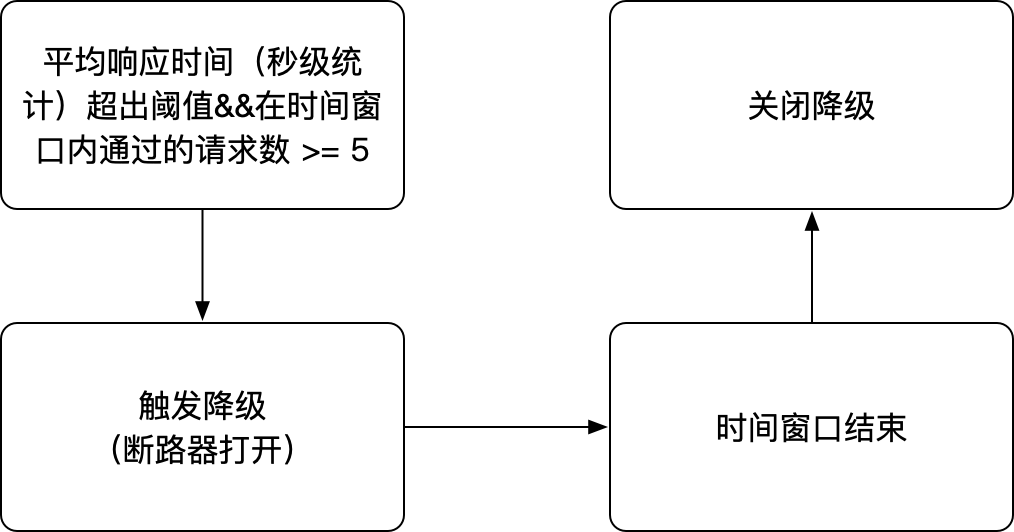
注意:RT默认最大4900ms,可以通过-Dcsp.sentinel.statistic.max.rt=xxx修改
5.2、降级-异常比例(单位:毫秒)
当某个方法每秒调用所获得的异常总数的比例超过设定的阈值时,该资源会自动进入降级状态,也就是在接下来的一个固定的时间窗口内,对这个方法的调用都会自动返回。
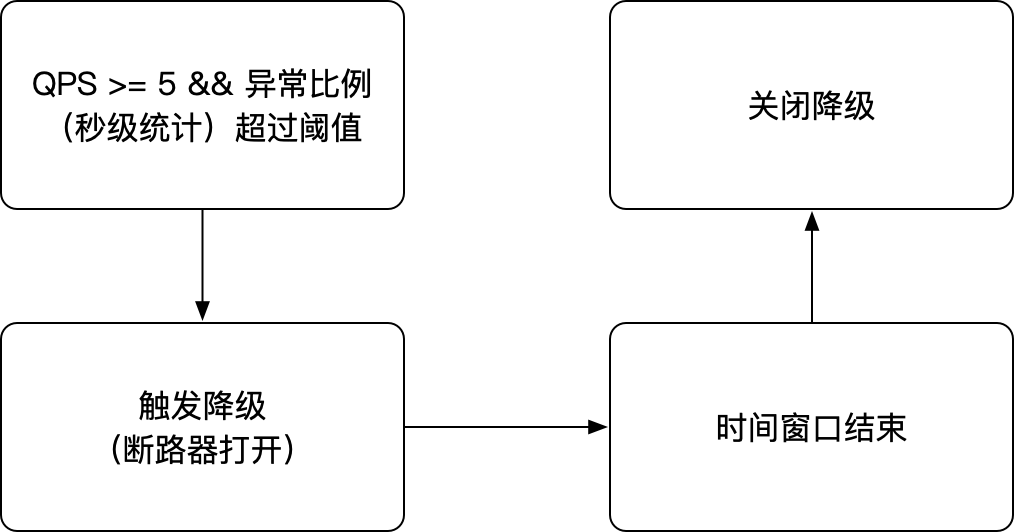
5.3、降级-异常数(单位:分钟)
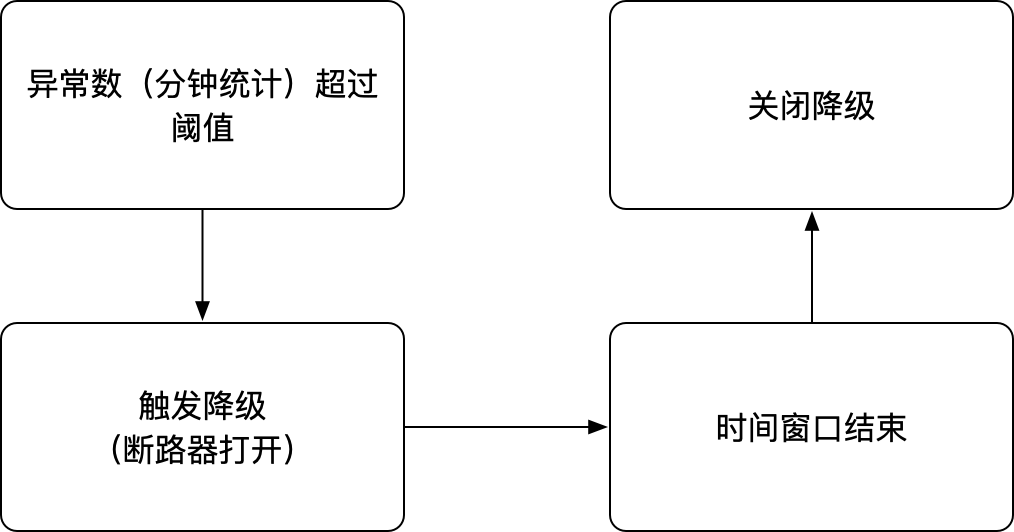
和异常比例类似,当某个方法在指定时间窗口内获得的异常数量超过阈值时,会触发熔断。
注意:时间窗口 < 60秒可能会出现问题
六、系统规则
LOAD:当系统load1(1分钟的load)超过阈值,且并发线程数超过系统容量时触发,建议设置为CPU核心数*2.5(LOAD规则仅对Linux/Unix-like机器生效)
系统容量 = maxQps * minRt
maxQps:秒级统计出来的最大Qps
minRt:秒级统计出来的最小响应时间
RT:所有入口流量的平均RT达到阈值时触发
线程数:所有入口流量的并发线程数达到阈值时触发
入口QPS:所有入口流量的QPS达到阈值时触发
七、控制台配置项
| 配置项 | 默认值 | 最小值 | 描述 |
| server.port | 8080 | - | 指定端口 |
| csp.sentinel.dashboard.server | localhost:8080 | - | 指定地址 |
| project.name | - | - | 指定程序名称 |
| sentinel.dashboard.auth.username | sentinel | - | Dashboard登陆账号 |
| sentinel.dashboard.auth.password | sentinel | - | Dashboard登陆密码 |
| server.servlet.session.timeout | 30分钟 | - | 登陆session超时时间 配置为7200表示7200秒 配置为60m表示60分钟 |
配置方式:
打开命令终端,以修改用户名和密码为例,命令:
java -jar -Dsentinel.dashboard.auth.username=admin -Dsentinel.dashboard.auth.passowrd=123456 sentinel-dashboard-1.6.2.jar八、Feign整合Sentinel
非常简单,只需要在application.yml中配置属性即可(该属性idea不会有提示,但是功能可用,直接手写上去就行)
feign:
  sentinel:
    enabled: true
九、微服务对限流后的处理fallbackfactory
9.1、新建工厂类
package personal.qin.contentcenter.feignclient.fallbackfactory;

import feign.hystrix.FallbackFactory;
import lombok.extern.slf4j.Slf4j;
import org.springframework.stereotype.Component;
import personal.qin.contentcenter.domain.dto.UserDTO;
import personal.qin.contentcenter.feignclient.UserCenterFeignClient;

@Slf4j
@Component
public class UserCenterFeignClientFallbackFactory implements FallbackFactory<UserCenterFeignClient> {
    @Override
    public UserCenterFeignClient create(Throwable e) {
        return new UserCenterFeignClient() {
            @Override
            public UserDTO findById(Integer id) {
                log.warn("远程调用被限流或者降级了", e);
                UserDTO userDTO = new UserDTO();
                userDTO.setWxNickname("一个默认用户");
                return userDTO;
            }
        };
    }
}
9.2、在Feign的客户端接口上添加引用
@FeignClient(name = "user-center", fallbackFactory = UserCenterFeignClientFallbackFactory.class)
package personal.qin.contentcenter.feignclient;

import org.springframework.cloud.openfeign.FeignClient;
import org.springframework.web.bind.annotation.GetMapping;
import org.springframework.web.bind.annotation.PathVariable;
import personal.qin.contentcenter.domain.dto.UserDTO;
import personal.qin.contentcenter.feignclient.fallbackfactory.UserCenterFeignClientFallbackFactory;

//Feign访问微服务的名称
@FeignClient(name = "user-center", fallbackFactory = UserCenterFeignClientFallbackFactory.class)
public interface UserCenterFeignClient {
    /**
     * Feign会自动构建URL为http://user-center/user/{id}
     * @param id
     * @return
     */
    @GetMapping("/user/{id}")
    UserDTO findById(@PathVariable Integer id);
}
9.3、测试效果
如果被限流,可以获得降级异常对象,如图:

十、规则持久化
持久化有两种方式,分别是拉模式和推模式。
10.1、两种模式的优缺点分析
· 优点
- 拉模式简单易懂
- 拉模式没有多余依赖(比如配置中心、缓存等)
· 缺点
- 由于规则是用 FileRefreshableDataSource 定时更新的,所以规则更新会有延迟。如果FileRefreshableDataSource定时时间过大,可能长时间延迟;如果FileRefreshableDataSource过小,又会影响性能;
- 规则存储在本地文件,如果有一天需要迁移微服务,那么需要把规则文件一起迁移,否则规则会丢失。
本文主要讲解拉模式,推模式请参考:https://www.imooc.com/article/289464
10.2、拉模式
参考:https://www.imooc.com/article/289402
10.2.1、在pom.xml中添加依赖
<dependency>
    <groupId>com.alibaba.csp</groupId>
    <artifactId>sentinel-datasource-extension</artifactId>
</dependency>
10.2.2、新建持久化类
package personal.qin.contentcenter.sentineltest;

import com.alibaba.csp.sentinel.command.handler.ModifyParamFlowRulesCommandHandler;
import com.alibaba.csp.sentinel.datasource.*;
import com.alibaba.csp.sentinel.init.InitFunc;
import com.alibaba.csp.sentinel.slots.block.authority.AuthorityRule;
import com.alibaba.csp.sentinel.slots.block.authority.AuthorityRuleManager;
import com.alibaba.csp.sentinel.slots.block.degrade.DegradeRule;
import com.alibaba.csp.sentinel.slots.block.degrade.DegradeRuleManager;
import com.alibaba.csp.sentinel.slots.block.flow.FlowRule;
import com.alibaba.csp.sentinel.slots.block.flow.FlowRuleManager;
import com.alibaba.csp.sentinel.slots.block.flow.param.ParamFlowRule;
import com.alibaba.csp.sentinel.slots.block.flow.param.ParamFlowRuleManager;
import com.alibaba.csp.sentinel.slots.system.SystemRule;
import com.alibaba.csp.sentinel.slots.system.SystemRuleManager;
import com.alibaba.csp.sentinel.transport.util.WritableDataSourceRegistry;
import com.alibaba.fastjson.JSON;
import com.alibaba.fastjson.TypeReference;

import java.io.File;
import java.io.IOException;
import java.util.List;

/**
 * 拉模式规则持久化
 *
 * @author itmuch.com
 */
public class FileDataSourceInit implements InitFunc {
    @Override
    public void init() throws Exception {
        // TIPS: 如果你对这个路径不喜欢,可修改为你喜欢的路径
        String ruleDir = System.getProperty("user.home") + "/sentinel/rules";
        String flowRulePath = ruleDir + "/flow-rule.json";
        String degradeRulePath = ruleDir + "/degrade-rule.json";
        String systemRulePath = ruleDir + "/system-rule.json";
        String authorityRulePath = ruleDir + "/authority-rule.json";
        String paramFlowRulePath = ruleDir + "/param-flow-rule.json";

        this.mkdirIfNotExits(ruleDir);
        this.createFileIfNotExits(flowRulePath);
        this.createFileIfNotExits(degradeRulePath);
        this.createFileIfNotExits(systemRulePath);
        this.createFileIfNotExits(authorityRulePath);
        this.createFileIfNotExits(paramFlowRulePath);

        // 流控规则
        ReadableDataSource<String, List<FlowRule>> flowRuleRDS = new FileRefreshableDataSource<>(
                flowRulePath,
                flowRuleListParser
        );
        // 将可读数据源注册至FlowRuleManager
        // 这样当规则文件发生变化时,就会更新规则到内存
        FlowRuleManager.register2Property(flowRuleRDS.getProperty());
        WritableDataSource<List<FlowRule>> flowRuleWDS = new FileWritableDataSource<>(
                flowRulePath,
                this::encodeJson
        );
        // 将可写数据源注册至transport模块的WritableDataSourceRegistry中
        // 这样收到控制台推送的规则时,Sentinel会先更新到内存,然后将规则写入到文件中
        WritableDataSourceRegistry.registerFlowDataSource(flowRuleWDS);

        // 降级规则
        ReadableDataSource<String, List<DegradeRule>> degradeRuleRDS = new FileRefreshableDataSource<>(
                degradeRulePath,
                degradeRuleListParser
        );
        DegradeRuleManager.register2Property(degradeRuleRDS.getProperty());
        WritableDataSource<List<DegradeRule>> degradeRuleWDS = new FileWritableDataSource<>(
                degradeRulePath,
                this::encodeJson
        );
        WritableDataSourceRegistry.registerDegradeDataSource(degradeRuleWDS);

        // 系统规则
        ReadableDataSource<String, List<SystemRule>> systemRuleRDS = new FileRefreshableDataSource<>(
                systemRulePath,
                systemRuleListParser
        );
        SystemRuleManager.register2Property(systemRuleRDS.getProperty());
        WritableDataSource<List<SystemRule>> systemRuleWDS = new FileWritableDataSource<>(
                systemRulePath,
                this::encodeJson
        );
        WritableDataSourceRegistry.registerSystemDataSource(systemRuleWDS);

        // 授权规则
        ReadableDataSource<String, List<AuthorityRule>> authorityRuleRDS = new FileRefreshableDataSource<>(
                authorityRulePath,
                authorityRuleListParser
        );
        AuthorityRuleManager.register2Property(authorityRuleRDS.getProperty());
        WritableDataSource<List<AuthorityRule>> authorityRuleWDS = new FileWritableDataSource<>(
                authorityRulePath,
                this::encodeJson
        );
        WritableDataSourceRegistry.registerAuthorityDataSource(authorityRuleWDS);

        // 热点参数规则
        ReadableDataSource<String, List<ParamFlowRule>> paramFlowRuleRDS = new FileRefreshableDataSource<>(
                paramFlowRulePath,
                paramFlowRuleListParser
        );
        ParamFlowRuleManager.register2Property(paramFlowRuleRDS.getProperty());
        WritableDataSource<List<ParamFlowRule>> paramFlowRuleWDS = new FileWritableDataSource<>(
                paramFlowRulePath,
                this::encodeJson
        );
        ModifyParamFlowRulesCommandHandler.setWritableDataSource(paramFlowRuleWDS);
    }

    private Converter<String, List<FlowRule>> flowRuleListParser = source -> JSON.parseObject(
            source,
            new TypeReference<List<FlowRule>>() {
            }
    );
    private Converter<String, List<DegradeRule>> degradeRuleListParser = source -> JSON.parseObject(
            source,
            new TypeReference<List<DegradeRule>>() {
            }
    );
    private Converter<String, List<SystemRule>> systemRuleListParser = source -> JSON.parseObject(
            source,
            new TypeReference<List<SystemRule>>() {
            }
    );

    private Converter<String, List<AuthorityRule>> authorityRuleListParser = source -> JSON.parseObject(
            source,
            new TypeReference<List<AuthorityRule>>() {
            }
    );

    private Converter<String, List<ParamFlowRule>> paramFlowRuleListParser = source -> JSON.parseObject(
            source,
            new TypeReference<List<ParamFlowRule>>() {
            }
    );

    private void mkdirIfNotExits(String filePath) throws IOException {
        File file = new File(filePath);
        if (!file.exists()) {
            file.mkdirs();
        }
    }

    private void createFileIfNotExits(String filePath) throws IOException {
        File file = new File(filePath);
        if (!file.exists()) {
            file.createNewFile();
        }
    }

    private <T> String encodeJson(T t) {
        return JSON.toJSONString(t);
    }
}
在项目的 resources/META-INF/services 目录下创建文件,名为 com.alibaba.csp.sentinel.init.InitFunc ,内容为初始化类的全路径:
# 改成上面FileDataSourceInit的包名类名全路径即可。
com.itmuch.contentcenter.FileDataSourceInit
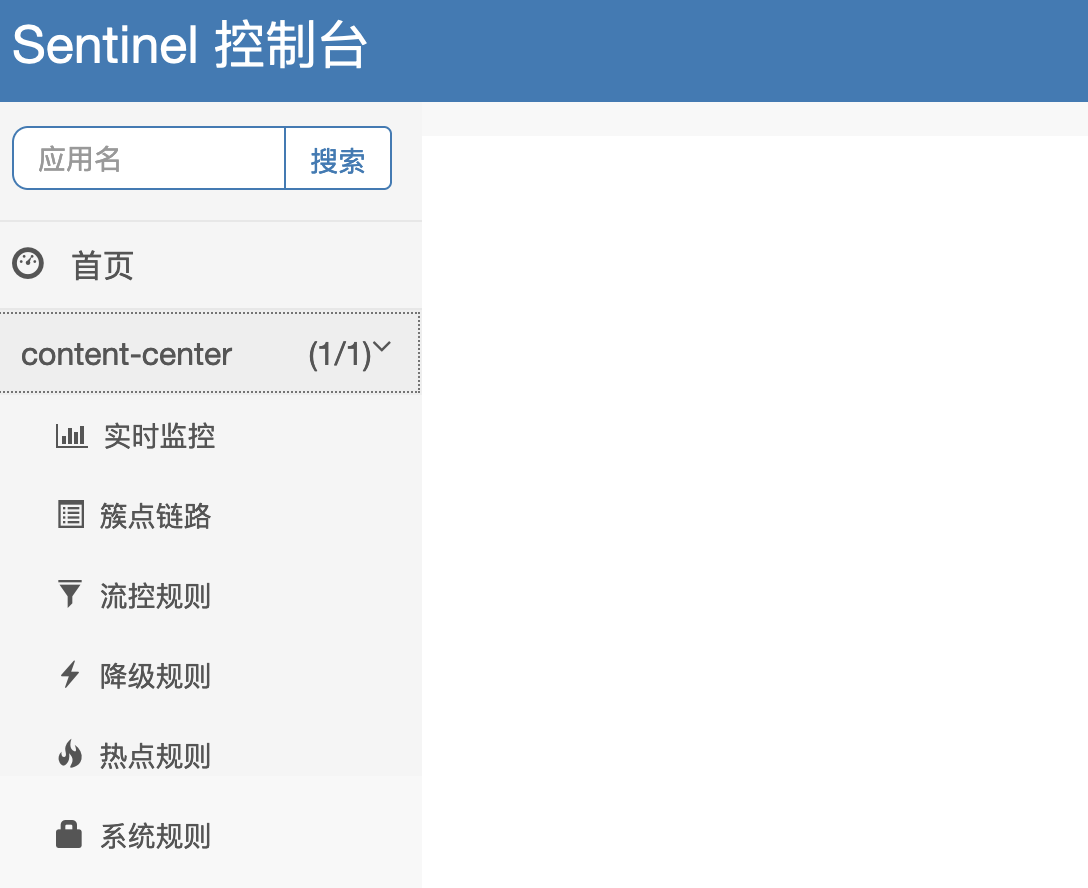
测试:重启Sentinel控制台服务,发现之前的请求已经被持久化
十一、生产环境下使用Sentinel
使用阿里云托管,推荐使用
开通地址:https://ahas.console.aliyun.com/
开通说明:https://help.aliyun.com/document_detail/90323.html
十二、错误页优化
根据不同的流控规则提供不同的错误页优化,确定到底是限流了?还是降级了,并且进行相应的处理。
12.1、新建错误页优化类
package personal.qin.contentcenter.sentineltest;

import com.alibaba.csp.sentinel.adapter.servlet.callback.UrlBlockHandler;
import com.alibaba.csp.sentinel.slots.block.BlockException;
import com.alibaba.csp.sentinel.slots.block.authority.AuthorityException;
import com.alibaba.csp.sentinel.slots.block.degrade.DegradeException;
import com.alibaba.csp.sentinel.slots.block.flow.FlowException;
import com.alibaba.csp.sentinel.slots.block.flow.param.ParamFlowException;
import com.alibaba.csp.sentinel.slots.system.SystemBlockException;
import com.fasterxml.jackson.databind.ObjectMapper;
import lombok.AllArgsConstructor;
import lombok.Builder;
import lombok.Data;
import lombok.NoArgsConstructor;
import org.springframework.stereotype.Component;

import javax.servlet.http.HttpServletRequest;
import javax.servlet.http.HttpServletResponse;
import java.io.IOException;

/**
 * Sentinel错误页优化类
 */
@Component
public class MyUrlBlockHandler implements UrlBlockHandler {
    @Override
    public void blocked(HttpServletRequest httpServletRequest, HttpServletResponse httpServletResponse, BlockException e) throws IOException {
        ErrorMsg msg = null;
        if(e instanceof FlowException){ //限流异常
            msg = ErrorMsg.builder()
                    .status(100)
                    .msg("限流了")
                    .build();
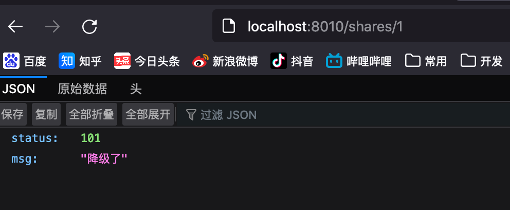
        } else if(e instanceof DegradeException){
            msg = ErrorMsg.builder()
                    .status(101)
                    .msg("降级了")
                    .build();
        } else if(e instanceof ParamFlowException){
            msg = ErrorMsg.builder()
                    .status(1002)
                    .msg("热点参数限流")
                    .build();
        } else if(e instanceof SystemBlockException){
            msg = ErrorMsg.builder()
                    .status(103)
                    .msg("系统规则(负载/...不满足要求)")
                    .build();
        } else if(e instanceof AuthorityException){
            msg = ErrorMsg.builder()
                    .status(104)
                    .msg("授权规则不通过")
                    .build();
        }
        httpServletResponse.setStatus(500);
        httpServletResponse.setCharacterEncoding("utf-8");
        httpServletResponse.setHeader("Content-Type", "application/json;charset=utf-8");
        httpServletResponse.setContentType("application/json;charset=utf-8");
        //SpringMVC自带的json操作工具jackson
        new ObjectMapper()
                .writeValue(
                        httpServletResponse.getWriter(),
                        msg
                );
    }
}

@Data
@Builder
@AllArgsConstructor
@NoArgsConstructor
class ErrorMsg{
    private Integer status;
    private String msg;
}
12.2、测试效果
十三、实现区分来源
根据不同的来源(比如:浏览器访问或者其他来源)提供不同的控流规则
13.1、新建来源处理类
package personal.qin.contentcenter.sentineltest;

import com.alibaba.csp.sentinel.adapter.servlet.callback.RequestOriginParser;
import io.netty.util.internal.StringUtil;
import org.apache.commons.lang.StringUtils;
import org.springframework.stereotype.Component;

import javax.servlet.http.HttpServletRequest;

/**
 * Sentinel区分来源处理类
 */
//@Component
public class MyRequestOriginPaser implements RequestOriginParser {
    @Override
    public String parseOrigin(HttpServletRequest request) {
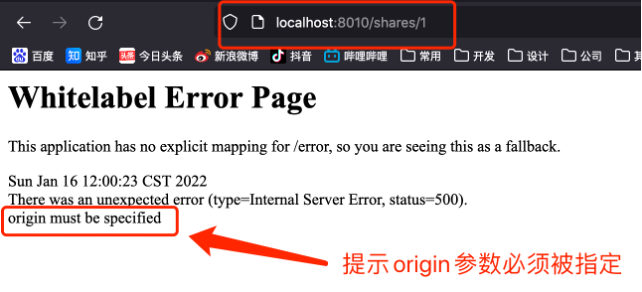
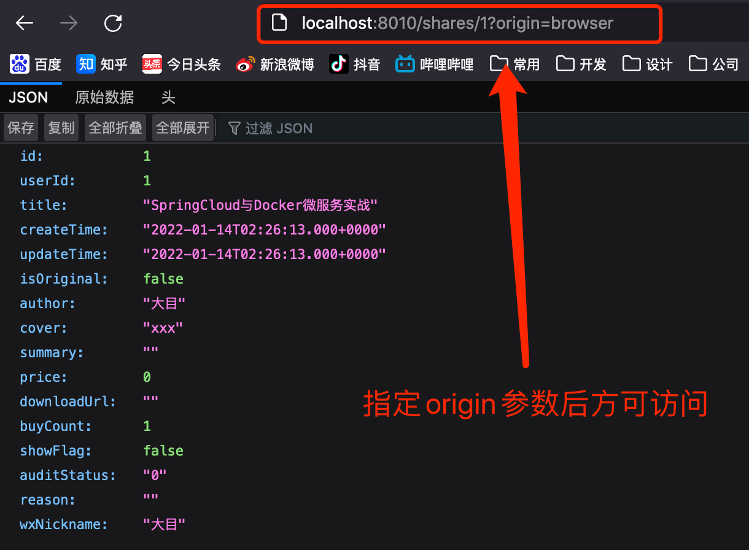
        //从请求参数中获取名为origin的参数并返回(强制要求只要调用我微服务就必须提供origin参数)
        //如果获取不到origin参数,就抛异常
        String origin = request.getParameter("origin");
        if(StringUtils.isBlank(origin)){
            throw new IllegalArgumentException("origin must be specified"); //origin参数必须被指定
        }
        return origin;
    }
}
13.2、测试效果
 设置授权规则
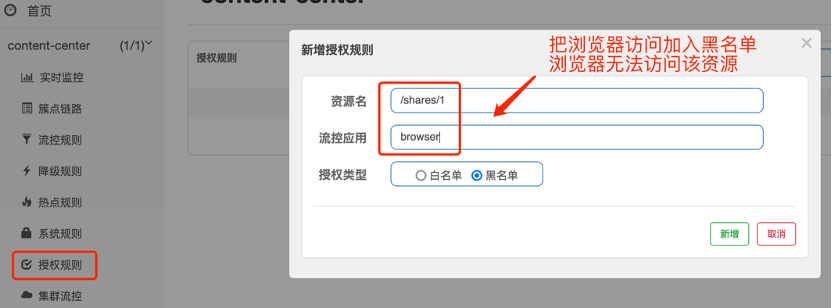

针对来源设置流控规则
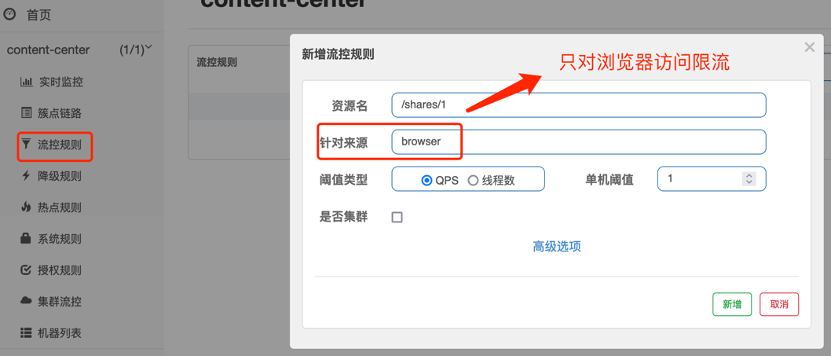

十四、扩展Sentinel支持RESTFul请求
14.1、新建处理类
package personal.qin.contentcenter.sentineltest;

import com.alibaba.csp.sentinel.adapter.servlet.callback.UrlCleaner;
import org.apache.commons.lang.math.NumberUtils;
import org.springframework.stereotype.Component;

import java.util.Arrays;

/**
 * 扩展Sentinel支持RESTFul的请求方式
 */
@Component
public class MyUrlCleaner implements UrlCleaner {
    @Override
    public String clean(String originUrl) {
        //让访问的URL /shares/1 与 /shares/2 的返回值相同
        //返回 /shares/{number}
        String[] split = originUrl.split("/");
        String s = Arrays.stream(split)
                .map(string -> {
                    if (NumberUtils.isNumber(string)) {
                        return "{number}";
                    }
                    return string;
                })
                .reduce((a, b) -> a + "/" + b)
                .orElse("");

        return s;
    }
}
14.2、测试效果

十五、Sentinel配置项总结
参考:https://www.imooc.com/article/289562
十六、pom.xml、application.yml及源代码下载
16.1、源代码
(代码)SpringCloud第08讲:使用Sentinel实现微服务容错
16.2、pom.xml
<?xml version="1.0" encoding="UTF-8"?>
<project xmlns="http://maven.apache.org/POM/4.0.0" xmlns:xsi="http://www.w3.org/2001/XMLSchema-instance"
         xsi:schemaLocation="http://maven.apache.org/POM/4.0.0 https://maven.apache.org/xsd/maven-4.0.0.xsd">
    <modelVersion>4.0.0</modelVersion>
    <parent>
        <groupId>org.springframework.boot</groupId>
        <artifactId>spring-boot-starter-parent</artifactId>
        <version>2.1.5.RELEASE</version>
        <relativePath/> <!-- lookup parent from repository -->
    </parent>
    <groupId>personal.qin</groupId>
    <artifactId>content-center</artifactId>
    <version>0.0.1-SNAPSHOT</version>
    <name>content-center</name>
    <description>content-center</description>
    <properties>
        <java.version>1.8</java.version>
    </properties>
    <dependencies>
        <dependency>
            <groupId>org.springframework.boot</groupId>
            <artifactId>spring-boot-starter-web</artifactId>
        </dependency>
        <dependency>
            <groupId>mysql</groupId>
            <artifactId>mysql-connector-java</artifactId>
            <scope>runtime</scope>
        </dependency>
        <dependency>
            <groupId>org.springframework.boot</groupId>
            <artifactId>spring-boot-starter-test</artifactId>
            <scope>test</scope>
        </dependency>
        <dependency>
            <groupId>tk.mybatis</groupId>
            <artifactId>mapper-spring-boot-starter</artifactId>
            <version>2.1.5</version>
        </dependency>
        <dependency>
            <groupId>org.projectlombok</groupId>
            <artifactId>lombok</artifactId>
            <version>1.18.8</version>
            <scope>provided</scope>
        </dependency>
        <dependency>
            <groupId>org.springframework.cloud</groupId>
            <artifactId>spring-cloud-starter-alibaba-nacos-discovery</artifactId>
        </dependency>
        <dependency>
            <groupId>org.springframework.cloud</groupId>
            <artifactId>spring-cloud-starter-openfeign</artifactId>
        </dependency>
        <dependency>
            <groupId>io.github.openfeign</groupId>
            <artifactId>feign-httpclient</artifactId>
        </dependency>
        <dependency>
            <groupId>org.springframework.cloud</groupId>
            <artifactId>spring-cloud-starter-alibaba-sentinel</artifactId>
        </dependency>
        <dependency>
            <groupId>org.springframework.boot</groupId>
            <artifactId>spring-boot-starter-actuator</artifactId>
        </dependency>
        <dependency>
            <groupId>com.alibaba.csp</groupId>
            <artifactId>sentinel-datasource-extension</artifactId>
        </dependency>

        <dependency>
            <groupId>org.junit.jupiter</groupId>
            <artifactId>junit-jupiter-api</artifactId>
            <version>5.5.0</version>
            <scope>test</scope>
        </dependency>
    </dependencies>
    <dependencyManagement>
        <dependencies>
            <!--整合spring cloud-->
            <dependency>
                <groupId>org.springframework.cloud</groupId>
                <artifactId>spring-cloud-dependencies</artifactId>
                <version>Greenwich.SR1</version>
                <type>pom</type>
                <scope>import</scope>
            </dependency>
            <!--整合spring cloud alibaba-->
            <dependency>
                <groupId>org.springframework.cloud</groupId>
                <artifactId>spring-cloud-alibaba-dependencies</artifactId>
                <version>0.9.0.RELEASE</version>
                <type>pom</type>
                <scope>import</scope>
            </dependency>
        </dependencies>
    </dependencyManagement>
    <build>
        <plugins>
            <plugin>
                <groupId>org.springframework.boot</groupId>
                <artifactId>spring-boot-maven-plugin</artifactId>
            </plugin>
            <plugin>
                <groupId>org.mybatis.generator</groupId>
                <artifactId>mybatis-generator-maven-plugin</artifactId>
                <version>1.3.6</version>
                <configuration>
                    <configurationFile>
                        ${basedir}/src/main/resources/generator/generatorConfig.xml
                    </configurationFile>
                    <overwrite>true</overwrite>
                    <verbose>true</verbose>
                </configuration>
                <dependencies>
                    <dependency>
                        <groupId>mysql</groupId>
                        <artifactId>mysql-connector-java</artifactId>
                        <version>8.0.16</version>
                    </dependency>
                    <dependency>
                        <groupId>tk.mybatis</groupId>
                        <artifactId>mapper</artifactId>
                        <version>4.1.5</version>
                    </dependency>
                </dependencies>
            </plugin>
        </plugins>
    </build>
</project>
16.3、application.yml
server:
  port: 8012
spring:
  datasource:
    url: jdbc:mysql://localhost:3306/user_center
    username: root
    password: Aa123123.
    #    driver-class-name: com.mysql.cj.jdbc.Driver
    driver-class-name: com.mysql.jdbc.Driver
  cloud:
    nacos:
      discovery:
        #指定nacos server的地址,用于微服务发现
        server-addr: localhost:8848
        cluster-name: BeiJing
    # 微服务content-center整合Sentinel
    sentinel:
      transport:
        #指定sentin控制台的地址
        dashboard: localhost:8080
  application:
    name: content-center
  #解决Feign多个Client接口指向同一个微服务出现异常的问题
  main:
    allow-bean-definition-overriding: true
feign:
  client:
    config:
      #想要调用的微服务的名称
      user-center:
        loggerLevel: full
  httpclient:
    #让feign使用Apache httpclient做请求,而不是默认的urlconnection
    enabled: true
    #feign的最大连接数
    max-connections: 200
    #feign单个路径的最大连接数
    max-connections-per-route: 50
  # feign整合Sentinel
  sentinel:
    enabled: true

# 配置actuator和Sentinel联动
management:
  endpoints:
    web:
      exposure:
        include: '*'
  endpoint:
    health:
      show-details: always
#设置日志输出级别
logging:
  level:
    personal.qin.contentcenter.UserCenterFeignClient: debug
最后
以上就是着急画笔最近收集整理的关于SpringCloud第08讲:使用Sentinel实现微服务容错 一、项目中整合Sentinel 二、搭建Sentinel控制台三、整合微服务 四、流控规则 五、降级规则(熔断) 六、系统规则七、控制台配置项八、Feign整合Sentinel九、微服务对限流后的处理fallbackfactory十、规则持久化10.2、拉模式十一、生产环境下使用Sentinel 十二、错误页优化 十三、实现区分来源十四、扩展Sentinel支持RESTFul请求 十五、Sentinel配置项总结十六、pom.x的全部内容,更多相关SpringCloud第08讲:使用Sentinel实现微服务容错 一、项目中整合Sentinel 二、搭建Sentinel控制台三、整合微服务 四、流控规则 五、降级规则(熔断) 六、系统规则七、控制台配置项八、Feign整合Sentinel九、微服务对限流后内容请搜索靠谱客的其他文章。


发表评论 取消回复