废话少说,直接从最初到后面一个一个代码展示最近参考文章(辛星tkinter第二版)书写的代码内容
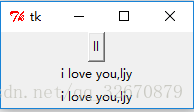
from tkinter import *

def xinlabel():
    '''2 ways to bind'''
    global xin
    s = Label(xin, text='i love you,ljy')
    s.pack()

xin = Tk()
b1 = Button(xin,text='ll', command=xinlabel)
b1.pack()

xin.mainloop()
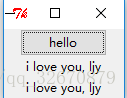
from tkinter import *
from tkinter.ttk import *

def xinlabel(event):
    global xin
    s = Label(xin,text='i love you, ljy')
    s.pack()

xin = Tk()
b1 = Button(xin, text='hello')
b1.bind('<Button-1>', xinlabel)
b1.pack()

xin.mainloop()
from tkinter import *

xin = Tk()
b1 = Button(xin, text='ll')
b1['width'] = 20
b1['height'] = 4
b1.pack()

b2 = Button(xin, text='love you')
b2['width'] = 20
b2['background'] = 'red'
b2.pack()

xin.mainloop()
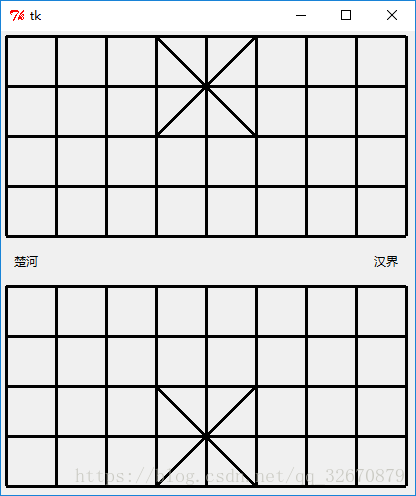
# encoding=utf-8
from tkinter import *
root = Tk()

canvas = Canvas(root, width=410, height=460)
# up 5 row
for i in range(10):
	canvas.create_line((5,5+50*i),(405,5+50*i), width=3)

canvas.create_text(25, 230, text='楚河')
canvas.create_text(385, 230, text='汉界')

# up 5 column
for i in range(10):
	canvas.create_line((5+50*i,5),(5+50*i,205), width=3)

# bottom 5 column
for i in range(10):
	canvas.create_line((5+50*i,255),(5+50*i,455), width=3)

canvas.create_line((155,5),(255,105), width=3)
canvas.create_line((155,105),(255,5), width=3)

canvas.create_line((155,355),(255,455), width=3)
canvas.create_line((155,455),(255,355), width=3)

canvas.pack()

root.mainloop()
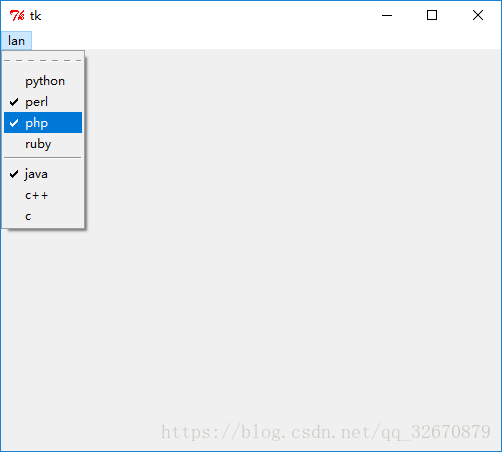
# encoding=utf-8
from tkinter import *

root = Tk()
root['width'] = 500
root['height'] = 400

menubar = Menu(root)

lmenu = Menu(menubar)
for item in ['python', 'perl', 'php', 'ruby']:
    lmenu.add_checkbutton(label=item)

lmenu.add_separator()

for item in ['java', 'c++', 'c']:
    lmenu.add_radiobutton(label=item)

menubar.add_cascade(label='lan', menu=lmenu)

root['menu'] = menubar

root.mainloop()
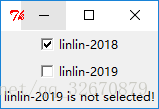
# encoding=utf-8
from tkinter import *

time1 = 0
time2 = 0

def xin1():
    global l, c1, time1
    if time1 % 2 == 0:
        time1 += 1
        l['text'] = 'linlin-2018 is selected!'
    else:
        time1 += 1
        l['text'] = 'linlin-2018 is not selected!'

def xin2():
    global l, c2, time2
    if time2 % 2 == 0:
        time2 += 1
        l['text'] = 'linlin-2019 is selected!'
    else:
        time2 += 1
        l['text'] = 'linlin-2019 is not selected!'

root = Tk()
c1 = Checkbutton(root, text='linlin-2018', command=xin1)
c1.pack()

c2 = Checkbutton(root, text='linlin-2019', command=xin2)
c2.pack()

l = Label(root, text='')
l.pack()

root.mainloop()
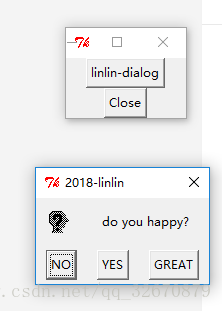
# encoding=utf-8
'''交互对话框'''

from tkinter.dialog import *
from tkinter import *


'''xin函数中 title表示弹窗窗口的标题,text表示弹窗展示的文字, strings表示用户可以点击的选项'''
'''打印的值,为我们点击后返回的数值,,,是将strings中的字符串按照list顺序输出的 (从0开始)'''

def xin():

    d = Dialog(None, title='2018-linlin', text='do you happy?',
            bitmap=DIALOG_ICON, default=0, strings=('NO', 'YES', 'GREAT'))
    print d.num

t = Button(None, text='linlin-dialog', command=xin)
t.pack()

b = Button(None, text='Close', command=t.quit)
b.pack()

t.mainloop()
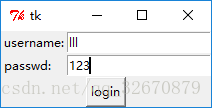
# encoding=utf-8
from tkinter import *

'''
**************grid布局*************
1.由于我们的程序大多数都是矩形,因此特别适合于网格布局,
也就是grid布局。

2.使用grid布局的时候,我们使用grid函数,在里面指定两个
参数,用row表示行,用column表示列,其中值得注意的是row
和column的编号都从0开始。

3.grid函数还有个sticky参数,它可以用N,E,S,W表示上
右下左,它决定了这个组件是从哪个方向开始的,下面的例子
可以很好的解释这一点。

4.grid布局直接用后面的行和列的数字来指定了它位于哪个
位置,而不必使用其他参数。

5.grid函数也支持诸如ipadx,ipady,padx,pady,它们
的意思和pack函数是一样的,默认边距是0。

6.它还支持参数比如rowspan,表示跨越的行数,columnspan
表示跨越的列数。

7.它还有一些属性,可以在以后我们的demo中慢慢使用来看
出其重要性。
**************账号登陆例子的code*********

Entry表示“输入框”。
'''

root = Tk()
Label(root, text='username:').grid(row=0,sticky=W)
Entry(root).grid(row=0, column=1,sticky=E)

Label(root, text='passwd:').grid(row=1, sticky=W)
Entry(root).grid(row=1, column=1,sticky=E)

Button(root, text='login').grid(row=2, columnspan=2) # , sticky=W

root.mainloop()
# encoding=utf-8
from tkinter import *
'''
*************事件*************
1.如果大家学习过Windows编程,经常会听到“Windows是基于消息的”,而绝大多数界面编程也都会涉及到“事件”。
2.我们的很多操作,比如我们点击了一下鼠标,这就是一个事件,而操作系统会根据我们的相应的事件产生相应的消息,操作系统把消息传递给我们的应用程序,然后我们的应用程序根据操作系统传入的数据执行相应的命令。
3.事件是我们触发的,消息是操作系统根据我们的事件产生的,我们通常对于“消息”并不多关注,我们重视的是“事件”。
4.事件的英文表述是“event”。
**********事件及其绑定**************
1.其实,我们在按钮那一节就接触到了事件的绑定,使用的函数是bind。
2.bind函数的调用规则:
窗体对象.bind(事件类型,回调函数)
3.所谓的“回调函数”,就是这个函数我们不用去调用它,当相应的事件发生的时候,它会自动取调用。比如当我们的按钮被按下的时候,它会被自动调用。
***************常用的事件************
1.我们在使用bind函数的时候,它的第一个参数就是事件的类型了。
2.<Button-1>表示鼠标左键单击,其中的1换成3表示右键被单击,为2的时候表示鼠标中键,感觉不算常用。
3.<KeyPress-A>表示A键被按下,其中的A可以换成其他的键位。
4.<Control-V>表示按下的是Ctrl和V键,V可以换成其他键位。
5.<F1>表示按下的是F1键,对于Fn系列的,都可以随便换。
***************再看绑定*************
1.事件不仅可以与Button绑定,我们之前看过源代码,发现bind函数是定义在Misc类里面的,也就是说,这个bind可以被绝大多数组件类所使用。
2.也就是说,我们可以让“标签”来模拟“按钮”的作用。
3.因为标签是Label类,而Label类继承自Widget,而Widget继承自BaseWidget,而Basewidget继承自Misc。
4.其实不仅是标签可以模拟button,任何组件都可以模拟它,只是那么有用。
********标签模拟按钮*************
'''
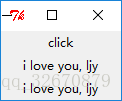
root = Tk()
def getEvent(event):
label = Label(root, text='i love you, ljy')
label.pack()
t = Label(root, text='click')
# <Button-1> 为左键单击事件
t.bind('<Button-1>', getEvent)
t.pack()
root.mainloop()
'''
************关于bind函数*************
1.关于bind函数,还有两个版本的,不能说高级低级,只是使用的方面不同。
2.可以在全程序级别的绑定,使用bind_all,它的参数类型和bind一样,它通常用于全局的快捷键,比如F1通常是用来打开帮助文档。
3.还可以绑定某些类别,使用bind_class,它接受三个参数,第一个参数是类名,第二个参数是事件类型,第三个参数是相应的操作,
比如w.bind_class(“Entry”,“<Control-V>”,my_paste)。它就是绑定了所有的所有的输入框的Ctrl+V表示粘贴。
*************解除绑定**************
1.接触绑定我们使用unbind方法,它和bind的使用很相似。
2.不过unbind方法只需要一个参数就可以了,它只需要解除绑定的事件类型,因为它会解除该绑定事件类型的所有回调函数。
''' 
# encoding=utf-8
from tkinter import *
'''
****************密码框***********
1.其实密码框和输入框基本是一样的,都是向里面输入信息用的。
2.如果要说不一样,也就一个地方不一样:密码框需要输入的信息的显示字符比较单一。
3.比如e是一个输入框,我们可以设置它的show属性让它变成一个密码框,即e[‘show’] = ‘*’就可以了。
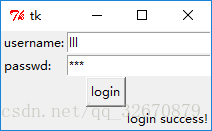
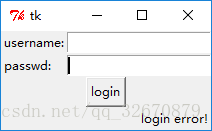
*********小型登录程序*************
1.下面是一个小型登录程序,它的用户名是111,密码是222,如果输入正确,那么点击“登录”按钮之后,
就会显示“登录成功”,如果输入不符合,那么就会显示“用户名或者密码错误”,并且清空两个输入框。
'''
def reg():
s1 = e1.get()
s2 = e2.get()
t1 = len(s1)
t2 = len(s2)
if s1 == 'lll' and s2 == '123':
c1['text'] = 'login success!'
else:
c1['text'] = 'login error!'
e1.delete(0,t1)
e2.delete(0,t2)
root = Tk()
l = Label(root, text='username:')
l.grid(row=0,column=0, sticky=W)
e1 = Entry(root)
e1.grid(row=0, column=1, sticky=E)
l2 = Label(root, text='passwd:')
l2.grid(row=1,column=0, sticky=W)
e2 = Entry(root)
e2.grid(row=1, column=1, sticky=E)
e2['show'] = '*'
b = Button(root, text='login', command=reg)
# b.grid(row=2, sticky=E)
# b.grid(row=2)
b.grid(row=2, columnspan=2)
c1 = Label(root, text='')
c1.grid(row=3, column=1, sticky=E)
root.mainloop()
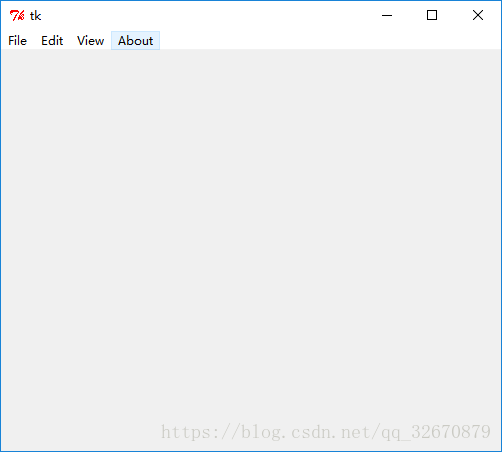
# encoding=utf-8
from tkinter import *

root = Tk()
root['width'] = 500
root['height'] = 400

menubar = Menu(root)

for item in ['File', 'Edit', 'View', 'About']:
    menubar.add_command(label = item)

root['menu'] = menubar

root.mainloop()
# encoding=utf-8
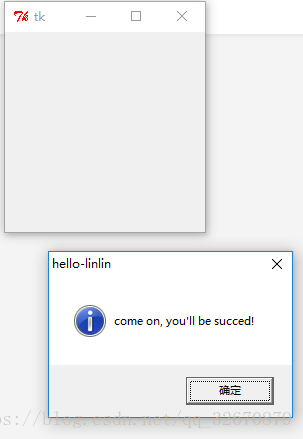
from tkinter.messagebox import *
showinfo(title='hello-linlin', message='come on, you'll be succed!')
# encoding=utf-8
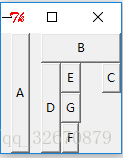
from tkinter import *
'''
**************pack布局*************
1.我们使用pack函数的时候,默认先使用的放到上面,然后 依次向下排,它会给我们的组
件一个自认为合适的位置和大小,这是默认方式,也是我们上面一直采用的方式。
2. pack函数也可以接受几个参数,side参数指定了它停靠在哪个方向,可以为LEFT,TOP,
RIGHT,BOTTOM,分别代表左,上,右,下,它的fill参数可以是X,Y,BOTH和NONE,即在水平
方向填充,竖直方向填充,水平和竖直方向填充和不填充。
3.它的expand参数可以是YES和NO,它的anchor参数可以是N,E,S,W(这里的NESW分别表示
北东南西,这里分别表示上右下左)以及他们的组合或者是CENTER(表示中间)。
4.它的ipadx表示的是内边距的x方向,它的ipady表示的是内边距的y方向,padx表示的是
外边距的x方向,pady表示的是外边距的y方向。
'''
root = Tk()
# 位置在左侧, 扩展为真, 纵向填充
Button(root, text='A').pack(side=LEFT, expand = YES, fill = Y)
Button(root, text='B').pack(side=TOP, expand=YES, fill=BOTH)
Button(root, text="C").pack(side=RIGHT, expand=YES, fill=NONE, anchor=NE)
Button(root, text="D").pack(side=LEFT, expand=NO, fill=Y)
Button(root, text='E').pack(side=TOP, expand=NO, fill=BOTH)
Button(root, text='F').pack(side=BOTTOM, expand=YES)
Button(root, text="G").pack(anchor=SE)
root.mainloop()
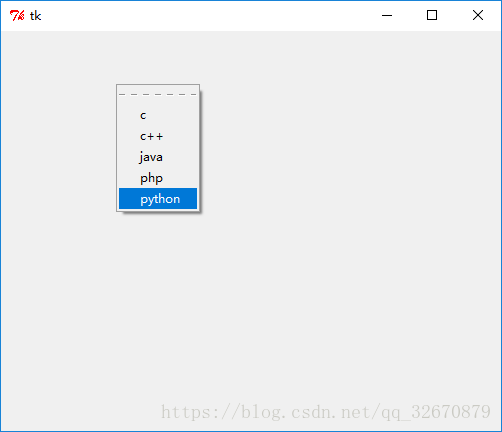
# encoding=utf-8
from tkinter import *

root = Tk()

root['width'] = 500
root['height'] = 400

def xin():
    global root
    s = Label(root, text='i love ljy').pack()

menubar = Menu(root)
for item in ['c','c++','java','php']:
    menubar.add_command(label=item)

menubar.add_command(label='python', command=xin)

def pop(event):
    menubar.post(event.x_root, event.y_root)

root.bind('<Button-3>', pop)

root.mainloop()
# encoding=utf-8
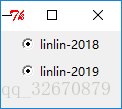
from tkinter import *
# 存在一个小问题,显示页面时,其中的单选框为选中状态
time1 = 0
time2 = 0
def xin1():
global l, c1, time1
if time1 % 2 == 0:
time1 += 1
l['text'] = 'linlin-2018 is selected!'
else:
time1 += 1
l['text'] = 'linlin-2018 is not selected!'
def xin2():
global l, c2, time2
if time2 % 2 == 0:
time2 += 1
l['text'] = 'linlin-2019 is selected!'
else:
time2 += 1
l['text'] = 'linlin-2019 is not selected!'
root = Tk()
c1 = Radiobutton(root, text='linlin-2018', command=xin1)
c1.pack()
c2 = Radiobutton(root, text='linlin-2019', command=xin2)
c2.pack()
l = Label(root, text='')
l.pack()
root.mainloop()
# encoding=utf-8
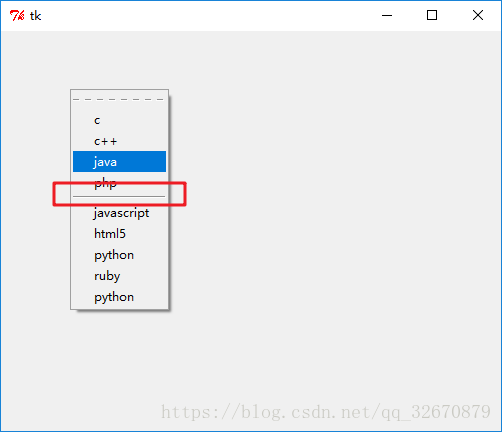
from tkinter import *
root = Tk()
root['width'] = 500
root['height'] = 400
def xin():
global root
s = Label(root, text='i love ljy').pack()
menubar = Menu(root)
for item in ['c','c++','java','php']:
menubar.add_command(label=item)
menubar.add_separator()
for item in ['javascript', 'html5', 'python', 'ruby']:
menubar.add_command(label=item)
menubar.add_command(label='python', command=xin)
def pop(event):
menubar.post(event.x_root, event.y_root)
root.bind('<Button-3>', pop)
root.mainloop()
# encoding=utf-8
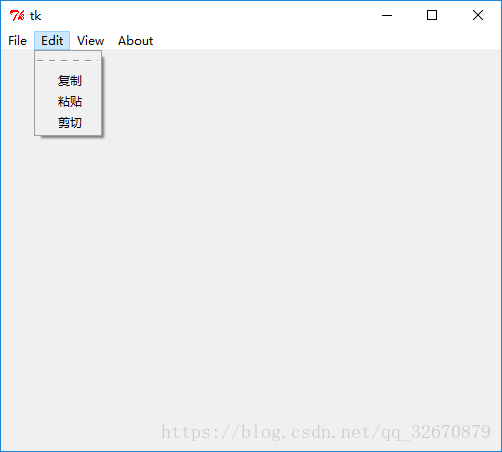
from tkinter import *
root = Tk()
root['width'] = 500
root['height'] = 400
menubar = Menu(root)
fmenu = Menu(menubar)
for item in ['新建', '打开', '保存', '另存为']:
fmenu.add_command(label = item)
emenu = Menu(menubar)
for item in ['复制', '粘贴', '剪切']:
emenu.add_command(label = item)
vmenu = Menu(menubar)
for item in ['默认视图', '新式视图']:
vmenu.add_command(label=item)
amenu = Menu(menubar)
for item in ['版权信息', '其他信息']:
amenu.add_command(label=item)
menubar.add_cascade(label='File', menu=fmenu)
menubar.add_cascade(label='Edit', menu=emenu)
menubar.add_cascade(label='View', menu=vmenu)
menubar.add_cascade(label='About', menu=amenu)
root['menu'] = menubar
root.mainloop()
# encoding=utf-8
from tkinter import *
root = Tk()

t = Text(root, width=500, height=400)
t.pack()
root.mainloop() 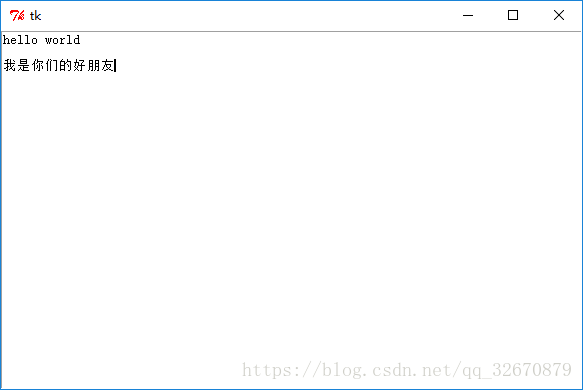
# encoding=utf-8
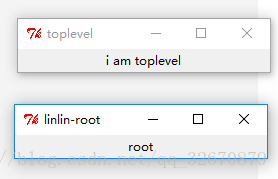
from tkinter import *
root = Tk()
root.title('linlin-root')
root.width=300
root.height=200
l = Label(root, text='root')
l.pack()
f = Toplevel(root,width=400, height=300)
f.title('toplevel')
lf = Label(f, text='i am toplevel')
lf.pack()
root.mainloop()
最后
以上就是踏实面包最近收集整理的关于Python中简单的GUI--Tkinter实例分析--2的全部内容,更多相关Python中简单内容请搜索靠谱客的其他文章。
本图文内容来源于网友提供,作为学习参考使用,或来自网络收集整理,版权属于原作者所有。


发表评论 取消回复