前期准备
1、生成secure_bootloader
由于编译BootLoader需要安全加密,按照网上大多数教程基本可以完成
注意初始生成的秘钥key 在之后的升级过程中应该始终保持一致,否则无法升级
2、移植dfu生成ble-uart-with-dfu 固件
为了让ble_app_uart具有DFU功能,有2种做法,一是把NUS服务移植到ble_app_buttonless_dfu中,这种方法相对来说更简单,但不利于理解DFU的移植原理;二是把DFU服务移植到ble_app_uart中,现在把DFU服务移植到ble_app_uart中。
1)打开如下工程:examplesble_peripheralble_app_uartpca10040s132arm5_no_packs
- 在nus服务函数中 添加DFU服务。代码如下:
#ifdef DFU_SUPPORT

    ble_dfu_buttonless_init_t dfus_init = {0};

    // Initialize the async SVCI interface to bootloader.

    err_code = ble_dfu_buttonless_async_svci_init();

    APP_ERROR_CHECK(err_code);

    dfus_init.evt_handler = ble_dfu_evt_handler;

    err_code = ble_dfu_buttonless_init(&dfus_init);

    APP_ERROR_CHECK(err_code);

#endif
其中定义ble_dfu_evt_handler,从ble_app_buttonless_dfu工程中复制即可。
Nordic对每一个模块都有一个编译总开关,因此还需到sdk_config.h中使能DFU模块,如下:
#ifndef BLE_DFU_ENABLED

#define BLE_DFU_ENABLED 1

#endif


// <q> NRF_DFU_BLE_BUTTONLESS_SUPPORTS_BONDS  - Buttonless DFU supports bonds.


#ifndef NRF_DFU_BLE_BUTTONLESS_SUPPORTS_BONDS

#define NRF_DFU_BLE_BUTTONLESS_SUPPORTS_BONDS 0

#endif
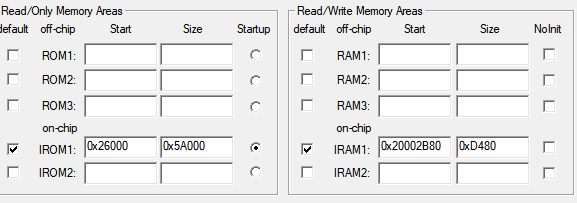
- 修改softdevice配置。现在整个应用包括2个vs_uuid:NUS和DFU,相应地ATT table size也要变大,然后应用程序RAM起始地址也需要跟着变,如下(注:这里的attr_tab_size设置得稍稍偏大):
// <o> NRF_SDH_BLE_GATTS_ATTR_TAB_SIZE - Attribute Table size in bytes. The size must be a multiple of 4.

#ifndef NRF_SDH_BLE_GATTS_ATTR_TAB_SIZE

#define NRF_SDH_BLE_GATTS_ATTR_TAB_SIZE 1600

#endif


// <o> NRF_SDH_BLE_VS_UUID_COUNT - The number of vendor-specific UUIDs.

#ifndef NRF_SDH_BLE_VS_UUID_COUNT

#define NRF_SDH_BLE_VS_UUID_COUNT 2

#endif
修改应用程序RAM起始地址,如下:
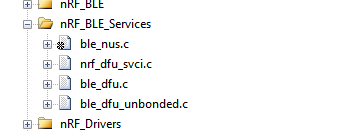
- 添加上述函数涉及到的文件,宏定义及包含相关目录。首先添加如下DFU目录及相关文件:
在define中添加这些宏:DEBUG DFU_SUPPORT BL_SETTINGS_ACCESS_ONLY NRF_DFU_SVCI_ENABLED NRF_DFU_TRANSPORT_BLE=1,其中DEBUG宏只是为了调试方便而设置的,跟DFU本身无关。DFU_SUPPORT是我用来控制我添加的DFU代码的,删掉DFU_SUPPORT,将不编译所有DFU有关代码。其余的宏都是系统自带的,如果要支持DFU,也是必须要定义的。

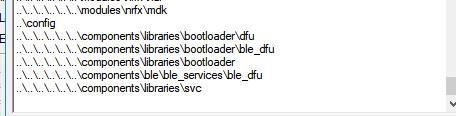
然后包含如下目录:
- 在main.c中添加如下头文件定义:
#ifdef DFU_SUPPORT

#include "ble_dfu.h"

#endif
6)编译工程,生成带dfu的工程,该工程不能直接运行,必须加上boot-settings ,协议栈 sd,BootLoader一起烧录才能正常运行 。
3、 批处理生成固件包
其中必须准备 第一步生成的秘钥 以及私钥,放在同一文件下 好进行批处理操作。
@echo on
:: 准备 BootLoader 和 固件app文件
copy "D:52832nRF5SDK15209412b96nRF5_SDK_15.2.0_9412b96examplesdfusecure_bootloaderpca10040_blearm5_no_packs_buildnrf52832_xxaa_s132.hex" "bootloader.hex"
copy "D:bond_nrf52_worknRF5_SDK_15.2.0_9412b96examplesble_peripheralble_app_uartpca10040s132arm5_no_packs_buildnrf52832_xxaa.hex" "nrf52832_xxaa_app.hex"


::第一步 生成bootloader setting文件
nrfutil.exe settings generate --family NRF52 --application nrf52832_xxaa_app.hex --application-version 0 --bootloader-version 0 --bl-settings-version 1 bootloader_settings.hex

::第二步 合并bootloader softdevice
mergehex.exe --merge bootloader.hex "D:52832nRF5SDK15209412b96nRF5_SDK_15.2.0_9412b96componentssoftdevices132hexs132_nrf52_6.1.0_softdevice.hex" --output production_final1.hex
::再合并application
mergehex.exe --merge production_final1.hex nrf52832_xxaa_app.hex --output production_final2.hex
::合并bootloader setting
mergehex.exe --merge production_final2.hex bootloader_settings.hex --output production_final.hex


::删除中间文件
del bootloader_settings.hex
del production_final1.hex
del production_final2.hex

::第四步  下载固件
"C:Program Files (x86)Nordic Semiconductornrf5xbinnrfjprog" -f NRF52 --eraseall
"C:Program Files (x86)Nordic Semiconductornrf5xbinnrfjprog" -f NRF52 --program "production_final.hex" --verify
"C:Program Files (x86)Nordic Semiconductornrf5xbinnrfjprog" -f NRF52 --reset
:: 第五步  制作升级包
nrfutil pkg generate --hw-version 52 --sd-req 0xaf --application-version 0xff --application nrf52832_xxaa_app.hex --key-file private.pem nrf52832_dfu_app.zip
pause
最后
以上就是悦耳黄蜂最近收集整理的关于nrf52832 -sdk15.2在ble-uart工程下移植dfu实验前期准备的全部内容,更多相关nrf52832内容请搜索靠谱客的其他文章。


发表评论 取消回复