系列文章目录
Android jni层开发 利用NDK定位崩溃crash 位置.
文章目录
- 系列文章目录
- 前言
- 一、串口通信整体步骤图
- 1.引入库
- 2.初始化串口
- 二、打开串口
- 1、源码:
- 2、open函数解析
- 3、fcntl 函数解析
- 三、设置串口属性
- 总结
前言
首先Android也是一个Linux,所以Android的串口通信,几乎就是Linux的串口通信,代码几乎都可以通用,当然尽量用标准库里的函数,可以跨平台使用。
提示:以下是本篇文章正文内容,GitHub上面有源码提供,欢迎点赞、收藏、转载、指导,有写错误的点,欢迎纠正。源码:https://github.com/LaoTie0815/AndroidSerialPort.
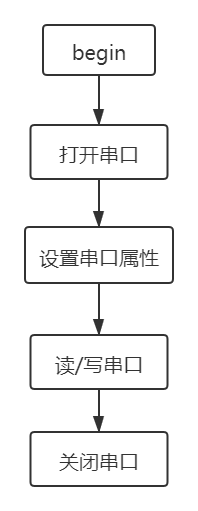
一、串口通信整体步骤图

整体步骤放在串口初始化函数里,读写在另外函数中
1.引入库
代码如下(示例):
#include "serial.h"
#include "mtc.h"
#include <fcntl.h>
#include <cstdio>
#include <termios.h>
#include <cstring>
#include <cerrno>
#include <sys/select.h>
#include <unistd.h>
#include <malloc.h>
#include <libgen.h>
#include <stdio.h>
#include <stdlib.h>
2.初始化串口
/******************************************************************************
Function   : init
Description: initialize config and data.
Input      : device: the dev path.
             speed:  the uart transfer baudrate.
             stopBits: the uart transfer data stop bit.
             dataBits: the uart transfer data width bit.
             parity: does the transmitted data need parity? 0 is none, 1 is odd,2 is even.
Output     : none
Return     : success: 0
             failure: uart_open() failure return value ,or uart_set_attr() failure return value.
******************************************************************************/
int Serial::init(const char *device, const int &speed, const int &stop_bits, const int &data_bits, const int &parity) {
    this->m_uart.speed = speed;
    this->m_uart.stopBits = stop_bits;
    this->m_uart.dataBits = data_bits;
    this->m_uart.parity = parity;
    strcpy(this->m_uart.path, device);
    if(this->m_is_init) this->destroy();
    int ret = this->uartOpen(this->m_uart.path);
    LOGI("%s %d: The Serial init result: %d", __FUNCTION__, __LINE__, ret);
    if(ret) return ret;
    if((ret = pipe(this->m_uart.pipe_fd)) != 0) return ret;
    if((ret = this->uartSetAttr()) != 0) return ret;
    LOGI("%s %d: The Serial set attr result: %d", __FUNCTION__, __LINE__, ret);
    this->m_is_init = true;
    return 0;
}
二、打开串口
1、源码:
/******************************************************************************
Function   : uartOpen
Description: open the uart
Input      : device: dev path.
Output     : none
Return     : success: 0
             failure: ERR_ALREADY_INIT: already init.
                      ERR_CANNOT_OPEN: can't open serial port,may not have permission.
                      ERR_CANNOT_FCNTL: catn't set fcntl.
******************************************************************************/
int Serial::uartOpen(const char *device) {
#ifdef _WIN32
    HANDLE pCom = CreateFileA(device,
                              GENERIC_READ | GENERIC_WRITE, //支持读写
                              0,                //独占方式,串口不支持共享
                              nullptr,          //安全属性指针,默认值为NULL
                              OPEN_EXISTING,    //打开现有的串口文件
                              0,                //0:同步方式,FILE_FLAG_OVERLAPPED:异步方式
                              nullptr);         //用于复制文件句柄,默认值为NULL,对串口而言该参数必须置为NULL);
    if(pCom==HANDLE(-1))
        return ERR_CANNOT_OPEN;
    if(!SetupComm(pCom,4096,4096))
        return ERR_CANNOT_OPEN;
#else
//    if(this->m_is_connect)
//        return ERR_ALREADY_INIT; //already init.
    if(this->m_is_init)
        return ERR_ALREADY_INIT;
    int fd;
    fd = open(device, O_RDWR | O_NOCTTY | O_NONBLOCK);
    LOGD("device:%s, fd:%d", device, fd);
//    fd = open(device, O_RDWR | O_NOCTTY | O_NDELAY);
    if (-1 == fd) {
        perror("Can't Open Serial Port");
        return ERR_CANNOT_OPEN;
    }
    if (fcntl(fd, F_SETFL, 0) < 0) {//设为阻塞状态
        perror("fcntl setfl failed!n");
        return ERR_CANNOT_FCNTL;
    } else {
        printf("fcntl=%dn", fcntl(fd, F_SETFL, 0));
    }
    this->m_uart.fd = fd;
#endif
    return 0;
}
2、open函数解析
功能描述:用于打开或创建文件,成功则返回文件描述符,否则返回-1,open返回的文件描述符一定是最小的未被使用的描述符
/*
 * pass_object_size serves two purposes here, neither of which involve __bos: it
 * disqualifies this function from having its address taken (so &open works),
 * and it makes overload resolution prefer open(const char *, int) over
 * open(const char *, int, ...).
 */
__BIONIC_FORTIFY_INLINE
int open(const char* const __pass_object_size pathname, int flags)
        __overloadable
        __clang_error_if(__open_modes_useful(flags), "'open' " __open_too_few_args_error) {
#if __ANDROID_API__ >= __ANDROID_API_J_MR1__
    return __open_2(pathname, flags);
#else
    return __open_real(pathname, flags);
#endif /* __ANDROID_API__ >= __ANDROID_API_J_MR1__ */
}
参数解释:
pathname:文件路径名,串口在Linux中被看做是一个文件
flags:一些文件模式选择,有如下几个参数可以设置
- O_RDONLY 只读模式
- O_WRONLY 只写模式
- O_RDWR 读写模式
上面三个参数在设置的时候必须选择其中一个!!!下面的是可选的 - O_APPEND 每次写操作都写入文件的末尾
- O_CREAT 如果指定文件不存在,则创建这个文件
- O_EXCL 如果要创建的文件已存在,则返回 -1,并且修改 errno 的值
- O_TRUNC 如果文件存在,并且以只写/读写方式打开,则清空文件全部内容
- O_NOCTTY 如果路径名指向终端设备,不要把这个设备用作控制终端。
- O_NONBLOCK 如果路径名指向 FIFO/块文件/字符文件,则把文件的打开和后继 I/O设置为非阻塞模式(nonblocking mode)
下面三个常量同样是选用的,他们用于同步输入输出 - O_DSYNC 等待物理 I/O 结束后再 write。在不影响读取新写入的数据的前提下,不等待文件属性更新。
- O_RSYNC 读(read)等待所有写入同一区域的写操作完成后再进行
- O_SYNC 等待物理 I/O 结束后再 write,包括更新文件属性的 I/O对于串口的打开操作,必须使用
- O_NOCTTY 参数,它表示打开的是一个终端设备,程序不会成为该端口的控制终端。如果不使用此标志,任务的一个输入(比如键盘终止信号等)都会影响进程。
- O_NDELAY表示不关心DCD信号所处的状态(端口的另一端是否激活或者停止)。
3、fcntl 函数解析
功能描述:根据文件描述词来操作文件的特性,返回-1代表出错
/**
 * [fcntl(3)](http://man7.org/linux/man-pages/man2/fcntl.2.html) performs various operations
 * on file descriptors.
 *
 * The return value depends on the operation.
 */
int fcntl(int __fd, int __cmd, ...);
参数说明:
fd:文件描述符
cmd:命令参数
fcntl函数有5种功能:
- 复制一个现有的描述符(cmd=F_DUPFD).
- 获得/设置文件描述符标记(cmd=F_GETFD或F_SETFD).
- 获得/设置文件状态标记(cmd=F_GETFL或F_SETFL).
- 获得/设置异步I/O所有权(cmd=F_GETOWN或F_SETOWN).
- 获得/设置记录锁(cmd=F_GETLK , F_SETLK或F_SETLKW).
具体使用见链接: http://www.cnblogs.com/lonelycatcher/archive/2011/12/22/2297349.html.
三、设置串口属性
******************************************************************************
Function   : uartSetAttr
Description: set the IO fd's attr of uart.
Input      : none
Output     : none
Return     : success: 0
             failure: ERR_CANNOT_SET_ATTR: failed.
******************************************************************************/
int Serial::uartSetAttr() {
    struct termios ios;
    if (tcgetattr(this->m_uart.fd, &ios) != 0) {
        perror("can't setup serial device.");
        this->uartClose();
        return ERR_CANNOT_SET_ATTR;
    }
    speed_t speed = getBaudrate(this->m_uart.speed);
    cfmakeraw(&ios);
    //设置速率
    cfsetispeed(&ios, speed);
    cfsetospeed(&ios, speed);
    //设置字符
    ios.c_cflag |= CLOCAL | CREAD;
    ios.c_cflag &= ~CSIZE;

    //设置数据位
    switch (this->m_uart.dataBits) {
        case 5:
            ios.c_cflag |= CS5;
            break;
        case 6:
            ios.c_cflag |= CS6;
            break;
        case 7:
            ios.c_cflag |= CS7;
            break;
        case 8:
            ios.c_cflag |= CS8;
            break;
        default:
            ios.c_cflag |= CS8;
            break;
    }

    //设置奇偶校验
    switch (this->m_uart.parity) {
        case 0:
            ios.c_cflag &= ~PARENB;
            break;
        case 1:
            ios.c_cflag |= PARENB;
            ios.c_cflag |= PARODD;
            ios.c_iflag |= (INPCK | ISTRIP);
            break;
        case 2:
            ios.c_iflag |= (INPCK | ISTRIP);
            ios.c_cflag |= PARENB;
            ios.c_cflag &= ~PARODD;
            break;
        default:
            ios.c_cflag &= ~PARENB;
            break;
    }

    //设置停止位
    switch (this->m_uart.stopBits) {
        case 1:
            ios.c_cflag &= ~CSTOPB;
            break;
        case 2:
            ios.c_cflag |= CSTOPB;
            break;
        default:
            ios.c_cflag &= ~CSTOPB;
            break;
    }

    if ((tcsetattr(this->m_uart.fd, TCSANOW, &ios)) != 0) {
        perror("serial set error.");
        return ERR_CANNOT_SET_ATTR;
    }
    return tcflush(this->m_uart.fd,TCIOFLUSH);
}
讲解这片代码之前,我们要先研究一下termios的数据结构。最小的termios结构的典型定义如下:
struct termios {
  tcflag_t c_iflag;
  tcflag_t c_oflag;
  tcflag_t c_cflag;
  tcflag_t c_lflag;
  cc_t c_line;
  cc_t c_cc[NCCS];
};
上面五个结构成员名称分别代表:
- c_iflag:输入模式
- c_oflag:输出模式
- c_cflag:控制模式
- c_lflag:本地模式
- c_cc[NCCS]:特殊控制模式
五种模式的参数说明见博客 http://blog.csdn.net/querdaizhi/article/details/7436722.
tcgetattr可以初始化一个终端对应的termios结构,tcgetattr函数原型如下:
/**
 * [tcgetattr(3)](http://man7.org/linux/man-pages/man3/tcgetattr.3.html)
 * reads the configuration of the given terminal.
 *
 * Returns 0 on success and returns -1 and sets `errno` on failure.
 */
int tcgetattr(int __fd, struct termios* __t) __INTRODUCED_IN(21);
这个函数调用把低昂前终端接口变量的值写入termios_p参数指向的结构。如果这些值其后被修改了,可以通过调用函数tcsetattr来重新配置。
再看我们的代码,我们修改字符大小的代码为
newtio.c_cflag |= CLOCAL | CREAD;
newtio.c_cflag &= ~CSIZE;
c_cflag代表控制模式
- CLOCAL 含义为忽略所有调制解调器的状态行,这个目的是为了保证程序不会占用串口。
- CREAD 代表启用字符接收器,目的是是的能够从串口中读取输入的数据。
- CS5/6/7/8 表示发送或接收字符时使用5/6/7/8比特。
- CSTOPB 表示每个字符使用两位停止位。
- HUPCL 表示关闭时挂断调制解调器。
- PARENB:启用奇偶校验码的生成和检测功能。
- PARODD:只使用奇校验而不使用偶校验。
c_iflag代表输入模式 - BRKINT:当在输入行中检测到一个终止状态时,产生一个中断。
- TGNBRK:忽略输入行中的终止状态。
- TCRNL:将接受到的回车符转换为新行符。
- TGNCR:忽略接受到的新行符。
- INLCR:将接受到的新行符转换为回车符。
- IGNPAR:忽略奇偶校检错误的字符。
- INPCK:对接收到的字符执行奇偶校检。
- PARMRK:对奇偶校检错误作出标记。
- ISTRIP:将所有接收的字符裁减为7比特。
- IXOFF:对输入启用软件流控。
- IXON:对输出启用软件流控。
c_cc 特殊的控制字符
cfsetispeed和cfsetospeed用来设置输入输出的波特率,函数模型如下:
/**
 * [cfsetispeed(3)](http://man7.org/linux/man-pages/man3/cfsetispeed.3.html)
 * sets the terminal input baud rate.
 *
 * Returns 0 on success and returns -1 and sets `errno` on failure.
 */
int cfsetispeed(struct termios* __t, speed_t __speed) __INTRODUCED_IN(21);

/**
 * [cfsetospeed(3)](http://man7.org/linux/man-pages/man3/cfsetospeed.3.html)
 * sets the terminal output baud rate.
 *
 * Returns 0 on success and returns -1 and sets `errno` on failure.
 */
int cfsetospeed(struct termios* __t, speed_t __speed) __INTRODUCED_IN(21);
参数说明:
struct termios *termptr:指向termios结构的指针
speed_t speed:需要设置的波特率
返回值:成功返回0,否则返回-1
这样,所有的初始化操作我们就完成了。
总结
提示:这里对文章进行总结:
例如:以上就是今天要讲的内容,本文仅仅简单介绍了pandas的使用,而pandas提供了大量能使我们快速便捷地处理数据的函数和方法。
最后
以上就是鳗鱼野狼最近收集整理的关于Android(Linux) usb串口通信连接,有轮子源码系列文章目录前言一、串口通信整体步骤图二、打开串口三、设置串口属性总结的全部内容,更多相关Android(Linux)内容请搜索靠谱客的其他文章。


发表评论 取消回复