写在前面
在这篇文章我们分析了springboot启动并且加载自动配置类的过程,其中加载自动配置类前,进行过滤(如果不提前过滤就需要将类加载到JVM中并解析类信息后才能过滤,因此这里提前过滤是一种性能优化的手段)的方法AutoConfigurationImportSelector#filter,因为相对还比较复杂,因此放在这篇文章中来分析,作为补充。
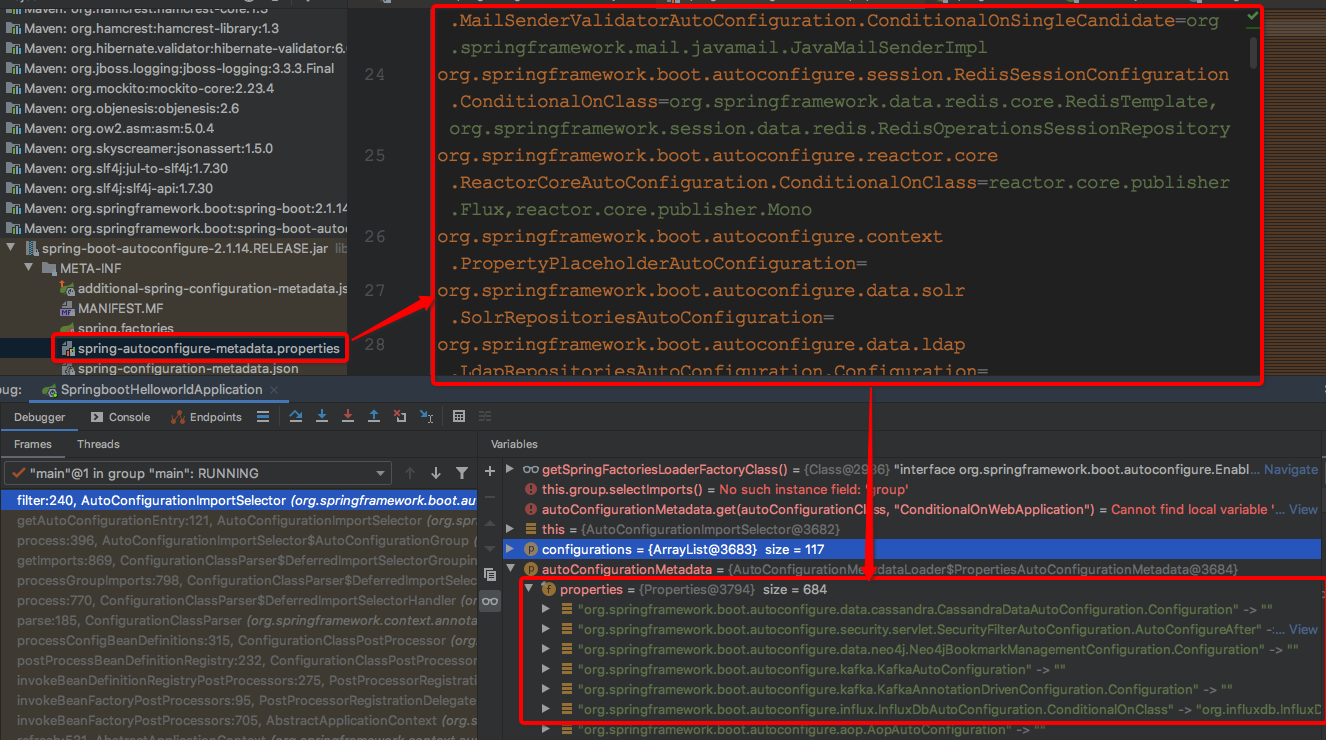
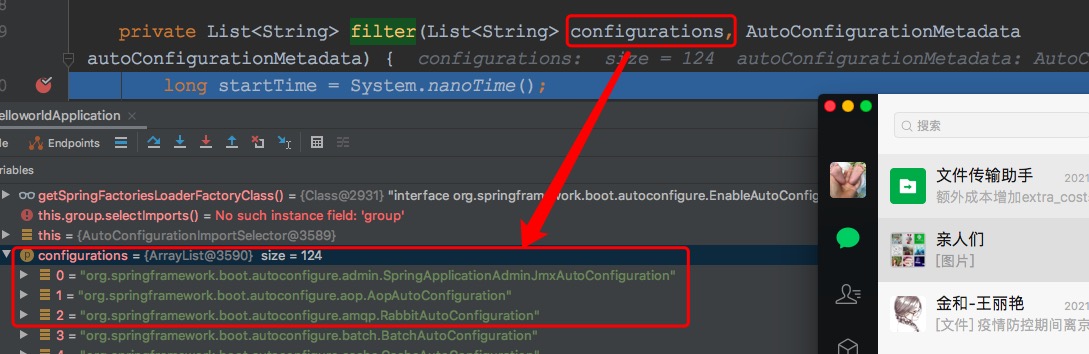
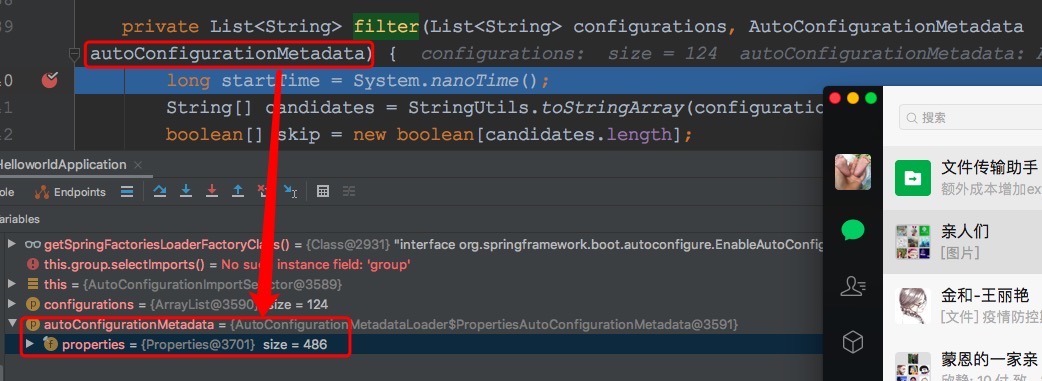
先来看下调用filter方法时方法参数信息,方便调试,一共两个参数,一个是List<String> configurations,存储的是META-INF/spring.factories文件中key为EnableAutoConfiguration的自动配置类信息,另一个是AutoConfigurationMetadata autoConfigurationMetadata存储的是META-INF/spring-autoconfigure-metadata.properties文件中存储的自动配置类和条件注解信息的组合信息,分别如下:

1:接口
执行这个自动配置类过滤过程的顶层接口是org.springframework.boot.autoconfigure.AutoConfigurationImportFilter,源码如下:
@FunctionalInterface
public interface AutoConfigurationImportFilter {

	boolean[] match(String[] autoConfigurationClasses, AutoConfigurationMetadata autoConfigurationMetadata);

}
从注解@FunctionalInterface可以看出这是一个函数接口,按照函数接口的定义是只有一个抽象方法(注意不是一个方法,还可以有default方法)的接口,这里的方法是match(autoConfigurationClass, authConfigurationMetadata),第一个参数是需要判定的自动配置类的全限定名称的数组。第二个参数是待判断的自动配置类上的注解的元信息对象,主要是注解信息,用来判断配置类是否需要引入。先在org.springframework.boot.autoconfigure.AutoConfigurationImportSelector#filterdebug看下:
最后的返回值是一个布尔类型的数组,这里是和autoConfigurationClasses一一对应的,对应位置是true则代表对应的配置类需要加载,对应位置是false则代表对应的配置类不需要加载。接下来我们再看下AutoConfigurationImportFilter的类图:
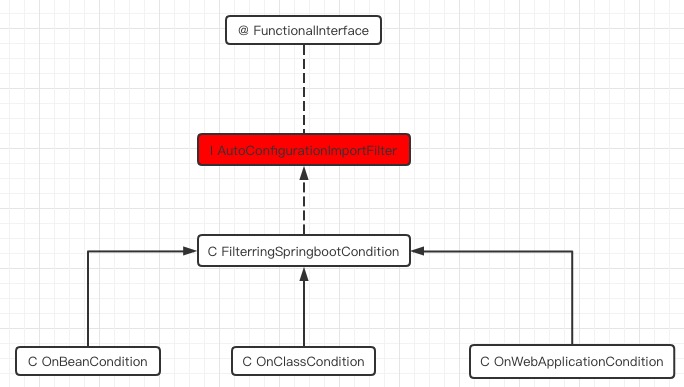
从类图中我们可以看到,AutoConfigurationImportFilter的直接子类是FilteringSpringbootCondition,通过这篇文章我们已经知道org.springframework.boot.autoconfigure.condition.FilteringSpringBootCondition同时也是SpringBootCondition的子类,而SpringBootCondition是对spring提供的Condition的扩展,因此FilteringSpringBootCondition就拥有了如下的两个能力:
1:spring原生的基于条件注解判断自动配置类是否需要加载,需要则加载,不需要则忽略
2:根据条件注解信息,同时判断一批自动配置类是否需要加载的能力(注意这里不会进行加载,加载过程要依赖于能力1)
可以看到一个是单个的判断,一个是批量的判断,可以认为只不过是多了一个for循环而已,因此spring设计放在一起,尽量复用可以复用的能力,减少代码量。
2:AutoConfigurationImportSelector#filter
源码:
private List<String> filter(List<String> configurations, AutoConfigurationMetadata autoConfigurationMetadata) {
long startTime = System.nanoTime();
// 转换自动配置类的List集合为String数组
String[] candidates = StringUtils.toStringArray(configurations);
// 存储最终的匹配结果,和candidates数组索引位置一一对应,true代表最终需要
// 自动引入,false代表不需要自动引入
boolean[] skip = new boolean[candidates.length];
boolean skipped = false;
// <AutoConfigurationImportSelector#filter_1>见详细讲解
for (AutoConfigurationImportFilter filter : getAutoConfigurationImportFilters()) {
// <AutoConfigurationImportSelector#filter_2>见详细讲解
invokeAwareMethods(filter);
// <AutoConfigurationImportSelector#filter_3>见详细讲解
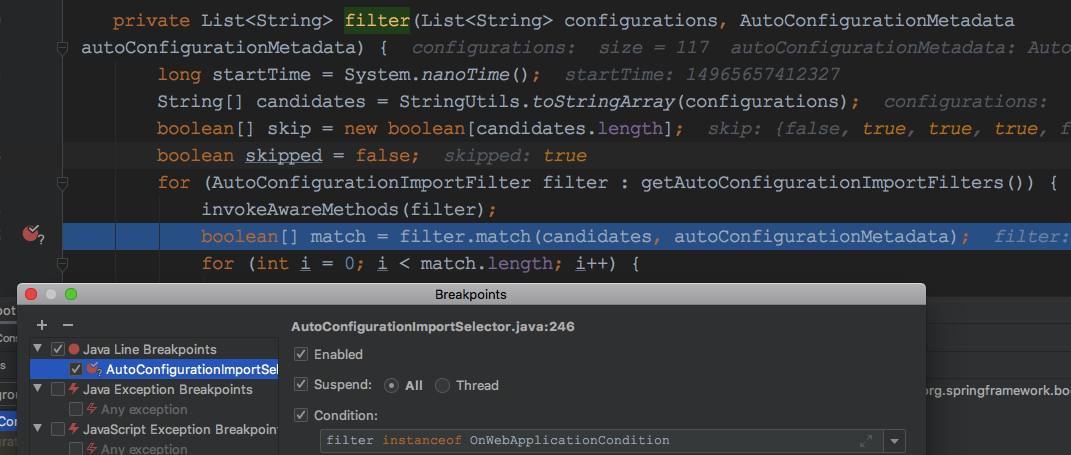
boolean[] match = filter.match(candidates, autoConfigurationMetadata);
// 循环当前的自动引入过滤器过滤结果,并记录过滤结果,用于后续逻辑过滤使用
for (int i = 0; i < match.length; i++) {
if (!match[i]) {
skip[i] = true;
candidates[i] = null;
skipped = true;
}
}
}
// 当没有需要过滤的自动配置类时,会进if直接返回,否则执行后续逻辑,通过布尔数组进行过滤
if (!skipped) {
return configurations;
}
// 存储过滤后需要自动配置的类
List<String> result = new ArrayList<>(candidates.length);
for (int i = 0; i < candidates.length; i++) {
// 如果当前位置为fasle则说明不需要跳过,则添加到最终结果中
if (!skip[i]) {
result.add(candidates[i]);
}
}
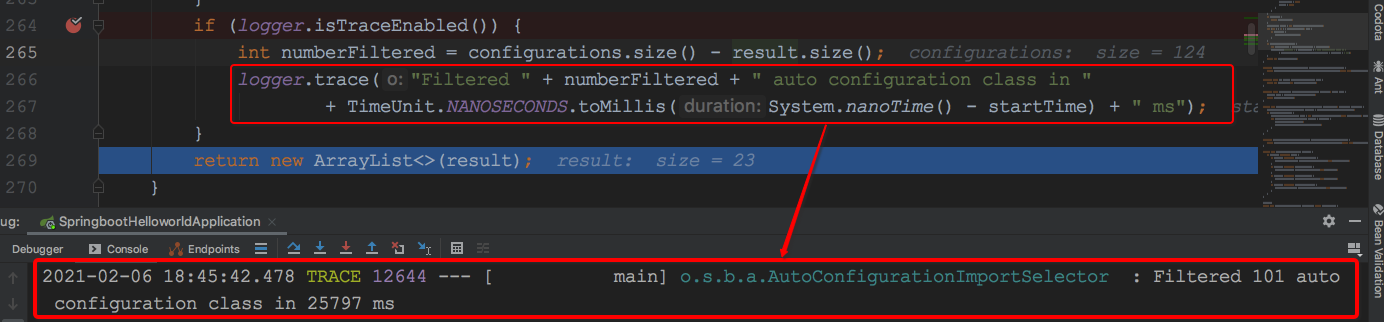
// <AutoConfigurationImportSelector#filter_4>见详细讲解
if (logger.isTraceEnabled()) {
int numberFiltered = configurations.size() - result.size();
logger.trace("Filtered " + numberFiltered + " auto configuration class in "
+ TimeUnit.NANOSECONDS.toMillis(System.nanoTime() - startTime) + " ms");
}
// 返回结果,不知道为什么要再重新new一个
return new ArrayList<>(result);
}
<AutoConfigurationImportSelector#filter_1>处的getAutoConfigurationImportFilters()是获取所有的自动配置导入过滤器,源码如下:
protected List<AutoConfigurationImportFilter> getAutoConfigurationImportFilters() {
	// 从META-INF/spring.factories获取key为org.springframework.boot.autoconfigure.AutoConfigurationImportFilter
	// 的所有实现类,如下:
	/*
	# Auto Configuration Import Filters
	org.springframework.boot.autoconfigure.AutoConfigurationImportFilter=
	org.springframework.boot.autoconfigure.condition.OnBeanCondition,
	org.springframework.boot.autoconfigure.condition.OnClassCondition,
	org.springframework.boot.autoconfigure.condition.OnWebApplicationCondition
	*/
	// 可以看到配置的正是3个实现类
	return SpringFactoriesLoader.loadFactories(AutoConfigurationImportFilter.class, this.beanClassLoader);
}
<AutoConfigurationImportSelector#filter_2>处是回调AutoConfigurationImportFilter的相关Aware,源码不是很复杂,如下:
private void invokeAwareMethods(Object instance) {
	if (instance instanceof Aware) {
		if (instance instanceof BeanClassLoaderAware) {
			((BeanClassLoaderAware) instance).setBeanClassLoader(this.beanClassLoader);
		}
		if (instance instanceof BeanFactoryAware) {
			((BeanFactoryAware) instance).setBeanFactory(this.beanFactory);
		}
		if (instance instanceof EnvironmentAware) {
			((EnvironmentAware) instance).setEnvironment(this.environment);
		}
		if (instance instanceof ResourceLoaderAware) {
			((ResourceLoaderAware) instance).setResourceLoader(this.resourceLoader);
		}
	}
}
<AutoConfigurationImportSelector#filter_3>处后续单起讲解。<AutoConfigurationImportSelector#filter_4>处是打印自动配置导入过滤结果日志,修改application.properties文件增加logging.level.org.springframework=trace然后debug查看:
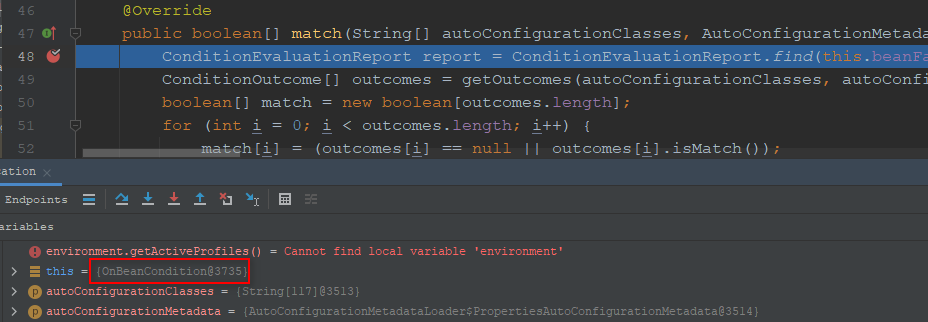
3:FilteringSpringBootCondition#match
在2:AutoConfigurationImportSelector#filter部分的讲解中,过滤不需要加载的自动配置类的工作是通过OnClassCondition,OnWebApplicationCondition,OnBeanCondition三个条件类完成,调用的方法都是match,我们先来验证下。
第1个条件类:
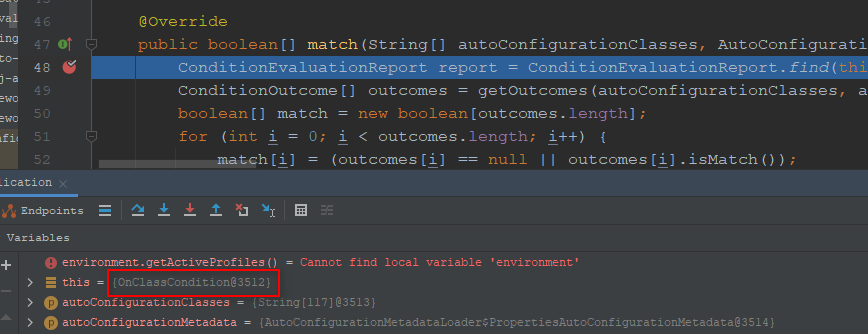
第2个条件类:

第3个条件类:
接着我们开始分析本部分的内容,即FilteringSpringbootCondition的骨架方法org.springframework.boot.autoconfigure.condition.FilteringSpringBootCondition#match,源码如下:
org.springframework.boot.autoconfigure.condition.FilteringSpringBootCondition#match
public boolean[] match(String[] autoConfigurationClasses, AutoConfigurationMetadata autoConfigurationMetadata) {
	// 创建负责记录某些信息的类,具体暂时不用深究,用到了再看
	ConditionEvaluationReport report = ConditionEvaluationReport.find(this.beanFactory);
	// <FilteringSpringBootCondition#match_1>
	ConditionOutcome[] outcomes = getOutcomes(autoConfigurationClasses, autoConfigurationMetadata);
	// 创建最终匹配结果集的数组
	boolean[] match = new boolean[outcomes.length];
	// 循环ConditionOutcome数组设置最终匹配的结果集
	for (int i = 0; i < outcomes.length; i++) {
		match[i] = (outcomes[i] == null || outcomes[i].isMatch());
		// <FilteringSpringBootCondition#match_2>
		// 如果是不匹配并且有ConditionOutCome信息则日志打印,
		// 方便定位过滤了哪些自动配置类
		if (!match[i] && outcomes[i] != null) {
			logOutcome(autoConfigurationClasses[i], outcomes[i]);
			if (report != null) {
				report.recordConditionEvaluation(autoConfigurationClasses[i], this, outcomes[i]);
			}
		}
	}
	return match;
}
<FilteringSpringBootCondition#match_1>处与三个子类相关,因此需要在具体的子类中来分析该方法。<FilteringSpringBootCondition#match_2>,修改application.properties文件增加logging.level.org.springframework=trace然后debug查看:

下面我们开始通过具体的子类OnClassCondition来开始吧!
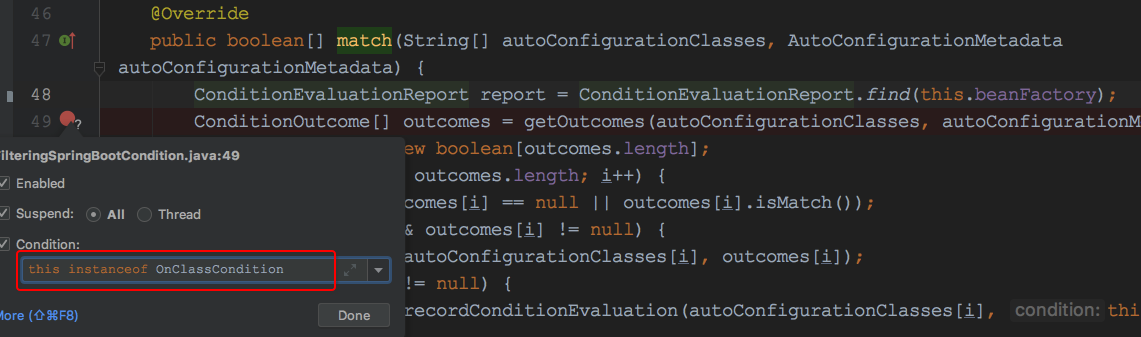
4:OnClassCondition
为了方便我们调试,先增加如下的条件变量:
位置org.springframework.boot.autoconfigure.condition.FilteringSpringBootCondition#match
源码如下:
org.springframework.boot.autoconfigure.condition.OnClassCondition#getOutcomes
protected final ConditionOutcome[] getOutcomes(String[] autoConfigurationClasses,
		AutoConfigurationMetadata autoConfigurationMetadata) {
	// 用于将待过滤的自动配置类一分为二,具体是使用new Thread()创建
	// 线程,另一半直接使用当前的主线程计算
	// 这样做是为了提高自动配置类过滤的效率,因为自动配置类比较多
	// 在2.1.14.RELEASE版本中有117个,在2.2.20版本中已经达到了124个
	// 随着版本的不断的迭代会越来越多
	int split = autoConfigurationClasses.length / 2;
	// <OnClassCondition#getOutcomes_1>
	// 创建线程执行过滤任务,后续详细分析,这行代码执行完创建的线程就开始执行过滤工作了
	// 内部创建OutcomesResolver的子类ThreadedOutcomesResolver
	OutcomesResolver firstHalfResolver = createOutcomesResolver(autoConfigurationClasses, 0, split,
			autoConfigurationMetadata);
	// 直接创建StandardOutcomesResolver对象用于执行过滤操作
	OutcomesResolver secondHalfResolver = new StandardOutcomesResolver(autoConfigurationClasses, split,
			autoConfigurationClasses.length, autoConfigurationMetadata, getBeanClassLoader());
	// 解析输出结果数组,这里调用的是StandardOutcomesResolver的方法
	ConditionOutcome[] secondHalf = secondHalfResolver.resolveOutcomes();
	// <OnClassCondition#getOutcomes_2>
	// 解析输出结果数组,这里调用的是ThreadedOutcomesResolver的方法
	ConditionOutcome[] firstHalf = firstHalfResolver.resolveOutcomes();
	// 创建结果数组,并使用System.arraycopy方法拷贝firstHalf和
	// secondHalf到结果集中
	ConditionOutcome[] outcomes = new ConditionOutcome[autoConfigurationClasses.length];
	System.arraycopy(firstHalf, 0, outcomes, 0, firstHalf.length);
	System.arraycopy(secondHalf, 0, outcomes, split, secondHalf.length);
	// 返回结果集
	return outcomes;
}
<OnClassCondition#getOutcomes_2>处源码如下:
org.springframework.boot.autoconfigure.condition.OnClassCondition.ThreadedOutcomesResolver#resolveOutcomes
public ConditionOutcome[] resolveOutcomes() {
	try {
		// 这里强制让主线程即当前调用方法线程等待this.thread执行完毕,保证
		// 创建的线程完成前一半自动配置类的工作,从而最终
		// 设置this.outcomes
		this.thread.join();
	}
	catch (InterruptedException ex) {
		Thread.currentThread().interrupt();
	}
	// 返回最终的结果
	return this.outcomes;
}
4.1:OutcomesResolver接口
该接口是一个内部接口,源码如下:
org.springframework.boot.autoconfigure.condition.OnClassCondition.OutcomesResolver
private interface OutcomesResolver {
	ConditionOutcome[] resolveOutcomes();
}
其有两个实现类,如下图:

最终的过滤工作就是依赖于这两个类来完成的。
4.2:<OnClassCondition#getOutcomes_1>
回顾下代码位置:
org.springframework.boot.autoconfigure.condition.OnClassCondition#getOutcomes
protected final ConditionOutcome[] getOutcomes(String[] autoConfigurationClasses,
		AutoConfigurationMetadata autoConfigurationMetadata) {
	OutcomesResolver firstHalfResolver = createOutcomesResolver(autoConfigurationClasses, 0, split,
			autoConfigurationMetadata);
}
createOutcomesResolver源码如下:
org.springframework.boot.autoconfigure.condition.OnClassCondition#createOutcomesResolver
private OutcomesResolver createOutcomesResolver(String[] autoConfigurationClasses, int start, int end,
			AutoConfigurationMetadata autoConfigurationMetadata) {
	// 创建StandardOutcomesResolver
	OutcomesResolver outcomesResolver = new StandardOutcomesResolver(autoConfigurationClasses, start, end,
			autoConfigurationMetadata, getBeanClassLoader());
	try {
		// <OnClassCondition#createOutcomesResolver_1>
		// 创建ThreadedOutcomesResolver,并指定outcomesResolver参数
		// 说明内部的自动配置类的过滤工作还是通过StandardOutcomesResolver
		// 完成的
		return new ThreadedOutcomesResolver(outcomesResolver);
	}
	catch (AccessControlException ex) {
		return outcomesResolver;
	}
}
<OnClassCondition#createOutcomesResolver_1>处源码如下:
private ThreadedOutcomesResolver(OutcomesResolver outcomesResolver) {
	// 创建线程,并调用outcomesResolver(StandardOutcomesResolver)
	// 的resolveOutcomes方法完成自动配置类的过滤
	this.thread = new Thread(() -> this.outcomes = outcomesResolver.resolveOutcomes());
	// 启动线程
	this.thread.start();
}
从以上可以看到,最终自动配置类的过滤工作都是通过类org.springframework.boot.autoconfigure.condition.OnClassCondition.StandardOutcomesResolver来完成的,那么我们接下来就重点分析这个类。
4.3:StandardOutcomesResolver
4.3.1:构造函数
源码:
org.springframework.boot.autoconfigure.condition.OnClassCondition.StandardOutcomesResolver#StandardOutcomesResolver
private StandardOutcomesResolver(String[] autoConfigurationClasses, int start, int end,
				AutoConfigurationMetadata autoConfigurationMetadata, ClassLoader beanClassLoader) {
	// 需要过滤的自动配置类class名称集合
	this.autoConfigurationClasses = autoConfigurationClasses;
	// 要过滤this.autoConfigurationClasses的开始位置
	this.start = start;
	// 要过滤this.autoConfigurationClasses的结束位置
	this.end = end;
	// <StandardOutcomesResolver#StandardOutcomesResolver_1>
	// 自动配置类和条件注解组合的信息类,即每个配置类的每个
	// 条件注解中设置的信息
	this.autoConfigurationMetadata = autoConfigurationMetadata;
	// 设置类加载器
	this.beanClassLoader = beanClassLoader;
}
<StandardOutcomesResolver#StandardOutcomesResolver_1>处autoConfigurationMetadata存储的是每个自动配置类和条件注解组合对应的值信息,我们以WebMvcAutoConfiguration为例,先看下WebMvcAutoConfiguration源码:
org.springframework.boot.autoconfigure.web.servlet.WebMvcAutoConfiguration
@Configuration
@ConditionalOnWebApplication(type = Type.SERVLET)
@ConditionalOnClass({ Servlet.class, DispatcherServlet.class, WebMvcConfigurer.class })
@ConditionalOnMissingBean(WebMvcConfigurationSupport.class)
@AutoConfigureOrder(Ordered.HIGHEST_PRECEDENCE + 10)
@AutoConfigureAfter({ DispatcherServletAutoConfiguration.class, TaskExecutionAutoConfiguration.class,
		ValidationAutoConfiguration.class })
public class WebMvcAutoConfiguration {}
因为我们这里分析的是OnClassCondition的条件类,那么我们就以ConditionalOnClass条件注解类为例,来看下存储的信息,如下图:
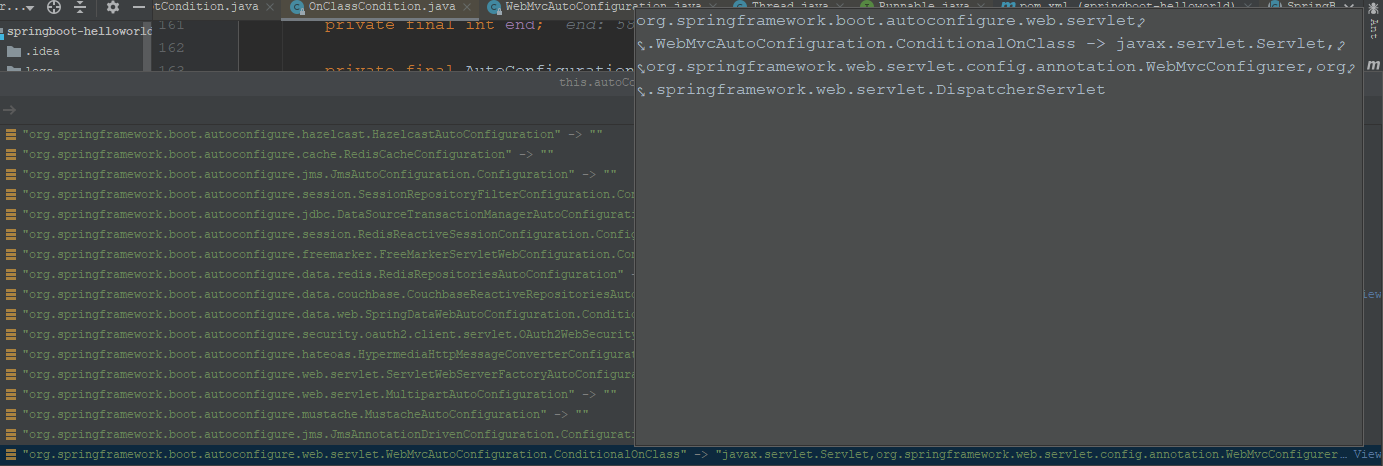
可以看到其格式是key:条件类全限定名+注解名,value:注解设置的值信息。
从前面的分析可以看到不管是使用ThreadedOutcomesResolver还是StandardOutcomesResolver都是使用的后者的resolveOutcomes方法来过滤自动配置类的,因此,我们只要分析清楚这个点流程基本上也就通了,下面开始分析。
4.3.2:StandardOutcomesResolver#resolveOutcomes
源码如下:
org.springframework.boot.autoconfigure.condition.OnClassCondition.StandardOutcomesResolver#resolveOutcomes
public ConditionOutcome[] resolveOutcomes() {
	return getOutcomes(this.autoConfigurationClasses, this.start, this.end, this.autoConfigurationMetadata);
}
继续:
org.springframework.boot.autoconfigure.condition.OnClassCondition.StandardOutcomesResolver#getOutcomes
private ConditionOutcome[] getOutcomes(String[] autoConfigurationClasses, int start, int end,
				AutoConfigurationMetadata autoConfigurationMetadata) {
	// 根据end和start的差值大小创建ConditionOutcome结果数组
	ConditionOutcome[] outcomes = new ConditionOutcome[end - start];
	// 依次处理每个待过滤的自动配置类
	for (int i = start; i < end; i++) {
	    // 获取当前自动配置类的全限定名,如
	    // org.springframework.boot.autoconfigure.web.servlet.WebMvcAutoConfiguration
		String autoConfigurationClass = autoConfigurationClasses[i];
		// 不为空则继续处理
		if (autoConfigurationClass != null) {
			// <StandardOutcomesResolver#getOutcomes_1>
			String candidates = autoConfigurationMetadata.get(autoConfigurationClass, "ConditionalOnClass");
			if (candidates != null) {
				// <StandardOutcomesResolver#getOutcomes_2>
				// 根据候选的待检测class类名称获取ConditionOutcome
				// 并放到结果数组的对应位置
				outcomes[i - start] = getOutcome(candidates);
			}
		}
	}
	// 返回ConditionOutcome结果数组
	return outcomes;
}
<StandardOutcomesResolver#getOutcomes_1>获取在ConditionalOnClass注解上配置的要求存在的类,如org.springframework.boot.autoconfigure.web.servlet.WebMvcAutoConfiguration配置如下(省略其它注解):
@ConditionalOnClass({ Servlet.class, DispatcherServlet.class, WebMvcConfigurer.class })
public class WebMvcAutoConfiguration {}
则结果就是Servlet.class,DispatcherServlet.class,WebMvcConfigurer.class这三个class对应的类的全限定名,下面开始看源码:
org.springframework.boot.autoconfigure.AutoConfigurationMetadataLoader.PropertiesAutoConfigurationMetadata#get(java.lang.String, java.lang.String)
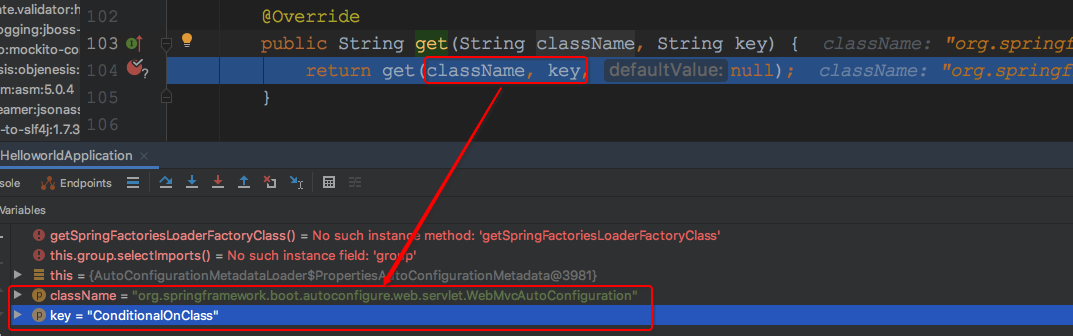
public String get(String className, String key) {
return get(className, key, null);
}
假定当前的className是org.springframework.boot.autoconfigure.web.servlet.WebMvcAutoConfiguration,key值就是传入的ConditionalOnClass,debug如下:
继续看get方法:
org.springframework.boot.autoconfigure.AutoConfigurationMetadataLoader.PropertiesAutoConfigurationMetadata#get(java.lang.String, java.lang.String, java.lang.String)
public String get(String className, String key, String defaultValue) {
	String value = this.properties.getProperty(className + "." + key);
	return (value != null) ? value : defaultValue;
}
还是以WebMvcAutoConfiguration为例,如下:
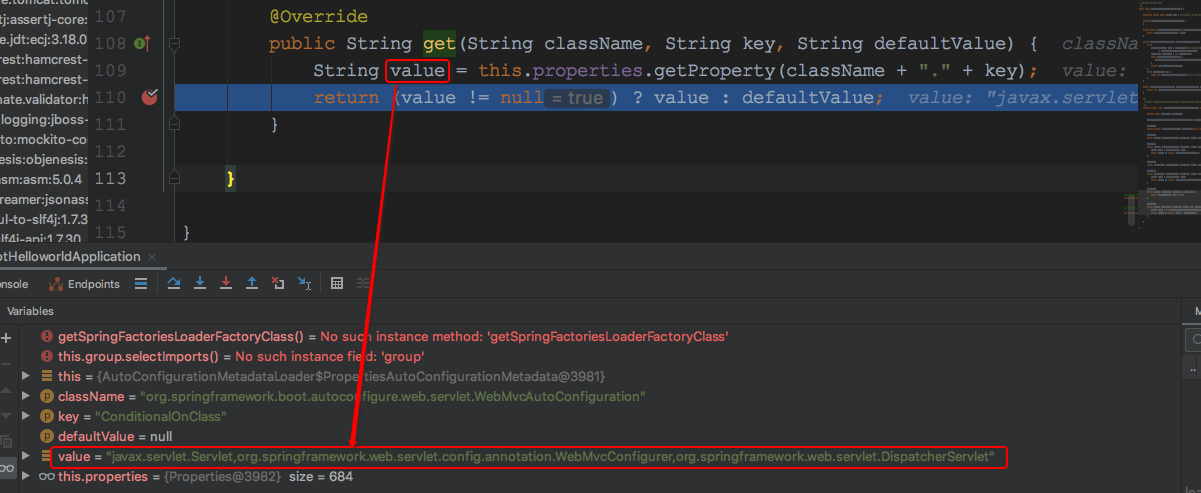
那么<StandardOutcomesResolver#getOutcomes_1>处的结果就是javax.servlet.Servlet,org.springframework.web.servlet.config.annotation.WebMvcConfigurer,org.springframework.web.servlet.DispatcherServlet了,这个结果会被用作<StandardOutcomesResolver#getOutcomes_2>的参数,源码如下:
org.springframework.boot.autoconfigure.condition.OnClassCondition.StandardOutcomesResolver#getOutcome(java.lang.String)
private ConditionOutcome getOutcome(String candidates) {
	try {
		// 待判断是否存在条件类只有一个情况
		if (!candidates.contains(",")) {
			return getOutcome(candidates, this.beanClassLoader);
		}
		// 包含逗号,说明待判断是否存在条件类有多个
		for (String candidate : StringUtils.commaDelimitedListToStringArray(candidates)) {
			// <StandardOutcomesResolver#getOutcome_1>
			// 获取过滤匹配结果
			ConditionOutcome outcome = getOutcome(candidate, this.beanClassLoader);
			// 这里一旦不为null则说明不匹配,就可以直接返回了
			if (outcome != null) {
				return outcome;
			}
		}
	}
	catch (Exception ex) {
		// We'll get another chance later
	}
	return null;
}
<StandardOutcomesResolver#getOutcome_1>处代码是执行最终的匹配工作,源码如下:
org.springframework.boot.autoconfigure.condition.OnClassCondition.StandardOutcomesResolver#getOutcome(className, classLoader)
private ConditionOutcome getOutcome(String className, ClassLoader classLoader) {
	// <StandardOutcomesResolver#getOutcome(className, classLoader)_1>
	if (ClassNameFilter.MISSING.matches(className, classLoader)) {
	    // 如果是不匹配则直接携带有相关不匹配信息的ConditionOutcome对象
		return ConditionOutcome.noMatch(ConditionMessage.forCondition(ConditionalOnClass.class)
				.didNotFind("required class").items(Style.QUOTE, className));
	}
	// 如果是到这里,则说明是匹配的,直接返回null
	return null;
}
<StandardOutcomesResolver#getOutcome(className, classLoader)_1>处代码是使用ClassNameFilter.MISSING类的matches(className, classLoader)方法来判断指定的类是不是MISSING,如果是则返回true,否则返回false,源码如下:
org.springframework.boot.autoconfigure.condition.FilteringSpringBootCondition.ClassNameFilter
protected enum ClassNameFilter {
	MISSING {
		@Override
		public boolean matches(String className, ClassLoader classLoader) {
			return !isPresent(className, classLoader);
		}
	};
	public abstract boolean matches(String className, ClassLoader classLoader);
}
可以看到其实是个枚举,个人觉得这样实现的代码还是挺优雅的,然后看下其中的isPresent(className, classLoader)方法,源码如下:
org.springframework.boot.autoconfigure.condition.FilteringSpringBootCondition.ClassNameFilter#isPresent
public static boolean isPresent(String className, ClassLoader classLoader) {
	// 如果是传入的类加载器为null则获取默认的类加载器
	if (classLoader == null) {
		classLoader = ClassUtils.getDefaultClassLoader();
	}
	try {
		// <ClassNameFilter#isPresent_1>
		forName(className, classLoader);
		return true;
	}
	catch (Throwable ex) {
		return false;
	}
}
<ClassNameFilter#isPresent_1>处源码:
org.springframework.boot.autoconfigure.condition.FilteringSpringBootCondition.ClassNameFilter#forName
private static Class<?> forName(String className, ClassLoader classLoader) throws ClassNotFoundException {
	if(classLoader != null) {
		return classLoader.loadClass(className);
	}
	return Class.forName(className);
}
可以看到就是使用类加载器加载了,加载到则返回true,加载不到则返回false。
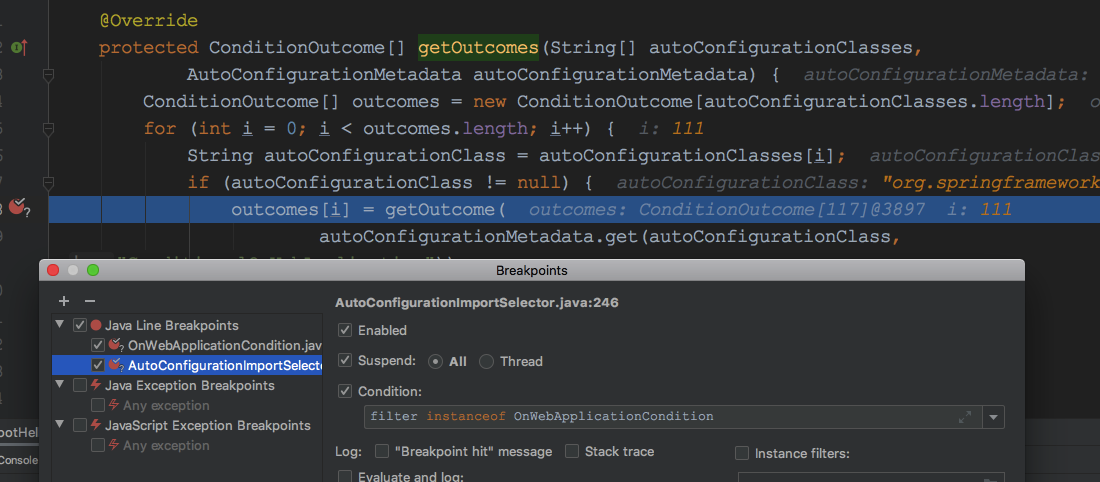
5:OnWebApplicationCondition
在org.springframework.boot.autoconfigure.AutoConfigurationImportSelector#filter设置如下条件变量,方便调试:
首先是执行FilterringSpringbootCondition的模板方法org.springframework.boot.autoconfigure.condition.FilteringSpringBootCondition#match如下:
public boolean[] match(String[] autoConfigurationClasses, AutoConfigurationMetadata autoConfigurationMetadata) {
    // 条件执行报告器
	ConditionEvaluationReport report = ConditionEvaluationReport.find(this.beanFactory);
	// <1>
	// 调用具体类的方法实现,获取条件输出结果
	// 这里调用的是OnWebApplicationCondition的实现类
	ConditionOutcome[] outcomes = getOutcomes(autoConfigurationClasses, autoConfigurationMetadata);
	// 定义自动配置类是否过滤的结果数组
	boolean[] match = new boolean[outcomes.length];
	// 循环条件输出结果,如果是条件输出为null或者是match属性为true则认为是匹配的
	for (int i = 0; i < outcomes.length; i++) {
		// 根据条件输出结果设置对应位置的匹配结果
		match[i] = (outcomes[i] == null || outcomes[i].isMatch());
		// 如果是是不匹配则日志记录匹配信息,以便知道哪些自动配置类被过滤了
		if (!match[i] && outcomes[i] != null) {
		    // 日志记录
			logOutcome(autoConfigurationClasses[i], outcomes[i]);
			if (report != null) {
				report.recordConditionEvaluation(autoConfigurationClasses[i], this, outcomes[i]);
			}
		}
	}
	// 返回匹配结果
	return match;
}
其中<1>处代码是调用的org.springframework.boot.autoconfigure.condition.OnWebApplicationCondition#getOutcomes源码如下:
protected ConditionOutcome[] getOutcomes(String[] autoConfigurationClasses,
			AutoConfigurationMetadata autoConfigurationMetadata) {
	// 创建条件输出的结果数组
	ConditionOutcome[] outcomes = new ConditionOutcome[autoConfigurationClasses.length];
	// 循环条件输出结果处理每个自动配置的过滤类
	for (int i = 0; i < outcomes.length; i++) {
		// 通过索引位置获取当前的自动配置了,并进行判断
		String autoConfigurationClass = autoConfigurationClasses[i];
		// 如果自动配置类不为null,则进行判断
		if (autoConfigurationClass != null) {
			// <OnWebApplicationCondition#getOutcomes_1>
			// 调用getOutcome方法完成判断,并赋值到结果输出数组的
			// 对应索引位置
			outcomes[i] = getOutcome(
					autoConfigurationMetadata.get(autoConfigurationClass, "ConditionalOnWebApplication"));
		}
	}
	// 返回条件输出结果数组
	return outcomes;
}
<OnWebApplicationCondition#getOutcomes_1>处代码我们还是以WebMvcAutoConfiguration为例,增加如下的条件变量:
方法autoConfigurationMetadata.get(autoConfigurationClass, "ConditionalOnWebApplication")结果如下图:
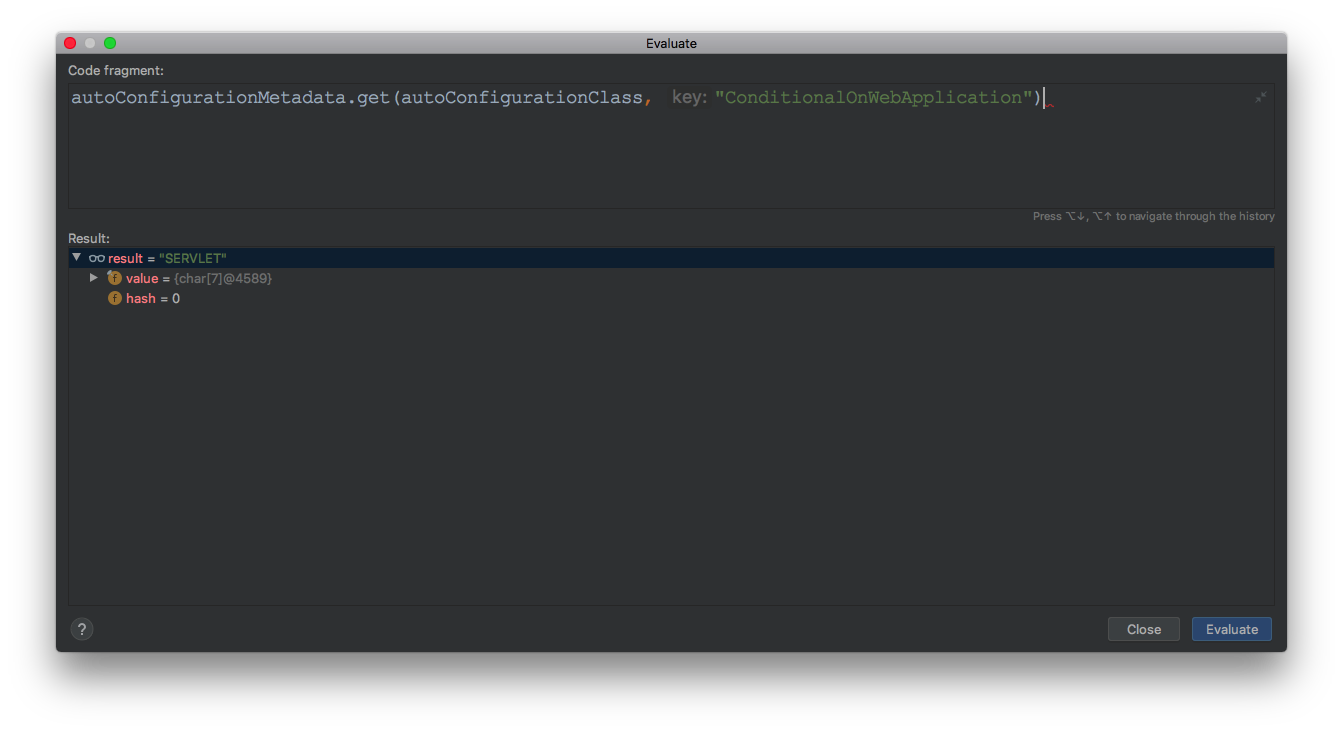
则方法getOutcome的参数就是SERVLET接着来看getOutcome方法:
private ConditionOutcome getOutcome(String type) {
	// 如果是type为null,则直接返回null代表结果为匹配
	if (type == null) {
		return null;
	}
	// 使用构造器构造消息
	ConditionMessage.Builder message = ConditionMessage.forCondition(ConditionalOnWebApplication.class);
	// 处理ConditionalOnWebApplication.Type.SERVLET类型的web应用程序,可以认为就是springmvc上下文环境
	if (ConditionalOnWebApplication.Type.SERVLET.name().equals(type)) {
		if (!ClassNameFilter.isPresent(SERVLET_WEB_APPLICATION_CLASS, getBeanClassLoader())) {
			return ConditionOutcome.noMatch(message.didNotFind("servlet web application classes").atAll());
		}
	}
	// 处理ConditionalOnWebApplication.Type.REACTIVE,暂时没用过
	if (ConditionalOnWebApplication.Type.REACTIVE.name().equals(type)) {
		if (!ClassNameFilter.isPresent(REACTIVE_WEB_APPLICATION_CLASS, getBeanClassLoader())) {
			return ConditionOutcome.noMatch(message.didNotFind("reactive web application classes").atAll());
		}
	}
	// 如果执行到这里则说明是任意的web类型org.springframework.boot.autoconfigure.condition.ConditionalOnWebApplication.Type#ANY,其中
	// 则判断servlet或者reactive二者存在其一即可SERVLET_WEB_APPLICATION_CLASS
	// REACTIVE_WEB_APPLICATION_CLASS是二者用于判断的标记类
	if (!ClassNameFilter.isPresent(SERVLET_WEB_APPLICATION_CLASS, getBeanClassLoader())
			&& !ClassUtils.isPresent(REACTIVE_WEB_APPLICATION_CLASS, getBeanClassLoader())) {
		return ConditionOutcome.noMatch(message.didNotFind("reactive or servlet web application classes").atAll());
	}
	// 返回null,认为匹配
	return null;
}
注意到在上面的源码中都使用了org.springframework.boot.autoconfigure.condition.FilteringSpringBootCondition.ClassNameFilter#isPresent方法,该方法源码如下:
public static boolean isPresent(String className, ClassLoader classLoader) {
	if (classLoader == null) {
		classLoader = ClassUtils.getDefaultClassLoader();
	}
	try {
		forName(className, classLoader);
		return true;
	}
	catch (Throwable ex) {
		return false;
	}
}
看forName(className, classLoader);:
private static Class<?> forName(String className, ClassLoader classLoader) throws ClassNotFoundException {
	if (classLoader != null) {
		return classLoader.loadClass(className);
	}
	return Class.forName(className);
}
其中的方法classLoader.loadClass(className);当加载的类在classpath下无法加载到时将会抛出java.lang.ClassNotFoundException该方法抛出该异常会被调用者通过catch (Throwable ex) {return false;}捕获,直接返回false,代表期望存在的类没有present,如下代码测试:
public static void main(String[] args) throws Exception {
    ClassLoader classLoader = Foo.class.getClassLoader();
    String exitsClassFullName = "java.util.ArrayList";
    String notExistClassFullName = "not.exits.class.name";
    Class<?> exitsClass = classLoader.loadClass(exitsClassFullName);
    System.out.println("exitsClass is: ");
    System.out.println(exitsClass);
    Class<?> notExistClass = classLoader.loadClass(notExistClassFullName);
    System.out.println("notExistClass is: ");
    System.out.println(notExistClass);
}
运行如下:
exitsClass is:
class java.util.ArrayList
notExistClass is:
Exception in thread "main" java.lang.ClassNotFoundException: not.exits.class.name
	at java.net.URLClassLoader.findClass(URLClassLoader.java:381)
	at java.lang.ClassLoader.loadClass(ClassLoader.java:424)
	at sun.misc.Launcher$AppClassLoader.loadClass(Launcher.java:349)
	at java.lang.ClassLoader.loadClass(ClassLoader.java:357)
	at Foo.main(Foo.java:14)

Process finished with exit code 1
6:OnBeanCondition
该条件类和ConditionalOnBean,ConditionalOnMIssingBean,ConditionalOnSingleCandidate等注解配合使用,我暂时还没有研究,等研究了再补充。
最后
以上就是执着海燕最近收集整理的关于springboot过滤不需要的自动配置类过程分析的全部内容,更多相关springboot过滤不需要内容请搜索靠谱客的其他文章。


发表评论 取消回复