热更新插件踩坑及优化 iOS
1. 前言
本文所指的热更新插件为 cordova-hot-code-push-plugin
注意:此插件已于 2018-09-30 废弃,作者已停止维护
可以换用 微软维护的 cordova-plugin-code-push 或者 腾讯的 Bugly 应用升级 等其他热更新技术,这两个笔者也没有深入了解,读者有兴趣的话可以自行查阅相关资料。
Github:https://github.com/nordnet/cordova-hot-code-push
可以使用npm或者拉取Github上的源代码或者别人 fork 的分支使用(使用 http://gitpop2.herokuapp.com/ 查看Git库的所有fork)
本文基于 npm 上的 cordova-hot-code-push-plugin 使用,使用iOS项目测试,不过Android端应该也相差无几。
2. 简单了解
下面了解下插件的一些相关内容和原理。
-
chcp.manifest 存储 www 下文件信息(每个源码文件的哈希值,判断是否更新)
-
chcp.json 存储发布信息(发布时间、版本号)
-
APP启动时,启动线程连接热更新服务器,加载服务器上的热更新配置文件
-
将本地和服务器的热更新配置文件对比。
-
若版本号相同,发布时间不同,则通过 chcp.manifest 文件查找有更新的文件,下载安装;
-
若版本号不同,提示用户下载安装新的App
-
-
下载更新时间点: App 启动时下载或者由js控制
-
安装更新时间点: 根据开发者选择的更新策略(Update method)不同,在对应的时间点进行安装,或者由js控制。
3. 使用
3.1 准备
首先准备一个Cordova项目,添加平台
cordova create testHotCodePush com.examplde.testhotcodepush testHotCodePush
cd testHotCodePush
cordova platform add ios
然后 全局安装热更新客户端,用于生成热更新配置文件
npm install cordova-hot-code-push-cli -g
3.2 添加插件,生成配置文件
添加插件:
cordova plugin add cordova-hot-code-push-plugin
初始化:
在项目根目录下执行以下语句进行初始化操作,生成 cordova-hcp.json
cordova-hcp init
执行命令后需输入一些参数:
-
Project name: 不能含有中文
-
有关 Amazon 的可直接回车跳过
-
IOS app identifier:APP 在 App Store上的 ID。用于有新版本更新时,打开苹果应用商店中的网页。可不填
-
Android app identifier:Android的 App ID。用于有新版本更新时,打开Google应用商店中的网页。可不填
-
Update method: 更新策略,默认为 resume。可选值有:
- now 下载完成后就安装更新
- start 应用启动时安装更新。即,有更新时,用户启动App,开始下载更新,下次再启动App时安装更新。(实际测试似乎 start 与 resume 表现相同)
- resume 应用启动或从后台唤醒时安装更新。
-
content_url: 热更新服务地址,写到 chcp.json 的上一级文件夹。
需要注意的是,我们要打开 cordova-hcp.json,添加配置 “min_native_interface”:1,这项配置代表web内容适应的最小外壳版本,是正整数,对应 android-versionCode 或者 ios-CFBundleVersion。
修改 config.xml
在Cordova 工程的 配置文件 config.xml 中添加热更新配置:
<chcp>
	<auto-download enabled="true" />
    <auto-install enabled="true" />
    <native-interface version="1" />
    <config-file url="这里写服务器chcp.json的地址" />
</chcp>
四个配置代表:
- auto-download 是否允许插件自动下载更新,默认为true,可省略,可以设置为 false,通过js控制何时下载更新。
- auto-install 是否允许插件自动安装更新,默认为true,可省略,可以设置为 false,通过js控制何时安装更新。
- native-interface 表示当前的App 版本号,默认设置为1. 和 chcp.json 文件中的 min_native_interface 配合使用,该字段是 App 升级提示的依据。若安装包中的 native-interface 小于热更新服务器上的 min_native_interface ,App需要提示用户重新下载安装进行版本升级,此时插件不会自动下载www目录下的更新文件。对Cordova插件或原生代码有修改,重新打包发布时,需要更新 min_native_interface 。 热更新插件不支持为不同的移动端系统指定不同的min_native_interface 。
- config-file 必填,由于指定热更新的 chcp.json 文件,需根据实际情况填写。
(注意: 改完要在项目根目录下执行 cordova build ios 命令,将修改同步到 platforms/ios 下的项目中)
拷贝代码到 www 文件夹下
使用以下命令,在 www 目录下生成热更新配置文件,即 chcp.json chcp.manifest
cordova-hcp build
3.3 本地测试
本地可启动 http 服务,测试热更新功能
全局安装 serve 工具:
npm install serve -g
在Cordova 根目录下执行命令,并指定端口号(可选,默认端口 5000)
serve -p 8080
修改 www 下文件,比如在 html 中新增一行文本。
执行命令,更新热更新配置文件
cordova-hcp build
在设备上,重启APP(可能需要重启两次),看是否修改成功。
3.4 js 调用
对于 Cordova 插件,为了了解插件暴露给 js 的方法,我们可以查看插件文件夹下www/**.js的内容。
此插件可以查看 www/chcp.js,可以看到,热更新插件暴露的接口有以下几个:
pluginNativeMethod = {
    // 初始化
    INITIALIZE: 'jsInitPlugin',
    // 下载更新
    FETCH_UPDATE: 'jsFetchUpdate',
    // 安装更新
    INSTALL_UPDATE: 'jsInstallUpdate',
    // 修改热更新配置
    CONFIGURE: 'jsConfigure',
    // 请求用户更新
    REQUEST_APP_UPDATE: 'jsRequestAppUpdate',
    // 是否有更新需安装
    IS_UPDATE_AVAILABLE_FOR_INSTALLATION: 'jsIsUpdateAvailableForInstallation',
    // 获取版本信息(APP版本、build版本、当前版本、上一个版本、准备安装的版本等)
    GET_INFO: 'jsGetVersionInfo'
  };
可以在 config.xml 中关闭自动下载和自动安装,使用 插件原生接口 在代码中灵活控制。
同时可以添加对应的监听,监听到事件后执行后续操作,如下:
document.addEventListener(chcp.event.UPDATE_LOAD_FAILED, this.onUpdateLoadFailed, false)

onUpdateLoadFailed(eventData){
    let error = eventData.detail.error
    if(error && error.code == chcp.error.APPLICATION_BUILD_VERSION_TOO_LOW) {
        // 需要重新下载应用安装,更新原生代码
        console.log("应用版本过低,需升级")
    }
}
热更新插件的错误码和事件有以下几种,起名见名知意,就不多做赘述:
error: {
    NOTHING_TO_INSTALL: 1,
    NOTHING_TO_UPDATE: 2,

    FAILED_TO_DOWNLOAD_APPLICATION_CONFIG: -1,
    APPLICATION_BUILD_VERSION_TOO_LOW: -2,
    FAILED_TO_DOWNLOAD_CONTENT_MANIFEST: -3,
    FAILED_TO_DOWNLOAD_UPDATE_FILES: -4,
    FAILED_TO_MOVE_LOADED_FILES_TO_INSTALLATION_FOLDER: -5,
    UPDATE_IS_INVALID: -6,
    FAILED_TO_COPY_FILES_FROM_PREVIOUS_RELEASE: -7,
    FAILED_TO_COPY_NEW_CONTENT_FILES: -8,
    LOCAL_VERSION_OF_APPLICATION_CONFIG_NOT_FOUND: -9,
    LOCAL_VERSION_OF_MANIFEST_NOT_FOUND: -10,
    LOADED_VERSION_OF_APPLICATION_CONFIG_NOT_FOUND: -11,
    LOADED_VERSION_OF_MANIFEST_NOT_FOUND: -12,
    FAILED_TO_INSTALL_ASSETS_ON_EXTERNAL_STORAGE: -13,
    CANT_INSTALL_WHILE_DOWNLOAD_IN_PROGRESS: -14,
    CANT_DOWNLOAD_UPDATE_WHILE_INSTALLATION_IN_PROGRESS: -15,
    INSTALLATION_ALREADY_IN_PROGRESS: -16,
    DOWNLOAD_ALREADY_IN_PROGRESS: -17,
    ASSETS_FOLDER_IN_NOT_YET_INSTALLED: -18,
    NEW_APPLICATION_CONFIG_IS_INVALID: -19
  },

// Plugin events
  event: {
    BEFORE_ASSETS_INSTALLATION: 'chcp_beforeAssetsInstalledOnExternalStorage',
    ASSETS_INSTALLATION_FAILED: 'chcp_assetsInstallationError',
    ASSETS_INSTALLED: 'chcp_assetsInstalledOnExternalStorage',

    NOTHING_TO_UPDATE: 'chcp_nothingToUpdate',
    UPDATE_LOAD_FAILED: 'chcp_updateLoadFailed',
    UPDATE_IS_READY_TO_INSTALL: 'chcp_updateIsReadyToInstall',

    BEFORE_UPDATE_INSTALLATION: 'chcp_beforeInstall',
    UPDATE_INSTALLATION_FAILED: 'chcp_updateInstallFailed',
    UPDATE_INSTALLED: 'chcp_updateInstalled',
    NOTHING_TO_INSTALL: 'chcp_nothingToInstall'
  },
4. 流程原理探究
这里,就对热更新的流程和原理进行简单探索。配置为自动下载和安装依赖。
为方便理解各文件所在路径,将项目文件夹命名为 projectDir。
cordova在安装后,都会在 projectDir/platforms/对应平台/www/plugins 下添加以插件ID命名的文件夹,里面的内容与 插件文件夹中www下的js文件( projectDir/plugins/插件文件夹/www/**.js)基本一致,只是最外层多了一层 cordova.define…。
所幸,热更新插件的js文件只有一个,很容易就可以找到,下面就以 chcp.js 为入口,根据一些主要的代码梳理一下插件初始化流程。
4.1 初始化流程
在 chcp.js 大概 22 行,可以看到以下代码:
// chcp.js
channel.onCordovaReady.subscribe(function() {
  // 初始化 js Event
  ensureCustomEventExists();
  // 执行Native端 jsInitPlugin 接口
  exec(nativeCallback, null, PLUGIN_NAME, pluginNativeMethod.INITIALIZE, []);
});
subscribe 是响应式编程的写法,相当于Promise中的then,这里代表在 onCordovaReady 事件后,调用 subscribe 里的函数。
nativeCallback 则是原生接口执行成功的回调。
INITIALIZE 就是执行插件的 jsInitPlugin 方法。
但是,注意,在调用 jsInitPlugin 之前,会先调用插件的初始化方法: pluginInitialize 。
pluginInitialize 中主要是变量和监听的初始化。
// HCPPlugin.m
-(void)pluginInitialize {
	// 插件的变量的初始化,如xml配置、文件结构等
    [self doLocalInit];
    // NSNotification 方式添加应用回到前台的监听看是否需要安装更新、以及下载和安装事件的监听
    [self subscribeToEvents];

    // install www folder if it is needed
    if ([self isWWwFolderNeedsToBeInstalled]) {
        [self installWwwFolder];
        return;
    }

    // cleanup file system: remove older releases, except current and the previous one
    [self cleanupFileSystemFromOldReleases];

    _isPluginReadyForWork = YES;
    [self resetIndexPageToExternalStorage];
    [self loadApplicationConfig];

    // install update if any exists
    if (_pluginXmlConfig.isUpdatesAutoInstallationAllowed &&
        _pluginInternalPrefs.readyForInstallationReleaseVersionName.length > 0) {
        [self _installUpdate:nil];
    }
}
接下来,再看 jsInitPlugin 的主要操作,是执行了 _fetchUpdate 方法。
// HCPPlugin.m
- (void)jsInitPlugin:(CDVInvokedUrlCommand *)command {
	...
	[self _fetchUpdate:nil withOptions:nil];
	...
}
_fetchUpdate 方法中则 主要执行了 下载更新 操作,根据是否下载成功返回 YES/NO。
- (BOOL)_fetchUpdate:(NSString *)callbackId withOptions:(HCPFetchUpdateOptions *)options {
	...
	[[HCPUpdateLoader sharedInstance] executeDownloadRequest:request error:&error];
	...
}
下载是否成功,给 js 的回调是在 HCPUpdateLoaderWorker.m 中,之前也提到在 插件的初始化方法 中初始化了对下载和安装的监听。
下面的代码只列出了下载成功的回调以作参考。
// HCPUpdateLoaderWorker.m
- (void)runWithComplitionBlock:(void (^)(void))updateLoaderComplitionBlock {
	...
	[self notifyUpdateDownloadSuccess:newAppConfig];
	...
}

/**
 *  发送通知,下载已完成,可以进行安装操作
 *
 *  @param config application config that was used for download
 */
- (void)notifyUpdateDownloadSuccess:(HCPApplicationConfig *)config {
    if (_complitionBlock) {
        _complitionBlock();
    }

    NSNotification *notification = [HCPEvents notificationWithName:kHCPUpdateIsReadyForInstallationEvent applicationConfig:config taskId:self.workerId];

    [[NSNotificationCenter defaultCenter] postNotification:notification];
}
下载成功后回调到 HCPPlugin.m 中
// HCPPlugin.m
/**
 *  Method is called when update is loaded and ready for installation.
 *
 *  @param notification captured notification with event details
 */
- (void)onUpdateIsReadyForInstallation:(NSNotification *)notification {
    ...
    // send notification to the associated callback
    CDVPluginResult *pluginResult = [CDVPluginResult pluginResultForNotification:notification];
    if (_downloadCallback) {
        [self.commandDelegate sendPluginResult:pluginResult callbackId:_downloadCallback];
        _downloadCallback = nil;
    }

    // send notification to the default callback
    [self invokeDefaultCallbackWithMessage:pluginResult];

    // 如果更新策略为 now,立即更新
    if (_pluginXmlConfig.isUpdatesAutoInstallationAllowed &&
        newConfig.contentConfig.updateTime == HCPUpdateNow &&
        ![HCPUpdateLoader sharedInstance].isDownloadInProgress &&
        ![HCPUpdateInstaller sharedInstance].isInstallationInProgress) {
        [self _installUpdate:nil];
    }
}
/**
 *  通知 JS 模块发生的事件.
 *  For that we will use callback, received on plugin initialization stage.
 *
 *  @param result message to send to web side
 *  @return YES - 返回web页面; NO - otherwise
 */
- (BOOL)invokeDefaultCallbackWithMessage:(CDVPluginResult *)result {
    ...
    [self.commandDelegate sendPluginResult:result callbackId:_defaultCallbackID];

    return YES;
}
回调到 chcp.js 中的 nativeCallback 中,就会触发相对应的事件,js端可以添加对应的事件监听来进行处理。
4.2 HCPFileStructure
这是热更新插件执行热更新所需要的文件结构,还是很重要的。
主要有以下几个文件夹:
-
rootFolder: Library/Application Support/APP对应的bundle id/cordova-hot-code-push-plugin
-
contentFolder: rootFolder/对应的releaseVersion
-
wwwFolder: contentFolder/www 放置最终版本资源包
-
downloadFolder: contentFolder/update 放置下载文件的临时文件夹
//  HCPFilesStructure.h

#import <Foundation/Foundation.h>

/**
 *  Model for plugins file structure.
 *  Each release has it's own folder, so we need to initialize this object with release version.
 *  每一个版本都有自己的文件夹,我们需要为新的版本初始化这个对象。
 *
 *  @see HCPFileStructure
 */
@interface HCPFilesStructure : NSObject

/**
 *  Constructor.
 *
 *  @param releaseVersion for what version this file structure
 *
 *  @return object instance
 */
- (instancetype)initWithReleaseVersion:(NSString *)releaseVersion;

/**
 *  Absolute path to plugins working directory.
 */
@property (nonatomic, strong, readonly) NSURL *contentFolder;

/**
 *  Absolute path to the folder on the external storage where all web content is placed.
 *  From this folder we will show web pages.
 *  Think of this as an bundle folder on the external storage.
 */
@property (nonatomic, strong, readonly) NSURL *wwwFolder;

/**
 *  Absolute path to the temporary folder where we will put files during the update download.
 *  放置下载文件的临时文件夹
 */
@property (nonatomic, strong, readonly) NSURL *downloadFolder;

/**
 *  Getter for the name of the application config file.
 */
@property (nonatomic, strong, readonly) NSString *configFileName;

/**
 *  Getter for the name of the manifest file.
 */
@property (nonatomic, strong, readonly) NSString *manifestFileName;

/**
 *  Get root folder for this plugin.
 *  In it all releases are located.
 *  对应文件夹为:
 *  Library/Application Support/APP对应的bundle id/cordova-hot-code-push-plugin
 *
 *  @return url on the external storage to the plugins root folder.
 */
+ (NSURL *)pluginRootFolder;

/**
 *  Default application config file name.
 *  Should be equal to the config name, that is bundled with the app.
 *
 *  @return default application config file name.
 */
+ (NSString *)defaultConfigFileName;

/**
 *  Default name of the manifest file.
 *  Should be equal to the manifest name, that is bundled with the app.
 *
 *  @return default manifest file name.
 */
+ (NSString *)defaultManifestFileName;

@end
4.3 下载
下面,再来看一下下载操作。
// HCPUpdateLoaderWorker.m
- (void)runWithComplitionBlock:(void (^)(void))updateLoaderComplitionBlock {
    _complitionBlock = updateLoaderComplitionBlock;

    // initialize before the run
    NSError *error = nil;
    // 加载本地配置文件
    if (![self loadLocalConfigs:&error]) {
        [self notifyWithError:error applicationConfig:nil];
        return;
    }

    HCPDataDownloader *configDownloader = [[HCPDataDownloader alloc] init];

    // 读取服务器上的chcp.json ,内部实现是用的 NSURLSession
    [configDownloader downloadDataFromUrl:_configURL requestHeaders:_requestHeaders completionBlock:^(NSData *data, NSError *error) {
        HCPApplicationConfig *newAppConfig = [self getApplicationConfigFromData:data error:&error];
        if (newAppConfig == nil) {
            // 获取新的配置为空,说明下载失败,返回通知给HCPPlugin,HCPPlugin会发送对应事件给js端
            [self notifyWithError:[NSError errorWithCode:kHCPFailedToDownloadApplicationConfigErrorCode descriptionFromError:error]
                applicationConfig:nil];
            return;
        }

        // 检查是否有更新
        if ([newAppConfig.contentConfig.releaseVersion isEqualToString:_oldAppConfig.contentConfig.releaseVersion]) {
            [self notifyNothingToUpdate:newAppConfig];
            return;
        }

        // 检查当前原生代码版本是否支持新的资源内容
        if (newAppConfig.contentConfig.minimumNativeVersion > _nativeInterfaceVersion) {
            [self notifyWithError:[NSError errorWithCode:kHCPApplicationBuildVersionTooLowErrorCode
                                             description:@"Application build version is too low for this update"]
                applicationConfig:newAppConfig];
            return;
        }

        // 读取服务器上的chcp.manifest
        NSURL *manifestFileURL = [newAppConfig.contentConfig.contentURL URLByAppendingPathComponent:_pluginFiles.manifestFileName];
        [configDownloader downloadDataFromUrl:manifestFileURL requestHeaders:_requestHeaders completionBlock:^(NSData *data, NSError *error) {
            HCPContentManifest *newManifest = [self getManifestConfigFromData:data error:&error];
            if (newManifest == nil) {
                // 获取chcp.manifest为空,说明下载失败,返回通知给HCPPlugin,HCPPlugin会发送对应事件给js端
                [self notifyWithError:[NSError errorWithCode:kHCPFailedToDownloadContentManifestErrorCode
                                        descriptionFromError:error]
                    applicationConfig:newAppConfig];
                return;
            }

            // 对比服务器下载的和本地的manifest,看是否有文件修改,
            // manifestDiff 有四个变量 updateFileList(包含新增和修改的文件)、deletedFiles(新版本删除的文件)、addedFiles(新增)、changedFiles(修改);
            // 其中 addedFiles、changedFiles 只是赋值,并未使用
            HCPManifestDiff *manifestDiff = [_oldManifest calculateDifference:newManifest];
            if (manifestDiff.isEmpty) {
                // 如果没有文件修改,将新的chcp.json 和 chcp.manifest 存到本地,发送无更新通知给HCPPlugin,HCPPlugin会发送对应事件给js端
                [_manifestStorage store:newManifest inFolder:_pluginFiles.wwwFolder];
                [_appConfigStorage store:newAppConfig inFolder:_pluginFiles.wwwFolder];
                [self notifyNothingToUpdate:newAppConfig];
                return;
            }

            // switch file structure to new release
            _pluginFiles = [[HCPFilesStructure alloc] initWithReleaseVersion:newAppConfig.contentConfig.releaseVersion];

            // 创建 downloadFolder
            [self createNewReleaseDownloadFolder:_pluginFiles.downloadFolder];

            // 如果有文件新增或更新,就下载对应的文件到 downloadFolder,
            // 并将服务器的chcp.json 和 chcp.manifest 存到downloadFolder,发送下载成功通知给HCPPlugin,HCPPlugin会发送对应事件给js端
            NSArray *updatedFiles = manifestDiff.updateFileList;
            if (updatedFiles.count > 0) {
                // 具体的下载可参考 HCPFileDownloader.m,是调用 NSSession 的 downloadTaskWithURL
                [self downloadUpdatedFiles:updatedFiles appConfig:newAppConfig manifest:newManifest];
                return;
            }

            // 否则 - 只有需要删除的文件;
            // 将服务器的chcp.json 和 chcp.manifest 存到downloadFolder,发送下载成功通知给HCPPlugin,HCPPlugin会发送对应事件给js端
            [_manifestStorage store:newManifest inFolder:_pluginFiles.downloadFolder];
            [_appConfigStorage store:newAppConfig inFolder:_pluginFiles.downloadFolder];

            [self notifyUpdateDownloadSuccess:newAppConfig];
        }];
    }];
}
下载成功:
// HCPPlugin.m
/**
 *  Method is called when update is loaded and ready for installation.
 *
 *  @param notification captured notification with event details
 */
- (void)onUpdateIsReadyForInstallation:(NSNotification *)notification {
    // new application config from server
    HCPApplicationConfig *newConfig = notification.userInfo[kHCPEventUserInfoApplicationConfigKey];

    NSLog(@"Update is ready for installation: %@", newConfig.contentConfig.releaseVersion);

    // 将版本信息保存到 NSUserDefault
    _pluginInternalPrefs.readyForInstallationReleaseVersionName = newConfig.contentConfig.releaseVersion;
    [_pluginInternalPrefs saveToUserDefaults];

    // send notification to the associated callback
    CDVPluginResult *pluginResult = [CDVPluginResult pluginResultForNotification:notification];
    if (_downloadCallback) {
        [self.commandDelegate sendPluginResult:pluginResult callbackId:_downloadCallback];
        _downloadCallback = nil;
    }

    // 发送回调给js
    [self invokeDefaultCallbackWithMessage:pluginResult];

    // 如果自动更新为 YES 并且 update method设置为 now,直接更新
    if (_pluginXmlConfig.isUpdatesAutoInstallationAllowed &&
        newConfig.contentConfig.updateTime == HCPUpdateNow &&
        ![HCPUpdateLoader sharedInstance].isDownloadInProgress &&
        ![HCPUpdateInstaller sharedInstance].isInstallationInProgress) {
        [self _installUpdate:nil];
    }
}
4.4 更新
下面,再来看一下更新操作。
// HCPInstallationWorker.m
...
// 下面的注释以新版本和旧版本代指
HCPFilesStructure *_newReleaseFS; // 服务器上新版本的文件结构
HCPFilesStructure *_currentReleaseFS; // 当前设备上正在使用的版本的文件结构
...
- (void)runWithComplitionBlock:(void (^)(void))updateInstallationComplitionBlock {
    // 安装前,返回到js event
    [self dispatchBeforeInstallEvent];

    NSError *error = nil;
    // 操作主要在 if 条件中
    // initBeforeRun 查看新旧配置文件是否都在
    // isUpdateValid 确认更新文件是否存在、更新文件的hash是否与chcp.manifest中的一致
    // copyFilesFromCurrentReleaseToNewRelease 将旧版本 wwwFolder的内容 复制到 新版本 的wwwFolder
    // deleteUnusedFiles 删除新版本没有的文件
    // moveDownloadedFilesToWwwFolder 将需要新增或更新的文件从 新版本的 downloadFolder 复制到 新版本的 wwwFolder
    if (![self initBeforeRun:&error] ||
        ![self isUpdateValid:&error] ||
        ![self copyFilesFromCurrentReleaseToNewRelease:&error] ||
        ![self deleteUnusedFiles:&error] ||
        ![self moveDownloadedFilesToWwwFolder:&error]) {
            NSLog(@"%@. Error code %ld", [error underlyingErrorLocalizedDesription], (long)error.code);
            // 删除 新版本的 contentFolder 内容
        	[self cleanUpOnFailure];
        	// 安装失败,发送安装失败通知给HCPPlugin,HCPPlugin会发送对应事件给js端
            [self dispatchEventWithError:error];

            return;
    }
    // 删除 新版本的 download文件夹的内容
    [self cleanUpOnSucess];
    // 保存新版本的 chcp.json chcp.manifest 到新版本的 wwwFolder
    [self saveNewConfigsToWwwFolder];
    // 安装成功,发送安装成功通知给HCPPlugin,HCPPlugin会发送对应事件给js端
    [self dispatchSuccessEvent];
}
更新成功:
// HCPPlugin.m
/**
 *  Method is called when update has been installed.
 *
 *  @param notification captured notification with the event details
 */
- (void)onUpdateInstalledEvent:(NSNotification *)notification {
    // 更新appconfig
    _appConfig = notification.userInfo[kHCPEventUserInfoApplicationConfigKey];
    // 将新版本置为当前版本,旧版本置为上一个版本
    _pluginInternalPrefs.readyForInstallationReleaseVersionName = @"";
    _pluginInternalPrefs.previousReleaseVersionName = _pluginInternalPrefs.currentReleaseVersionName;
    _pluginInternalPrefs.currentReleaseVersionName = _appConfig.contentConfig.releaseVersion;
    [_pluginInternalPrefs saveToUserDefaults];

    _filesStructure = [[HCPFilesStructure alloc] initWithReleaseVersion:_pluginInternalPrefs.currentReleaseVersionName];

    CDVPluginResult *pluginResult = [CDVPluginResult pluginResultForNotification:notification];

    // send notification to the caller from the JavaScript side of there was any
    if (_installationCallback) {
        [self.commandDelegate sendPluginResult:pluginResult callbackId:_installationCallback];
        _installationCallback = nil;
    }

    // 发送回调给js
    [self invokeDefaultCallbackWithMessage:pluginResult];

    // 重新加载html
    [self loadURL:[self indexPageFromConfigXml]];
    // 删除旧版本文件
    [self cleanupFileSystemFromOldReleases];
}
5. 问题
5.1 kCFErrorDomainCFNetwork error -1002
问题:
报错截图如下:
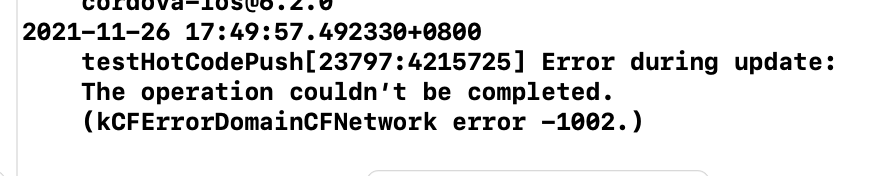
-1002 对应的报错类型可以在 Xcode 中 使用快捷键 shift+command+o ,搜索 CFNetworkErrors,可以看到对应的报错为 kCFURLErrorUnsupportedURL。
排查为 HCPUpdateRequest 的 configURL 为 nil,入口是 HCPPlugin.m 下的 jsInitPlugin,调用了 _fetchUpdate 方法,_fetchUpdate 取 options(js参数)、defaultFetchUpdateOptions(原生端配置)、_pluginXmlConfig(xml配置) 下不为空的 configUrl(优先级:options > defaultFetchUpdateOptions > _pluginXmlConfig ),但三个变量下的 configUrl 均为 nil,最终导致了此问题。
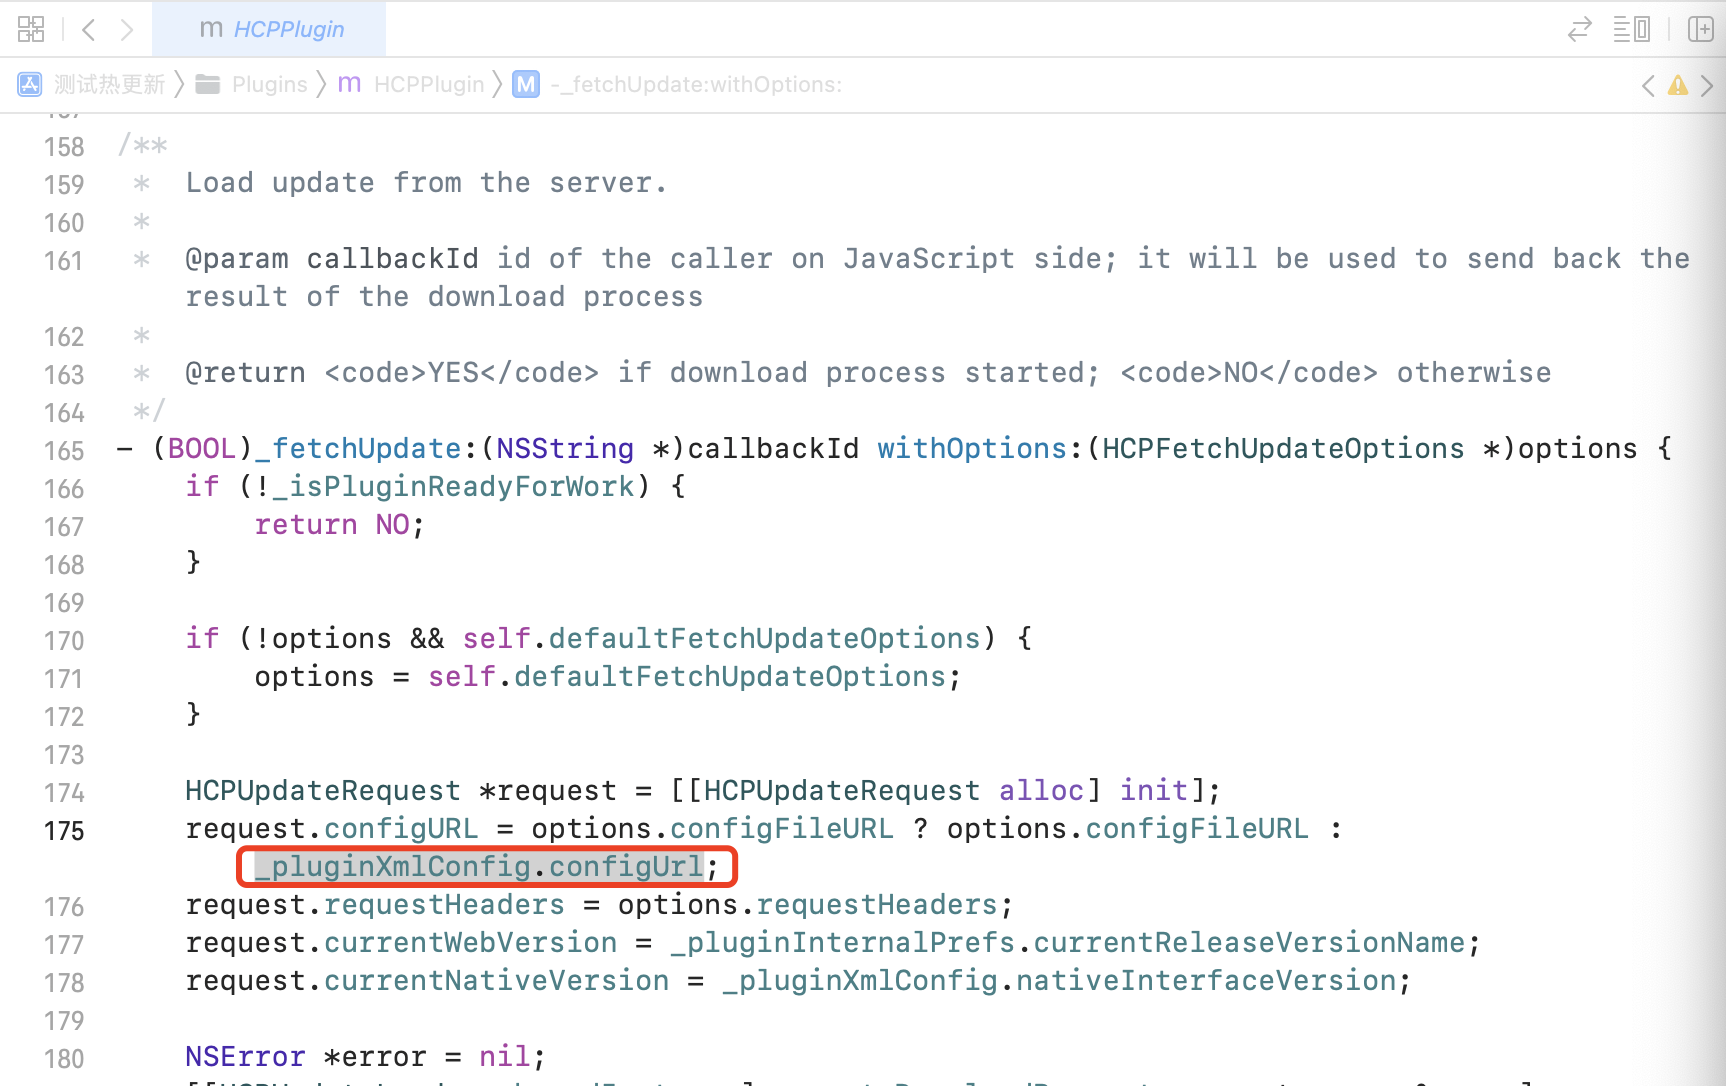
解决:其实是在修改cordova项目下的 config.xml 时,没有 执行 cordova build ios 导致的,执行完再运行到手机就可以了。
5.2
6. 优化点
6.1 应用首次安装
应用首次安装会提示用户授予网络权限,在这个过程中,由于无网络,热更新报错。
6.2 代码升级
代码中存在一些已经废弃的类和方法,可以进行升级
6.3
最后
以上就是爱听歌老鼠最近收集整理的关于热更新插件踩坑及优化 iOS热更新插件踩坑及优化 iOS的全部内容,更多相关热更新插件踩坑及优化内容请搜索靠谱客的其他文章。


发表评论 取消回复