1.pom依赖
<!-- 引入freeMarker的依赖包. -->
<dependency>
<groupId>org.springframework.boot</groupId>
<artifactId>spring-boot-starter-freemarker</artifactId>
</dependency>
2.配置application.properties
server.port=8080
spring.freemarker.allow-request-override=false
spring.freemarker.cache=true
spring.freemarker.check-template-location=true
spring.freemarker.charset=UTF-8
spring.freemarker.content-type=text/html
spring.freemarker.expose-request-attributes=false
spring.freemarker.expose-session-attributes=false
spring.freemarker.suffix=.html
spring.freemarker.templateEncoding=UTF-8
spring.freemarker.templateLoaderPath=classpath:/templates/
spring.freemarker.expose-spring-macro-helpers=false
3.代码实现
1) 控制层代码
package com.xsjt.controller;
import java.text.SimpleDateFormat;
import java.util.ArrayList;
import java.util.Date;
import java.util.HashMap;
import java.util.List;
import java.util.Map;
import org.springframework.stereotype.Controller;
import org.springframework.web.bind.annotation.RequestMapping;
/**
* ClassName:StudentController
* Date:
2017年11月6日 下午4:27:40
* @author
Joe
* @version
* @since
JDK 1.8
*/
@Controller
public class StudentController {
/**
* freemarker:(跳转到 freemarker.ftl).
* @author Joe
* Date:2017年11月6日下午4:52:19
*
* @param map
* @return
*/
@RequestMapping("/freemarker")
public String freemarker(Map<String, Object> map){
map.put("name", "Joe");
map.put("sex", 1);
//sex:性别,1:男;0:女;
// 模拟数据
List<Map<String, Object>> friends = new ArrayList<Map<String, Object>>();
Map<String, Object> friend = new HashMap<String, Object>();
friend.put("name", "xbq");
friend.put("age", 22);
friends.add(friend);
friend = new HashMap<String, Object>();
friend.put("name", "July");
friend.put("age", 18);
friends.add(friend);
map.put("friends", friends);
return "freemarker";
}
}
2)在mainresourcestemplates 目录下 新建 freemarker.ftl 文件,也可以是html的后缀,内容如下:
<!DOCTYPE html>
<html xmlns="http://www.w3.org/1999/xhtml" xmlns:th="http://www.thymeleaf.org"
xmlns:sec="http://www.thymeleaf.org/thymeleaf-extras-springsecurity3">
<head>
<title>Hello World!</title>
</head>
<body>
<center>
<p>
welcome ${name} to freemarker!
</p>
<p>性别:
<#if sex==0>
女
<#elseif sex==1>
男
<#else>
保密
</#if>
</p>
<h4>我的好友:</h4>
<#list friends as item>
姓名:${item.name} , 年龄${item.age}
<br>
</#list>
</center>
</body>
</html>
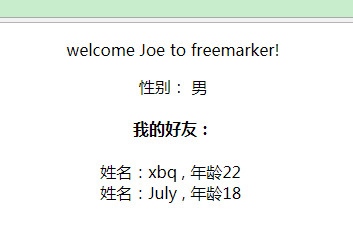
3)在浏览器中访问 http:127.0.0.1:8080/freemarker,即可跳转到 到页面,如下:
4.源码下载
https://gitee.com/xbq8023/spring-boot-learn
-------------------------------------------------------------------------------------
----文章说明:
本文原作者:小葱拌豆腐~
本文转自https://www.cnblogs.com/xbq8080/p/7768744.html,请点击查看原文!
最后
以上就是幽默小霸王最近收集整理的关于springboot整合freemarker的具体方法及案例的全部内容,更多相关springboot整合freemarker内容请搜索靠谱客的其他文章。
本图文内容来源于网友提供,作为学习参考使用,或来自网络收集整理,版权属于原作者所有。


发表评论 取消回复