修改solver文件参数
首先打开模型优化文件,lenet_solver.prototxt。
关键参数如下:
# Carry out testing every 500 training iterations.
test_interval: 500
# The base learning rate, momentum and the weight decay of the network.
base_lr: 0.01
momentum: 0.9
weight_decay: 0.0005
然后我把学习率调整到了0.02,保存退出。进行训练:
I1102 14:07:40.107688  6627 sgd_solver.cpp:105] Iteration 2900, lr = 0.016523
I1102 14:07:47.156118  6627 solver.cpp:447] Snapshotting to binary proto file examples/mnist/lenet_iter_3000.caffemodel
I1102 14:07:47.161020  6627 sgd_solver.cpp:273] Snapshotting solver state to binary proto file examples/mnist/lenet_iter_3000.solverstate
I1102 14:07:47.192687  6627 solver.cpp:310] Iteration 3000, loss = 0.011648
I1102 14:07:47.192719  6627 solver.cpp:330] Iteration 3000, Testing net (#0)
I1102 14:07:51.407235  6632 data_layer.cpp:73] Restarting data prefetching from start.
I1102 14:07:51.583055  6627 solver.cpp:397]     Test net output #0: accuracy = 0.9881
I1102 14:07:51.583092  6627 solver.cpp:397]     Test net output #1: loss = 0.0373711 (* 1 = 0.0373711 loss)
I1102 14:07:51.583096  6627 solver.cpp:315] Optimization Done.
I1102 14:07:51.583101  6627 caffe.cpp:259] Optimization Done.
我们可以发现,把学习率调高之后,训练时的loss(损失程度)也增大了。
Finetune
所谓fine tune就是用别人训练好的模型,加上我们自己的数据,来训练新的模型。fine tune相当于使用别人的模型的前几层,来提取浅层特征,然后在最后再落入我们自己的分类中。fine tune的好处在于不用完全重新训练模型,从而提高效率,因为一般新训练模型准确率都会从很低的值开始慢慢上升,但是fine tune能够让我们在比较少的迭代次数之后得到一个比较好的效果。在数据量不是很大的情况下,fine tune会是一个比较好的选择。
实验
还是修改solver训练参数,修改后的参数如下:
这次调整的还是base_lr(学习率),稍微调小了些
# The train/test net protocol buffer definition
net: "examples/mnist/lenet_train_test.prototxt"
# test_iter specifies how many forward passes the test should carry out.
# In the case of MNIST, we have test batch size 100 and 100 test iterations,
# covering the full 10,000 testing images.
test_iter: 100
# Carry out testing every 500 training iterations.
test_interval: 500
# The base learning rate, momentum and the weight decay of the network.
base_lr: 0.001   # 学习率
momentum: 0.9
weight_decay: 0.0005
# The learning rate policy
lr_policy: "inv"
gamma: 0.0001
power: 0.75
# Display every 100 iterations
display: 100
# The maximum number of iterations
max_iter: 3000   # 迭代次数为3000
# snapshot intermediate results
snapshot: 5000
snapshot_prefix: "examples/mnist/lenet"
# solver mode: CPU or GPU
solver_mode: CPU
训练后的结果
I1103 11:02:05.322260  3602 solver.cpp:310] Iteration 3000, loss = 0.0226078
I1103 11:02:05.322298  3602 solver.cpp:330] Iteration 3000, Testing net (#0)
I1103 11:02:11.000803  3605 data_layer.cpp:73] Restarting data prefetching from start.
I1103 11:02:11.236557  3602 solver.cpp:397]     Test net output #0: accuracy = 0.9926
I1103 11:02:11.236601  3602 solver.cpp:397]     Test net output #1: loss = 0.0255786 (* 1 = 0.0255786 loss)
I1103 11:02:11.236609  3602 solver.cpp:315] Optimization Done.
I1103 11:02:11.236618  3602 caffe.cpp:259] Optimization Done.
损失率降低了1%左右。
cifar 训练集
cifar是一个常见的图像分类训练集,包括上万张图片及20个分类,caffe提供了一个网络用于分类cifar数据集。cifar网络的定义在examples/cifar10目录下,训练的过程十分简单。
以下命令均在caffe默认根目录下运行,下同)
1、获取训练数据
./data/cifar10/get_cifar10.sh
./examples/cifar10/create_cifar10.sh
2、开始训练
./examples/cifar10/train_quick.sh经过一段时间的等待,快速迭代(quick train)了4000
I1103 16:58:46.149611  3297 solver.cpp:397]     Test net output #0: accuracy = 0.7111
I1103 16:58:46.149660  3297 solver.cpp:397]     Test net output #1: loss = 0.868548 (* 1 = 0.868548 loss)
I1103 16:58:46.743127  3297 solver.cpp:218] Iteration 4000 (165.872 iter/s, 24.115s/100 iters), loss = 0.540525
I1103 16:58:46.743175  3297 solver.cpp:237]     Train net output #0: loss = 0.540525 (* 1 = 0.540525 loss)
I1103 16:58:46.743185  3297 sgd_solver.cpp:105] Iteration 4000, lr = 0.0001
然后实验一下
./build/tools/caffe test -model ./examples/cifar10/cifar10_quick_train_test.prototxt -weights ./examples/cifar10/cifar10_quick_iter_4248.caffemodel.h5 -iterations 20I1103 17:15:32.987692 3555 caffe.cpp:313] Batch 11, accuracy = 0.78
I1103 17:15:32.987737 3555 caffe.cpp:313] Batch 11, loss = 0.698263
I1103 17:15:33.224419 3555 caffe.cpp:313] Batch 12, accuracy = 0.71
I1103 17:15:33.224452 3555 caffe.cpp:313] Batch 12, loss = 0.746989
I1103 17:15:33.458003 3555 caffe.cpp:313] Batch 13, accuracy = 0.73
I1103 17:15:33.458035 3555 caffe.cpp:313] Batch 13, loss = 0.683601
I1103 17:15:33.691421 3555 caffe.cpp:313] Batch 14, accuracy = 0.83
I1103 17:15:33.691453 3555 caffe.cpp:313] Batch 14, loss = 0.545713
I1103 17:15:33.931823 3555 caffe.cpp:313] Batch 15, accuracy = 0.77
I1103 17:15:33.931865 3555 caffe.cpp:313] Batch 15, loss = 0.723403
I1103 17:15:34.166936 3555 caffe.cpp:313] Batch 16, accuracy = 0.75
I1103 17:15:34.166971 3555 caffe.cpp:313] Batch 16, loss = 0.793825
I1103 17:15:34.401072 3555 caffe.cpp:313] Batch 17, accuracy = 0.73
I1103 17:15:34.401100 3555 caffe.cpp:313] Batch 17, loss = 0.705245
I1103 17:15:34.632591 3555 caffe.cpp:313] Batch 18, accuracy = 0.77
I1103 17:15:34.632623 3555 caffe.cpp:313] Batch 18, loss = 0.904923
I1103 17:15:34.863441 3555 caffe.cpp:313] Batch 19, accuracy = 0.69
I1103 17:15:34.863482 3555 caffe.cpp:313] Batch 19, loss = 1.05045
I1103 17:15:34.863487 3555 caffe.cpp:318] Loss: 0.759157
I1103 17:15:34.863499 3555 caffe.cpp:330] accuracy = 0.754
I1103 17:15:34.863510 3555 caffe.cpp:330] loss = 0.759157 (* 1 = 0.759157 loss)用图片进行验证
编写python ,主要先提取数据(Label,R, G, B),接着使用merge将三个维度合并,接着使用Iamge.fromarray转换为图片,并进行保存。
import numpy as np
import struct
import matplotlib.pyplot as plt
import Image
import cv2 as cv


def unzip(filename):
    binfile = open(filename, 'rb')
    buf = binfile.read()

    index = 0
    numImages = 10000
    i = 0
    for image in range(0, numImages):
        label = struct.unpack_from('>1B', buf, index)
        index += struct.calcsize('>1B')
        imR = struct.unpack_from('>1024B', buf, index)
        index += struct.calcsize('>1024B')
        imR = np.array(imR, dtype='uint8')
        imR = imR.reshape(32, 32)
        imG = struct.unpack_from('>1024B', buf, index)
        imG = np.array(imG, dtype='uint8')
        imG = imG.reshape(32, 32)
        index += struct.calcsize('>1024B')
        imB = struct.unpack_from('>1024B', buf, index)
        imB = np.array(imB, dtype='uint8')
        imB = imB.reshape(32, 32)
        index += struct.calcsize('>1024B')
        im = cv.merge((imR, imG, imB))
        im = Image.fromarray(im)
        im.save('/usr/local/caffe/examples/cifar10/cifar10_test/train_%s_%s.png' % (label , image), 'png')

unzip("/usr/local/caffe/data/cifar10/data_batch_1.bin")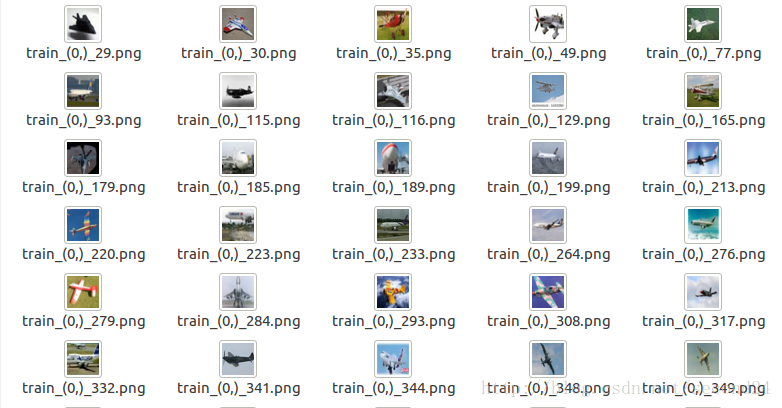
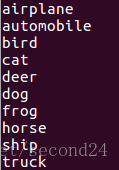
然后我们再找一下标签(label)。
cat /usr/local/caffe/data/cifar10/batches.meta.txt得到了以下几个
验证
现在已经有了训练好的模型,得到了图片,就可以验证一下了。
import struct
import matplotlib.pyplot as plt
import Image
import cv2 as cv
import os
def unzip(filename):
binfile = open(filename, 'rb');
buf = binfile.read();
import caffe
index = 0;
numImages = 10000;
i = 0;
n = np.zeros(10);
for image in range(0, numImages):
label = struct.unpack_from('>1B', buf, index);
index += struct.calcsize('>1B');
imR = struct.unpack_from('>1024B', buf, index);
index += struct.calcsize('>1024B');
imR = np.array(imR, dtype='uint8');
imR = imR.reshape(32, 32);
imG = struct.unpack_from('>1024B', buf, index);
imG = np.array(imG, dtype='uint8');
imG = imG.reshape(32, 32);
index += struct.calcsize('>1024B');
imB = struct.unpack_from('>1024B', buf, index);
imB = np.array(imB, dtype='uint8');
imB = imB.reshape(32, 32);
index += struct.calcsize('>1024B');
im = cv.merge((imR, imG, imB));
im = Image.fromarray(im);
im.save('cifar10_test/train_%s_%s.png' % (label , n[label]), 'png');
n[label] += 1;
def getType(file):
img = caffe.io.load_image(file, color=True);
net = caffe.Classifier('/usr/local/caffe/examples/cifar10/cifar10_quick.prototxt',
'/usr/local/caffe/examples/cifar10/cifar10_quick_iter_4248.caffemodel.h5', channel_swap=(2, 1, 0),
raw_scale=255,image_dims=(32, 32));
pre = net.predict([img]);
caffe.set_mode_cpu();
return pre[0].argmax();
#unzip("/usr/local/caffe/data/cifar10/data_batch_1.bin")
import fileinput
labelName = '/usr/local/caffe/data/cifar10/batches.meta.txt';
file = open(labelName, 'r');
lines = file.read(100000);
import re
label = re.split('n', lines);
import caffe
import random
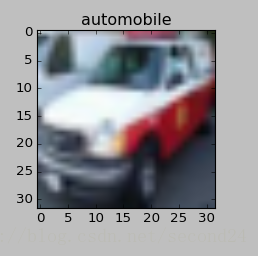
for i in range(1, 21):
fileName = 'cifar10_test/train_(%d,)_%d.png' % (random.choice(range(0, 10)), random.choice(range(0, 100)));
if os.path.exists(fileName):
img = caffe.io.load_image(fileName);
plt.subplot(4, 5, i);
plt.imshow(img);
plt.title(label[getType(fileName)]);
plt.show();
大致识别出了一只小鹿和一辆汽车

最后
以上就是轻松大地最近收集整理的关于caffe学习笔记修改solver文件参数Finetunecifar 训练集的全部内容,更多相关caffe学习笔记修改solver文件参数Finetunecifar内容请搜索靠谱客的其他文章。


发表评论 取消回复