先记住几个linux命令行
启动:./nginx
解压即用 ./nginx -p  /mnt/disk/nginx
停止:./nginx -s stop
重新加载:./nginx -s reload
查看进程:ps -ef|grep nginx
查看完进程之后,杀死该杀掉的进程: kill -9 28220(28220为进程号)
tail -f   不间断看 cat 是查看
最高权限:chmod 777 +文件名(运行谁文件名就是谁)
netstat -lnp|grep 80 查看端口 可以kill -9 进程号 杀死进程
查看jar包运行状态:ps -ef|grep commom-person-1.0.0.jar
清空日志  :>文件


VIM编辑器,可以新建文件也可以修改文件,命令为:vim  /usr/local/con.cfg
如果这个文件,以前是没有的,则为新建,则下方有提示为新文件,如果文件已存在,则没有提示。
进入编辑器后,我们先按"I”,即切换到“插入”状态。就可以通过上下左右移动光标,或空格、退格及回车等进行编辑内容了,和WINDOWS是一样的了。
当文本编辑结束之后,通常需要退出编辑器。退出编辑器又分为4种情况:保存退出、正常退出、不保存退出及强制退出。
 按键盘左上角的"ESC",左下角的插入状态不见了
然后这时,我们输入“冒号”,即":"(不需双引号),在下方会出现冒号,等待输入命令,如图,我输入的是WQ。功能如下。
W:write,写入
Q:quit,退出
再回车,就保存退出了
也可以esc后两次shift+Z
1.使用supervisorctl管理工具进行后端项目运行的管理
1.1 linux语句
supervisorctl status  查看jar包运行状态
supervisorctl help   查看有关suoer的所有功能
supervisorctl start
supervisorctl stop
jcmd  查看所有jar包运行
2.配置supervisorctl,在xxx.ini文件中配置
[program:organization]  //设置jar包名称
command=java -jar common-organization-1.0.0.jar  //command=(运行jar包的命令)
; This is the directory from which RQ is ran. Be sure to point this to the
; directory where your source code is importable from
directory=/root/topic/back  //directory=(jar包路径)

redirect_stderr = true  ; 把 stderr 重定向到 stdout,默认 false
stdout_logfile_maxbytes = 20MB  ; stdout 日志文件大小,默认 50MB
stdout_logfile_backups = 5     ; stdout 日志文件备份数
; stdout 日志文件,需要注意当指定目录不存在时无法正常启动,所以需要手动创建目录(supervisord 会自动创建日志文件)
stdout_logfile = /root/topic/back/log/out.log ;  //日志文件路径
***2.使用脚本直接更新前后端
2.1 将项目完整的放到与脚本同级的文件夹中
2.1 cd进脚本的所在位置,运行脚本
2.2 脚本的内容
#! /bin/bash

update_back()
{
  work_dir=`pwd`
  project_name=$1
  target_dir=$2
  service_name=$3
  git --git-dir="${work_dir}/bigdata-platform/bigdata-common/.git" pull
  git --git-dir="${work_dir}/bigdata-platform/common-services/${project_name}/.git" pull
  mvn package -f bigdata-platform --pl "common-services/${project_name}" -am
  mv -f ${work_dir}/bigdata-platform/common-services/${project_name}/target/*.jar $target_dir
  supervisorctl restart $service_name
}
nginx_html_dir=/usr/local/nginx/html/

update_front()
{
  work_dir=`pwd`
  project_name=$1
  target_dir=$2
  dist=$3
  cd $project_name
  git pull
  npm i
  npm link big-data-common
  npm run build
  rm -rf ${nginx_html_dir}${target_dir}/*
  mv ${work_dir}/${project_name}/${dist}/* ${nginx_html_dir}${target_dir}
  cd ..
}

echo "选择要更新的项目"
select project in "案事件" "人员" "组织" "车辆" "场所"; do
  break;
done
echo "你选择了 $project"

case $project in
  "案事件")
  update_back common-case /root/topic/case "case"
  update_front lawcase-topic "case" dist
  update_front event-topics "event" dist
  ;;
  "人员")
  update_back common-person /root/topic/person-back "person"
  update_front person-topics "person" dist
  ;;
  "组织")
  update_back common-organization /root/topic/back "organization"
  update_front organization-topics "organization" dist
  ;;
  "车辆")
  update_back common-article /root/topic/car-back "car"
  update_front vehicle-topics "car" car
  ;;
  "场所")
  update_back common-location /root/topic/location-back "location"
  update_front location-topics "location" location
  ;;
  *) echo "系统异常";
esac
1.前端
修改production文件

地址拼接1与nginx的配置文件对应,写什么都可以,但是必须对应起来,主要目的就是方便nginx找到后端的请求转发配置,/***/中间的星号会在访问后端时候被裁掉
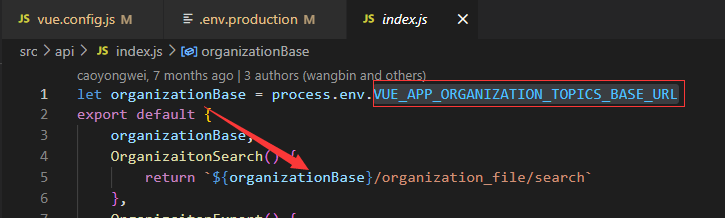
然后vue.config.js里面配置
//手动部署 vue.config.js
const host = process.env.VUE_APP_CONFIG_HOST
const port = process.env.VUE_APP_CONFIG_PORT ? process.env.VUE_APP_CONFIG_PORT : 8080
const devServer = {
  proxy: {
    '/person_topics/*': {
      target: process.env.VUE_APP_CONFIG_PROXY_PERSON_TOPICS_TARGET
    },
  },
  port
}
if (host) {
  devServer.host = host
}
module.exports = {
  devServer,
  productionSourceMap: false,
  configureWebpack: config => {
    if (process.env.NODE_ENV === 'production') {
      config.optimization.minimizer[0].options.terserOptions.compress.drop_console = true;
    }
  },
  chainWebpack: config => {
    config.resolve.symlinks(false)
  },
}
然后 npm run build 打包前端成一个dist文件夹
后端:
1.修改配置,保证nacos与项目配置的端口号一致,保证和其他主体在同一个nacos服务下,这样才可以互相访问
2.然后打包:
E:git_newbigdata-platform>mvn clean package -pl common-services/common-person -am
E:git_newbigdata-platform为整个微服务项目地址
3.打完包之后可以看到jar包所在位置
4.编写脚本
4.1 start.sh
nohup java -jar common-organization-1.0.1.jar > ./logs/backgroud.txt 2>&1 &
4.2 stop.sh
ps -ef|grep common-organization-1.0.1.jar | grep -v grep | awk ‘{print $2}’ |xargs kill -kill
xshell远程服务器:
使用xshell链接服务器
左上角文件-新建-名称随便起-主机:要部署道德服务器IP-点击用户身份验证输入密码连接
nginx安装配置、
1.官网下载安装包(后缀tar.gz)
2.安装环境(根目录下)
yum install gcc-c++
yum install -y pcre pcre-devel
yum install -y zlib zlib-devel
yum install -y openssl openssl-devel
3.解压nginx
cd到压缩包目录下执行
tar -zxvf nginx-1.10.1.tar.gz
4.解压后进行配置,使用默认配置:进入解压的文件夹下执行
./configure
5.编译nginx(再解压之后的文件夹下)
make
make install
6.这时候返回上一级目录,就会发现多了nginx目录,接下来,启动nginx。
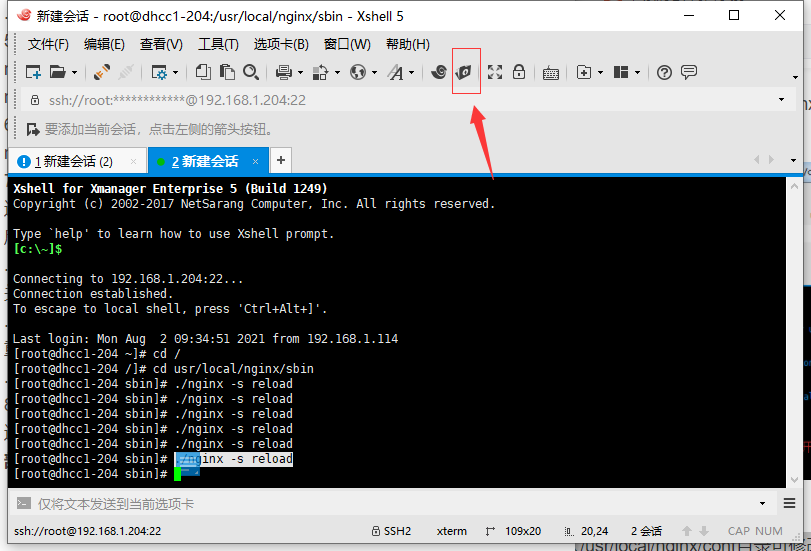
7.启动nginx
进入sbin目录下执行
启动nginx
./nginx
关闭nginx
./nginx -s quit 或者 ./nginx -s stop
重启nginx
./nginx -s reload
8.安装目录
进入/usr/local/nginx/conf目录可修改nginx的配置文件
部署前端
xfpt文件传输,把前端打的dist包放到usr/local/nginx中
修改conf里面的配置文件nginx.conf,
#user  nobody;
worker_processes  1;

#error_log  logs/error.log;
#error_log  logs/error.log  notice;
#error_log  logs/error.log  info;

#pid        logs/nginx.pid;


events {
    worker_connections  1024;
}


http {
    include       mime.types;
    default_type  application/octet-stream;

    #log_format  main  '$remote_addr - $remote_user [$time_local] "$request" '
    #                  '$status $body_bytes_sent "$http_referer" '
    #                  '"$http_user_agent" "$http_x_forwarded_for"';

    #access_log  logs/access.log  main;

    sendfile        on;
    #tcp_nopush     on;

    #keepalive_timeout  0;
    keepalive_timeout  65;

    #gzip  on;

    server {
        listen       80;
        server_name  localhost;

        #charset koi8-r;

        #access_log  logs/host.access.log  main;

        location / {
            root   html;
            index  index.html index.htm;
        }
        location /organization_topics/ {
            proxy_pass http://192.168.1.204:8088;
            proxy_read_timeout 600;
        }
       location /ct/ {
            proxy_pass http://192.168.1.204:8090/;
            proxy_read_timeout 600;
        }
       location ^~ /api {
            proxy_pass http://192.168.1.204:8099/;
            proxy_read_timeout 600;
        }
       location ^~ /apl {
            proxy_pass http://192.168.1.204:8089/;
            proxy_read_timeout 600;
        }
        location /person_topics/ {
            proxy_pass http://192.168.1.204:8082;
            proxy_read_timeout 600;
        }


        #error_page  404              /404.html;

        # redirect server error pages to the static page /50x.html
        #
        error_page   500 502 503 504  /50x.html;
        location = /50x.html {
            root   html;
        }

        # proxy the PHP scripts to Apache listening on 127.0.0.1:80
        #
        #location ~ .php$ {
        #    proxy_pass   http://127.0.0.1;
        #}

        # pass the PHP scripts to FastCGI server listening on 127.0.0.1:9000
        #
        #location ~ .php$ {
        #    root           html;
        #    fastcgi_pass   127.0.0.1:9000;
        #    fastcgi_index  index.php;
        #    fastcgi_param  SCRIPT_FILENAME  /scripts$fastcgi_script_name;
        #    include        fastcgi_params;
        #}

        # deny access to .htaccess files, if Apache's document root
        # concurs with nginx's one
        #
        #location ~ /.ht {
        #    deny  all;
        #}
    }


    # another virtual host using mix of IP-, name-, and port-based configuration
    #
    #server {
    #    listen       8000;
    #    listen       somename:8080;
    #    server_name  somename  alias  another.alias;

    #    location / {
    #        root   html;
    #        index  index.html index.htm;
    #    }
    #}


    # HTTPS server
    #
    #server {
    #    listen       443 ssl;
    #    server_name  localhost;

    #    ssl_certificate      cert.pem;
    #    ssl_certificate_key  cert.key;

    #    ssl_session_cache    shared:SSL:1m;
    #    ssl_session_timeout  5m;

    #    ssl_ciphers  HIGH:!aNULL:!MD5;
    #    ssl_prefer_server_ciphers  on;

    #    location / {
    #        root   html;
    #        index  index.html index.htm;
    #    }
    #}

}
其中需要修改的地方
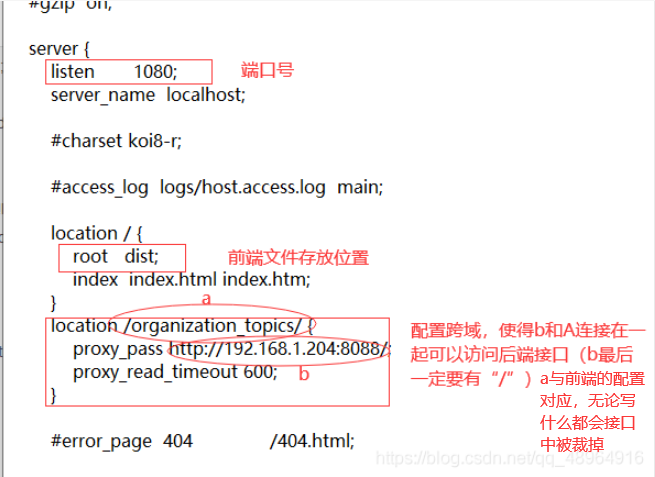
配置后端:
将jar包和启动,停止脚本随意放在哪个文件夹,cd进入这个文件夹,执行
./start.sh
运行脚本,然后cd进入logs
tail -f backgroud.txt
查看是否后端运行成功
浏览器访问
自此部署完成,访问 http://ip:端口号(111.111.1.111:8081) 查看是否有错就欧克了
注意
1.如果要部署同一个项目的其他主题,
1.1只需要在之前部署好的前端存放里面新建个文件夹(car),将另主题打包的内容放进去,访问的时候地址(111.111.1.111:8081/car)即可访问
1.2 可以nginx下新建文件夹(car),把配置文件复制出来到car文件中,同理:在原来部署好的也复制一份出来,将nginx最初的配置文件改成原始样子,配置内容改成该有的信息即可。
最后
以上就是跳跃大白最近收集整理的关于linux部署前后端分离(微服务)到服务器上,借用nginx的全部内容,更多相关linux部署前后端分离(微服务)到服务器上内容请搜索靠谱客的其他文章。


发表评论 取消回复