nginx进阶
目录
nginx进阶
访问控制
用户认证
配置实例
https配置
访问控制
权限控制指令
Nginx中提供了两个用于配置访问权限控制的指令,分别为allow和deny。从其名称就可以看出,allow用于设置允许访问的权限、deny用于设置禁止访问的权限。在使用时,权限指令后只需要跟上允许或禁止的ip、ip段或all即可。其中,all表示所有的。
单个ip指定的范围最小,all指定的范围最大
同一块下,若同时存在多个权限指令(deny、allow),则先出现的访问权限设置生效,并且会对后出现的设置进行覆盖,未覆盖的范围以然生效,否则以先出现的设置为准
当多个块(如http、server、location)中都出现了权限设置指令,则内层块中的权限级别要比外层块中设置的权限级别高
用于location段
allow:设定允许哪台或哪些主机访问,多个参数间用空格隔开
deny:设定禁止哪台或哪些主机访问,多个参数间用空格隔开
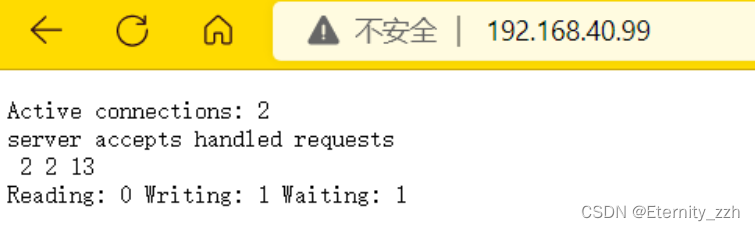
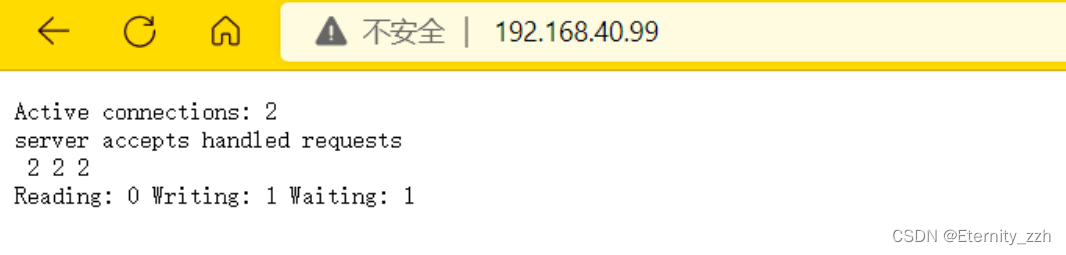
location / {

stub_status on;

allow 192.168.40.1;

deny all;


}
用户认证
auth_basic “欢迎信息”;

auth_basic_user_file “/path/to/user_auth_file”;

//user_auth_file内容格式

username:password
这里的密码为加密后的密码串,建议用htpasswd来创建文件
htpasswd -c -m /path/to/.user_auth_file USERNAME配置实例
//授权用户

//安装httpd-tools软件包

[root@nginx ~]# yum -y install httpd-tools

//创建用户密钥文件

[root@nginx ~]# cd /usr/local/nginx/conf/

[root@nginx nginx]# htpasswd -c -m .user_auth_file niuma

New password:

Re-type new password:

Adding password for user niuma

[root@nginx nginx]#

[root@nginx nginx]# cat .user_auth_file

niuma:$apr1$C/alc5Ab$m4waqGTDkdCe9k5Bzfcf61

//配置nginx(注意auth_basic_user_file必须用绝对路径)

[root@nginx conf]# vim nginx.conf

location /status {

stub_status on;

auth_basic_user_file "/usr/local/nginx/conf/.user_auth_file";

}

//ngint -t 测试配置文件并重载配置文件

[root@nginx conf]# nginx -t

nginx: the configuration file /usr/local/nginx/conf/nginx.conf syntax is ok

nginx: configuration file /usr/local/nginx/conf/nginx.conf test is successful

[root@nginx conf]# nginx -s reload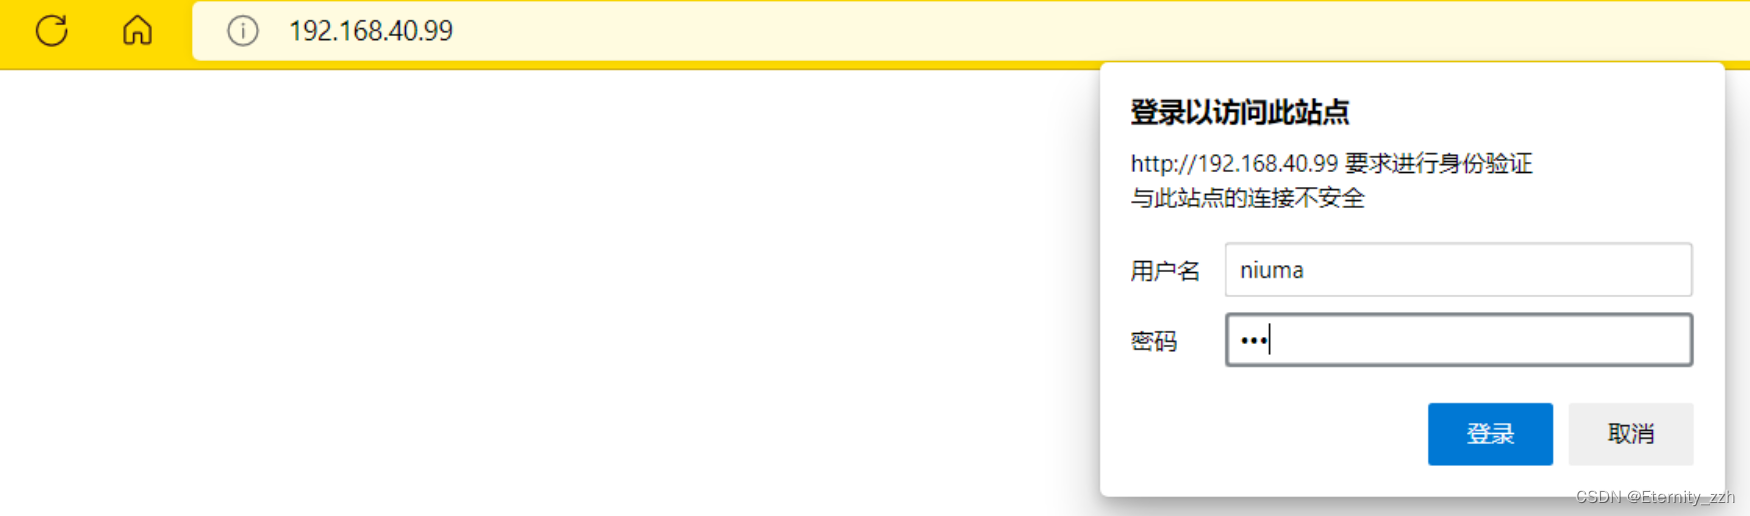
https配置
在CA服务器中生成一对密钥
[root@CA ~]# mkdir -p /etc/pki/CA/private

[root@CA ~]# cd /etc/pki/CA/

[root@CA CA]# (umask 077;openssl genrsa -out private/cakey.pem 2048)

Generating RSA private key, 2048 bit long modulus (2 primes)

..............................................................................................+++++

.........................+++++

e is 65537 (0x010001)

[root@CA CA]# openssl rsa -in private/cakey.pem -pubout

writing RSA key

-----BEGIN PUBLIC KEY-----

MIIBIjANBgkqhkiG9w0BAQEFAAOCAQ8AMIIBCgKCAQEAmrSDCcbCEyJDjFxSznWh

JzbqYQxcrlXGLjFHQ1vhBZUUGllVVcUQVZ1civMAV/ORBVBiLe22BiucuxIkvdvg

Ge9wPXJN1i1xIak5kFMtkhKwjGREo7Jeh6dlUtqxhVMpq9V8qx/qTS93FxGwNBv5

eSiUkMHrClpCmYkpjFMX+V57jurSlqB38XJYa+pBxNuerQ/RHiJjAaMfLXucc3aZ

pZ/F5s6Hjqrvh2EmP06vJaPAyVwAtAlpsbityoBzE5SAF/3SitE7L0QuTl1fRwaB

1oZ2UUBKrryojHXfRBgNy7900tUT65OD3ZFVwKFwtlJMINd3GM1oFBl/oXBmZONm

GQIDAQAB

-----END PUBLIC KEY-----

[root@CA CA]# openssl req -new -x509 -key private/cakey.pem -out cacert.pem -days 1024

You are about to be asked to enter information that will be incorporated

into your certificate request.

What you are about to enter is what is called a Distinguished Name or a DN.

There are quite a few fields but you can leave some blank

For some fields there will be a default value,

If you enter '.', the field will be left blank.

-----

Country Name (2 letter code) [XX]:CN

State or Province Name (full name) []:HB

Locality Name (eg, city) [Default City]:WH

Organization Name (eg, company) [Default Company Ltd]:haha

Organizational Unit Name (eg, section) []:linux

Common Name (eg, your name or your server's hostname) []:sb

Email Address []:sb@example.com

[root@CA CA]#

//在nginix中生成证书签署请求,发送给CA

[root@nginx nginx]# (umask 077;openssl genrsa -out httpd.key 2048)

Generating RSA private key, 2048 bit long modulus (2 primes)

.....................................................................+++++

.........................+++++

e is 65537 (0x010001)

[root@nginx nginx]# openssl req -new -key httpd.key -days 1024 -out httpd.csr

Ignoring -days; not generating a certificate

You are about to be asked to enter information that will be incorporated

into your certificate request.

What you are about to enter is what is called a Distinguished Name or a DN.

There are quite a few fields but you can leave some blank

For some fields there will be a default value,

If you enter '.', the field will be left blank.

-----

Country Name (2 letter code) [XX]:CN

State or Province Name (full name) []:HB

Locality Name (eg, city) [Default City]:WH

Organization Name (eg, company) [Default Company Ltd]:haha

Organizational Unit Name (eg, section) []:linux

Common Name (eg, your name or your server's hostname) []:sb

Email Address []:sb@example.com


Please enter the following 'extra' attributes

to be sent with your certificate request

A challenge password []:

An optional company name []:

[root@nginx nginx]# scp httpd.csr ssh root@192.168.40.100:/etc/pki/CA

//在CA主机中查看

[root@CA CA]# ls

cacert.pem httpd.csr private

//CA签署证书并发送给NGINX

[root@CA CA]# mkdir /etc/pki/CA/newcerts

[root@CA CA]# touch /etc/pki/CA/index.txt

[root@CA CA]# echo "01" > /etc/pki/CA/serial

[root@CA CA]# openssl ca -in httpd.csr -out httpd.crt -days 1024

Using configuration from /etc/pki/tls/openssl.cnf

Check that the request matches the signature

Signature ok

Certificate Details:

Serial Number: 1 (0x1)

Validity

Not Before: Oct 13 07:44:10 2022 GMT

Not After : Aug 2 07:44:10 2025 GMT

Subject:

countryName = CN

stateOrProvinceName = HB

organizationName = haha

organizationalUnitName = linux

commonName = sb

emailAddress = sb@example.com

X509v3 extensions:

X509v3 Basic Constraints:

CA:FALSE

Netscape Comment:

OpenSSL Generated Certificate

X509v3 Subject Key Identifier:

5B:E0:3F:65:4F:C2:54:FF:ED:50:DE:27:2B:39:B0:BD:69:9F:77:54

X509v3 Authority Key Identifier:

keyid:13:AF:1A:7A:A5:AF:6E:83:FD:99:91:07:6B:46:AD:A3:7C:1D:F6:50


Certificate is to be certified until Aug 2 07:44:10 2025 GMT (1024 days)

Sign the certificate? [y/n]:y


1 out of 1 certificate requests certified, commit? [y/n]y

Write out database with 1 new entries

Data Base Updated

[root@CA CA]# ls

cacert.pem httpd.csr index.txt.attr newcerts serial

httpd.crt index.txt index.txt.old private serial.old

//将CA签署的证书httpd.crt和服务器的证书cacert.pem发送给nginx

[root@CA CA]# cp httpd.crt root@192.168.40.99:/usr/local/nginx/conf/

[root@CA private]# scp /etc/pki/CA/cacert.pem root@192.168.40.99:/usr/local/nginx/conf/

//nginx配置https

[root@nginx ~]# vim /usr/local/nginx/conf/nginx.conf

server {

listen 443 ssl;

server_name localhost;

ssl_certificate httpd.crt;

ssl_certificate_key httpd.key;

ssl_session_cache shared:SSL:1m;

ssl_session_timeout 5m;

ssl_ciphers HIGH:!aNULL:!MD5;

ssl_prefer_server_ciphers on;


location / {

root html;

index index.html index.htm;

}

//nginx -t 测试配置文件

[root@nginx conf]# nginx -t

nginx: the configuration file /usr/local/nginx/conf/nginx.conf syntax is ok

nginx: configuration file /usr/local/nginx/conf/nginx.conf test is successful

//编辑测试网页,重载服务,验证

[root@nginx conf]# cd /usr/local/nginx/html/

[root@nginx html]# echo "hello,my name is sb niahao" > index.html

[root@nginx html]# nginx -s reload
最后
以上就是复杂金针菇最近收集整理的关于nginx进阶nginx进阶的全部内容,更多相关nginx进阶nginx进阶内容请搜索靠谱客的其他文章。
本图文内容来源于网友提供,作为学习参考使用,或来自网络收集整理,版权属于原作者所有。


发表评论 取消回复