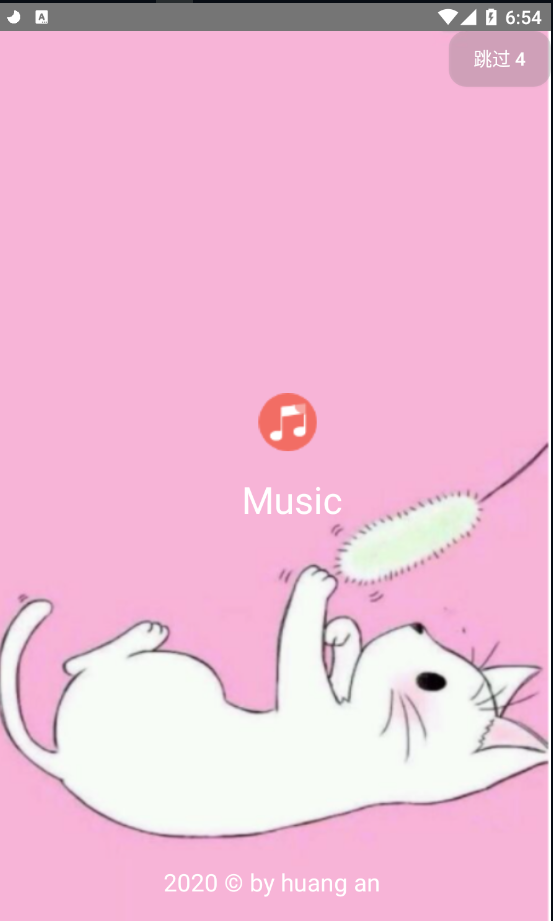
先上一个实现效果:

我这个人很讨厌那种直接贴代码的,不给解释的(害人害己,贴代码不解释跟没贴没有区别)
1.我们来讲下思路
我们要实现倒计时启动页,然后进入到我们的主页面。
首先肯定是要准备一个启动Activity,我们命名为 StartActivity,并且你要把它设置成主Activity,方法是在mainfest.xml文件中
<activity android:name=".Activity.StartActivity">
            <intent-filter>
                <action android:name="android.intent.action.MAIN" />
                <category android:name="android.intent.category.LAUNCHER" />
            </intent-filter>
        </activity>
然后一个Activity自然要有layout布局。
我们来分析下这个布局:
布局包括一个背景图片,一个倒计时框,一个动态数字
******背景图片的设置方法很简单,直接设置在最外层布局中。
<?xml version="1.0" encoding="utf-8"?>
<RelativeLayout xmlns:android="http://schemas.android.com/apk/res/android"
    android:id="@+id/lin"
    xmlns:app="http://schemas.android.com/apk/res-auto"
    android:layout_width="match_parent"
    android:layout_height="match_parent"
    android:background="@drawable/start_fengmian">
其中: android:background="@drawable/start_fengmian">
这句是设置背景图片的方法,图片改成你自己的就行。
********倒计时框
我们实现的原理是使用按钮,然后设置按钮的样式,为透明背景色,圆角边框,用按钮还有一个有点是,可以直接设置点击功能,然后往里面写点击跳过代码。
<Button
        android:id="@+id/start_tiaoguo_bt"
        android:layout_width="wrap_content"
        android:layout_height="wrap_content"
        android:layout_alignParentRight="true"
        android:background="@drawable/start_bt_tiaoguo"
        android:textColor="@color/white"
        android:text="跳过"/>
****倒计时的数字
这个数字我们利用动态设置来设置,因为xml是静态的,所以不可能写在xml里面。
我们这部分写在代码里,也就是activity里。
怎么让数字自己动呢?
我这里使用了 自定义 一个子线程的方法,设置一个时间,然后利用handle更新ui。不会用子线程的多看看书(这个我也不知道怎么解释)
另外记住子线程无法更新ui。
StartActivity完整代码:
class StartActivity : AppCompatActivity() {
    //跳转 的时间线程
    var thread: timeThread? = null
    //使用handle
    val MSG = 1
    val handler = @SuppressLint("HandlerLeak")
    object : Handler() {
        override fun handleMessage(msg: Message) {
            //进行ui操作
            when (msg.what) {
                MSG -> {
                    start_tiaoguo_bt.setText("跳过 " + msg.arg1)
                    if (msg.arg1 <= 0) {
                        //先销毁欢迎界面
                        finish()
                        //去登录界面
                        val intent = Intent(this@StartActivity, LoginActivity::class.java)
                        startActivity(intent)
                    }
                }
            }
        }
    }

    // 自定义的线程---控制倒计时
    inner class timeThread : Thread() {
        override fun run() {
            var i = 5
            while (i >= 0) {
                var msg = Message()
                msg.what = MSG
                //把倒计时传过去
                msg.arg1 = i
                //倒计时
                //发送
                handler.sendMessage(msg)
                i--
                try {
                    // 每1000毫秒更新一次位置
                    sleep(1000)
                    //播放进度
                } catch (e: Exception) {
                    // e.printStackTrace()
                    break
                }
            }
        }
    }

    override fun onCreate(savedInstanceState: Bundle?) {
        super.onCreate(savedInstanceState)
        setContentView(R.layout.activity_start)

        //开启倒计时线程
        if (thread == null) {
            thread = timeThread()
            thread?.start()
            /* Log.d("Thread", "startThread()....")*/
        }
        start_tiaoguo_bt.setOnClickListener {
            if (thread != null) {
                thread?.interrupt()
                thread = null
            }
            //销毁欢迎界面
            finish()
            //去登录界面
            val intent = Intent(this, LoginActivity::class.java)
            startActivity(intent)
        }
    }
}
l布局文件:
<RelativeLayout xmlns:android="http://schemas.android.com/apk/res/android"
    android:id="@+id/lin"
    xmlns:app="http://schemas.android.com/apk/res-auto"
    android:layout_width="match_parent"
    android:layout_height="match_parent"
    android:background="@drawable/start_fengmian">

    <!--  整体是一个线性布局,里面包括applogo,和输入框,还有登录注册按钮-->
    <!--这个包含在最外面相对布局里的版权声明-->

    <Button
        android:id="@+id/start_tiaoguo_bt"
        android:layout_width="wrap_content"
        android:layout_height="wrap_content"
        android:layout_alignParentRight="true"
        android:background="@drawable/start_bt_tiaoguo"
        android:textColor="@color/white"
        android:text="跳过"/>
    <androidx.constraintlayout.widget.ConstraintLayout
        android:layout_width="match_parent"
        android:layout_height="291dp"
        android:layout_centerInParent="true"
        android:gravity="center_horizontal">

        <TextView
            android:id="@+id/start_app_name"
            android:layout_width="wrap_content"
            android:layout_height="40dp"
            android:layout_marginBottom="112dp"
            android:gravity="center_vertical"
            android:text="@string/login_title"
            android:textColor="#ffffff"
            android:textSize="28sp"
            app:layout_constraintBottom_toBottomOf="parent"
            app:layout_constraintEnd_toEndOf="parent"
            app:layout_constraintHorizontal_bias="0.544"
            app:layout_constraintStart_toStartOf="parent" />

        <ImageView
            android:id="@+id/start_logo"
            android:layout_width="60dp"
            android:layout_height="50dp"
            android:layout_above="@+id/start_app_name"
            android:src="@drawable/music"
            app:layout_constraintBottom_toTopOf="@+id/start_app_name"
            app:layout_constraintEnd_toEndOf="parent"
            app:layout_constraintHorizontal_bias="0.532"
            app:layout_constraintStart_toStartOf="parent"
            app:layout_constraintTop_toTopOf="parent"
            app:layout_constraintVertical_bias="0.776" />

    </androidx.constraintlayout.widget.ConstraintLayout>

    <TextView
        android:layout_width="match_parent"
        android:layout_height="wrap_content"
        android:textSize="18sp"
        android:textColor="@color/white"
        android:gravity="center_horizontal"
        android:layout_alignParentBottom="true"
        android:layout_marginBottom="30dp"
        android:text="@string/copyright_information"/>

</RelativeLayout>
我们说一下这个按钮,按钮的样式怎么设置呢。
在drawable目录下,新建一个start_bt_tiaoguo.xml(反正名字自己定义)
然后android:background="@drawable/start_bt_tiaoguo"
这一行去引用这个自定义的样式。
我现在把这个样式贴出来:
<shape
    xmlns:android="http://schemas.android.com/apk/res/android"
    android:shape="rectangle">
    <!-- 填充的颜色 -->
    <solid android:color= "@color/tou_ming_hui" />
    <!-- android:radius 弧形的半径 -->
    <!-- 设置按钮的四个角为弧形 -->
    <corners
        android:radius="15dip" />
    **设置文字padding**
    <!-- padding:Button里面的文字与Button边界的间隔 -->
    <padding
        android:left="6dp"
        android:top="6dp"
        android:right="6dp"
        android:bottom="6dp"
        />
</shape>
已经写的很详细了,源码全给了。还有不懂得可以留言问。
希望对你们有帮助!
最后
以上就是着急奇迹最近收集整理的关于安卓使用kotlin语言写一个启动页面(倒计时+跳过)+详解解说的全部内容,更多相关安卓使用kotlin语言写一个启动页面(倒计时+跳过)+详解解说内容请搜索靠谱客的其他文章。


发表评论 取消回复