新建 RabbitMQProducer项目后,添加依赖
<dependency>
        <groupId>org.springframework.boot</groupId>
        <artifactId>spring-boot-starter-amqp</artifactId>
        <version>2.1.4.RELEASE</version>
    </dependency>
添加配置类 MQConfig
import org.springframework.amqp.core.Exchange;
import org.springframework.amqp.core.Queue;
import org.springframework.amqp.core.TopicExchange;
import org.springframework.amqp.rabbit.connection.CachingConnectionFactory;
import org.springframework.amqp.rabbit.connection.ConnectionFactory;
import org.springframework.context.annotation.Bean;
import org.springframework.context.annotation.Configuration;

@Configuration
public class MQConfig {
//    @Bean
//    public ConnectionFactory connectionFactory(){
//        return new CachingConnectionFactory();
//    }
//
//    @Bean
//    public RabbitAdmin rabbitAdmin(){
//        return new RabbitAdmin(connectionFactory());
//    }
    @Bean
    public Exchange bootExchange(){
        return new TopicExchange("BOOT-EXCHANGE-1", true, false);
    }

    @Bean
    public Queue bootQueue(){
        return new Queue("boot.queue1", true);
    }


}
添加po类 user
import java.io.Serializable;

public class User implements Serializable{

		/**
	 *
	 */
	private static final long serialVersionUID = 1L;
		private String userName;
		private String password;
		public User(String userName, String password) {
			super();
			this.userName = userName;
			this.password = password;
		}
		public String getUserName() {
			return userName;
		}
		public void setUserName(String userName) {
			this.userName = userName;
		}
		public String getPassword() {
			return password;
		}
		public void setPassword(String password) {
			this.password = password;
		}
		@Override
		public String toString() {
			return "User [userName=" + userName + ", password=" + password + "]";
		}


}
添加发送类 MQSender
import org.springframework.amqp.core.Message;
import org.springframework.amqp.core.MessageProperties;
import org.springframework.amqp.rabbit.connection.CorrelationData;
import org.springframework.amqp.rabbit.core.RabbitTemplate;
import org.springframework.beans.factory.annotation.Autowired;
import org.springframework.stereotype.Component;

import cn.syf.rabbitmq.po.User;

import java.util.Date;
import java.util.Map;

@Component
public class MQSender {

    @Autowired
    private RabbitTemplate rabbitTemplate;

    final RabbitTemplate.ConfirmCallback confirmCallback= new RabbitTemplate.ConfirmCallback() {

        public void confirm(CorrelationData correlationData, boolean ack, String cause) {
            System.out.println("correlationData: " + correlationData);
            System.out.println("ack: " + ack);
            if(!ack){
                System.out.println("异常处理....");
            }
        }

    };

    final RabbitTemplate.ReturnCallback returnCallback = new RabbitTemplate.ReturnCallback() {

        public void returnedMessage(Message message, int replyCode, String replyText, String exchange, String routingKey) {
            System.out.println("return exchange: " + exchange + ", routingKey: "
                    + routingKey + ", replyCode: " + replyCode + ", replyText: " + replyText);
        }
    };

    //发送消息方法调用: 构建Message消息
    public void send(Object message, Map<String, Object> properties) throws Exception {
        MessageProperties mp = new MessageProperties();
        //在生产环境中这里不用Message,而是使用 fastJson 等工具将对象转换为 json 格式发送
        Message msg = new Message(message.toString().getBytes(),mp);
        rabbitTemplate.setMandatory(true);
        rabbitTemplate.setConfirmCallback(confirmCallback);
        rabbitTemplate.setReturnCallback(returnCallback);
        //id + 时间戳 全局唯一
        CorrelationData correlationData = new CorrelationData("1234567890"+new Date());
        rabbitTemplate.convertAndSend("BOOT-EXCHANGE-1", "boot.save", msg, correlationData);
    }
    //发送消息方法调用: 构建Message消息
    public void sendUser(User user) throws Exception {
        rabbitTemplate.setMandatory(true);
        rabbitTemplate.setConfirmCallback(confirmCallback);
        rabbitTemplate.setReturnCallback(returnCallback);
        //id + 时间戳 全局唯一
        CorrelationData correlationData = new CorrelationData("1234567890"+new Date());
        rabbitTemplate.convertAndSend("BOOT-EXCHANGE-1", "boot.save", user, correlationData);
    }
}
用单元测试来测试
import org.junit.Test;
import org.junit.runner.RunWith;
import org.springframework.beans.factory.annotation.Autowired;
import org.springframework.boot.test.context.SpringBootTest;
import org.springframework.test.context.junit4.SpringRunner;

import cn.syf.rabbitmq.po.User;
import cn.syf.rabbitmq.sender.MQSender;

@RunWith(SpringRunner.class)
@SpringBootTest
public class RabbitMqApplicationTests {

	@Autowired
    private MQSender mqSender;

	@Test
	public void contextLoads() {
		String msg = "hello spring boot";
        try {
            for (int i = 0; i < 15; i++) {
                try {
                    Thread.sleep(1000);
                } catch (InterruptedException e) {
                    e.printStackTrace();
                }
                //mqSender.send(msg + ":" + i, null);
                mqSender.sendUser(new User("anqi", "25"));
            }
        } catch (Exception e) {
            e.printStackTrace();
        }
	}

}
生产者配置信息:
spring.rabbitmq.host=localhost
spring.rabbitmq.port=5672
spring.rabbitmq.username=admin
spring.rabbitmq.password=123456
spring.rabbitmq.virtual-host=admin
spring.rabbitmq.connection-timeout=15000

#开启 confirm 确认机制
spring.rabbitmq.publisher-confirms=true
#开启 return 确认机制
spring.rabbitmq.publisher-returns=true
#设置为 true 后 消费者在消息没有被路由到合适队列情况下会被return监听,而不会自动删除
spring.rabbitmq.template.mandatory=true
生产者项目已经写好了,接下来写消费者项目RabbitMQConsumer
添加跟上个项目一样的依赖 添加一样的po类,这里就不copy代码了,
添加接收类MQReceiver
import com.rabbitmq.client.Channel;

import cn.syf.rabbitmq.po.User;

import org.springframework.amqp.core.Message;
import org.springframework.amqp.rabbit.annotation.*;
import org.springframework.amqp.support.AmqpHeaders;
import org.springframework.messaging.handler.annotation.Headers;
import org.springframework.messaging.handler.annotation.Payload;
import org.springframework.stereotype.Component;

import java.io.IOException;
import java.util.Map;

@RabbitListener(bindings = @QueueBinding(value = @Queue(value = "boot.queue1", durable = "true"), exchange = @Exchange(value = "BOOT-EXCHANGE-1", type = "topic", durable = "true", ignoreDeclarationExceptions = "true"), key = "boot.*"))
@Component
public class MQReceiver {

	@RabbitHandler
	public void onMessage(Message message, Channel channel) throws IOException {

		try {
			Thread.sleep(5000);
		} catch (InterruptedException e) {
			e.printStackTrace();
		}
		long deliveryTag = message.getMessageProperties().getDeliveryTag();
		// 手工ack
		channel.basicAck(deliveryTag, true);
		System.out.println("receive--1: " + new String(message.getBody()));
	}

	@RabbitHandler
	public void onUserMessage(@Payload User user, Channel channel, @Headers Map<String, Object> headers)
			throws IOException {

		try {
			Thread.sleep(5000);
		} catch (InterruptedException e) {
			e.printStackTrace();
		}

		long deliveryTag = (Long) headers.get(AmqpHeaders.DELIVERY_TAG);
		// 手工ack
		channel.basicAck(deliveryTag, true);
		System.out.println("receive--11: " + user.toString());
	}

}
消费者配置信息:
spring.rabbitmq.host=localhost
spring.rabbitmq.virtual-host=admin
spring.rabbitmq.username=admin
spring.rabbitmq.password=123456


#设置消费端手动 ack
spring.rabbitmq.listener.simple.acknowledge-mode=manual
#消费者最小数量
spring.rabbitmq.listener.simple.concurrency=1
#消费之最大数量
spring.rabbitmq.listener.simple.max-concurrency=10

#在单个请求中处理的消息个数,他应该大于等于事务数量(unack的最大数量)
spring.rabbitmq.listener.simple.prefetch=2
接来了先运行消费者项目,再运行生产者单元测试方法,在rabbitMQ manager 就会看到
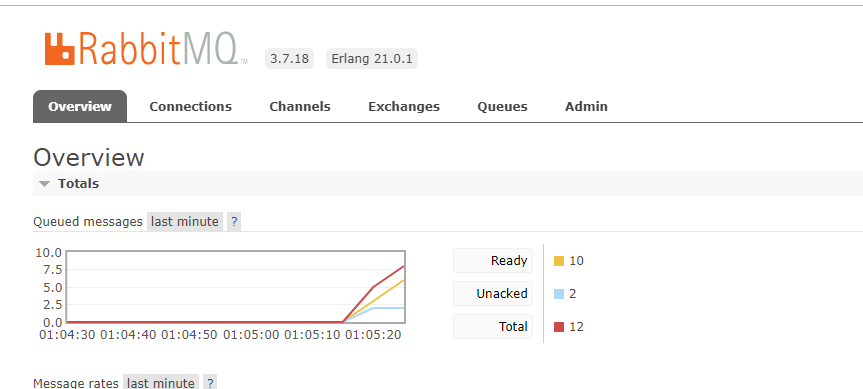
我们看到Unacked始终都是2,在完成中的消息队列只有2个,达到了我们期待的效果,限流的目的已经实现。
最后
以上就是发嗲大门最近收集整理的关于springboot + rabbitMQ 消费端限流限流的全部内容,更多相关springboot内容请搜索靠谱客的其他文章。
本图文内容来源于网友提供,作为学习参考使用,或来自网络收集整理,版权属于原作者所有。


发表评论 取消回复