iOS10 本地通知使用了新的注册方法,需要根据iOS版本进行判断了。
appDelegate.m
#import <UserNotifications/UserNotifications.h>
@interface AppDelegate ()<UNUserNotificationCenterDelegate>
  @property(nonatomic) NSInteger badge;
@end

- (BOOL)application:(UIApplication *)application didFinishLaunchingWithOptions:(NSDictionary *)launchOptions {


    if ([[UIDevice currentDevice] systemVersion].floatValue >= 10.0) {
        UNUserNotificationCenter *center = [UNUserNotificationCenter currentNotificationCenter];
        center.delegate = self;
        [center requestAuthorizationWithOptions:(UNAuthorizationOptionBadge | UNAuthorizationOptionSound | UNAuthorizationOptionAlert) completionHandler:^(BOOL granted, NSError * _Nullable error) {
            if (granted) {
                //点击允许
                NSLog(@"注册通知成功");
                [center getNotificationSettingsWithCompletionHandler:^(UNNotificationSettings * _Nonnull settings) {
                    [self registerNotification:1];
                }];
            } else {
                //点击不允许
                NSLog(@"注册通知失败");
            }
        }];
        //注册推送(同iOS8)
        [[UIApplication sharedApplication] registerForRemoteNotifications];

    }
    else if([[UIDevice currentDevice] systemVersion].floatValue < 10.0 &&[[UIDevice currentDevice] systemVersion].floatValue >= 8.0){//iOS8到iOS10

        //1.创建消息上面要添加的动作(按钮的形式显示出来)
        UIMutableUserNotificationAction *action = [[UIMutableUserNotificationAction alloc] init];
        action.identifier = @"action";//按钮的标示
        action.title=@"Accept";//按钮的标题
        action.activationMode = UIUserNotificationActivationModeForeground;//当点击的时候启动程序
        //    action.authenticationRequired = YES;
        //    action.destructive = YES;

        UIMutableUserNotificationAction *action2 = [[UIMutableUserNotificationAction alloc] init];
        action2.identifier = @"action2";
        action2.title=@"Reject";
        action2.activationMode = UIUserNotificationActivationModeBackground;//当点击的时候不启动程序,在后台处理
        action.authenticationRequired = YES;//需要解锁才能处理,如果action.activationMode = UIUserNotificationActivationModeForeground;则这个属性被忽略;
        action.destructive = YES;

        //2.创建动作(按钮)的类别集合
        UIMutableUserNotificationCategory *categorys = [[UIMutableUserNotificationCategory alloc] init];
        categorys.identifier = @"alert";//这组动作的唯一标示,推送通知的时候也是根据这个来区分
        [categorys setActions:@[action,action2] forContext:(UIUserNotificationActionContextMinimal)];

        //3.创建UIUserNotificationSettings,并设置消息的显示类类型
        if ([[UIApplication sharedApplication] respondsToSelector:@selector(registerUserNotificationSettings:)]) {
            UIUserNotificationType type =  UIUserNotificationTypeAlert | UIUserNotificationTypeBadge | UIUserNotificationTypeSound;
            UIUserNotificationSettings *settings = [UIUserNotificationSettings settingsForTypes:type categories:nil];
            [[UIApplication sharedApplication] registerUserNotificationSettings:settings];
        }
    }
    else {//iOS8以下
        [application registerForRemoteNotificationTypes: UIRemoteNotificationTypeBadge | UIRemoteNotificationTypeAlert | UIRemoteNotificationTypeSound];
    }

    return YES;
}
发送通知:
/**
* 描述 使用 UNNotification 本地通知(iOS 10)
* @param alerTime 多长时间后进行推送
**/
-(void)registerNotification:(NSInteger)alerTime
{
// 1、创建通知内容,注:这里得用可变类型的UNMutableNotificationContent,否则内容的属性是只读的
UNMutableNotificationContent *content = [[UNMutableNotificationContent alloc] init];
// 标题
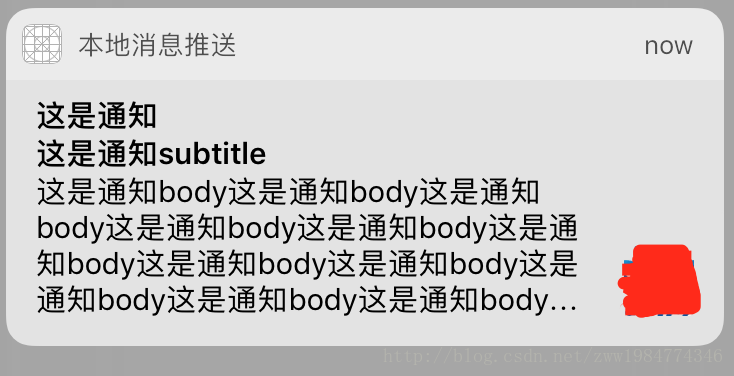
content.title = @"这是通知";
// 次标题
content.subtitle = @"这是通知subtitle";
// 内容
content.body = @"这是通知body这是通知body这是通知body这是通知body这是通知body这是通知body这是通知body这是通知body这是通知body这是通知body这是通知body这是通知body这是通知body这是通知body";
self.badge++;
// app显示通知数量的角标
content.badge = [NSNumber numberWithInteger:self.badge];
// 通知的提示声音,这里用的默认的声音
content.sound = [UNNotificationSound defaultSound];
NSURL *imageUrl = [[NSBundle mainBundle] URLForResource:@"1" withExtension:@"png"];
UNNotificationAttachment *attachment = [UNNotificationAttachment attachmentWithIdentifier:@"imageIndetifier" URL:imageUrl options:nil error:nil];
// 附件 可以是音频、图片、视频 这里是一张图片
content.attachments = @[attachment];
// 标识符
content.categoryIdentifier = @"categoryIndentifier";
// 2、创建通知触发
/* 触发器分三种:
UNTimeIntervalNotificationTrigger : 在一定时间后触发,如果设置重复的话,timeInterval不能小于60
UNCalendarNotificationTrigger : 在某天某时触发,可重复
UNLocationNotificationTrigger : 进入或离开某个地理区域时触发
*/
//UNTimeIntervalNotificationTrigger *trigger = [UNTimeIntervalNotificationTrigger triggerWithTimeInterval:60 repeats:YES];
NSDateComponents *components = [NSDateComponents new]; components.second = 2.0f;
UNCalendarNotificationTrigger *trigger = [UNCalendarNotificationTrigger triggerWithDateMatchingComponents:components repeats:YES];
// 3、创建通知请求
UNNotificationRequest *notificationRequest = [UNNotificationRequest requestWithIdentifier:@"KFGroupNotification" content:content trigger:trigger];
// 4、将请求加入通知中心
[[UNUserNotificationCenter currentNotificationCenter] addNotificationRequest:notificationRequest withCompletionHandler:^(NSError * _Nullable error) {
if (error == nil) {
NSLog(@"已成功加推送%@",notificationRequest.identifier);
}
}];
}
通知代理:
iOS10 推送代理
#pragma mark - iOS10 推送代理
- (void)userNotificationCenter:(UNUserNotificationCenter *)center willPresentNotification:(UNNotification *)notification withCompletionHandler:(void (^)(UNNotificationPresentationOptions))completionHandler {
    //应用在前台收到通知
    NSLog(@"========%@", notification);
    //如果需要在应用在前台也展示通知
    completionHandler(UNNotificationPresentationOptionBadge|UNNotificationPresentationOptionSound|UNNotificationPresentationOptionAlert);
}

// 对通知进行响应
- (void)userNotificationCenter:(UNUserNotificationCenter *)center didReceiveNotificationResponse:(UNNotificationResponse *)response withCompletionHandler:(void(^)())completionHandler {

    // 根据类别标识符处理目标反应
    if ([response.notification.request.content.categoryIdentifier isEqualToString:@"categoryIndentifier"]) {
        [self handleResponse:response];
    }
    completionHandler();
}

- (void)handleResponse:(UNNotificationResponse *)response {

    NSString *actionIndentifier = response.actionIdentifier;
    NSLog(@"%@",@"处理通知");
}
#pragma mark - iOS10 推送代理
iOS8- 10 推送代理
#pragma mark - iOS8 -  10 推送代理
- (void)application:(UIApplication *)application handleActionWithIdentifier:(NSString *)identifier forLocalNotification:(UILocalNotification *)notification completionHandler:(void (^)())completionHandler
{
    if ([identifier isEqualToString:@"XXX"]) {

    }
    completionHandler();
}

- (void)application:(UIApplication *)application handleActionWithIdentifier:(NSString *)identifier forRemoteNotification:(NSDictionary *)userInfo completionHandler:(void (^)())completionHandler
{
    NSLog(@"handleActionWithIdentifier");
}

//点击本地推送
- (void)application:(UIApplication *)application didReceiveLocalNotification:(UILocalNotification *)notification
{
    NSLog(@"didReceiveLocalNotification notification");
}

//点击远程推送
- (void)application:(UIApplication *)application didReceiveRemoteNotification:(NSDictionary *)userInfo
{
    NSLog(@"didReceiveRemoteNotification userInfo");
}
#pragma mark - iOS8-  10 推送代理
最后
以上就是壮观时光最近收集整理的关于iOS10 本地通知的全部内容,更多相关iOS10内容请搜索靠谱客的其他文章。
本图文内容来源于网友提供,作为学习参考使用,或来自网络收集整理,版权属于原作者所有。


发表评论 取消回复