1 visual studio配置C/C++编译环境
- visual studio文档:https://docs.microsoft.com/zh-cn/visualstudio/ide/?view=vs-2022
1.1 下载和安装visual studio
1.1.1 下载visual studio
1、下载visual studio安装包地址:
- https://visualstudio.microsoft.com/zh-hans/downloads/
windows可以直接下载社区版本即可(免费),专业版的要收费(可以看到右下角还提供了Visual Studio Code的下载,说明VScode还是比较好用,比较轻量化)
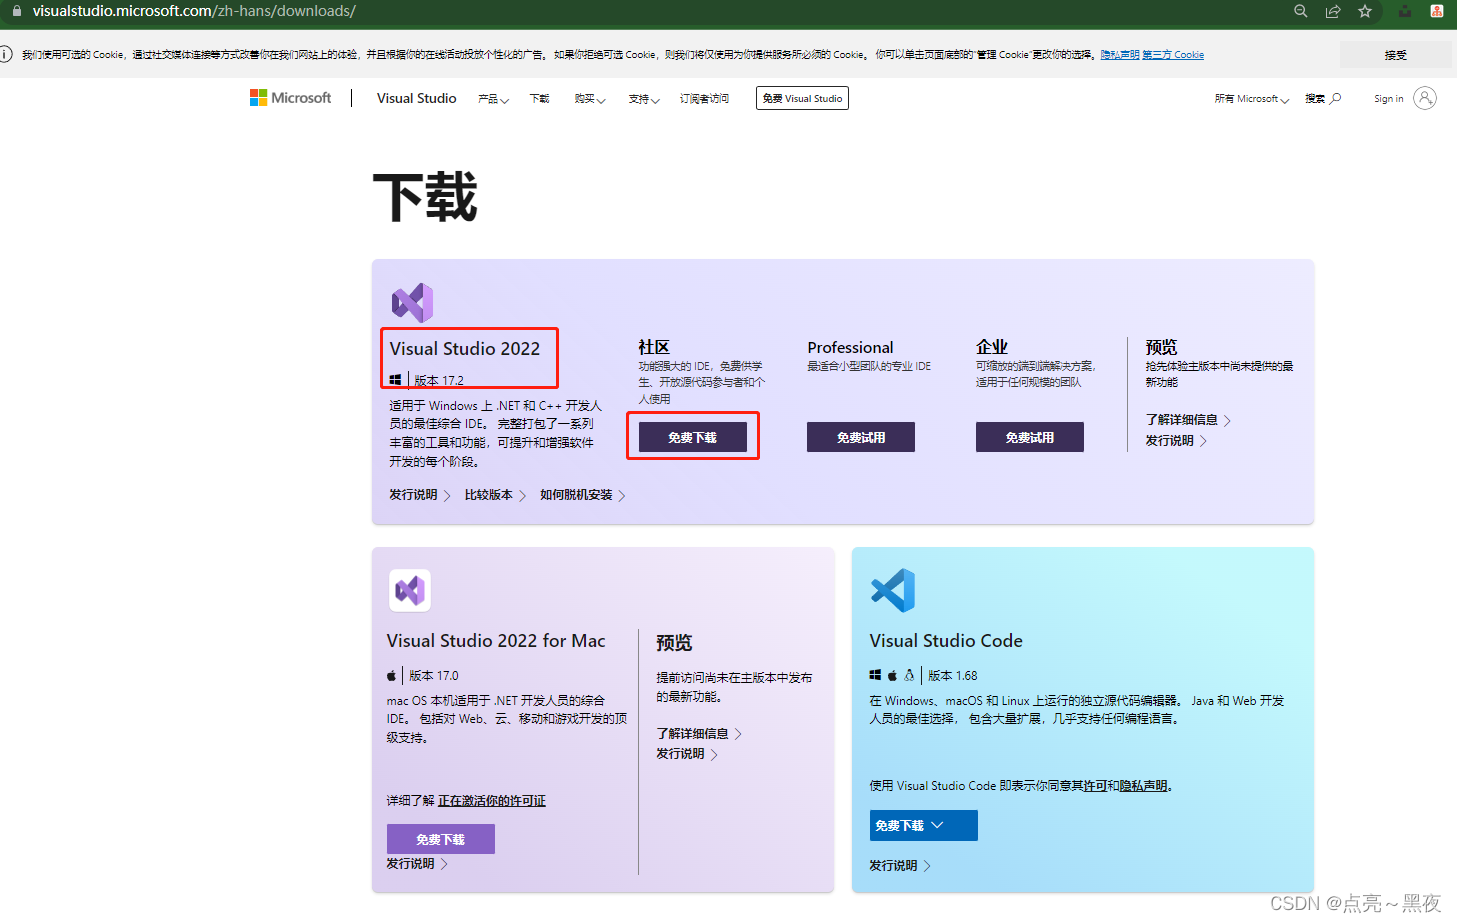
安装包下载之后,看似很小只有1.6MB,这其实只相当于是一个启动程序,后面在安装的过程中,会下载很多安装文件!

1.1.2 安装visual studio
安装visual studio可以参考官方文档:
- https://docs.microsoft.com/zh-cn/visualstudio/install/install-visual-studio?view=vs-2022
1、下载的程序直接点击安装可执行文件即可:
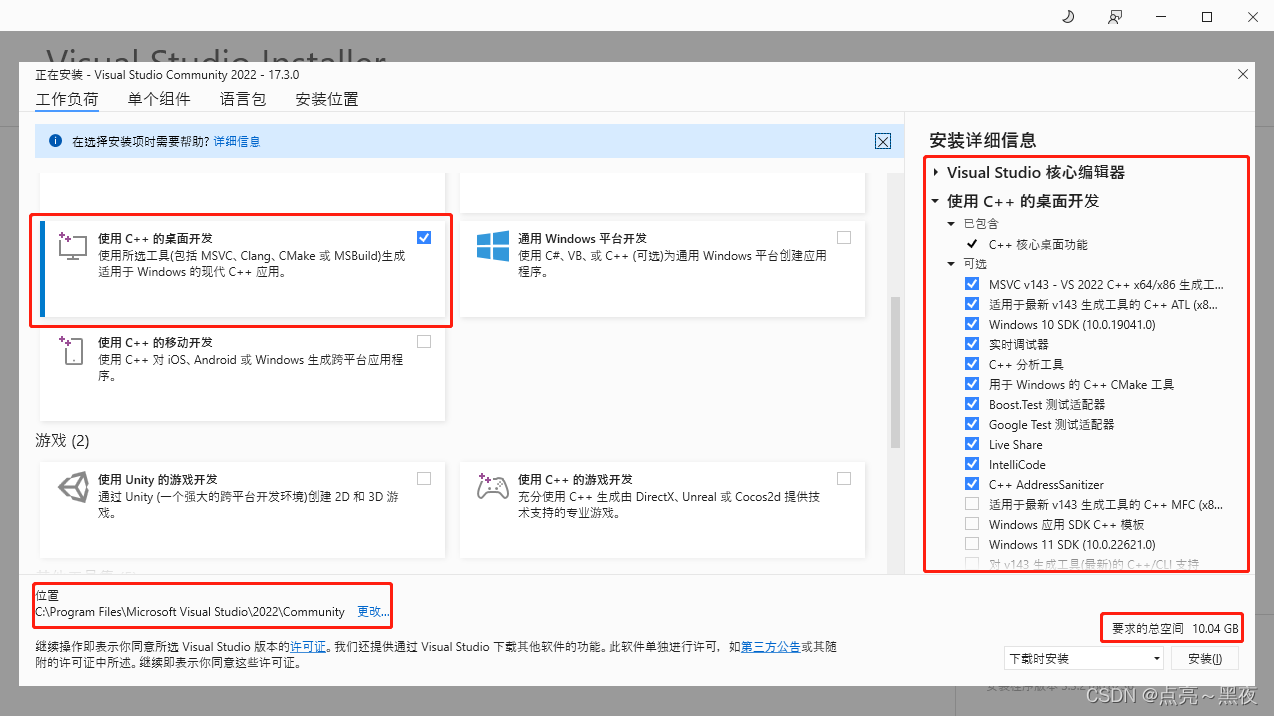
- 1)直接选择
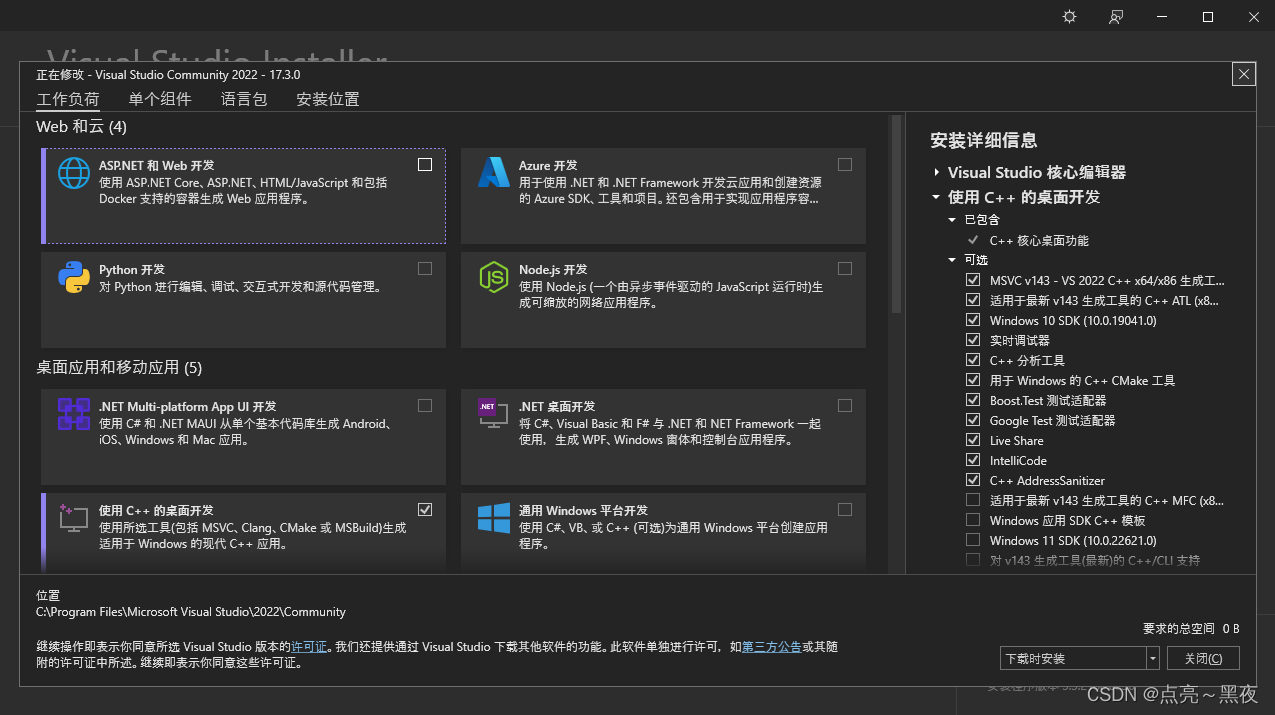
使用C++的桌面开发:如果知识进行C++的编程选用该选线即可,在右边有安装的选项的详细信息,如果其他的不需要建议不要勾选,可以看到我的安装要求空间大小已经占用10.04GB了! - 2)安装位置也可以修改,建议使用默认
从下面的界面可以看到,你还可以设置一些其他的选项:
- 工作负荷
- 单个组件
- 语言包(这里选择
中文简体) - 安装路径
2、更过关于选线的介绍可以参考官方文档
- https://visualstudio.microsoft.com/zh-hans/vs/getting-started/

3、默认的安装位置:
- visual studio IDE:
C:Program FilesMicrosoft Visual Studio2022Community4.57GB - 下载缓存:
C:ProgramDataMicrosoftVisualStudioPackages2.29GB - 共享组件、工具和SDK:
C:Program Files (x86)Microsoft Visual StudioShared1.75GB
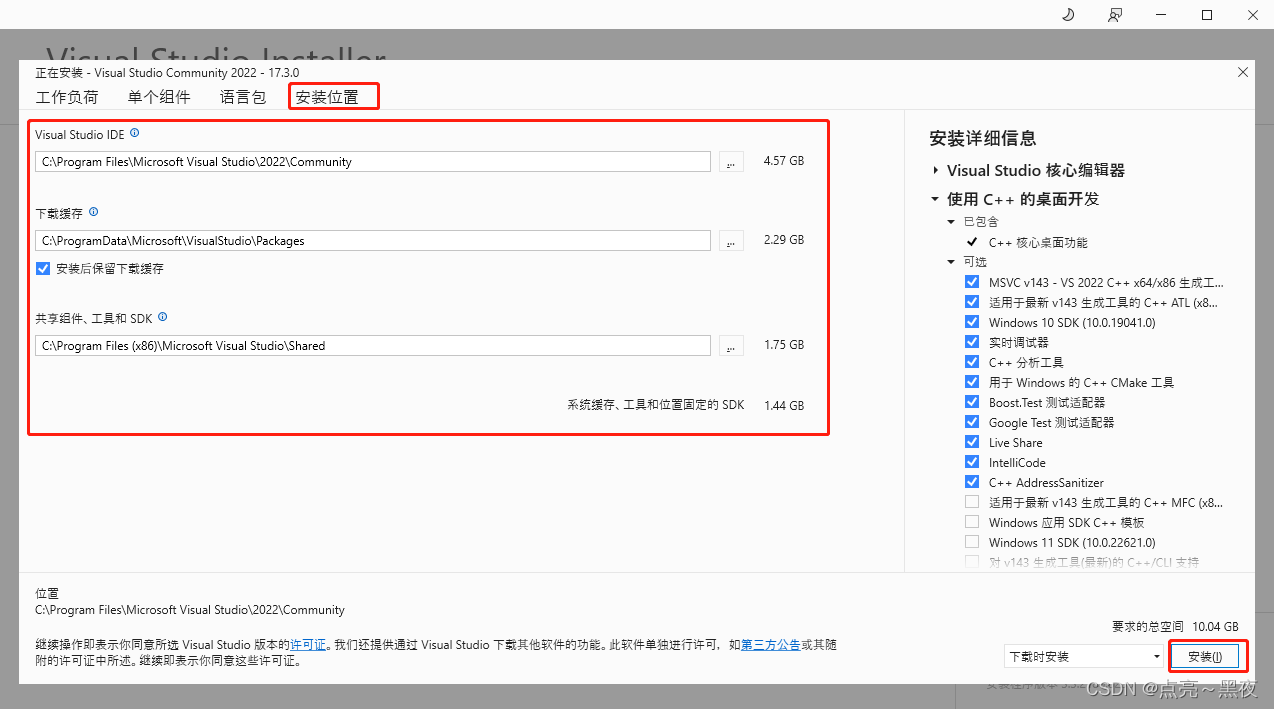
安装的过程时间比较长,耐心等待吧(我的网速感人)
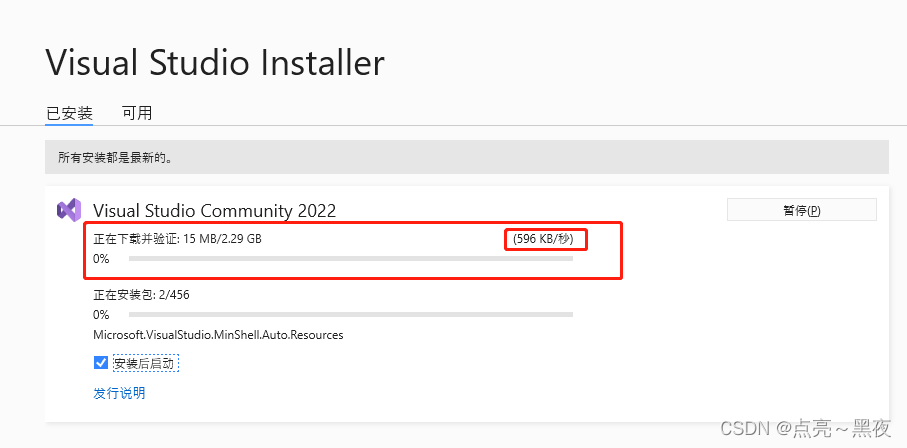
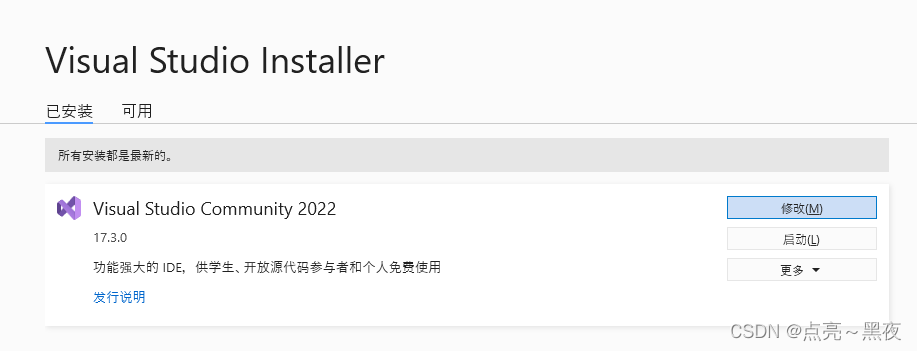
安装好如下图,此时还可以点击修改继续选择安装其它模块组件功能扩展包
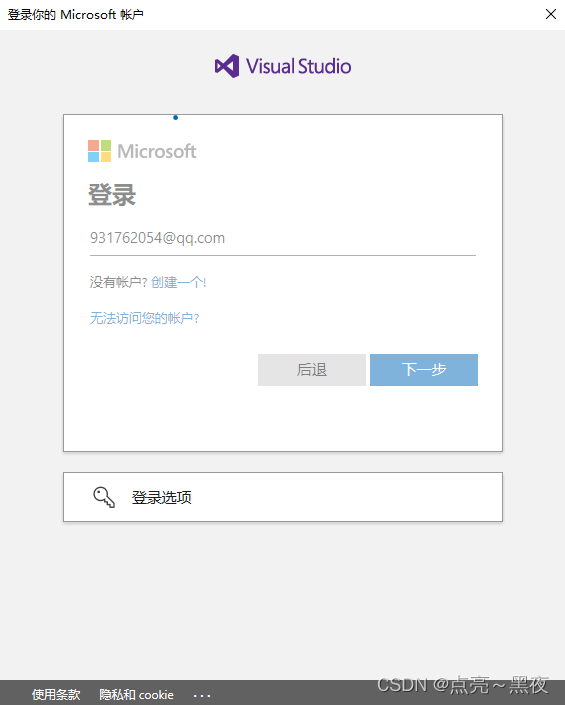
4、安装好之后可能需要登录,使用微软账号登录就可以,登录比较慢,这里选择暂时跳过此项

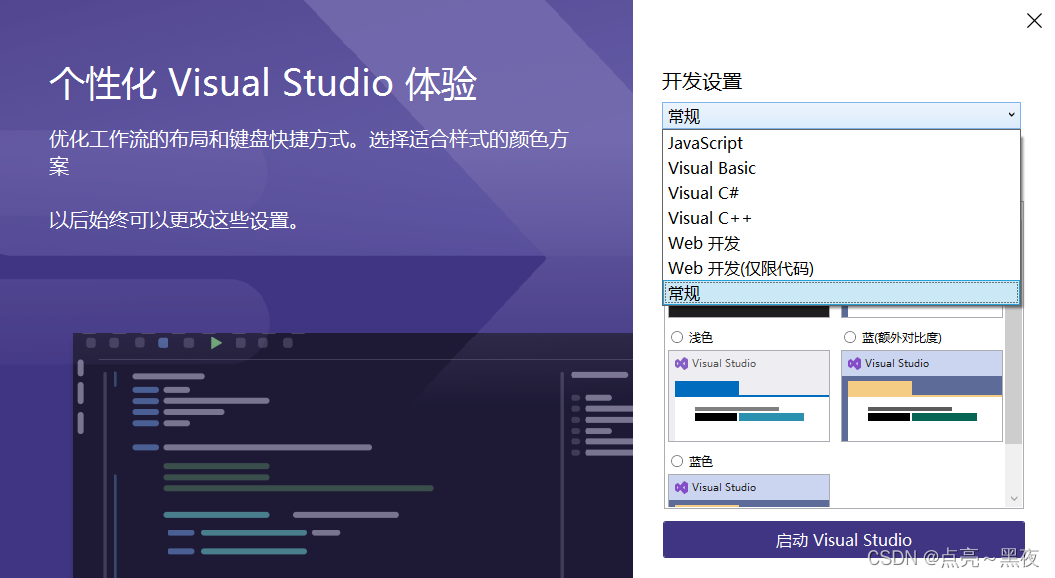
5、然后设置界面风格等就可以打开了
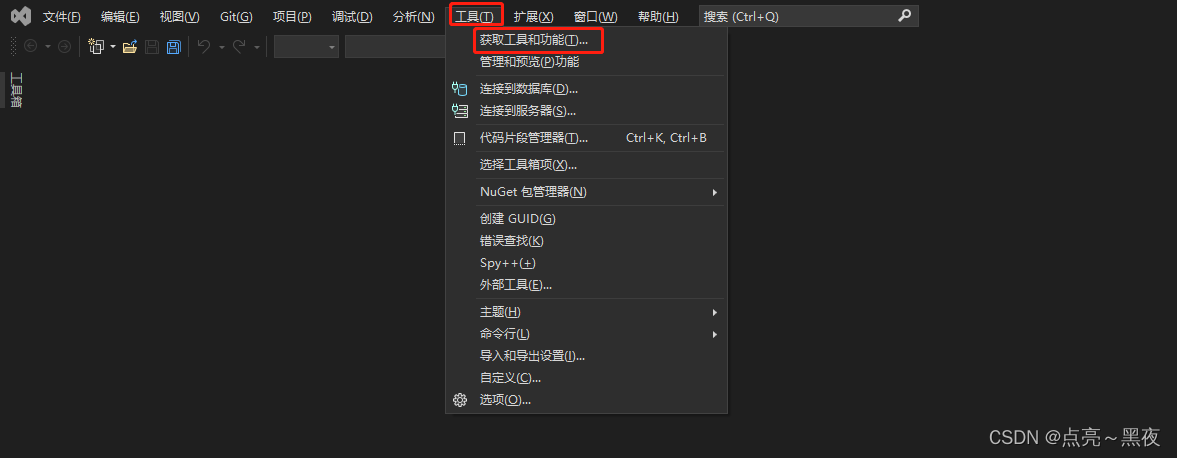
1.1.3 visual studio按照之后,如何添加其它模块组件功能扩展包
如果我们的visual studio已经安装好之后,后面又想要添加其他的组件和功能扩展包,应该如何添加安装呢
1、在工具-获取工具和功能,点开即可看到和我们安装时一样的组件选择界面,选择对应的组件安装即可!(参考)
1.1.4 visual studio 创建C++示例程序
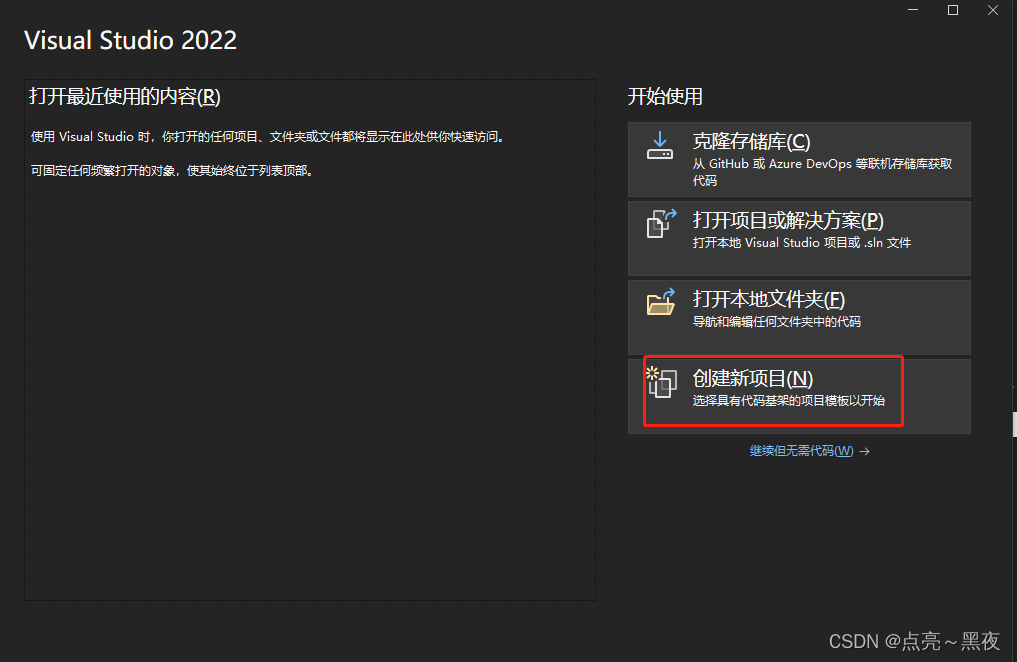
1、点击文件-新建-项目 或者直接按快捷键Ctrl+Shift+N 打开新建项目页面

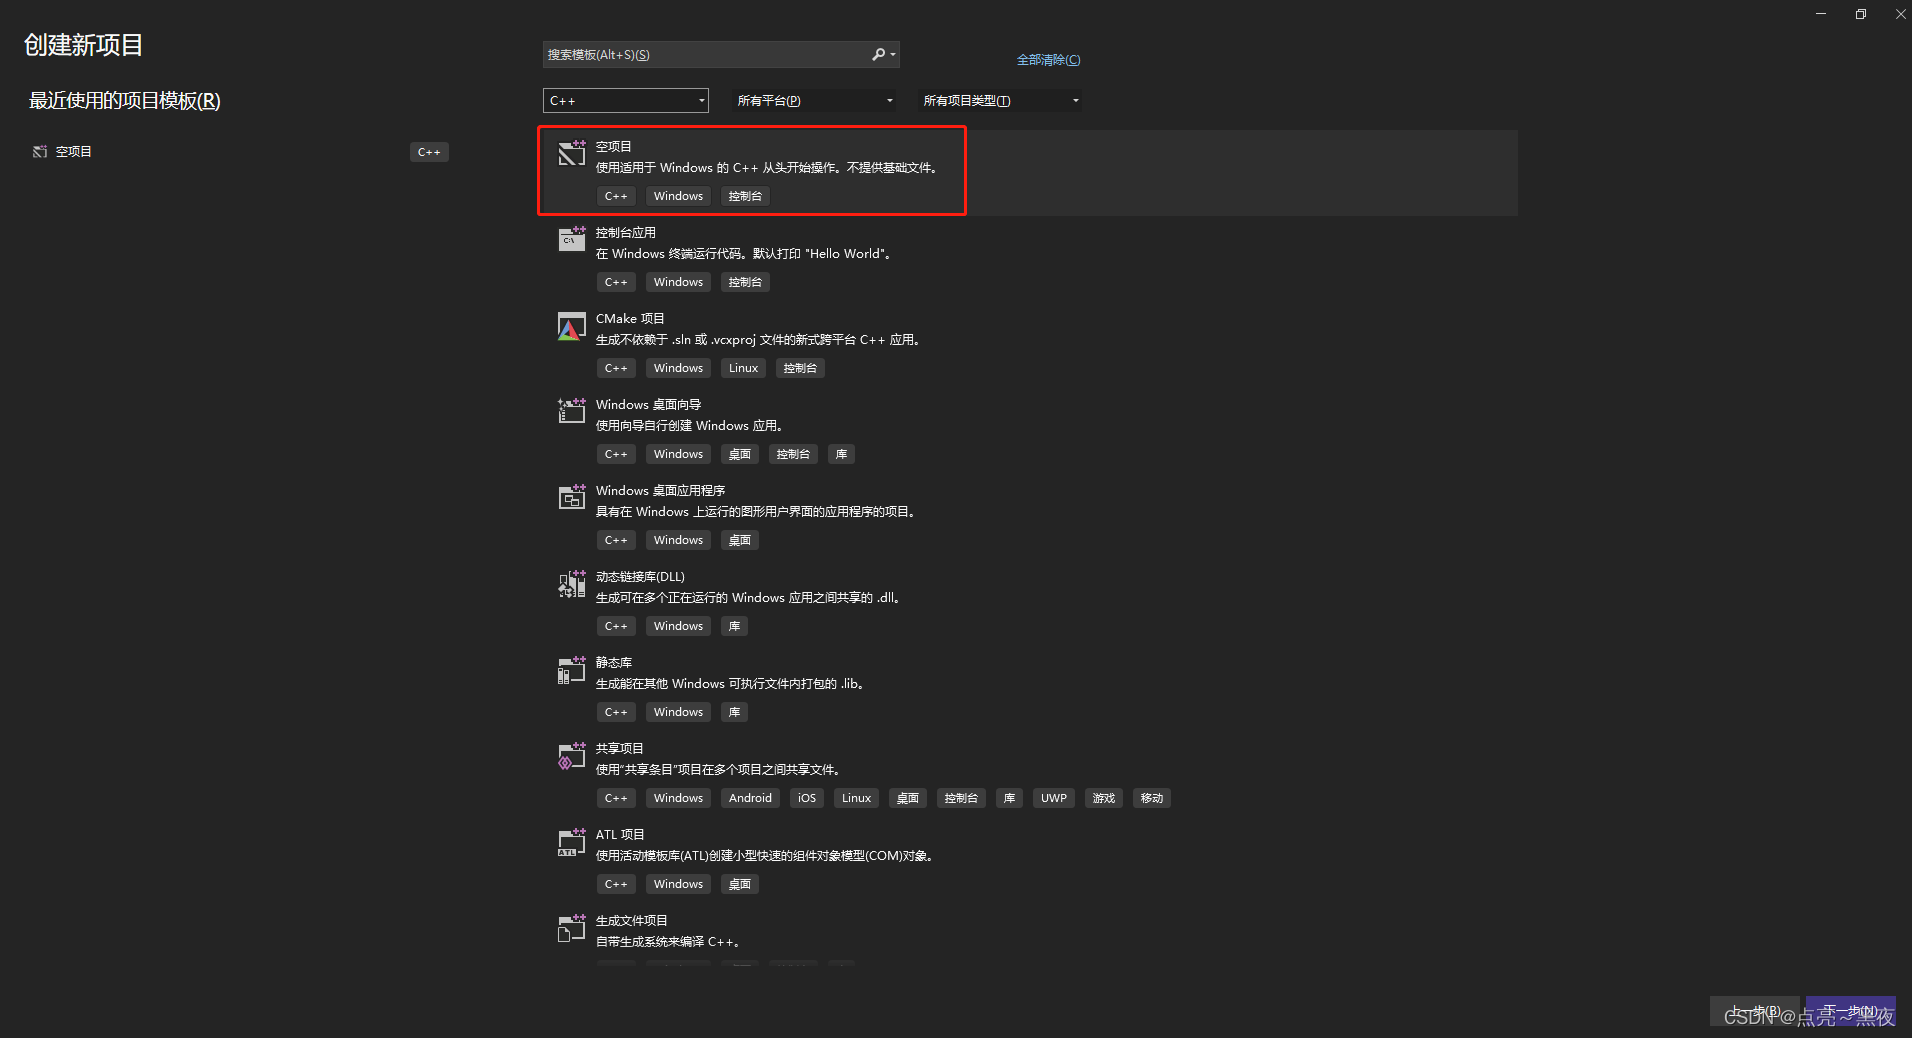
1、然后选择第一个创建空项目,当然这里还可以选择语言、平台、项目类型:

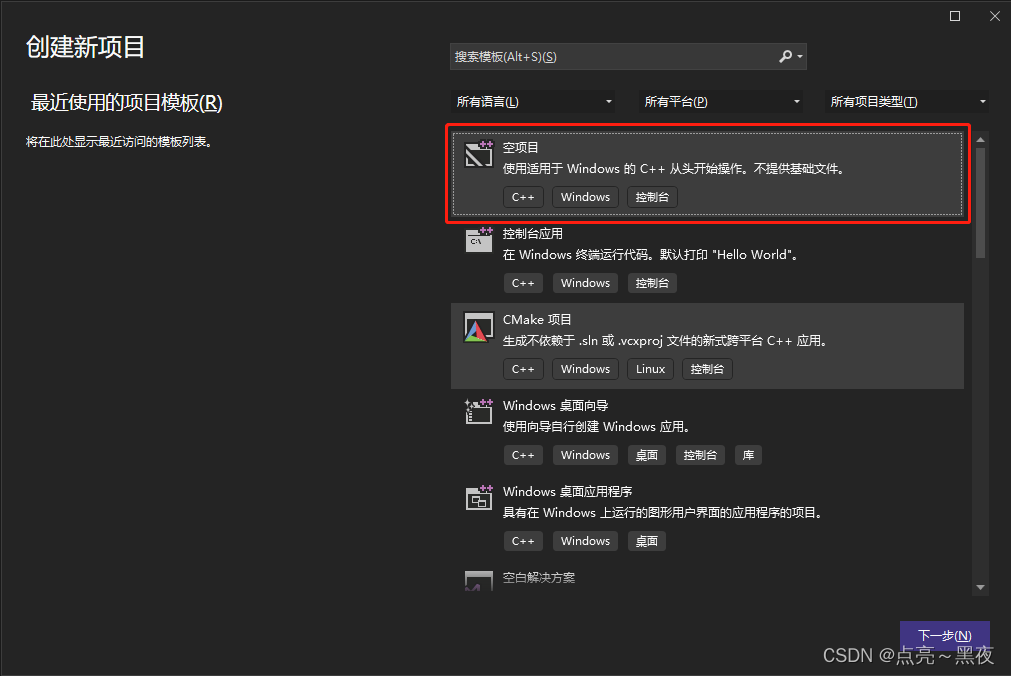
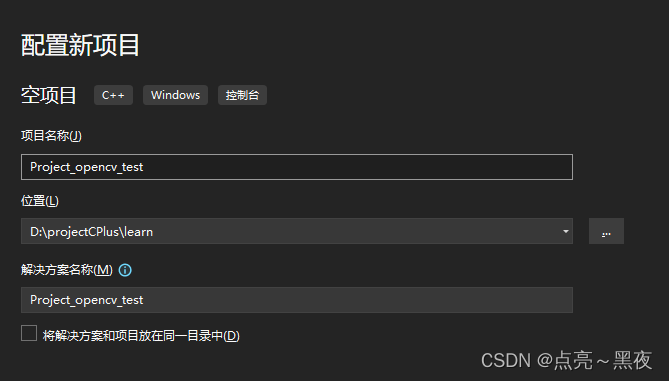
不选择默认就是C++、windows、控制台,项目的默认的位置是:C:UsersAdministratorsourcerepos
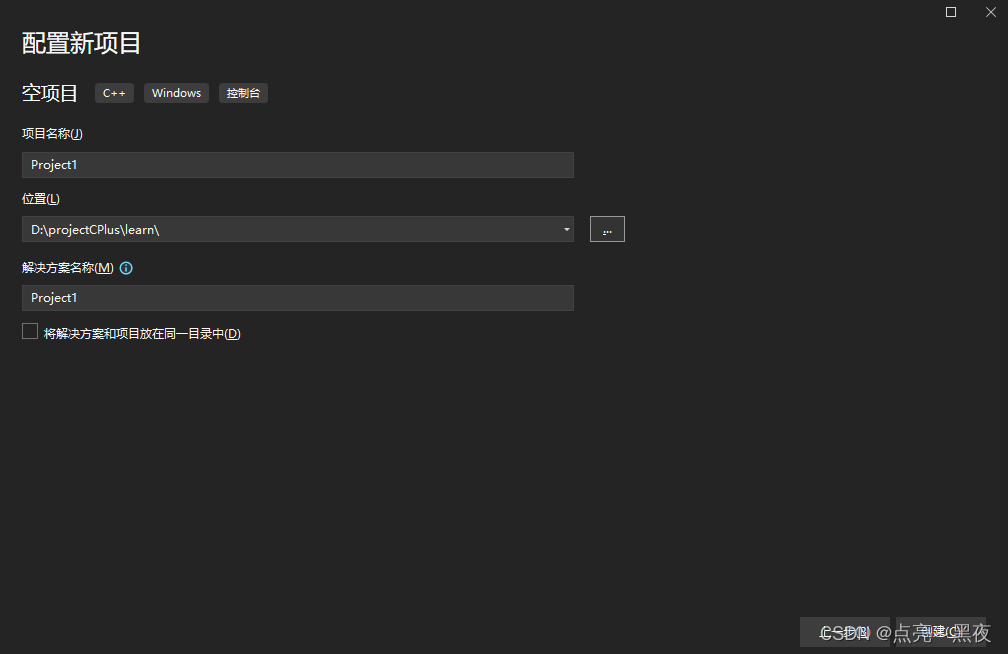
新建好的项目如下:
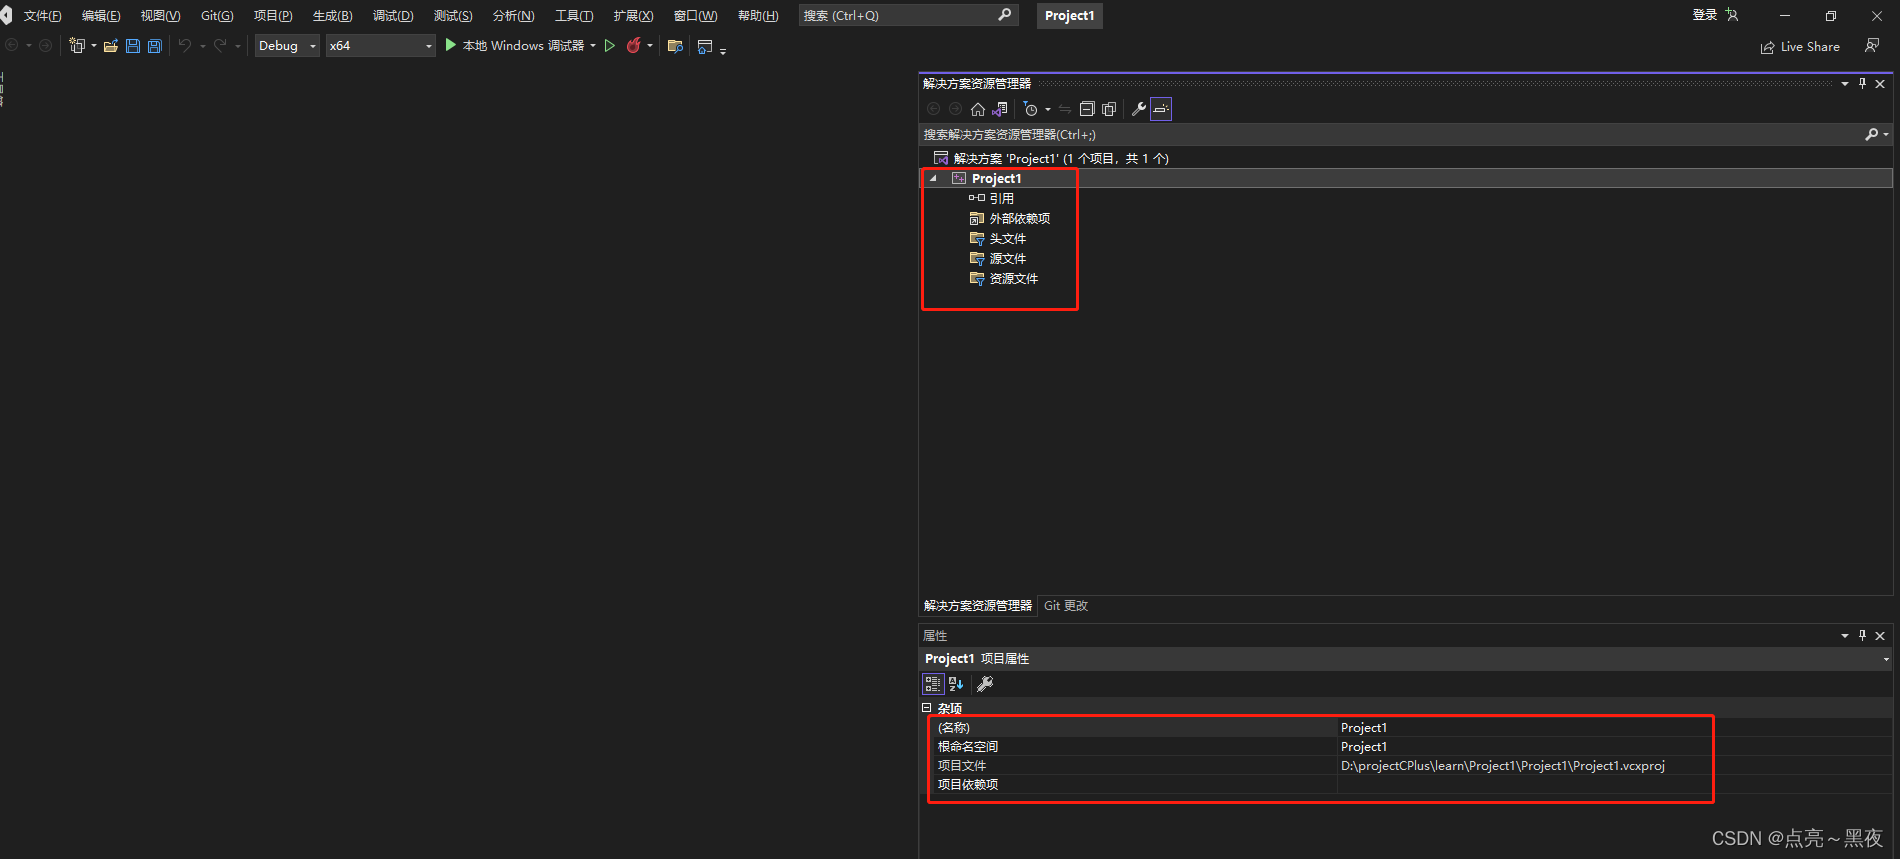
2、创建好目录之后,会自动生成如下文件:
在windows下使用tree /f查看文件树结构!
D:.
└─learn
    └─Project1
        │  Project1.sln
        │
        └─Project1
                Project1.vcxproj
                Project1.vcxproj.filters
                Project1.vcxproj.user
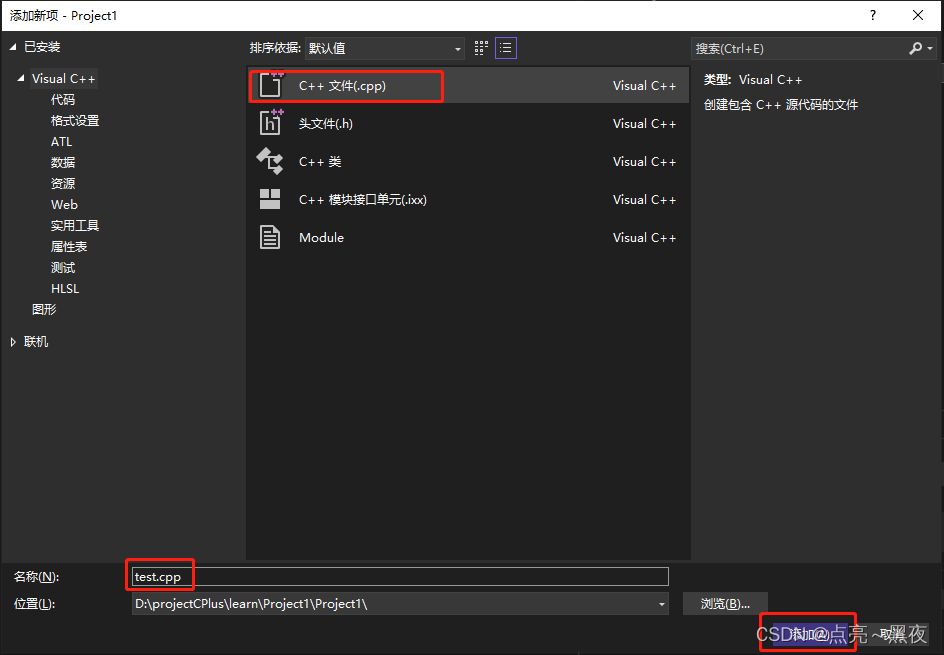
3、创建一个测试程序
在项目的源文件上鼠标右键,然后选择:添加-新建项 (或 直接使用快捷键Ctrl+Shift+A)
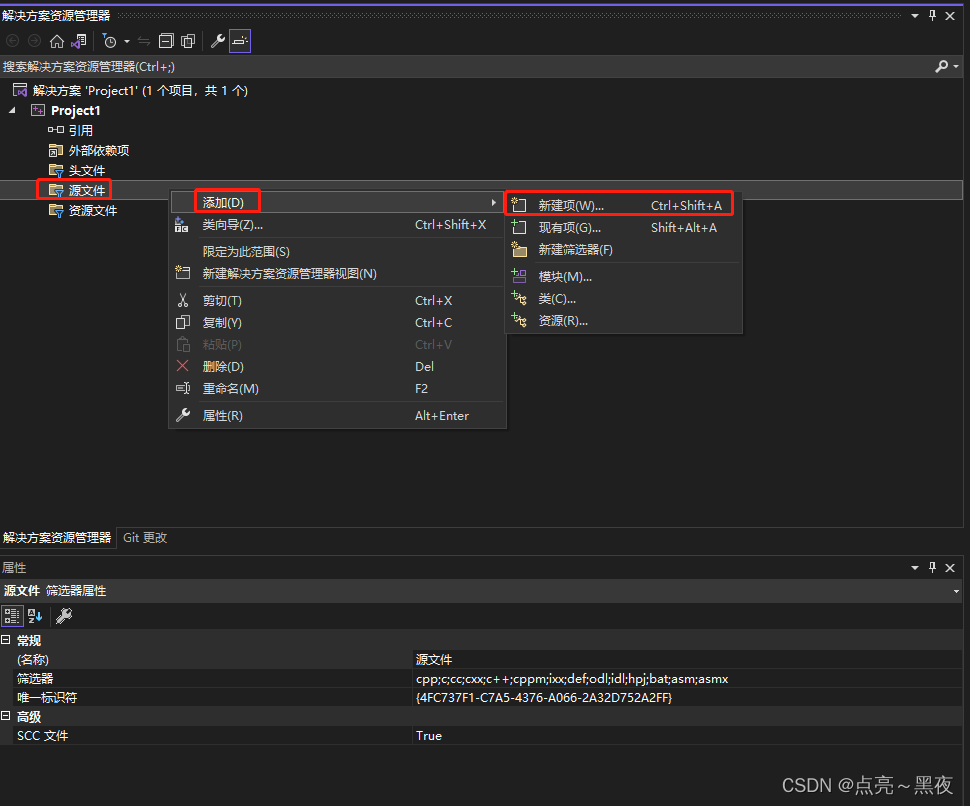
然后选择C++文件(.cpp) 创建一个测试的test.cpp的c++测试文件!
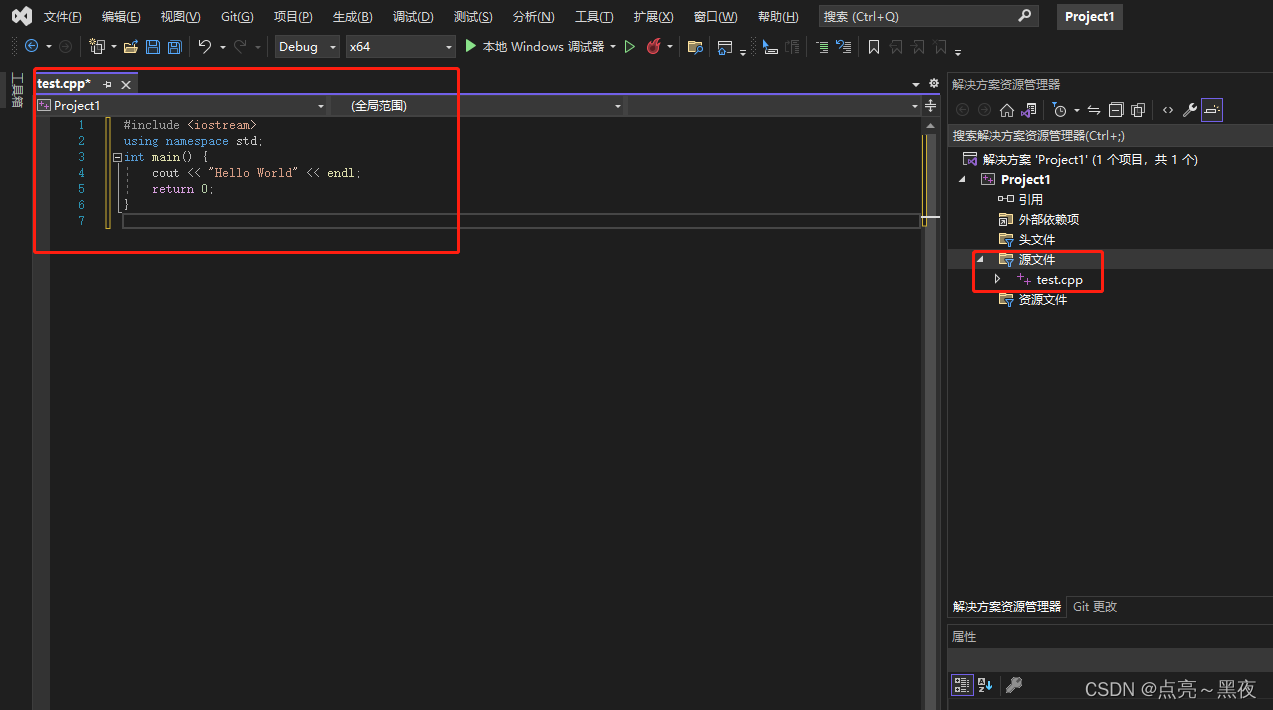
4、测试程序test.cpp,这里是打印一下hello wold
#include <iostream>
using namespace std;
int main() {
	cout << "Hello World" << endl;
	return 0;
}
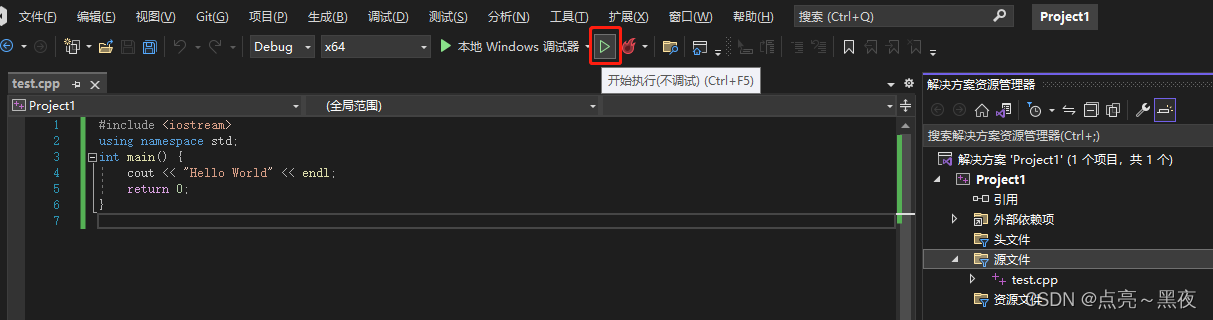
5、开始执行测试程序:点击如下图中的绿色按钮 或 直接按Ctrl+F5开始执行(不调试)
执行后,会自动打开命令行界面,显示如下:
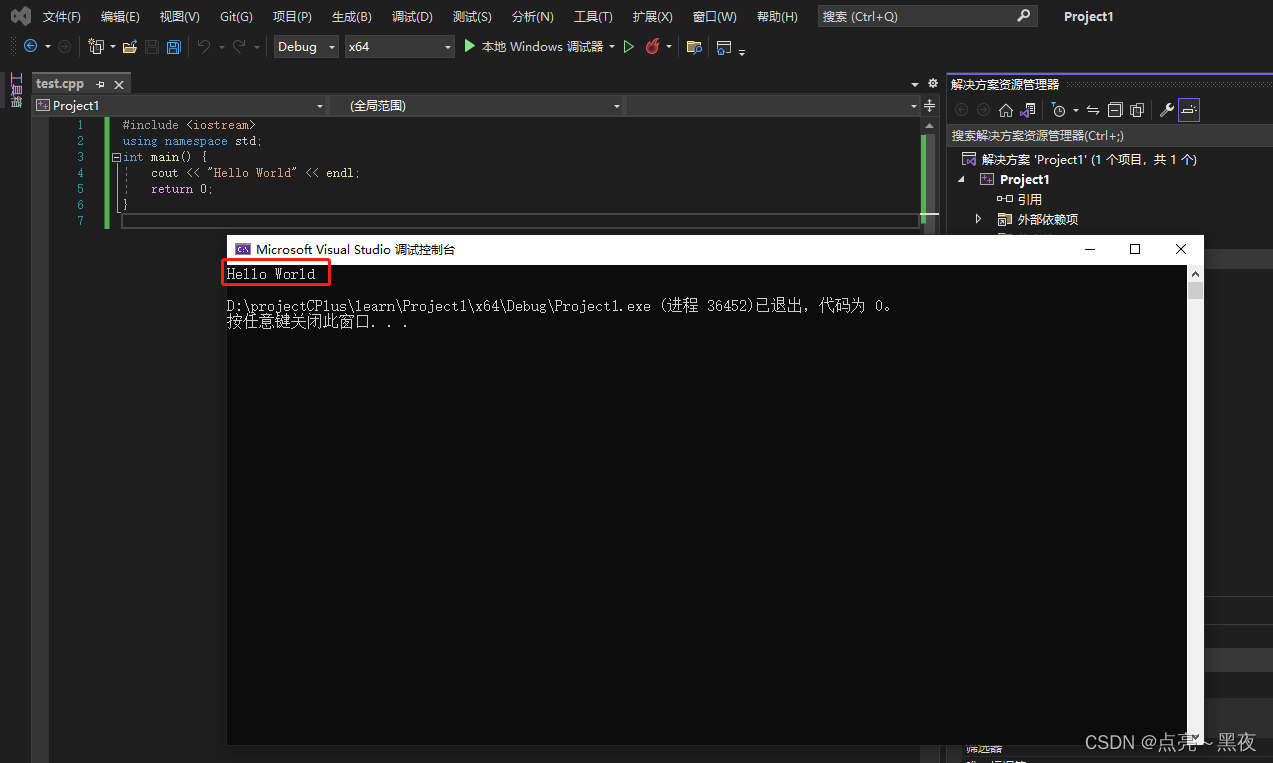
同时会在:D:projectCPluslearnProject1x64Debug 目录下生成一个Project1.exe的可执行文件!

1.1.4 创建空目录下的.sln和Project1.vcxproj文件说明
1、.sln文件
.sln文件:是解决方案的配置,主要是管理这个方案里的多个vcxproj。sln文件不是很重要,即使删除也可以重新生成!
.sln文件通常由三部分组成(参考)
- 文件版本
- 工程信息
- 全局设置
2、.vcproj/.vcxproj文件:是工程的配置文件,管理工程中细节比如包含的文件,引用库等
-
.vcproj后缀的文件:VS2008以及VS2008之前版本的VS工程文件 -
.vcxproj后缀的文件:VS2010以及VS2010之后版本的VS工程文件。我下载的是visual studio 2022版本,因此生成工程的配置文件的后缀名为.vcxproj
一般没有sln,也可以直接打开vcxproj,也可以重新生成sln
如下是我使用visual studio创建一个空项目后生成的项目配置文件里的信息,如下:
1)Project1.sln文件中的内容:
Microsoft Visual Studio Solution File, Format Version 12.00
# Visual Studio Version 17
VisualStudioVersion = 17.3.32804.467
MinimumVisualStudioVersion = 10.0.40219.1
Project("{8BC9CEB8-8B4A-11D0-8D11-00A0C91BC942}") = "Project1", "Project1Project1.vcxproj", "{040374C9-9063-4E4C-BD40-BB318CCC6B6E}"
EndProject
Global
	GlobalSection(SolutionConfigurationPlatforms) = preSolution
		Debug|x64 = Debug|x64
		Debug|x86 = Debug|x86
		Release|x64 = Release|x64
		Release|x86 = Release|x86
	EndGlobalSection
	GlobalSection(ProjectConfigurationPlatforms) = postSolution
		{040374C9-9063-4E4C-BD40-BB318CCC6B6E}.Debug|x64.ActiveCfg = Debug|x64
		{040374C9-9063-4E4C-BD40-BB318CCC6B6E}.Debug|x64.Build.0 = Debug|x64
		{040374C9-9063-4E4C-BD40-BB318CCC6B6E}.Debug|x86.ActiveCfg = Debug|Win32
		{040374C9-9063-4E4C-BD40-BB318CCC6B6E}.Debug|x86.Build.0 = Debug|Win32
		{040374C9-9063-4E4C-BD40-BB318CCC6B6E}.Release|x64.ActiveCfg = Release|x64
		{040374C9-9063-4E4C-BD40-BB318CCC6B6E}.Release|x64.Build.0 = Release|x64
		{040374C9-9063-4E4C-BD40-BB318CCC6B6E}.Release|x86.ActiveCfg = Release|Win32
		{040374C9-9063-4E4C-BD40-BB318CCC6B6E}.Release|x86.Build.0 = Release|Win32
	EndGlobalSection
	GlobalSection(SolutionProperties) = preSolution
		HideSolutionNode = FALSE
	EndGlobalSection
	GlobalSection(ExtensibilityGlobals) = postSolution
		SolutionGuid = {27CBC4B0-714F-472B-B16A-47B7A1672990}
	EndGlobalSection
EndGlobal
2)Project1.vcxproj
<?xml version="1.0" encoding="utf-8"?>
<Project DefaultTargets="Build" xmlns="http://schemas.microsoft.com/developer/msbuild/2003">
  <ItemGroup Label="ProjectConfigurations">
    <ProjectConfiguration Include="Debug|Win32">
      <Configuration>Debug</Configuration>
      <Platform>Win32</Platform>
    </ProjectConfiguration>
    <ProjectConfiguration Include="Release|Win32">
      <Configuration>Release</Configuration>
      <Platform>Win32</Platform>
    </ProjectConfiguration>
    <ProjectConfiguration Include="Debug|x64">
      <Configuration>Debug</Configuration>
      <Platform>x64</Platform>
    </ProjectConfiguration>
    <ProjectConfiguration Include="Release|x64">
      <Configuration>Release</Configuration>
      <Platform>x64</Platform>
    </ProjectConfiguration>

  </ItemGroup>
  <PropertyGroup Label="Globals">
    <VCProjectVersion>16.0</VCProjectVersion>
    <Keyword>Win32Proj</Keyword>
    <ProjectGuid>{040374c9-9063-4e4c-bd40-bb318ccc6b6e}</ProjectGuid>
    <RootNamespace>Project1</RootNamespace>
    <WindowsTargetPlatformVersion>10.0</WindowsTargetPlatformVersion>
  </PropertyGroup>
  <Import Project="$(VCTargetsPath)Microsoft.Cpp.Default.props" />
  <PropertyGroup Condition="'$(Configuration)|$(Platform)'=='Debug|Win32'" Label="Configuration">
    <ConfigurationType>Application</ConfigurationType>
    <UseDebugLibraries>true</UseDebugLibraries>
    <PlatformToolset>v143</PlatformToolset>
    <CharacterSet>Unicode</CharacterSet>
  </PropertyGroup>
  <PropertyGroup Condition="'$(Configuration)|$(Platform)'=='Release|Win32'" Label="Configuration">
    <ConfigurationType>Application</ConfigurationType>
    <UseDebugLibraries>false</UseDebugLibraries>
    <PlatformToolset>v143</PlatformToolset>
    <WholeProgramOptimization>true</WholeProgramOptimization>
    <CharacterSet>Unicode</CharacterSet>
  </PropertyGroup>
  <PropertyGroup Condition="'$(Configuration)|$(Platform)'=='Debug|x64'" Label="Configuration">
    <ConfigurationType>Application</ConfigurationType>
    <UseDebugLibraries>true</UseDebugLibraries>
    <PlatformToolset>v143</PlatformToolset>
    <CharacterSet>Unicode</CharacterSet>
  </PropertyGroup>
  <PropertyGroup Condition="'$(Configuration)|$(Platform)'=='Release|x64'" Label="Configuration">
    <ConfigurationType>Application</ConfigurationType>
    <UseDebugLibraries>false</UseDebugLibraries>
    <PlatformToolset>v143</PlatformToolset>
    <WholeProgramOptimization>true</WholeProgramOptimization>
    <CharacterSet>Unicode</CharacterSet>
  </PropertyGroup>

  <Import Project="$(VCTargetsPath)Microsoft.Cpp.props" />
  <ImportGroup Label="ExtensionSettings">
  </ImportGroup>
  <ImportGroup Label="Shared" >
  </ImportGroup>
    <ImportGroup Label="PropertySheets" Condition="'$(Configuration)|$(Platform)'=='Debug|Win32'">
      <Import Project="$(UserRootDir)Microsoft.Cpp.$(Platform).user.props" Condition="exists('$(UserRootDir)Microsoft.Cpp.$(Platform).user.props')" Label="LocalAppDataPlatform" />
    </ImportGroup>
    <ImportGroup Label="PropertySheets" Condition="'$(Configuration)|$(Platform)'=='Release|Win32'">
      <Import Project="$(UserRootDir)Microsoft.Cpp.$(Platform).user.props" Condition="exists('$(UserRootDir)Microsoft.Cpp.$(Platform).user.props')" Label="LocalAppDataPlatform" />
    </ImportGroup>
    <ImportGroup Label="PropertySheets" Condition="'$(Configuration)|$(Platform)'=='Debug|x64'">
      <Import Project="$(UserRootDir)Microsoft.Cpp.$(Platform).user.props" Condition="exists('$(UserRootDir)Microsoft.Cpp.$(Platform).user.props')" Label="LocalAppDataPlatform" />
    </ImportGroup>
    <ImportGroup Label="PropertySheets" Condition="'$(Configuration)|$(Platform)'=='Release|x64'">
      <Import Project="$(UserRootDir)Microsoft.Cpp.$(Platform).user.props" Condition="exists('$(UserRootDir)Microsoft.Cpp.$(Platform).user.props')" Label="LocalAppDataPlatform" />
    </ImportGroup>

  <PropertyGroup Label="UserMacros" />

  <ItemDefinitionGroup Condition="'$(Configuration)|$(Platform)'=='Debug|Win32'">
    <ClCompile>
      <WarningLevel>Level3</WarningLevel>
      <SDLCheck>true</SDLCheck>
      <PreprocessorDefinitions>WIN32;_DEBUG;_CONSOLE;%(PreprocessorDefinitions)</PreprocessorDefinitions>
      <ConformanceMode>true</ConformanceMode>
    </ClCompile>
    <Link>
      <SubSystem>Console</SubSystem>
      <GenerateDebugInformation>true</GenerateDebugInformation>
    </Link>
  </ItemDefinitionGroup>
  <ItemDefinitionGroup Condition="'$(Configuration)|$(Platform)'=='Release|Win32'">
    <ClCompile>
      <WarningLevel>Level3</WarningLevel>
      <FunctionLevelLinking>true</FunctionLevelLinking>
      <IntrinsicFunctions>true</IntrinsicFunctions>
      <SDLCheck>true</SDLCheck>
      <PreprocessorDefinitions>WIN32;NDEBUG;_CONSOLE;%(PreprocessorDefinitions)</PreprocessorDefinitions>
      <ConformanceMode>true</ConformanceMode>
    </ClCompile>
    <Link>
      <SubSystem>Console</SubSystem>
      <EnableCOMDATFolding>true</EnableCOMDATFolding>
      <OptimizeReferences>true</OptimizeReferences>
      <GenerateDebugInformation>true</GenerateDebugInformation>
    </Link>
  </ItemDefinitionGroup>
  <ItemDefinitionGroup Condition="'$(Configuration)|$(Platform)'=='Debug|x64'">
    <ClCompile>
      <WarningLevel>Level3</WarningLevel>
      <SDLCheck>true</SDLCheck>
      <PreprocessorDefinitions>_DEBUG;_CONSOLE;%(PreprocessorDefinitions)</PreprocessorDefinitions>
      <ConformanceMode>true</ConformanceMode>
    </ClCompile>
    <Link>
      <SubSystem>Console</SubSystem>
      <GenerateDebugInformation>true</GenerateDebugInformation>
    </Link>
  </ItemDefinitionGroup>
  <ItemDefinitionGroup Condition="'$(Configuration)|$(Platform)'=='Release|x64'">
    <ClCompile>
      <WarningLevel>Level3</WarningLevel>
      <FunctionLevelLinking>true</FunctionLevelLinking>
      <IntrinsicFunctions>true</IntrinsicFunctions>
      <SDLCheck>true</SDLCheck>
      <PreprocessorDefinitions>NDEBUG;_CONSOLE;%(PreprocessorDefinitions)</PreprocessorDefinitions>
      <ConformanceMode>true</ConformanceMode>
    </ClCompile>
    <Link>
      <SubSystem>Console</SubSystem>
      <EnableCOMDATFolding>true</EnableCOMDATFolding>
      <OptimizeReferences>true</OptimizeReferences>
      <GenerateDebugInformation>true</GenerateDebugInformation>
    </Link>
  </ItemDefinitionGroup>

  <ItemGroup></ItemGroup>
  <Import Project="$(VCTargetsPath)Microsoft.Cpp.targets" />
  <ImportGroup Label="ExtensionTargets">
  </ImportGroup>
</Project>
3)Project1.vcxproj.filters
<?xml version="1.0" encoding="utf-8"?>
<Project ToolsVersion="4.0" xmlns="http://schemas.microsoft.com/developer/msbuild/2003">
  <ItemGroup>
    <Filter Include="源文件">
      <UniqueIdentifier>{4FC737F1-C7A5-4376-A066-2A32D752A2FF}</UniqueIdentifier>
      <Extensions>cpp;c;cc;cxx;c++;cppm;ixx;def;odl;idl;hpj;bat;asm;asmx</Extensions>
    </Filter>
    <Filter Include="头文件">
      <UniqueIdentifier>{93995380-89BD-4b04-88EB-625FBE52EBFB}</UniqueIdentifier>
      <Extensions>h;hh;hpp;hxx;h++;hm;inl;inc;ipp;xsd</Extensions>
    </Filter>
    <Filter Include="资源文件">
      <UniqueIdentifier>{67DA6AB6-F800-4c08-8B7A-83BB121AAD01}</UniqueIdentifier>
      <Extensions>rc;ico;cur;bmp;dlg;rc2;rct;bin;rgs;gif;jpg;jpeg;jpe;resx;tiff;tif;png;wav;mfcribbon-ms</Extensions>
    </Filter>
  </ItemGroup>
</Project>
4)Project1.vcxproj.user
<?xml version="1.0" encoding="utf-8"?>
<Project ToolsVersion="Current" xmlns="http://schemas.microsoft.com/developer/msbuild/2003">
  <PropertyGroup />
</Project>
1.1.5 visual studio 快速创建项目、程序和执行的快捷键
从上面的步骤已经知道如何创建项目、程序 和 执行程序,但是快捷键的使用会更方便一点:
- 创建空项目:
ctrl+shift+n - 创建cpp文件:
ctrl+shfit+a - 执行cpp文件(不调试):
ctrl+F5
1.2 visual studio 扩展(安装插件)
1.2.1 安装壁纸插件
参考:https://www.jb51.net/article/233878.htm
1.3 windows10 + visual studio + opencv4.5.5 安装与配置
1.3.1 下载opencv
1、下载解压 opencv
- 下载opencv:https://opencv.org/releases/
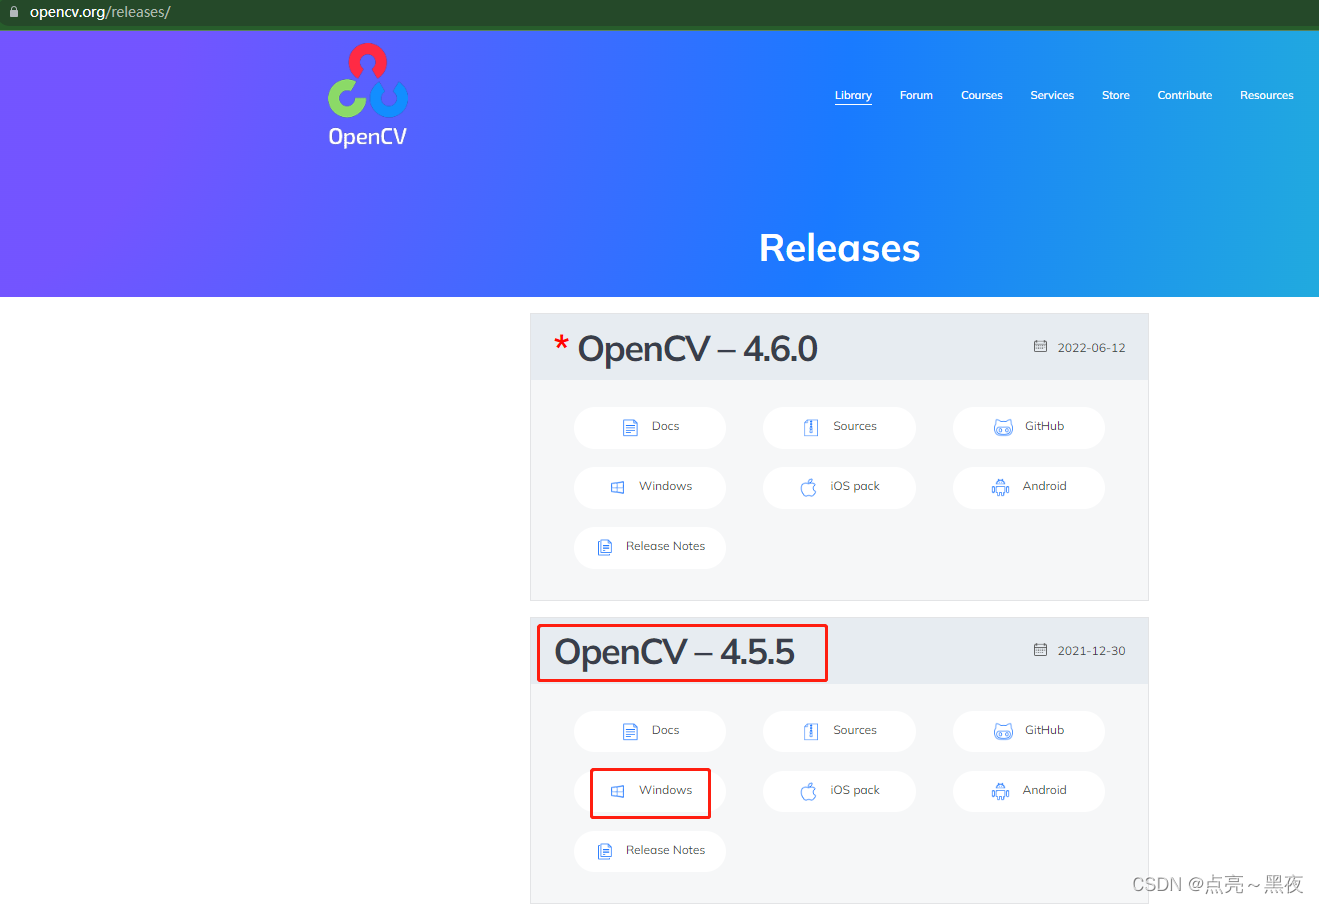
注意:
这里下载的opencv是exe文件,并不是源码
下载好:opencv-4.5.5-vc14_vc15.exe文件,直接双击解压到指定的目录下即可!

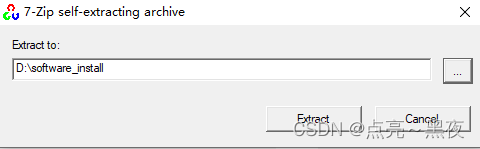
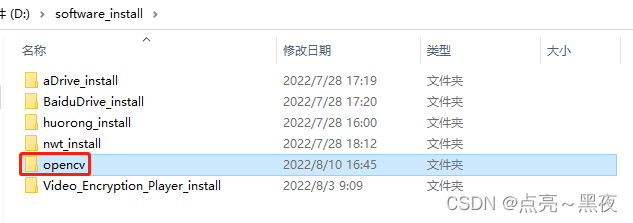
解压后的目录名为opencv,我们重新命名为opencv455,方便知道版本!
1.3.2 把opencv的添加到系统环境变量中
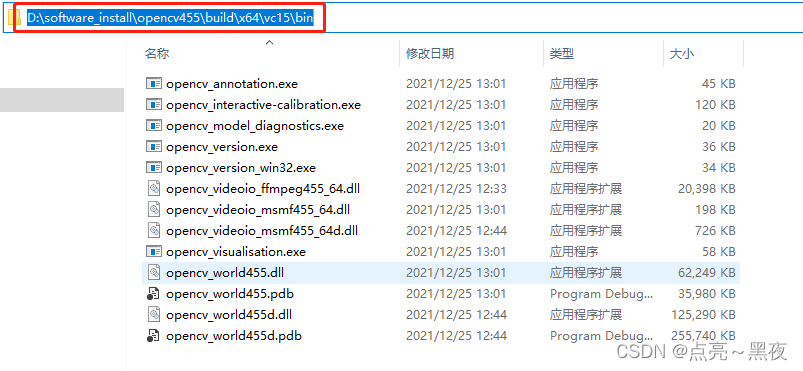
把D:software_installopencv455buildx64vc15bin 路径添加到系统的PATH环境变量中
如果没有添加到系统环境变量中,就会报:1.4.1中错误!
1.3.3 在visual studio2022 中配置opencv
1、先创建新项目
选择创建空项目
2、选中项目名称后,点击上方的扳手图标即属性
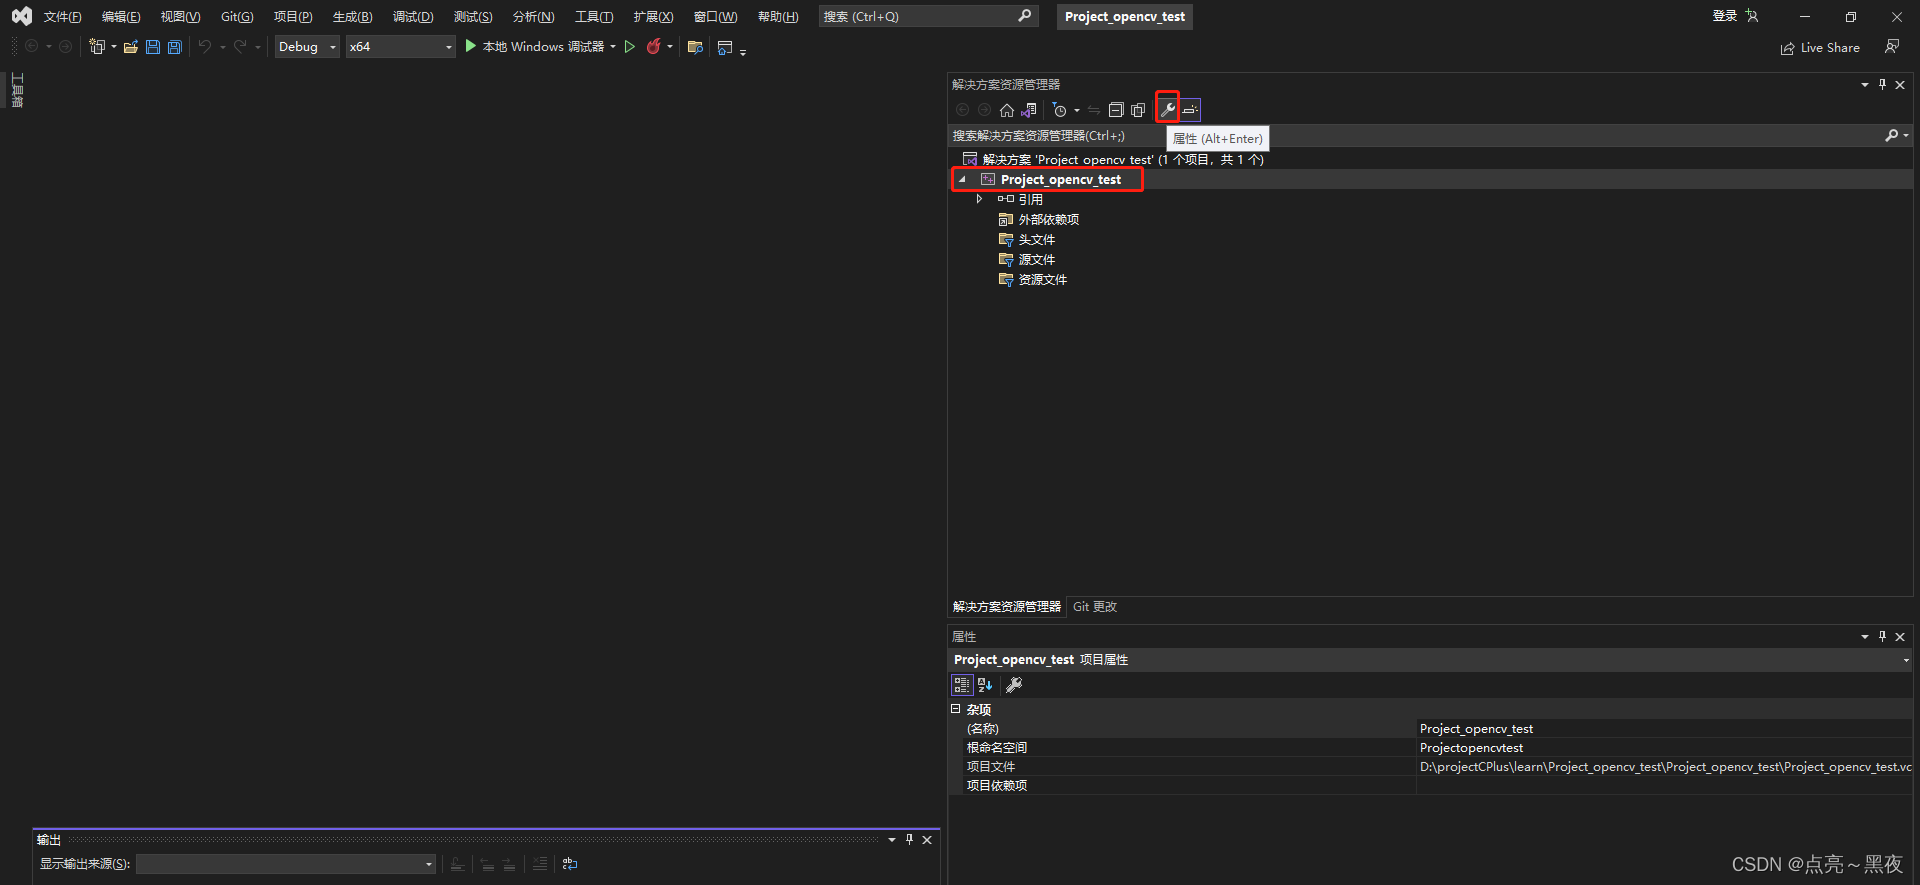
打开属性界面如下:
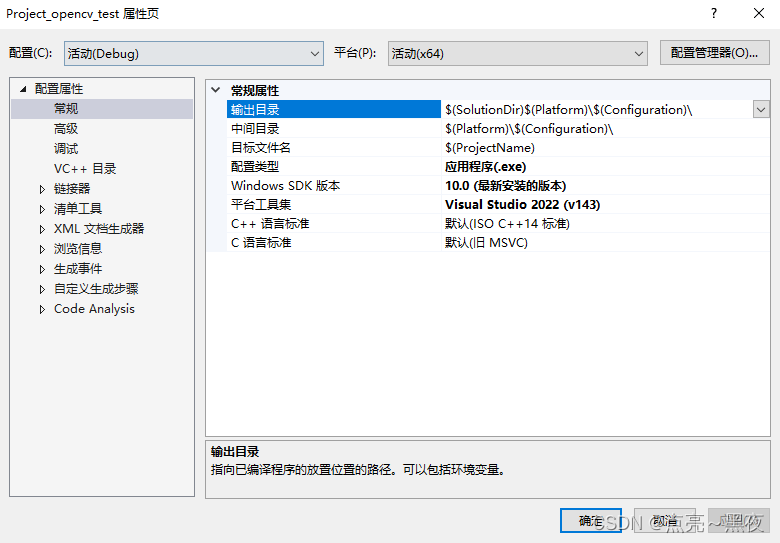
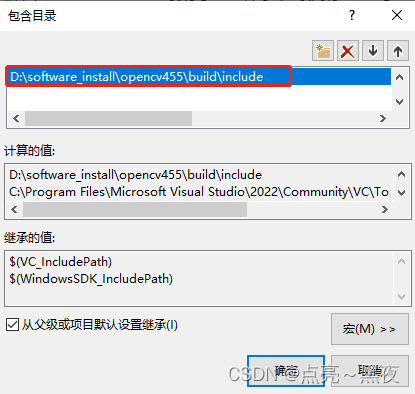
3、添加包含目录:选中VC++ 目录-包含目录-编辑
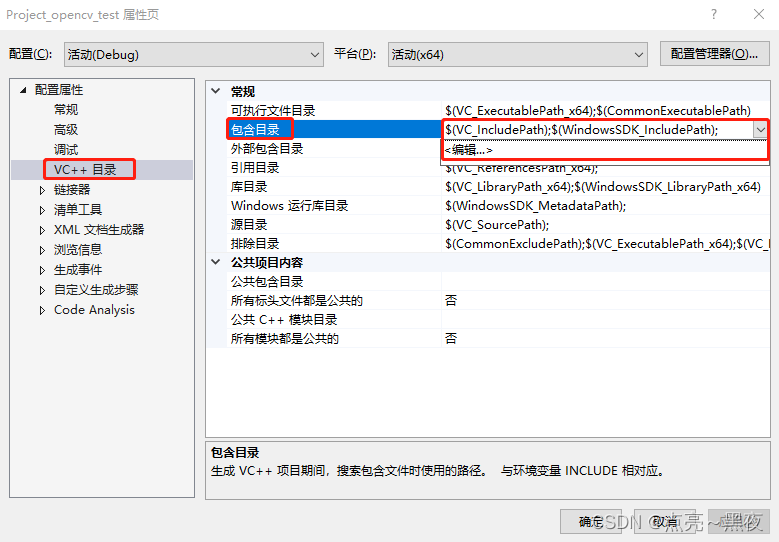
然后把opencv的包含(include)目录添加进去:D:software_installopencv455buildinclude 添加进去
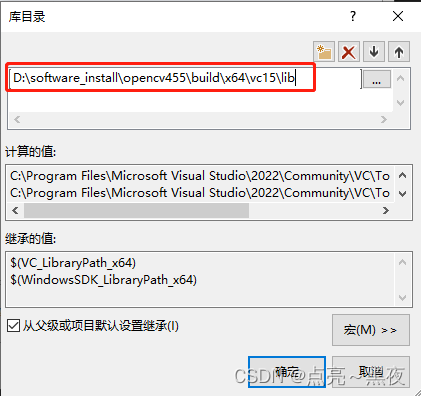
4、添加库目录:选中VC++ 目录-库目录-编辑
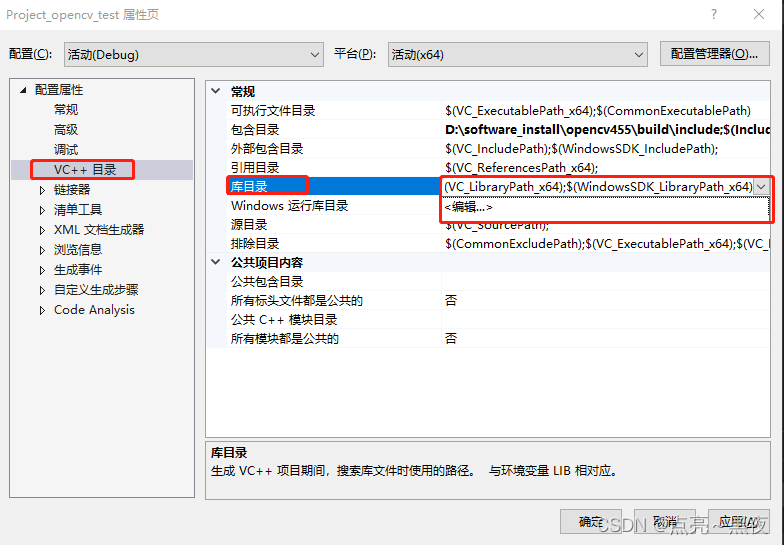
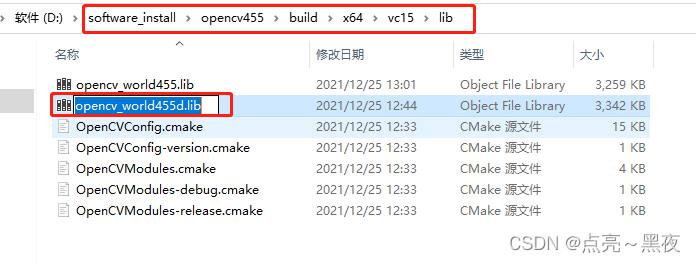
然后把opencv的库目录:D:software_installopencv455buildx64vc15lib 添加进去
5、添加链接器的附加依赖项(附加依赖项就是动态库):选中链接器-输入-附加依赖项-编辑
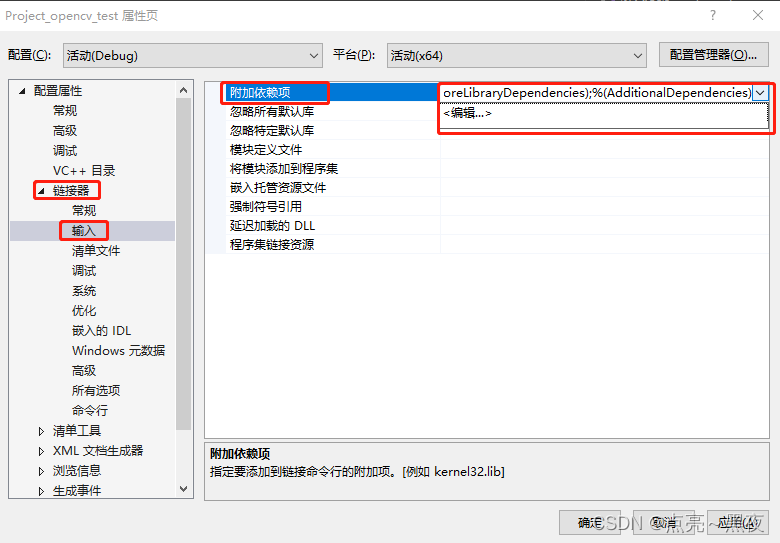
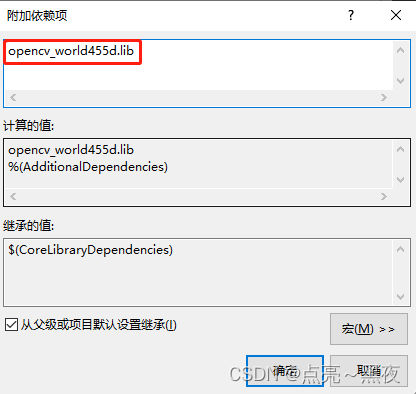
然后把D:software_installopencv455buildx64vc15lib 下的opencv_world455d.lib 文件名粘贴到我们的附加依赖项中!
1.3.4 测试配置环境
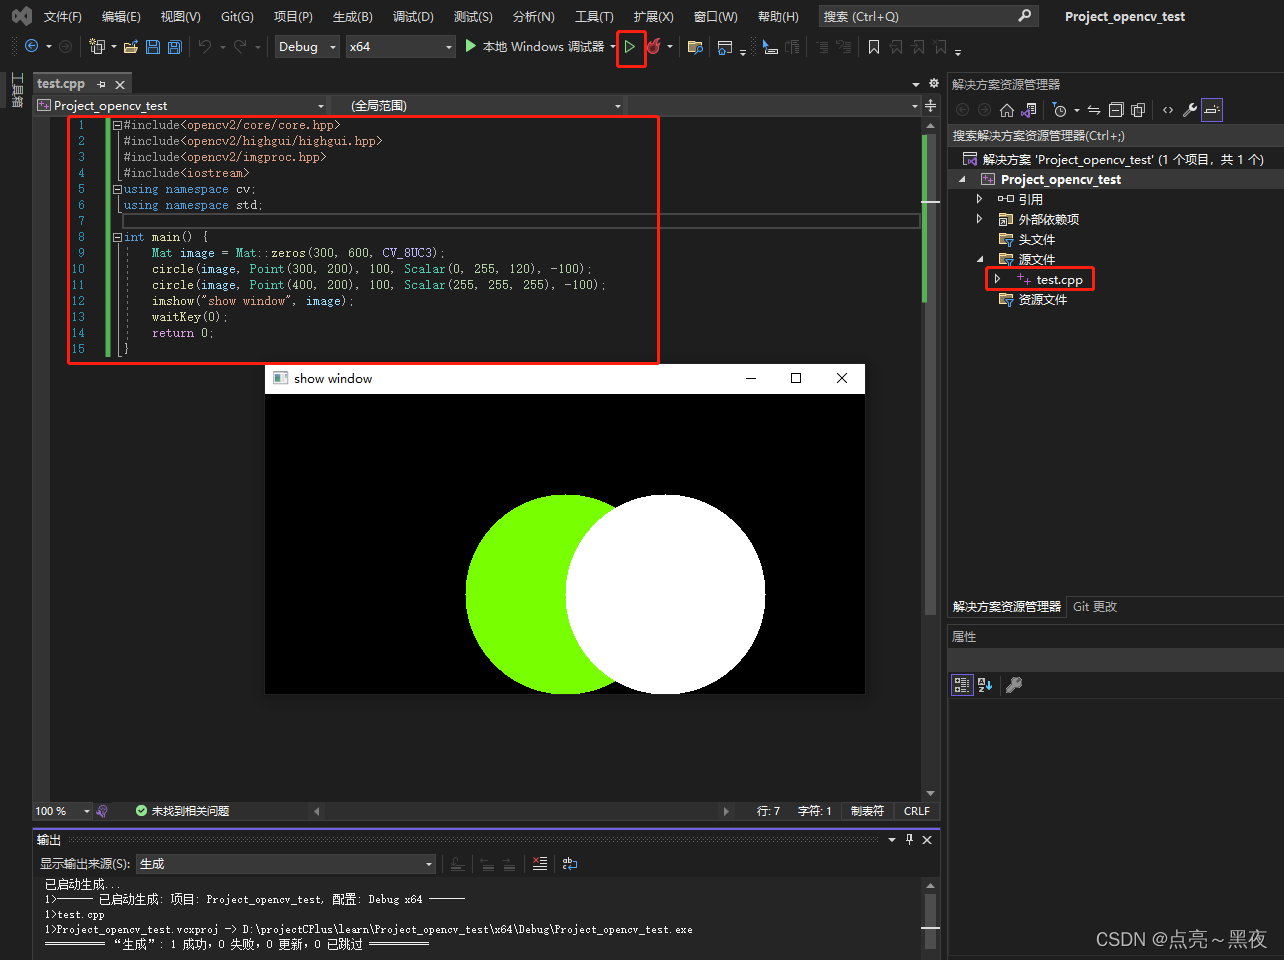
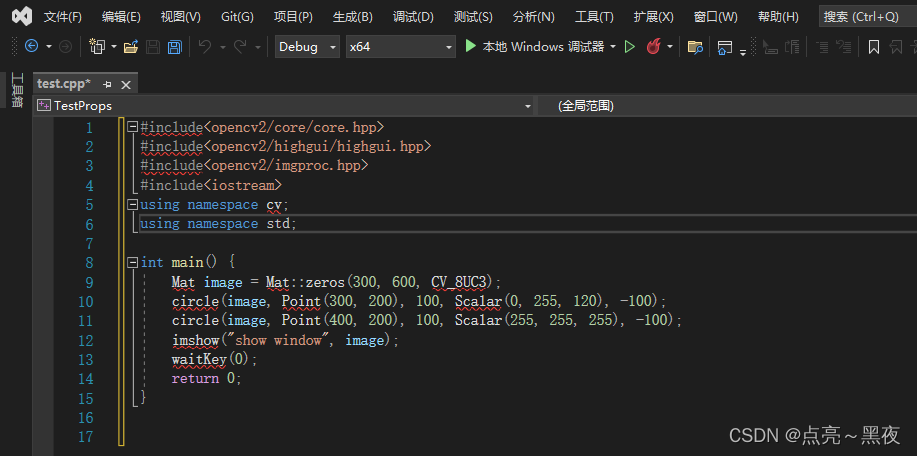
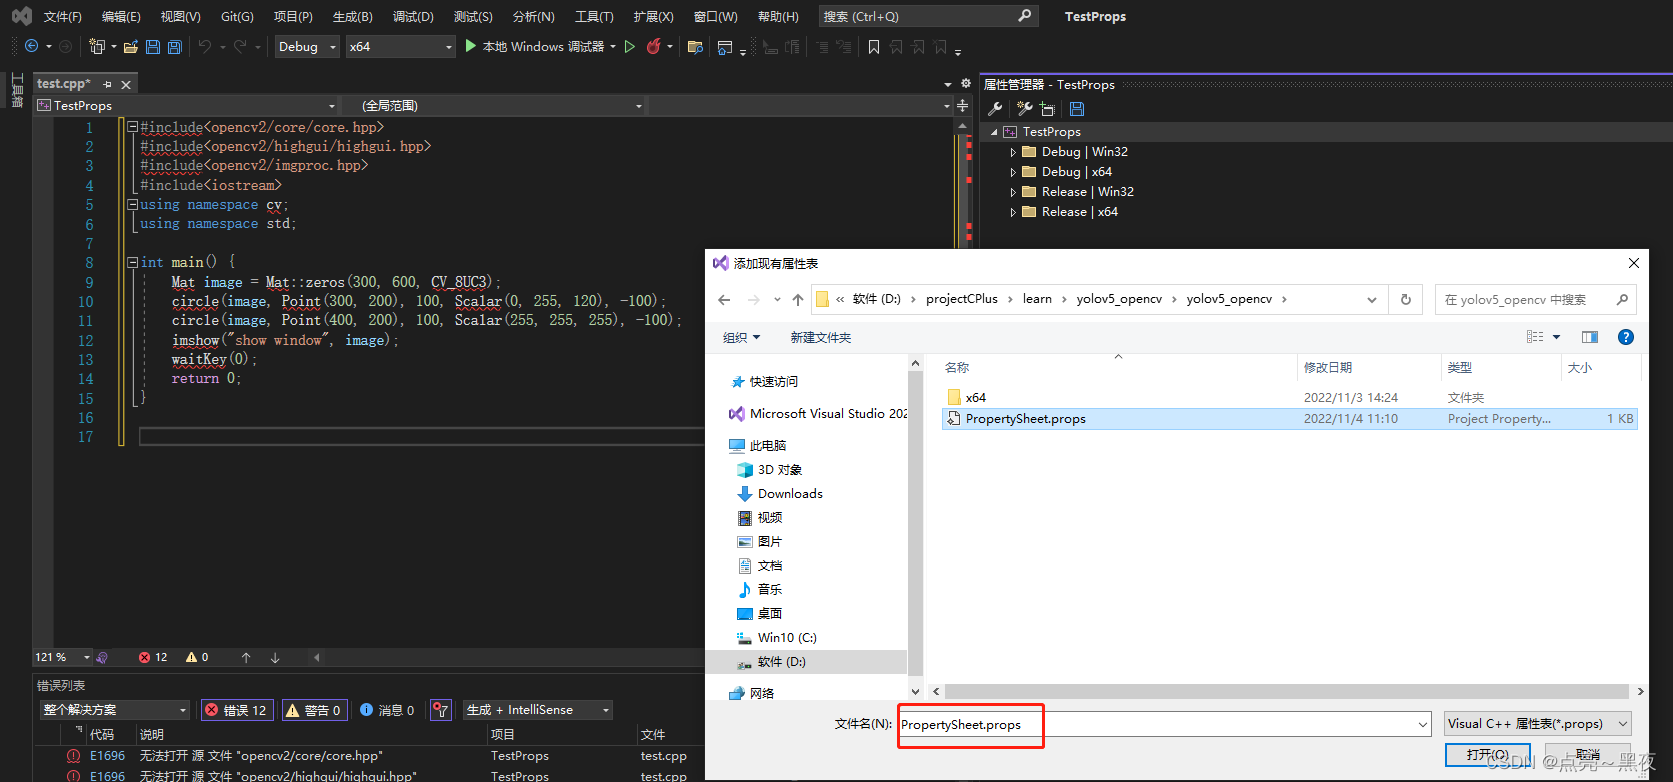
1、新建一个test.cpp测试文件,测试代码:
#include<opencv2/core/core.hpp>
#include<opencv2/highgui/highgui.hpp>
#include<opencv2/imgproc.hpp>
#include<iostream>
using namespace cv;
using namespace std;

int main() {
	Mat image = Mat::zeros(300, 600, CV_8UC3);
	circle(image, Point(300, 200), 100, Scalar(0, 255, 120), -100);
	circle(image, Point(400, 200), 100, Scalar(255, 255, 255), -100);
	imshow("show window", image);
	waitKey(0);
	return 0;
}
程序执行结果如下,表面我们的环境配置成功!
1.3.5 在Visual Studio新的项目中如何快速配置opencv环境
1、在Visual Studio新的项目中如何快速配置opencv环境,如果还是像上面一样在属性中添加:
VC++目录-包含目录:D:software_installopencv455buildincludeVC++目录-库目录:D:software_installopencv455buildx64vc15lib链接器-输入-附加依赖项:D:software_installopencv455buildx64vc15lib 目录下的opencv_world455d.lib文件
但是上面就显的稍微有点麻烦了,因为你可能记不住上面路径的具体位置,只要在新项目中添加之前的
2、具体操作(参考1、参考3、参考3)
保存当前项目的属性表,即.props文件*
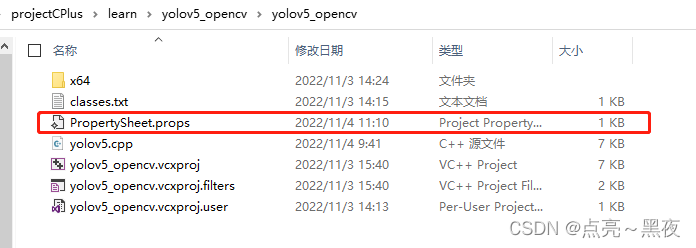
1、如下是原项目下的文件,并没有*.props后缀的文件(*.props是一个属性表文件,里面就是存储的项目的包含库目录等配置信心)
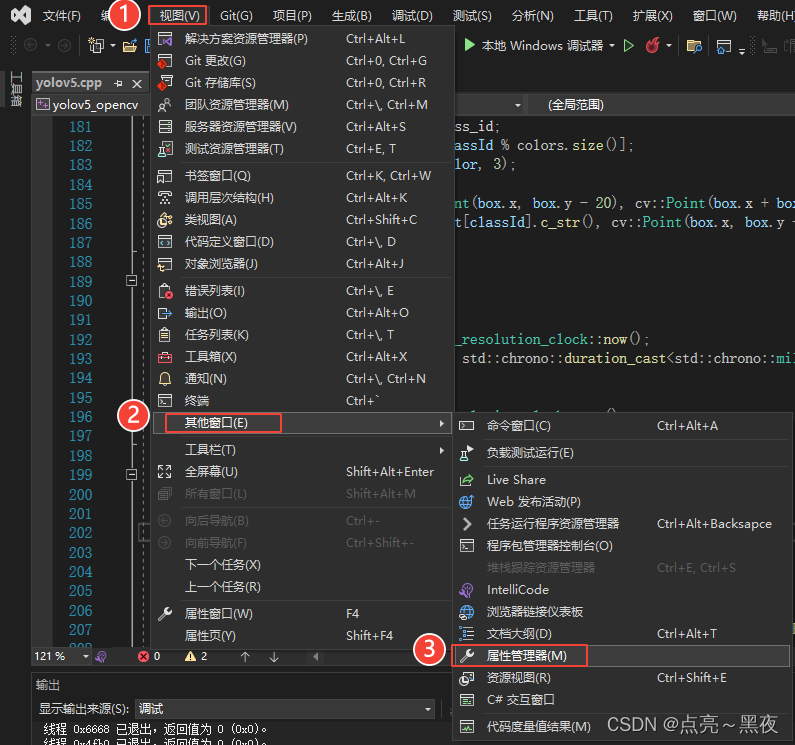
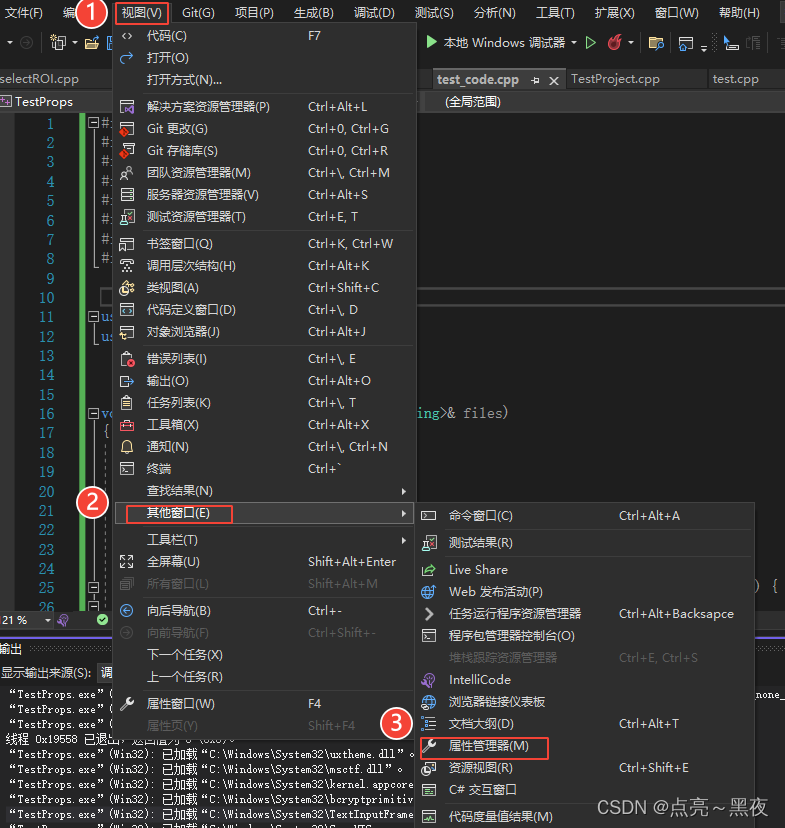
2、原项目生成*.props文件,点击视图-其他窗口-属性管理器,先打开属性管理器面板
3、保存当前项目的属性表*.props文件:在窗口右侧,就可以看到打开的属性管理器面板,然后在属性管理器面板上鼠标右键,选择添加新项目属性表
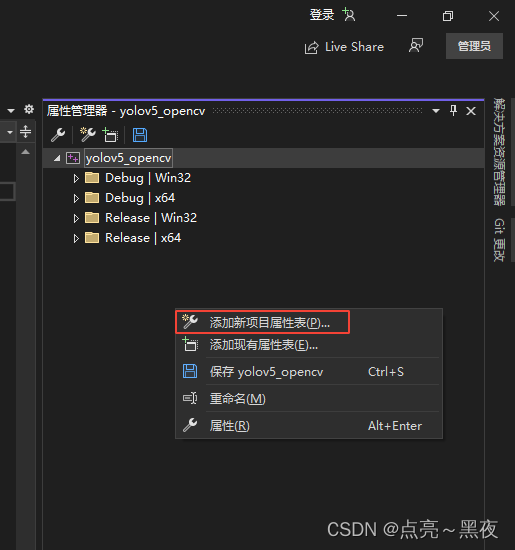
然后就可以保存当前项目的属性表文件*.props,如下:
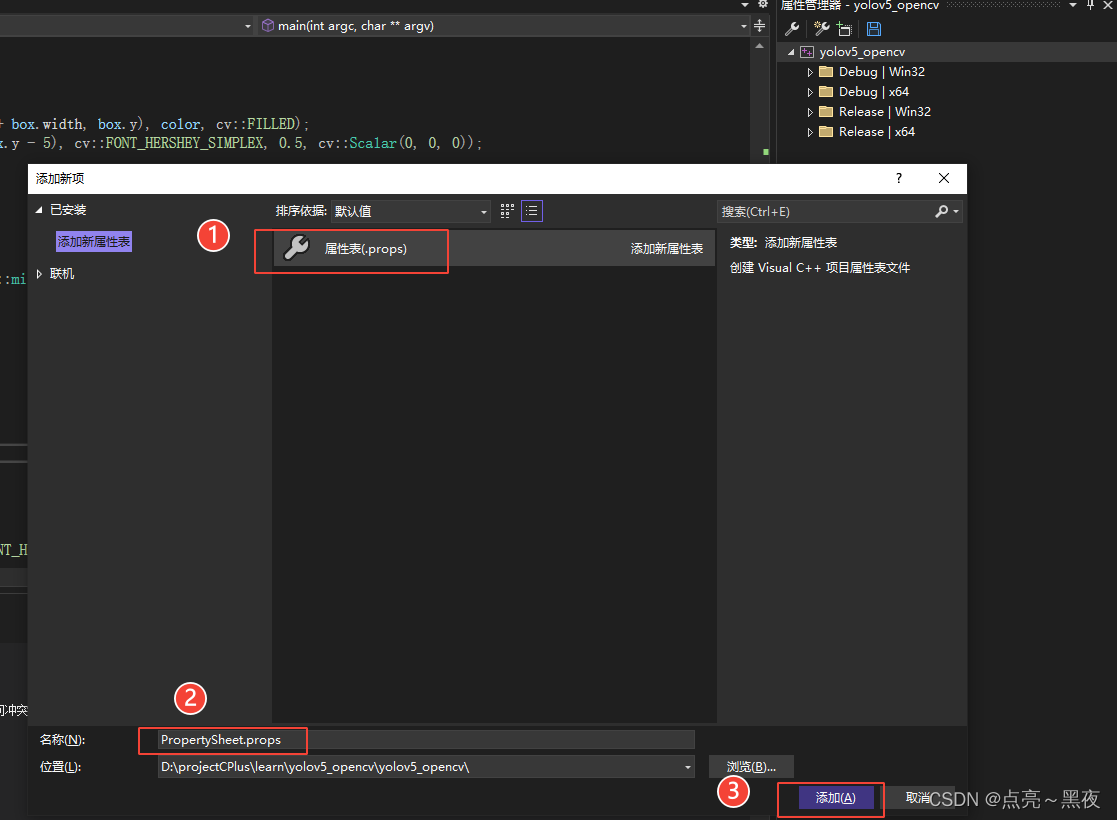
可以看到当前项目下已经有了属性表文件*.props
双击:*props就可以打开属性表,或者在属性管理器中双击打开是一样的!
在新的项目中加载上面项目保存的属性表
在新的项目中加载上面项目中保存的*.props属性表文件,比如上面的项目中已经配置了opencv,此时在新的项目中,我们只需要加载一下上面项目中的*.props属性表文件,就不需要重新配置一边opencv的库目录和附加依赖项了。
新的项目中如何加载*.props属性表文件:
1、在新的项目中打开属性管理器,然后鼠标右键,选择添加现有属性表
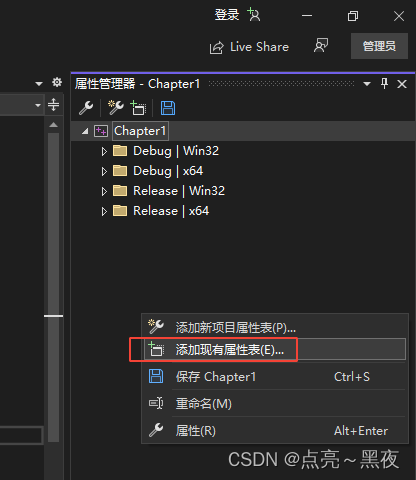
2、然后把上面项目中保存的*.props文件加载进来即可!
新的项目中,没有配置opencv时时不能够正确引入头文件的,如下:
添加新的
参考:https://www.jb51.net/article/246632.htm
参考:https://blog.csdn.net/m0_66494900/article/details/125997895
参考:https://blog.csdn.net/qq_37705525/article/details/125570452
参考:https://blog.csdn.net/weixin_43213895/article/details/121958969 # 如果要配置opencv-contrib 参考该文档
1.4 opencv配置好之后可能遇到的错误
1.4.1 opencv配置好后执行程序报错:由于找不到opencv_world455.dll,无法继续执行代码
1、在运行上面的opencv测试程序的时候可能会报错:由于找不到opencv_world455.dll,无法继续执行代码
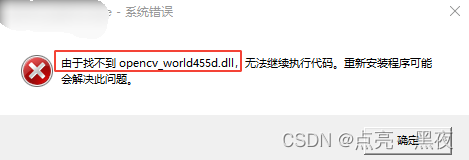
2、错误解决的方式:
把D:software_installopencv455buildx64vc15bin 添加到系统环境变量Path中,然后重新启动一下VS即可!
1.5 配置debug和release两种模式下的opencv环境
当你配置好环境后,运行opencv程序也没有问题,但是当你从Debug模式切换到Release模式之后,却发现opencv的环境又不能用了,这是因为你只配置了Debug模式下的opencv环境,而且这两种环境的配置还有一点不同!
下面说明如何配置Debug和Release两种模式下的环境,如下是在debug模式没有问题,在release模式下执行opencv相关程序报错:一般会出现错误:Opencv 报错 “LNK2019 无法解析的外部符号 “ ……”和“LNK2001 无法解析的外部符号 “ ……”(参考)
下面是配置release的环境:
- 添加
VC++目录/包含目录 - 添加
VC++目录/库目录 - 添加
链接器/输入/附加依赖项
Debug和release配置的包含目录和库目录路径使一模一样的,唯一不同的就是链接器/输入/附加依赖项,Debug配置对应的为:opencv_world455d.lib,而Release配置的为:opencv_world455.lib
- Debug配置的opencv附加依赖项为:
opencv_world455d.lib(带有d,这个d就是debug的缩写,表示为调试库文件) - Release配置的opencv附加依赖项为:
opencv_world455.lib(不带d)
- 如下打开
视图-其他窗口-属性管理器
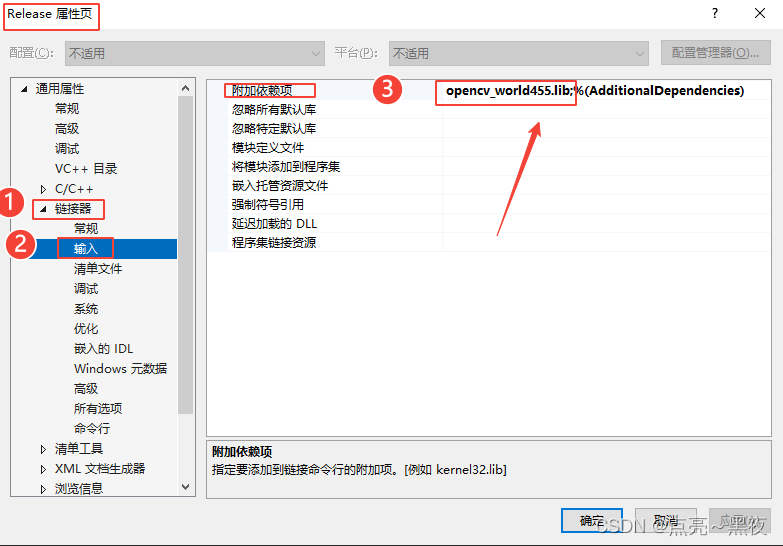
2、在Release |x64 上鼠标右键属性,然后添加opencv的包含目录、库目录、附加依赖项
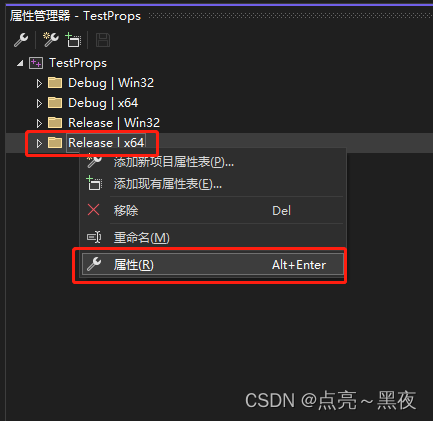
3、Release模式下配置的opencv附加依赖项为:opencv_world455.lib(不带d的)
注意:
如果你连个依赖库都添加,默认调用的是第一个,比如在Release模式下,你添加两个依赖库(参考):
// 依然报错:这种虽然两个依赖库都添加了,但是默认先调用第一个,但是第一个是debug模式的依赖库,因此就会报错
opencv_world455d.lib
opencv_world455.lib

// 下面这种写法就不会报错,但是建议每种模式写对应的依赖库就可以!!!
opencv_world455.lib
opencv_world455d.lib
1.5.1 关于debug和release两种模式的介绍
1、Debug模式和Release模式区别
- 只有Debug模式可以调试代码
- Debug模式不会对代码进行很好的优化,而且调试模式包含了很多调试信息,因此发布的软件也会比较大
- Release模式对代码的性能和体积都进行了很好的优化,体积一般都比较小巧精悍!
Debug 版本的存在是为了方便程序员开发和调试,性能和体积不是它的重点;Release 版本是最终交给用户的程序,性能和体积是需要重点优化的两个方面(参考)。
在开发过程中,我们一般使用 Debug 版本,只有等到开发完成,确认没有任何 Bug 之后,希望交给用户时再生成 Release 版本。
参考:http://c.biancheng.net/view/4124.html
参考:https://blog.csdn.net/whl0071/article/details/125393458
参考:
2 vscode配置C/C++编译环境
挖坑,待填
参考:
最后
以上就是漂亮灯泡最近收集整理的关于windows10 + visual studio配置C/C++编译环境 和 vscode配置C/C++编译环境,以及opencv4.5.5环境1 visual studio配置C/C++编译环境2 vscode配置C/C++编译环境的全部内容,更多相关windows10内容请搜索靠谱客的其他文章。

![[填坑]VS环境下C语言与C++混合编译1、若在cpp文件中引用c语言代码,需要添加extern](https://www.shuijiaxian.com/files_image/reation/bcimg8.png)


发表评论 取消回复