在本示例教程中,你将在索引之前使用 ingest pipeline 以通用日志格式解析服务器日志。 在开始之前,请检查摄取管道的先决条件。
你要解析的日志类似于以下内容:
127.0.0.1 user-identifier frank [10/Oct/2000:13:55:36 -0700] "GET /apache_pb.gif HTTP/1.0" 200 2326这些日志包含时间戳、IP 地址和用户代理。 你希望在 Elasticsearch 中为这三个项目提供自己的字段,以实现更快的搜索和可视化。 你还想知道请求来自哪里。通用日志格式的每一行具有如下的语法:
host ident authuser date request status bytes一个 “-” 符号代表缺失的数据
- 127.0.0.1 是向服务器发出请求的客户端(远程主机)的 IP 地址。
user-identifier 是客户端的 RFC 1413 身份。 通常 ”-”。frank 是请求文档的人的用户 ID。 通常为“-”,除非 .htaccess 已请求身份验证。- [10/Oct/2000:13:55:36 -0700] 是收到请求的日期、时间和时区,默认为 strftime 格式 %d/%b/%Y:%H:%M:%S %z。
- "GET /apache_pb.gif HTTP/1.0” 是来自客户端的请求行。 方法 GET、/apache_pb.gif 请求的资源和 HTTP/1.0 HTTP 协议。
- 200 是返回给客户端的 HTTP 状态码。 2xx 是成功响应,3xx 是重定向,4xx 是客户端错误,5xx 是服务器错误。
- 2326 是返回给客户端的对象的大小,以字节为单位。
在下面的示例中,日志的格式和上面的还说有所不同。
设计 grok pattern
上面的日志信息显然是一个非结构化的日志信息。如果我们直接写入到 Elasticsearch,那肯定是没有多大用处的,除了我们可以做一些简单的全文查询之外。为了能够让上面的日志信息更加易于分析统计,我们可以在写入之前对这个日志信息进行结构化。结构化的途径有很多。 我在文章 “Elasticsearch:创建 Ingest pipeline” 里有介绍几种方案。Ingest pipeline 无疑是一种比较容易部署且有效的方法。我们可以依托 Elasticsearch 的可拓展性,使用专门的 ingest 节点来处理 pipeline。
为了达到结构化的目的,我们可以采用 grok processor 来处理上面的常用日志格式。我们启动 Kibana:
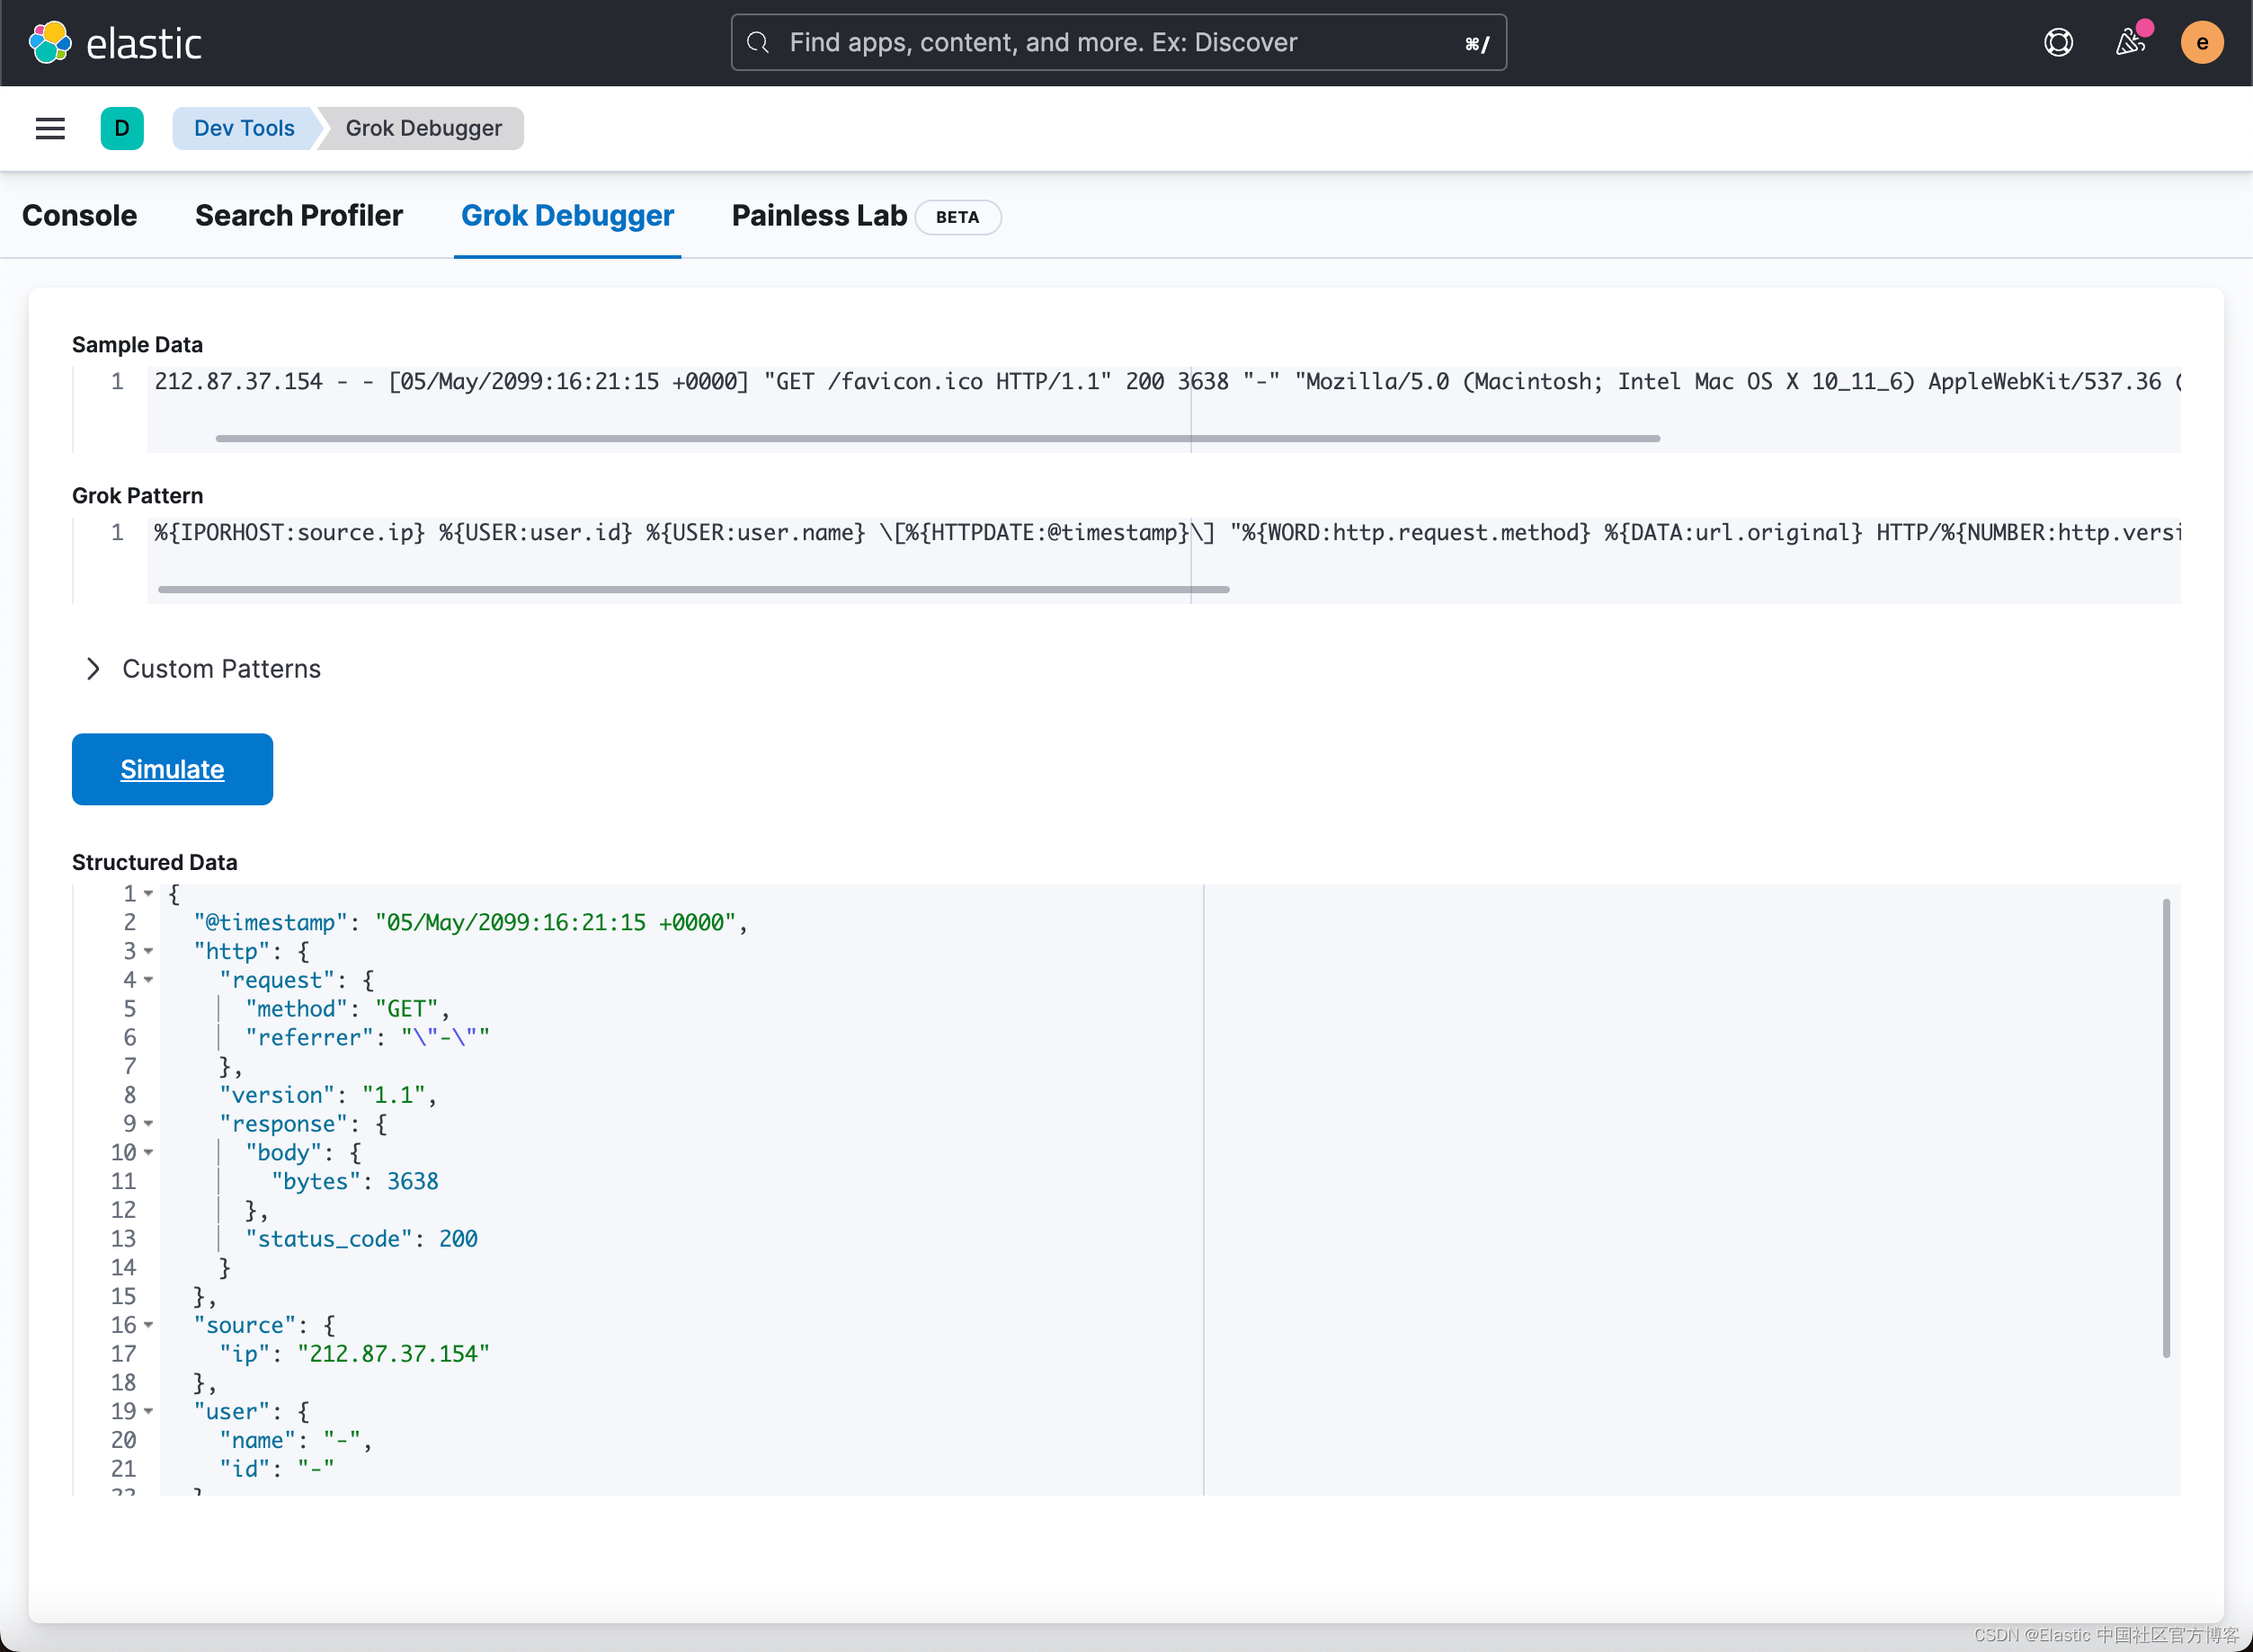
我们首先在 Sample data 项输入如下的句子:
212.87.37.154 - - [05/May/2099:16:21:15 +0000] "GET /favicon.ico HTTP/1.1" 200 3638 "-" "Mozilla/5.0 (Macintosh; Intel Mac OS X 10_11_6) AppleWebKit/537.36 (KHTML, like Gecko) Chrome/52.0.2743.116 Safari/537.36"在 Grok pattern 下输入:
%{IPORHOST:source.ip} %{USER:user.id} %{USER:user.name} [%{HTTPDATE:@timestamp}] "%{WORD:http.request.method} %{DATA:url.original} HTTP/%{NUMBER:http.version}" %{NUMBER:http.response.status_code:int} (?:-|%{NUMBER:http.response.body.bytes:int}) %{QS:http.request.referrer} %{QS:user_agent}我们点击 Simulate 后就可以看到上面截图下面的输出。 如果你能看到上面的结构化的输出,则说明我们的 grok pattern 是正确的。
创建 ingest pipeline
我们有两种方法来创建 ingest pipeline。
使用 Kibana 提供的 UI
我们使用如下的方法来进行操作:
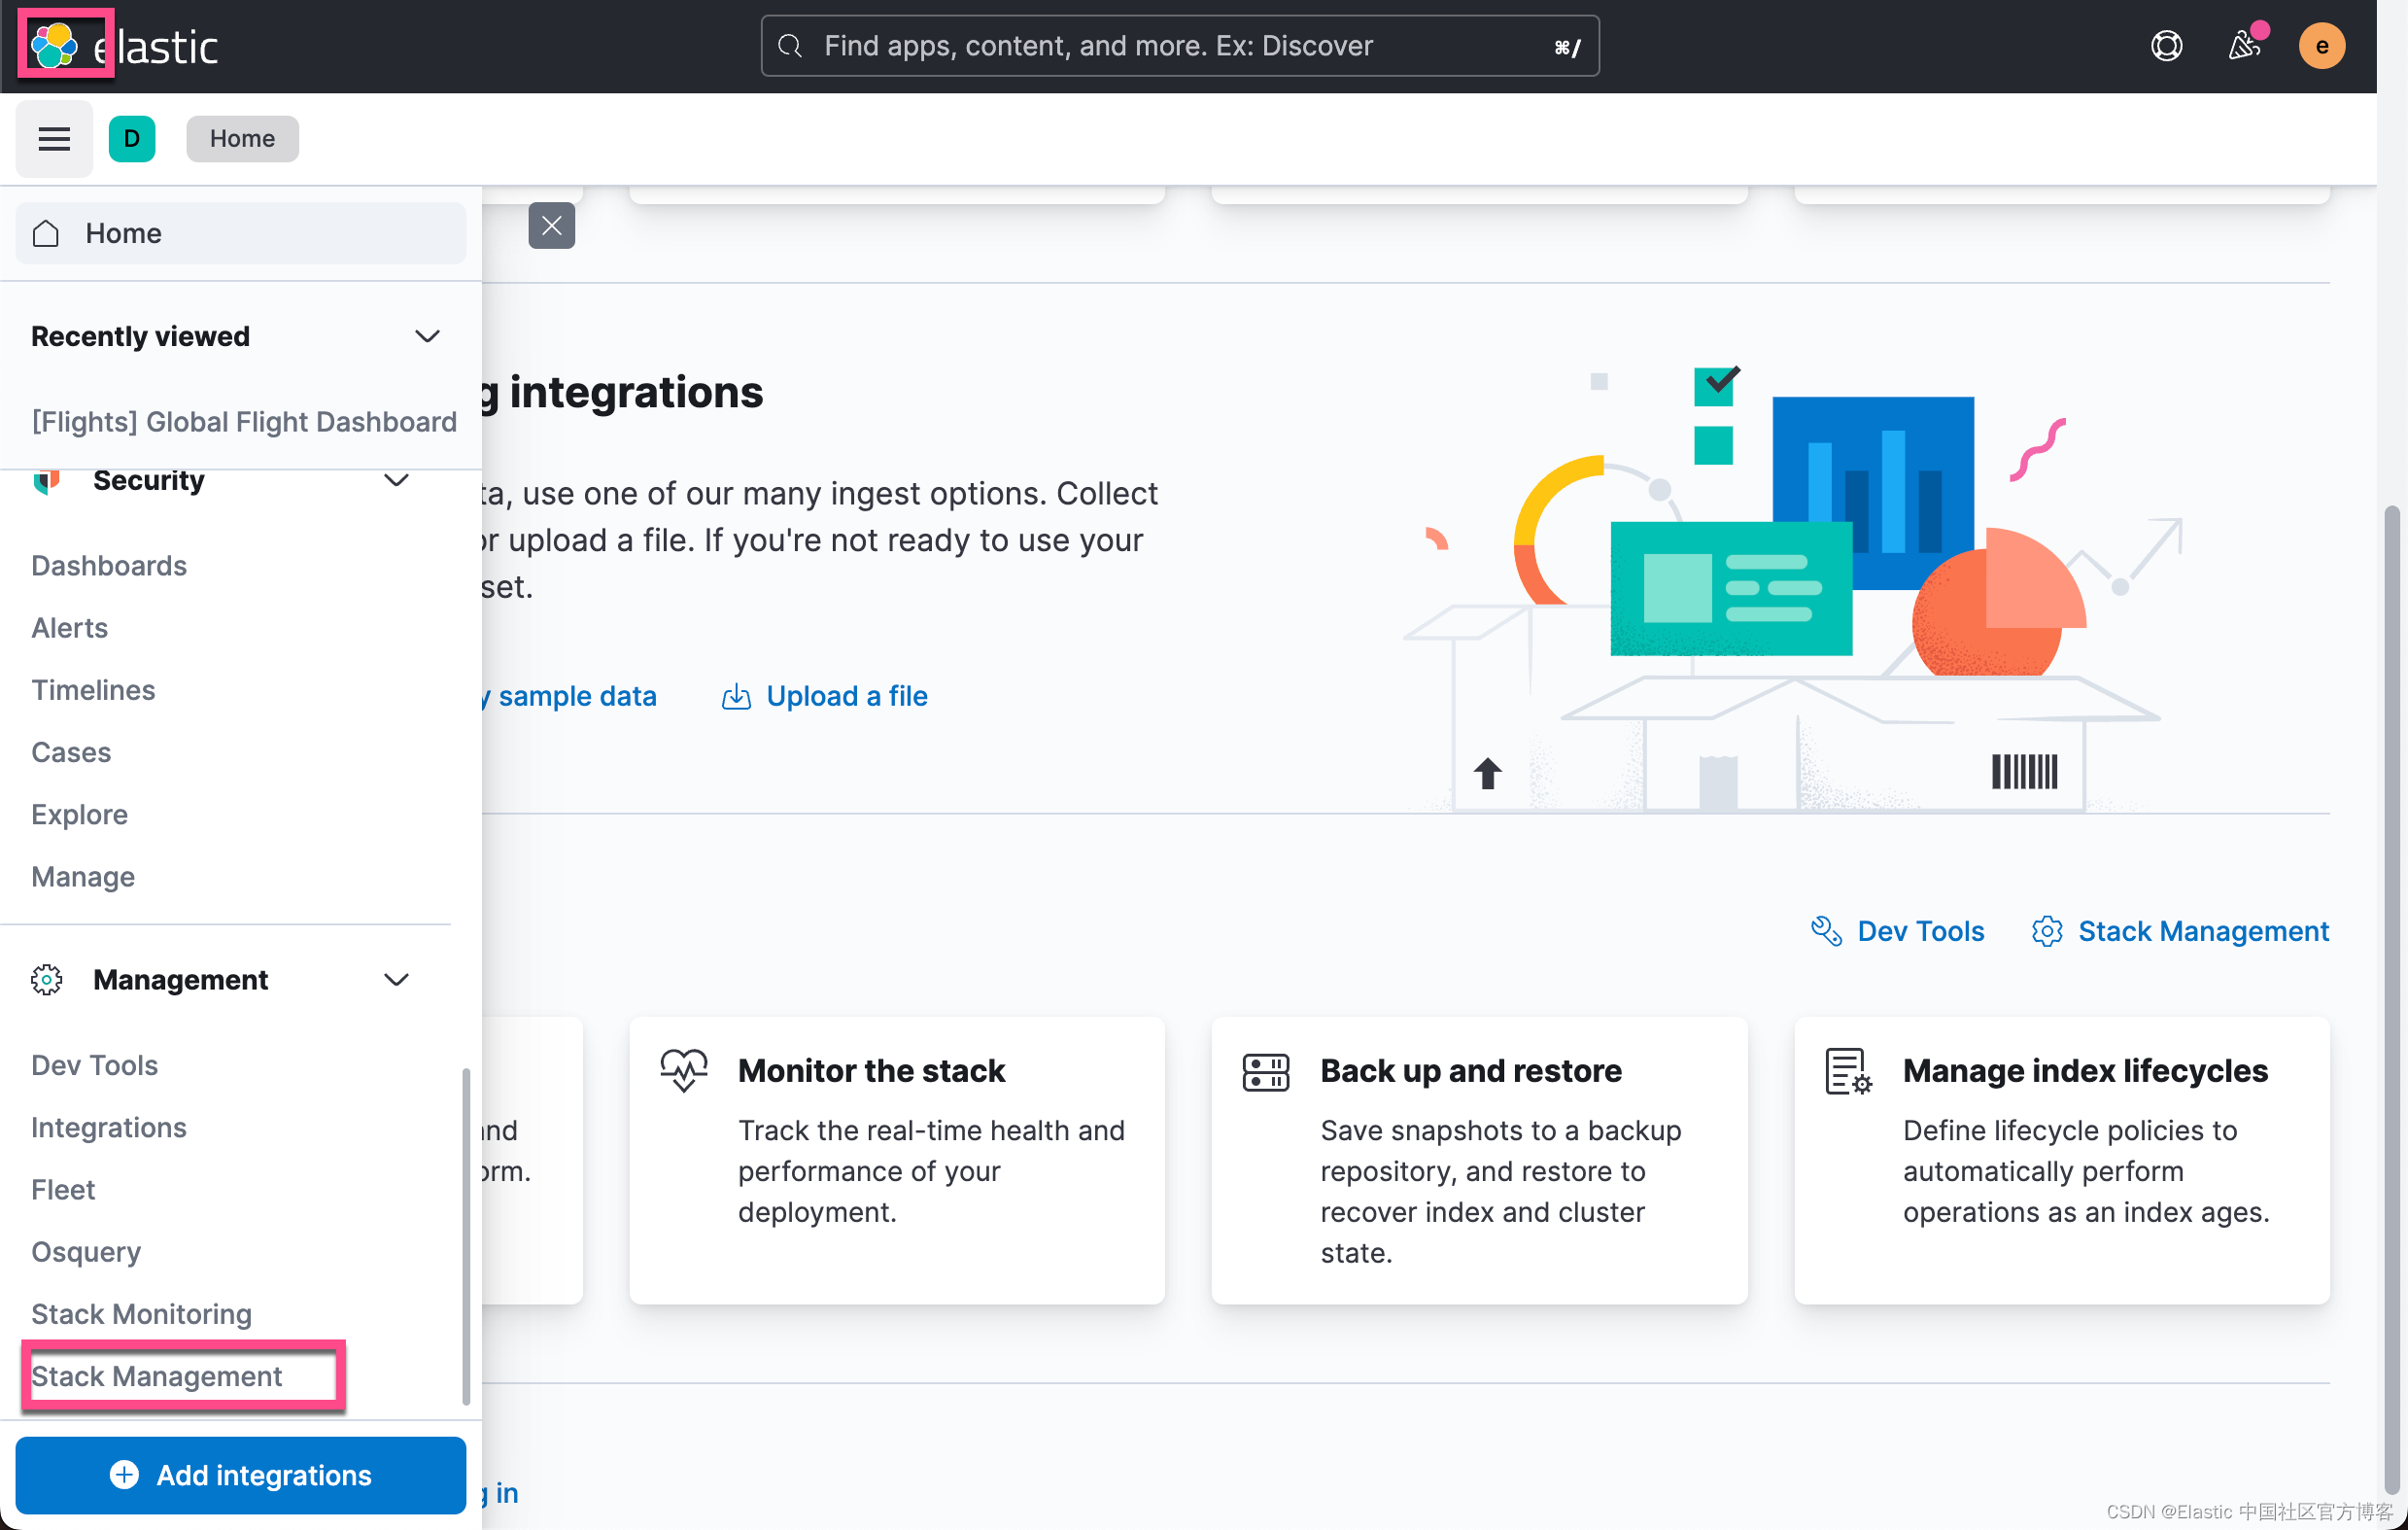
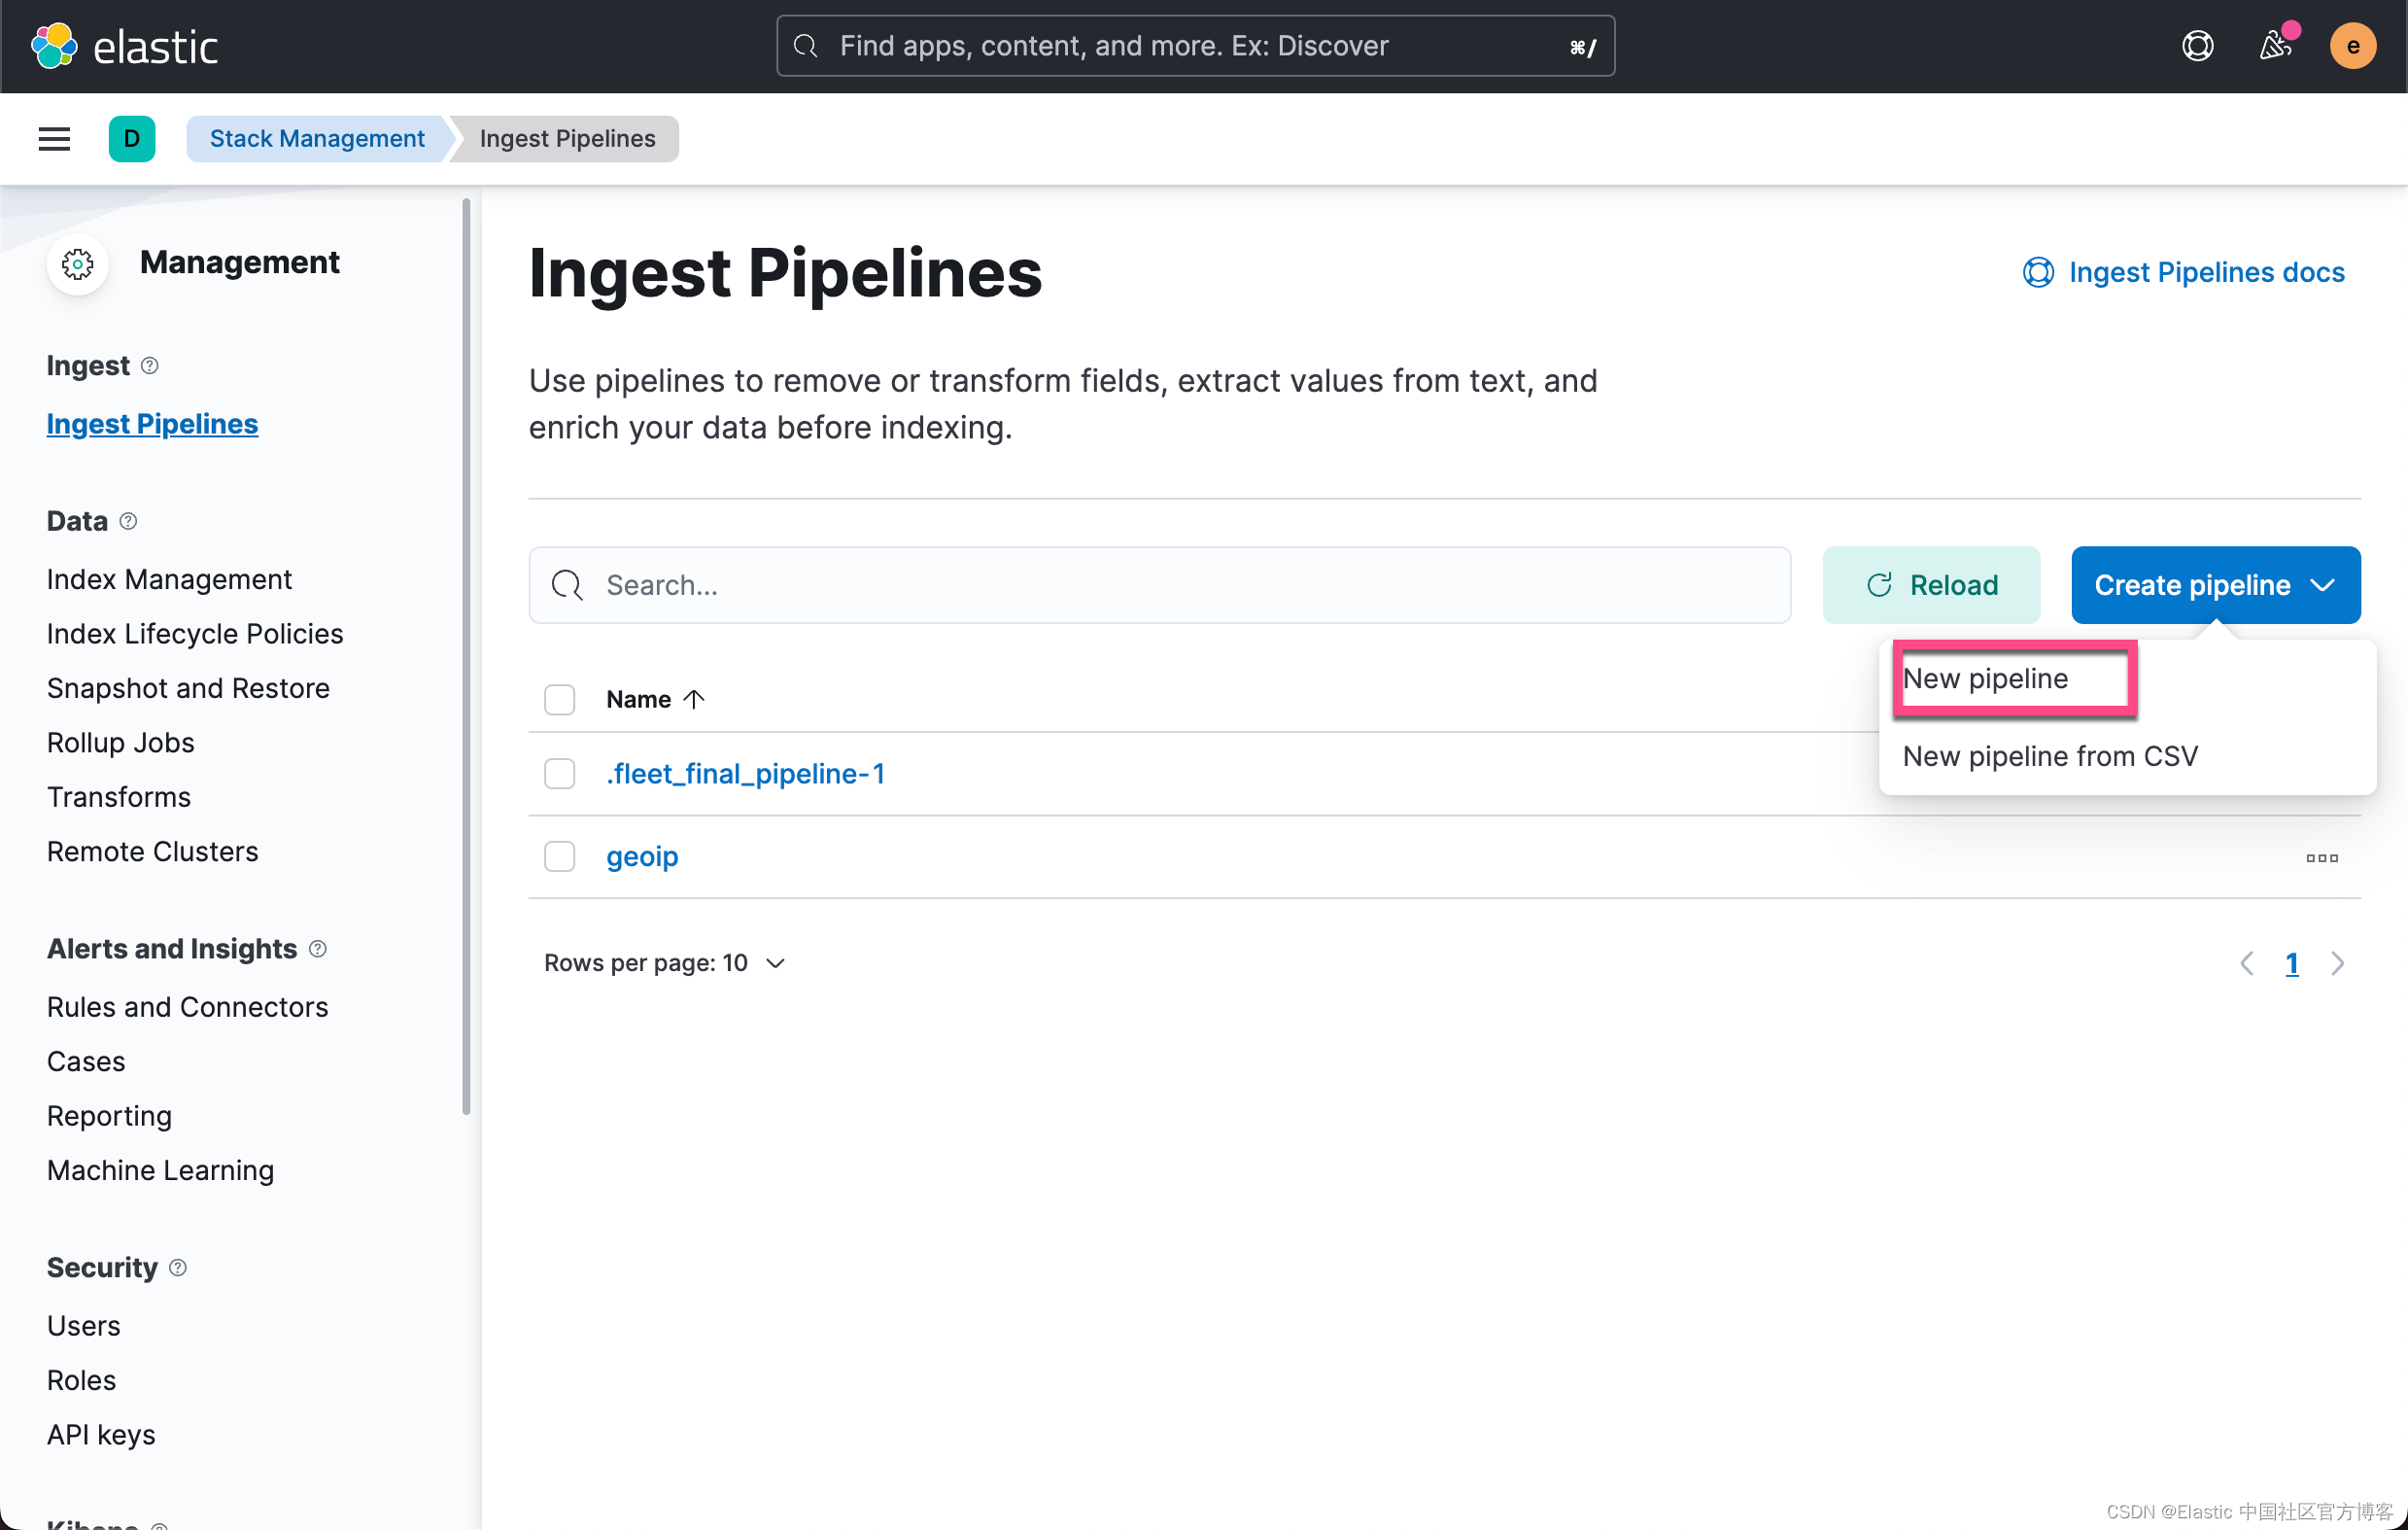
从上面的界面中,我们可以看出来我们可以甚至直接从 CSV 来创建一个 pipeline。点击上面的 New pipeline:

我们的 pipeline 名称定义为 common_log_format。接下来,我们来创建一系列的处理器来处理我们的日志:

在上面,我们在 Patterns 里输入:
%{IPORHOST:source.ip} %{USER:user.id} %{USER:user.name} \[%{HTTPDATE:@timestamp}\] "%{WORD:http.request.method} %{DATA:url.original} HTTP/%{NUMBER:http.version}" %{NUMBER:http.response.status_code:int} (?:-|%{NUMBER:http.response.body.bytes:int}) %{QS:http.request.referrer} %{QS:user_agent}请注意,由于字符 是特殊字符,它需要 escape 的字符,所以,我们需要使用两个 "" 来代替。针对 " 字符,它也是一样的,需要 escape。在它的前面需要添加 符号。点击上面的 Add 按钮。这样我们就创建了第一个 processor:
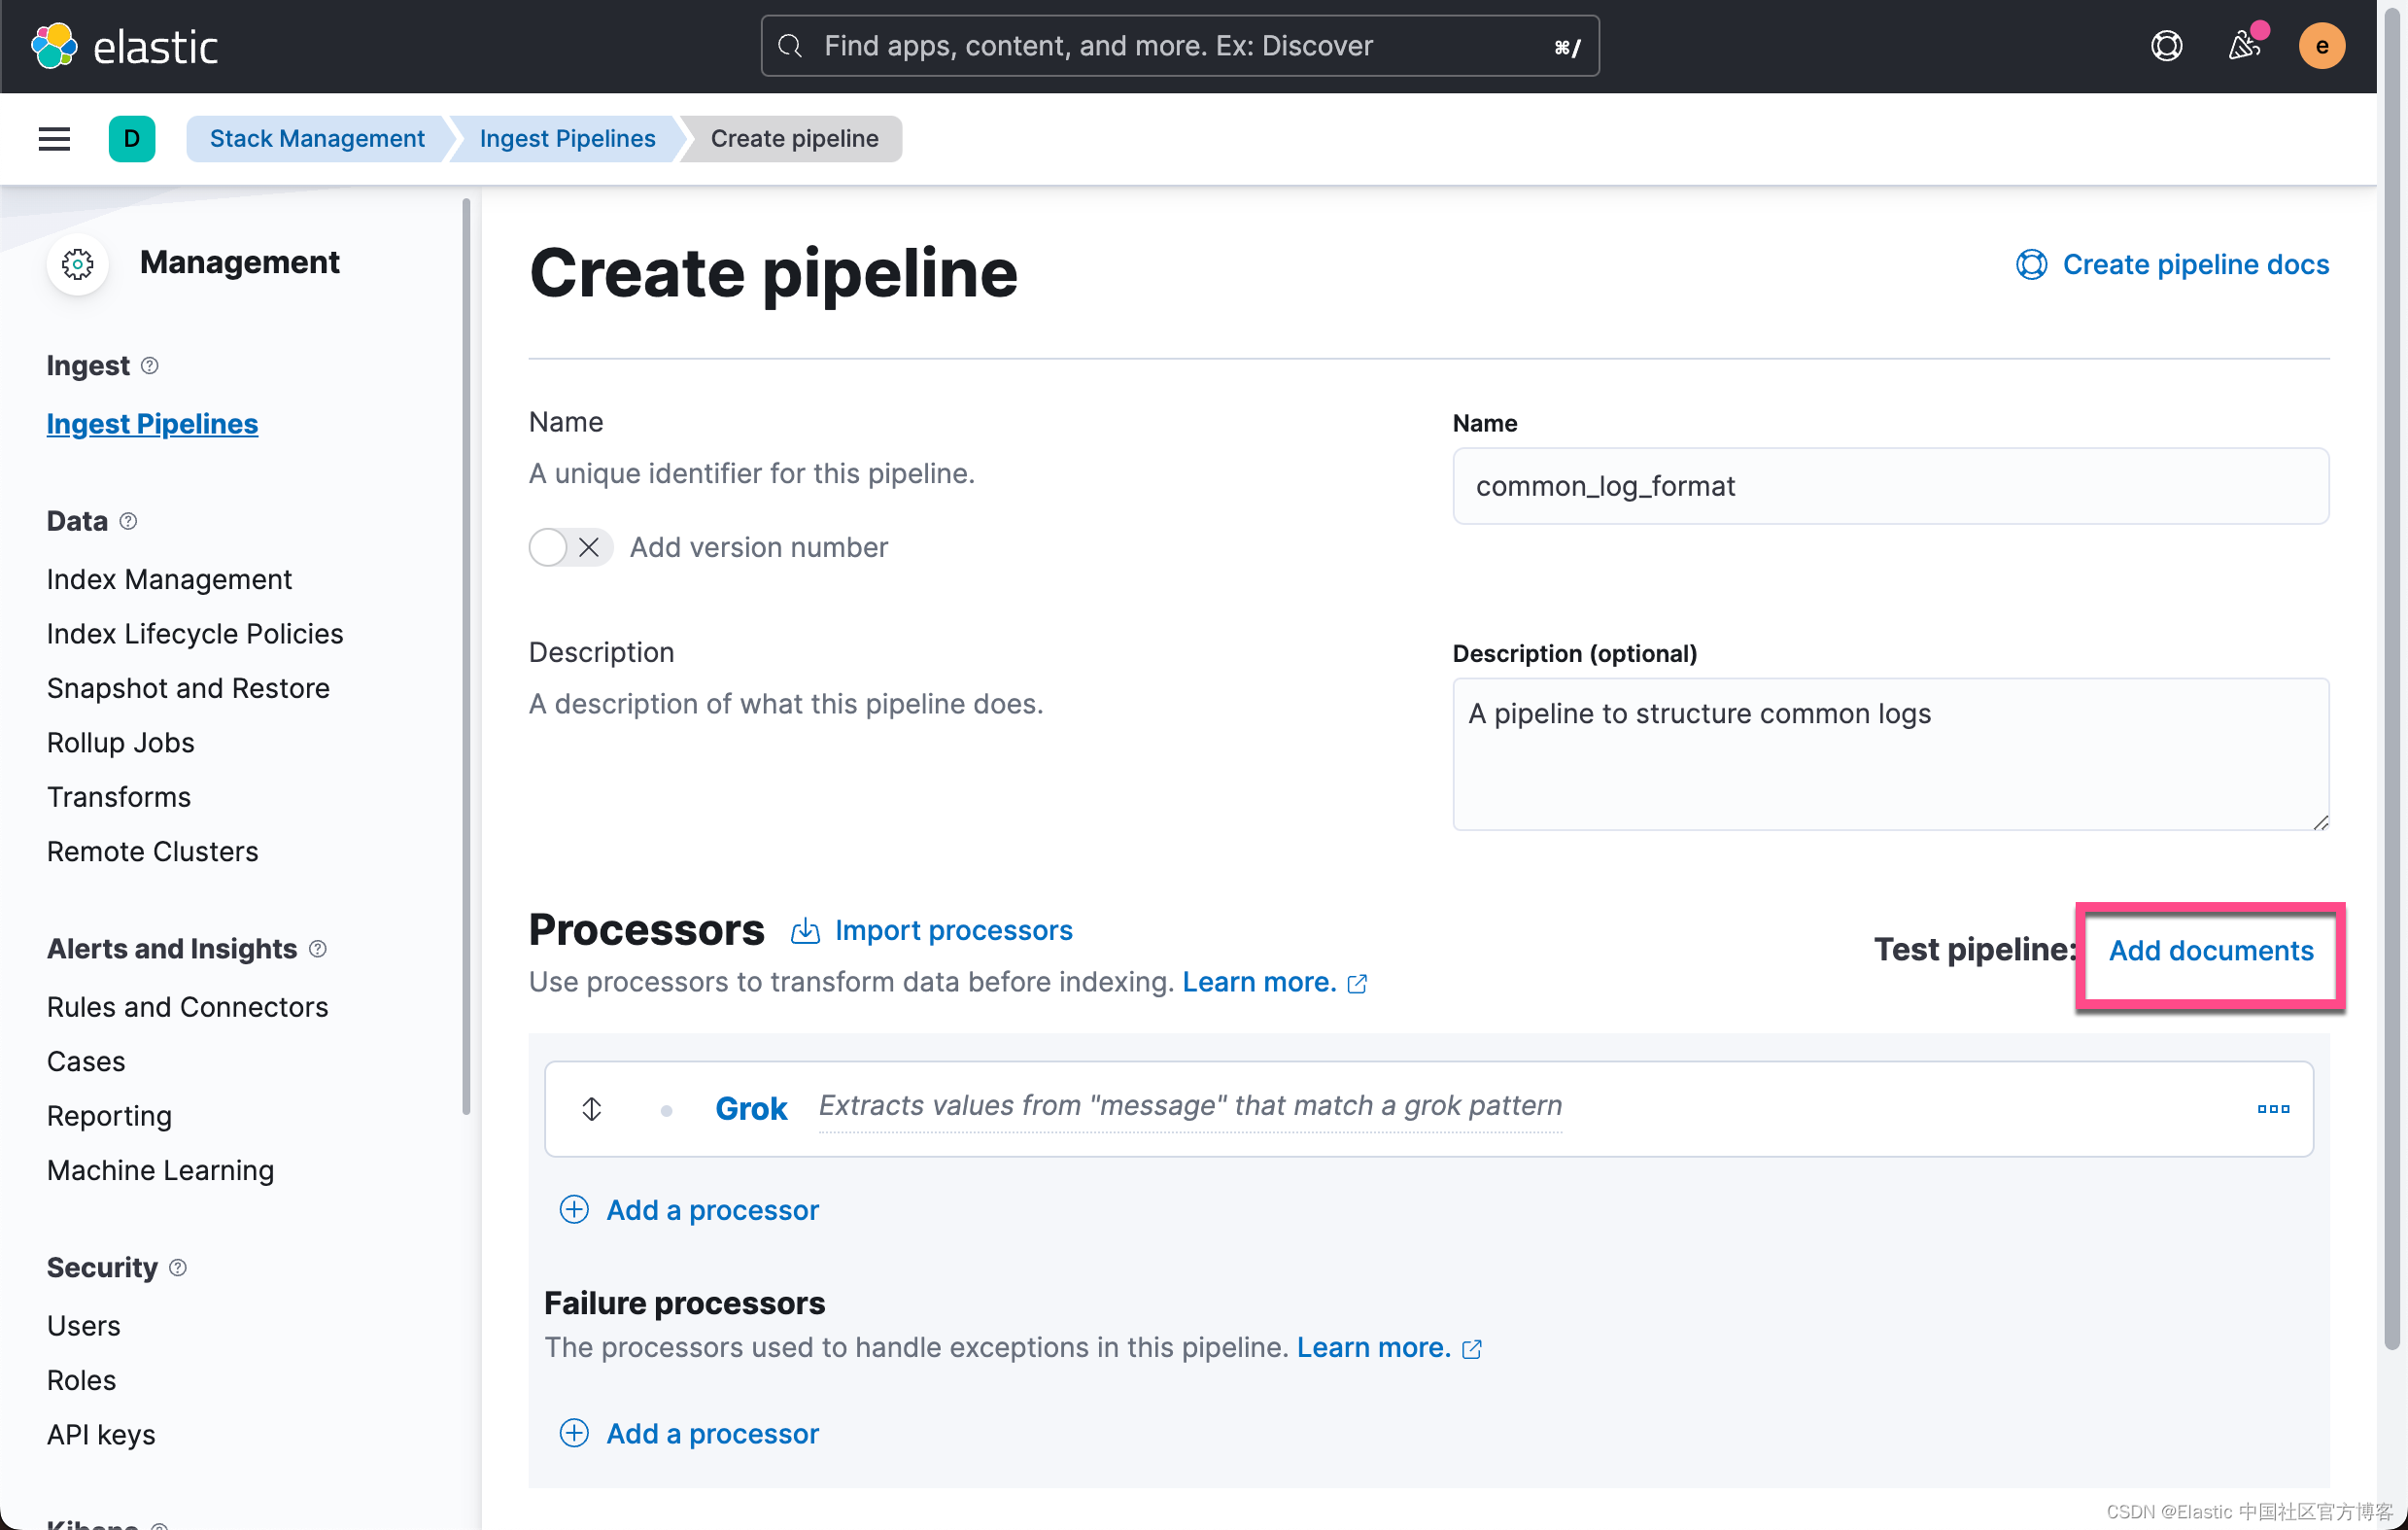
为了验证 Grok processor 的正确性,点击上面的 Add documents 来进行测试:
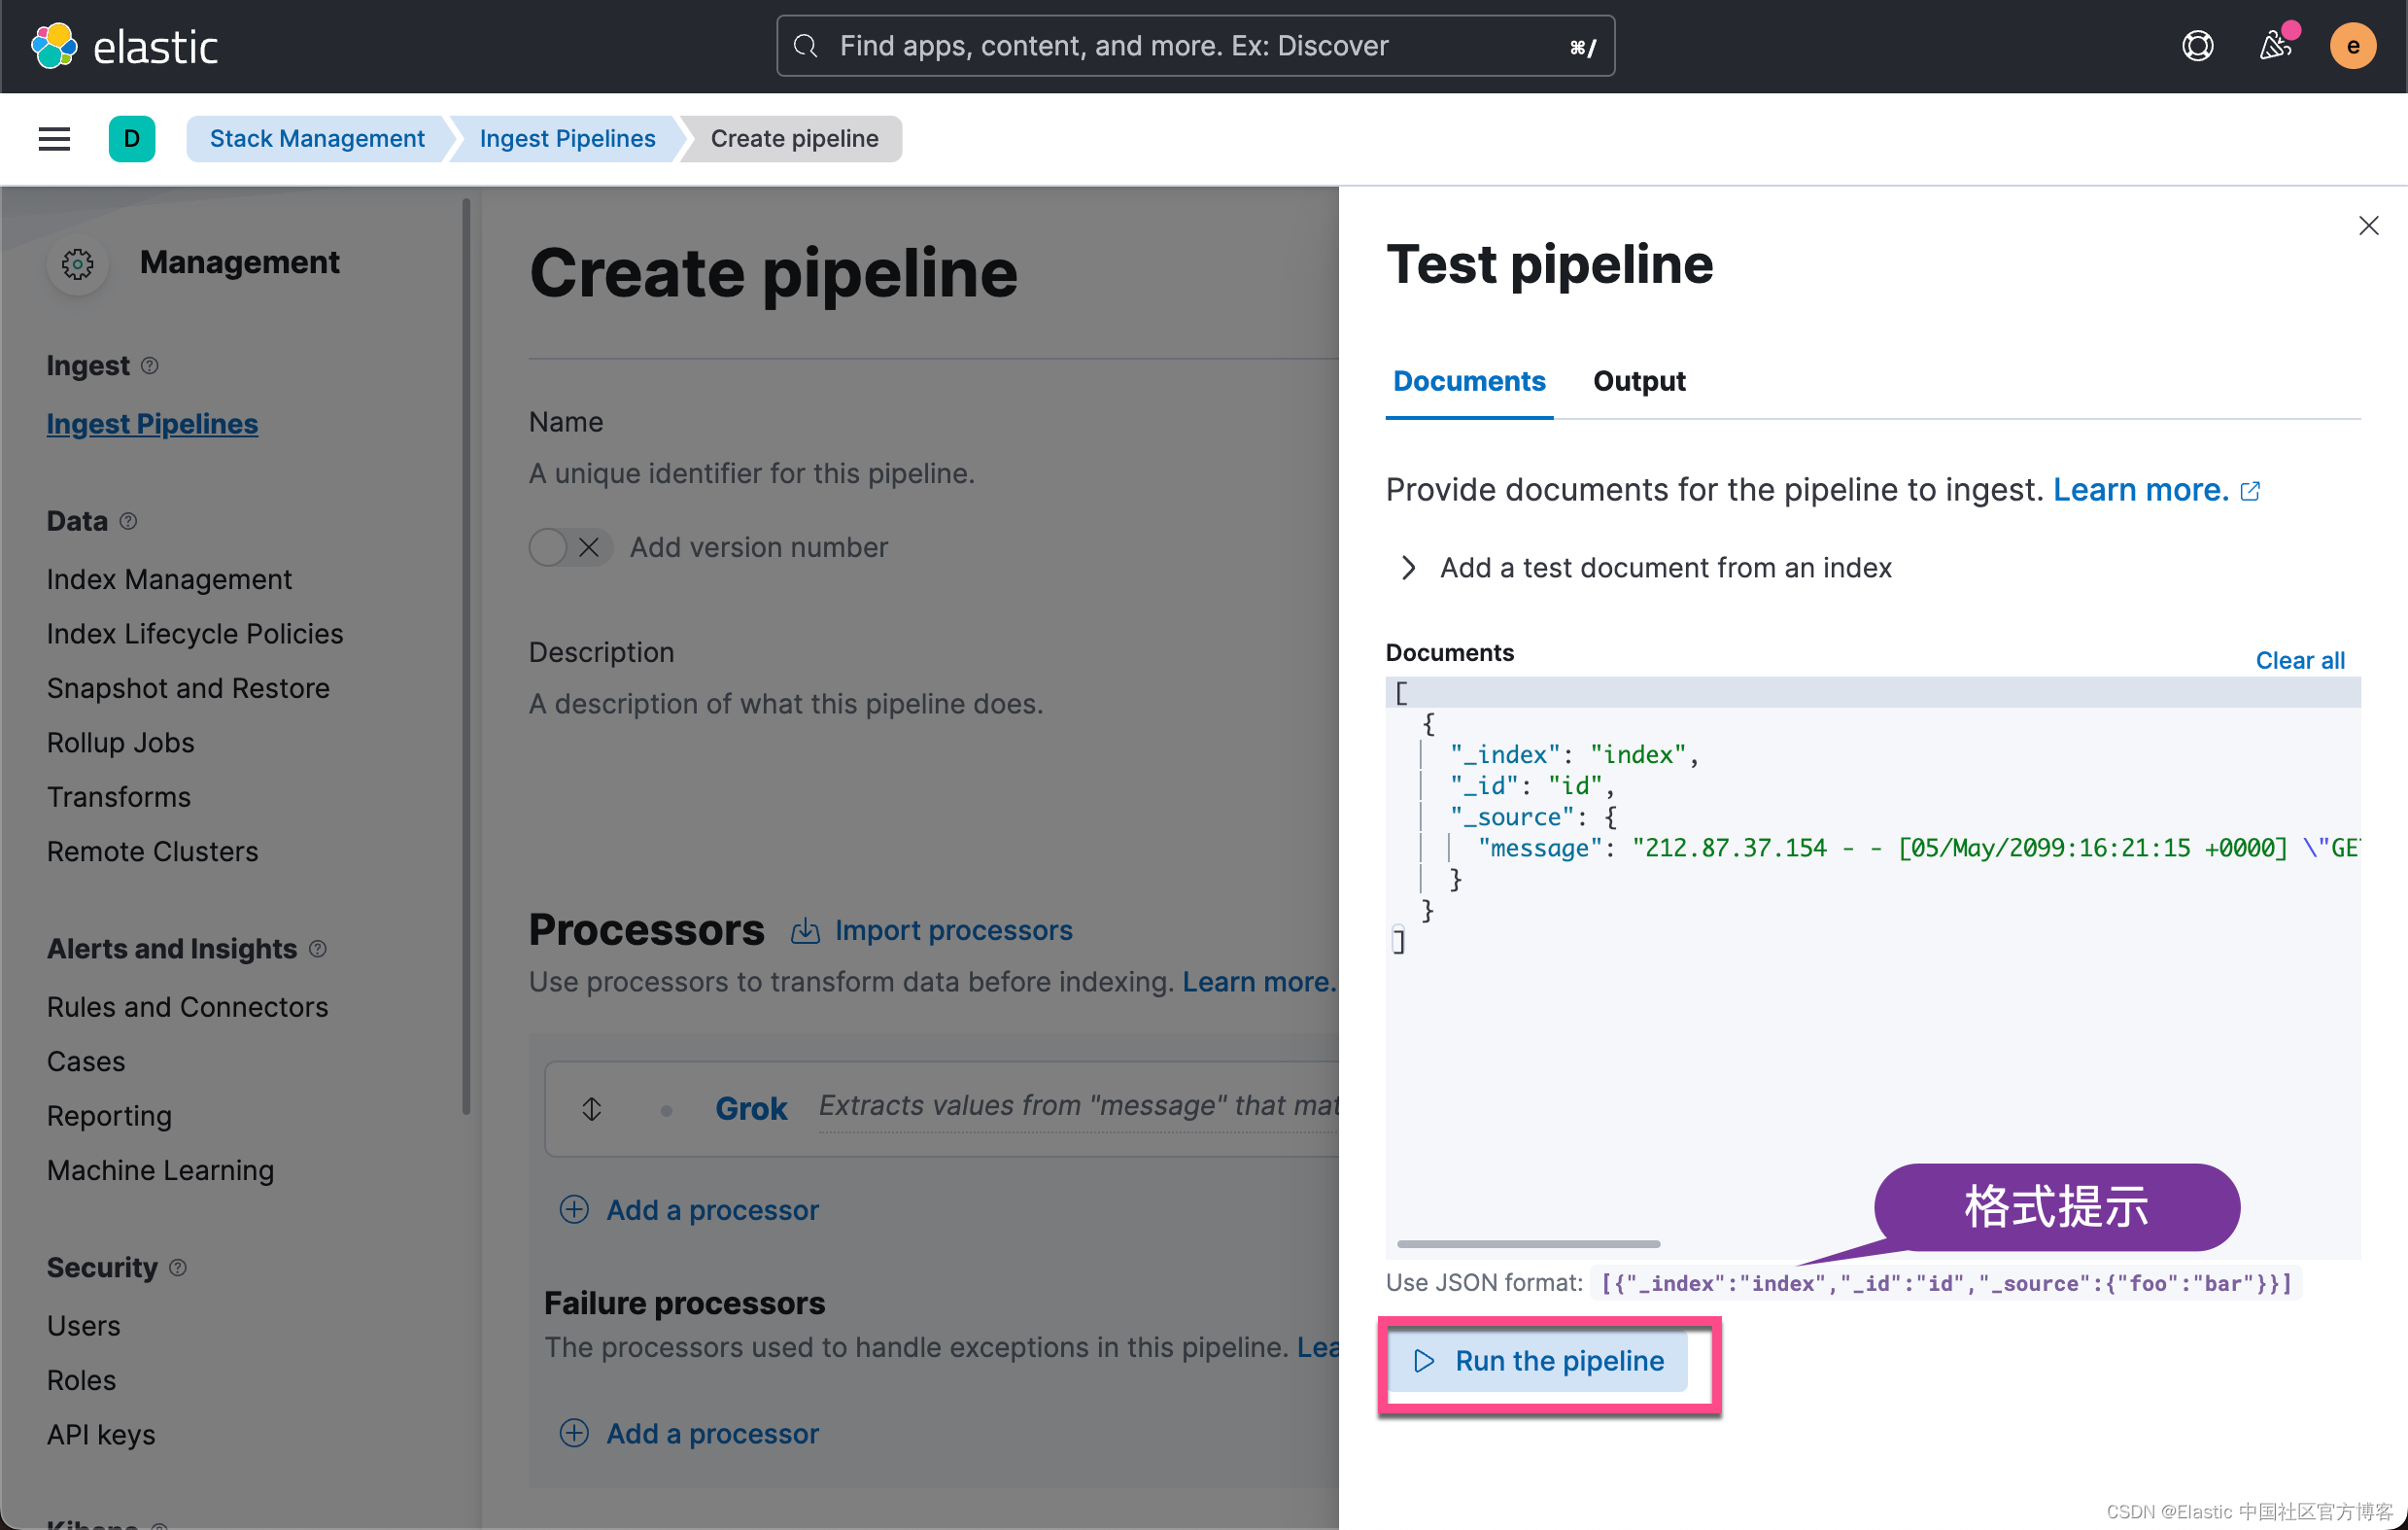
我们按照上面的提示填入相应的测试信息。针对我们的情况:
[
  {
    "_index": "index",
    "_id": "id",
    "_source": {
      "message": "212.87.37.154 - - [05/May/2099:16:21:15 +0000] "GET /favicon.ico HTTP/1.1" 200 3638 "-" "Mozilla/5.0 (Macintosh; Intel Mac OS X 10_11_6) AppleWebKit/537.36 (KHTML, like Gecko) Chrome/52.0.2743.116 Safari/537.36""
    }
  }
]
同样地,我们需要 escape 引号这个特殊的字符。
点击上面的 Run the pipeline 按钮:
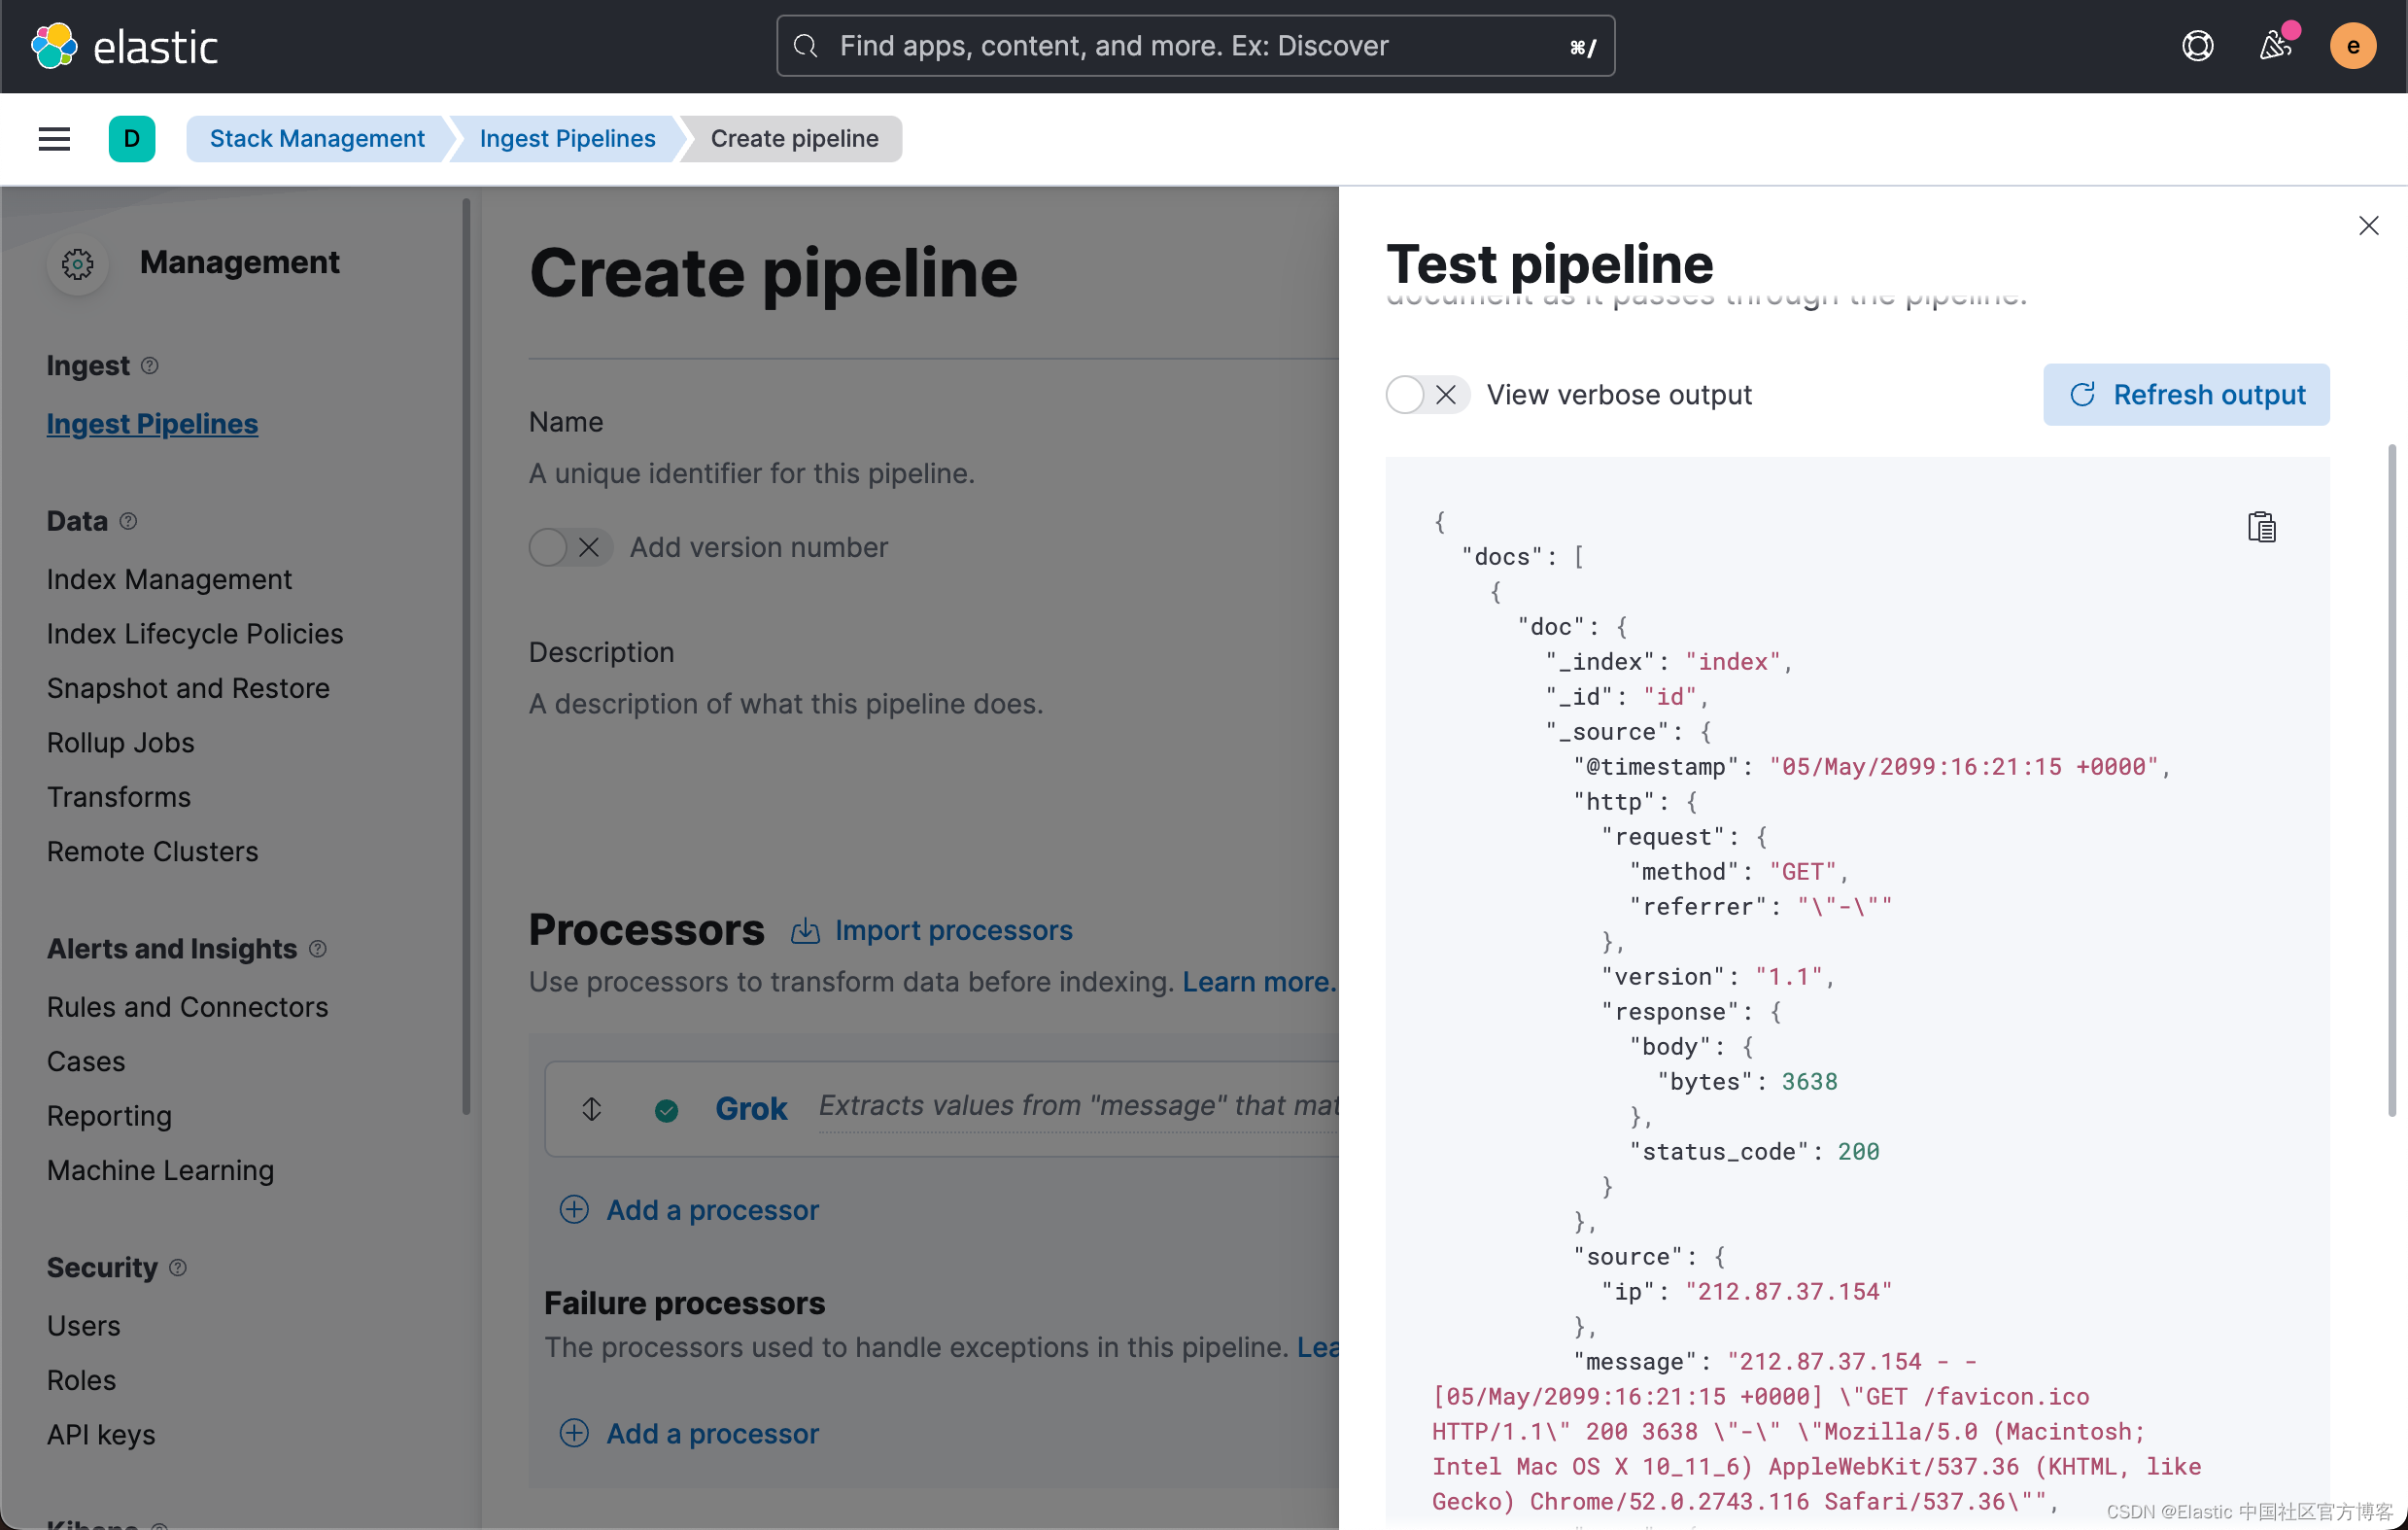
我们看到了我们想要的结果。它说明我们的 grok processor 是工作正常的。在实际的使用中,在解析的过程中,有可能会出现错误。它可能是不符合 grok pattern 的文档而造成的。我们可以参考之前的文章 “Elasticsearch:如何处理 ingest pipeline 中的异常” 来处理这些异常。
我们查看一下当前的时间戳格式:

我们发现它不是我们想要的格式,比如 2099-05-05T16:21:15.000Z。我们可以使用 date processor 来进行转换:
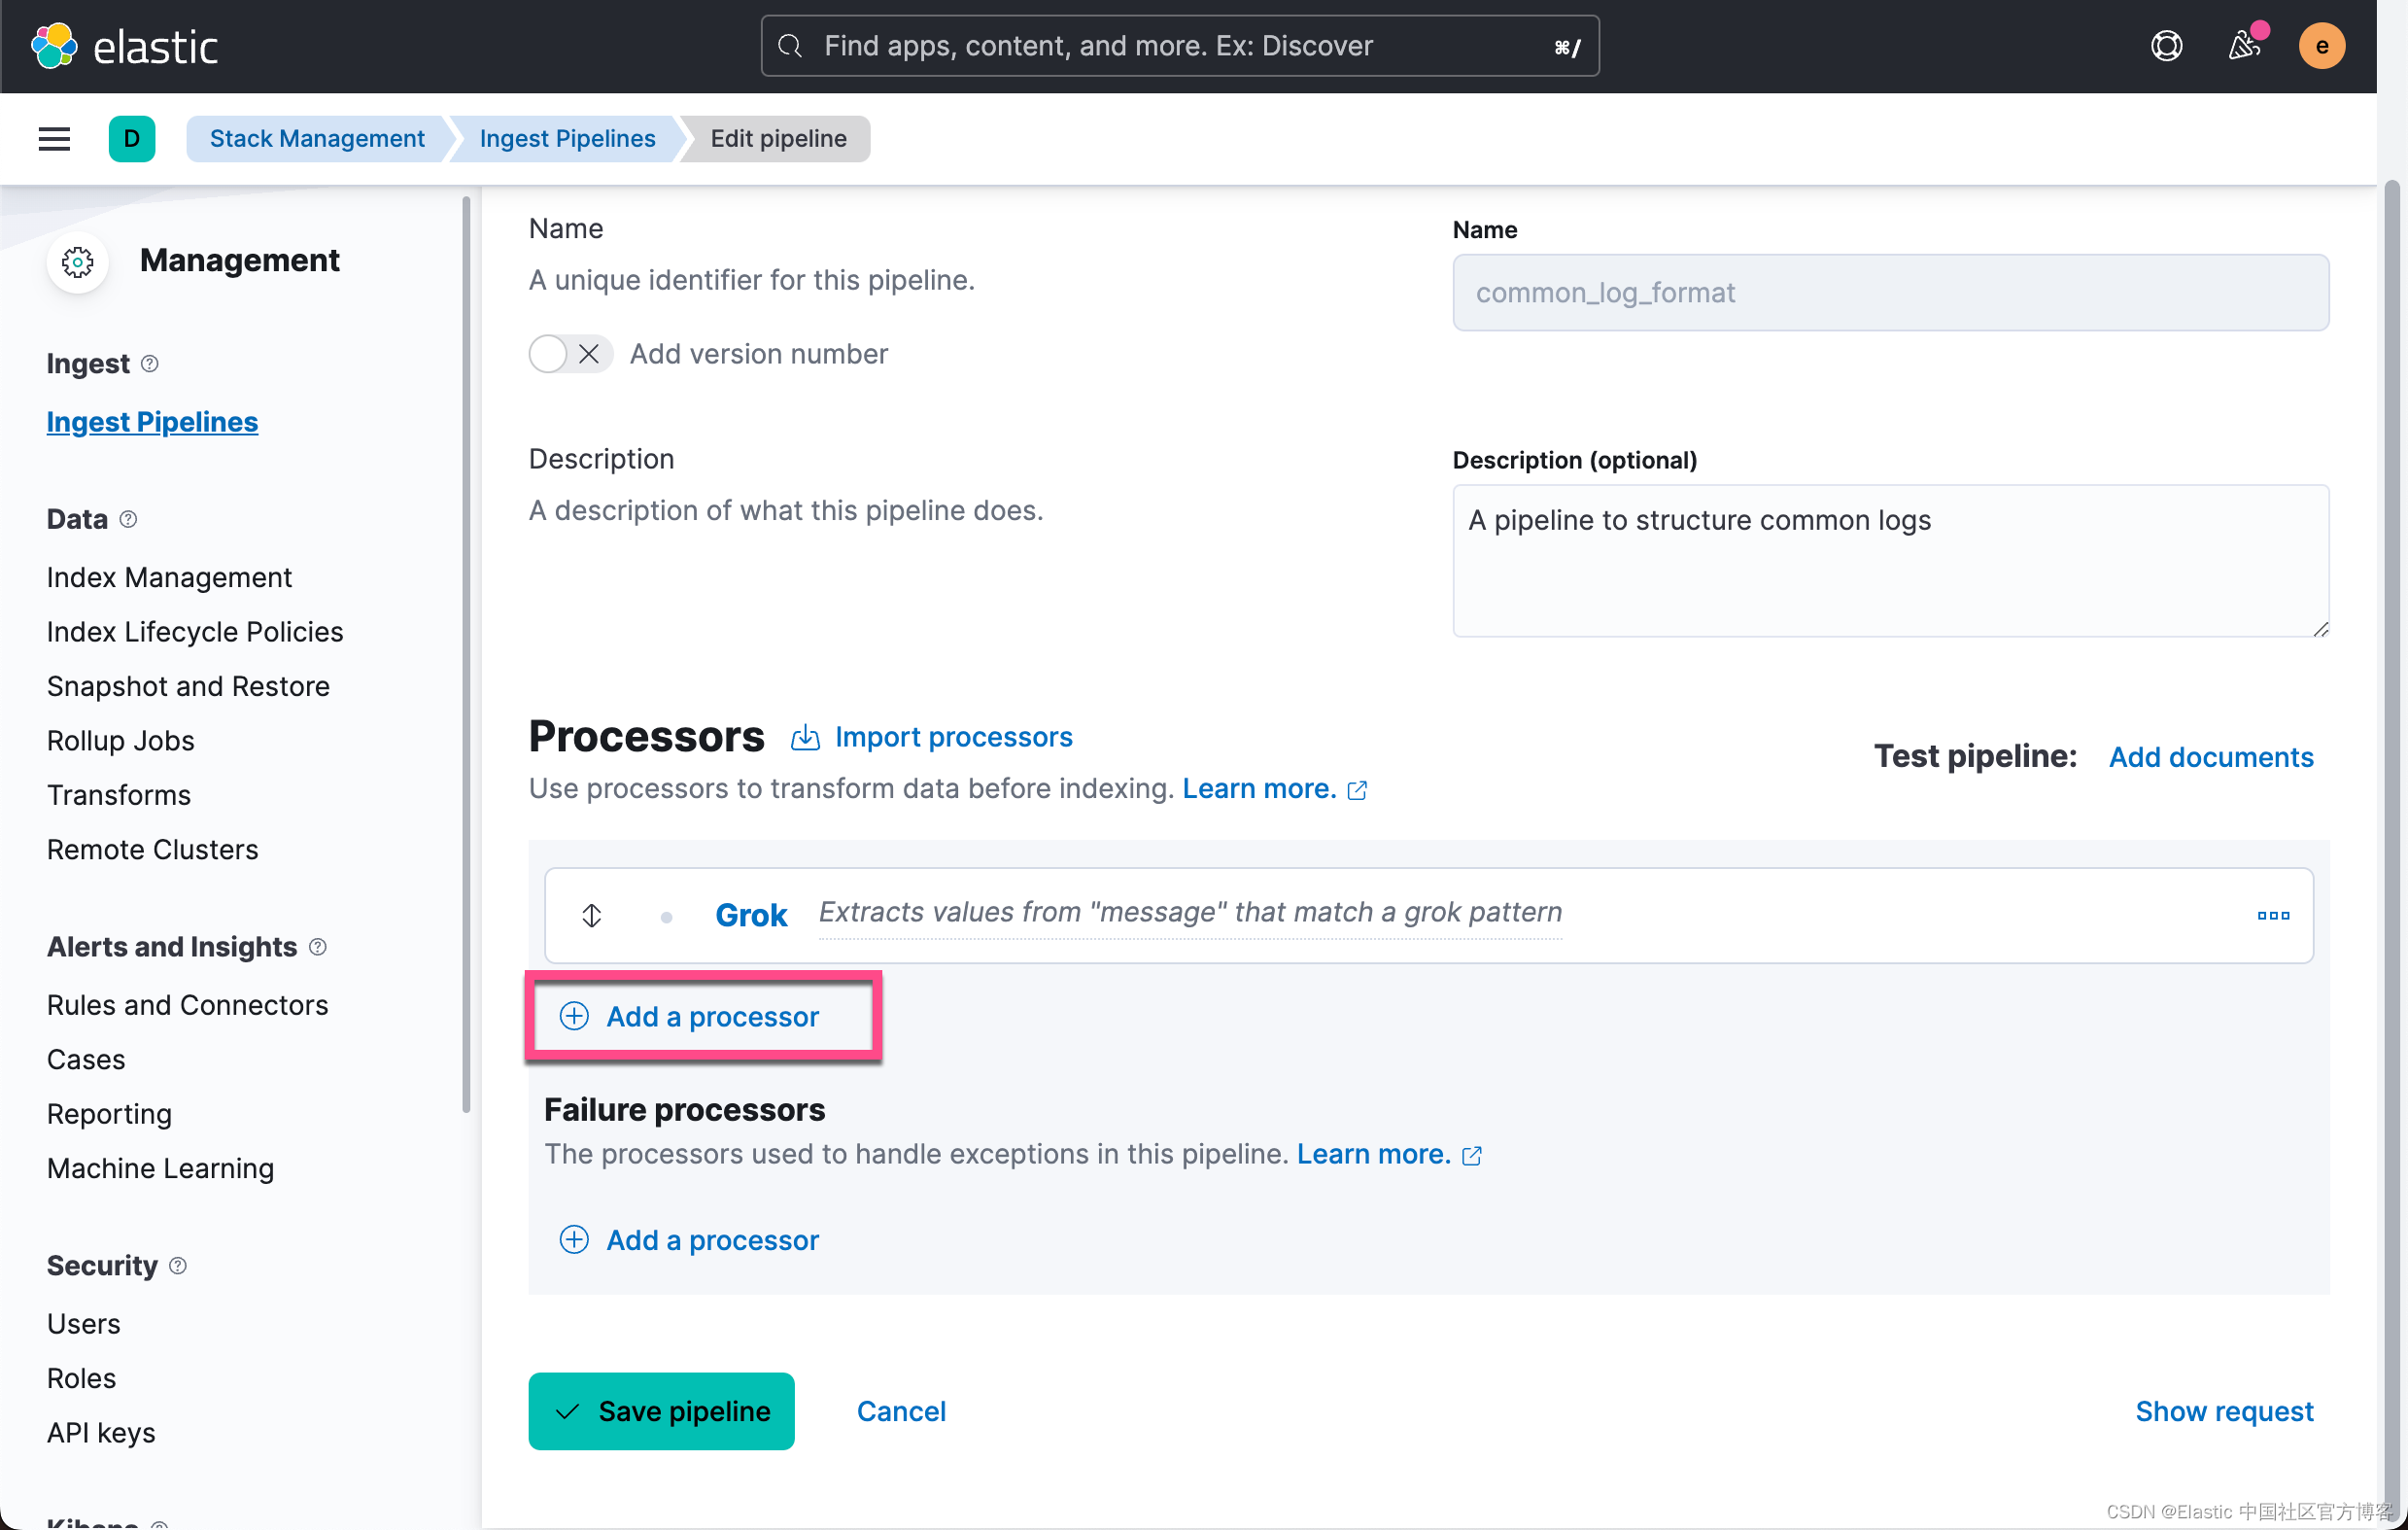

在上面,我们可以把格式 format 定义为:
dd/MMM/yyyy:HH:mm:ss Z点击 Add 按钮:

上面显示我们已经成功地创建了 Grok 及 Date processors。它们是按照顺序依次执行的。点击 View output 按钮:

从上面的输出中,我们可以看出来显示的时间格式已经发生改变。它是按照我们默认的 locale 的时间格式来进行显示的。当然,我们甚至可以在 Date processor 里定义输出显示的时间格式,比如:
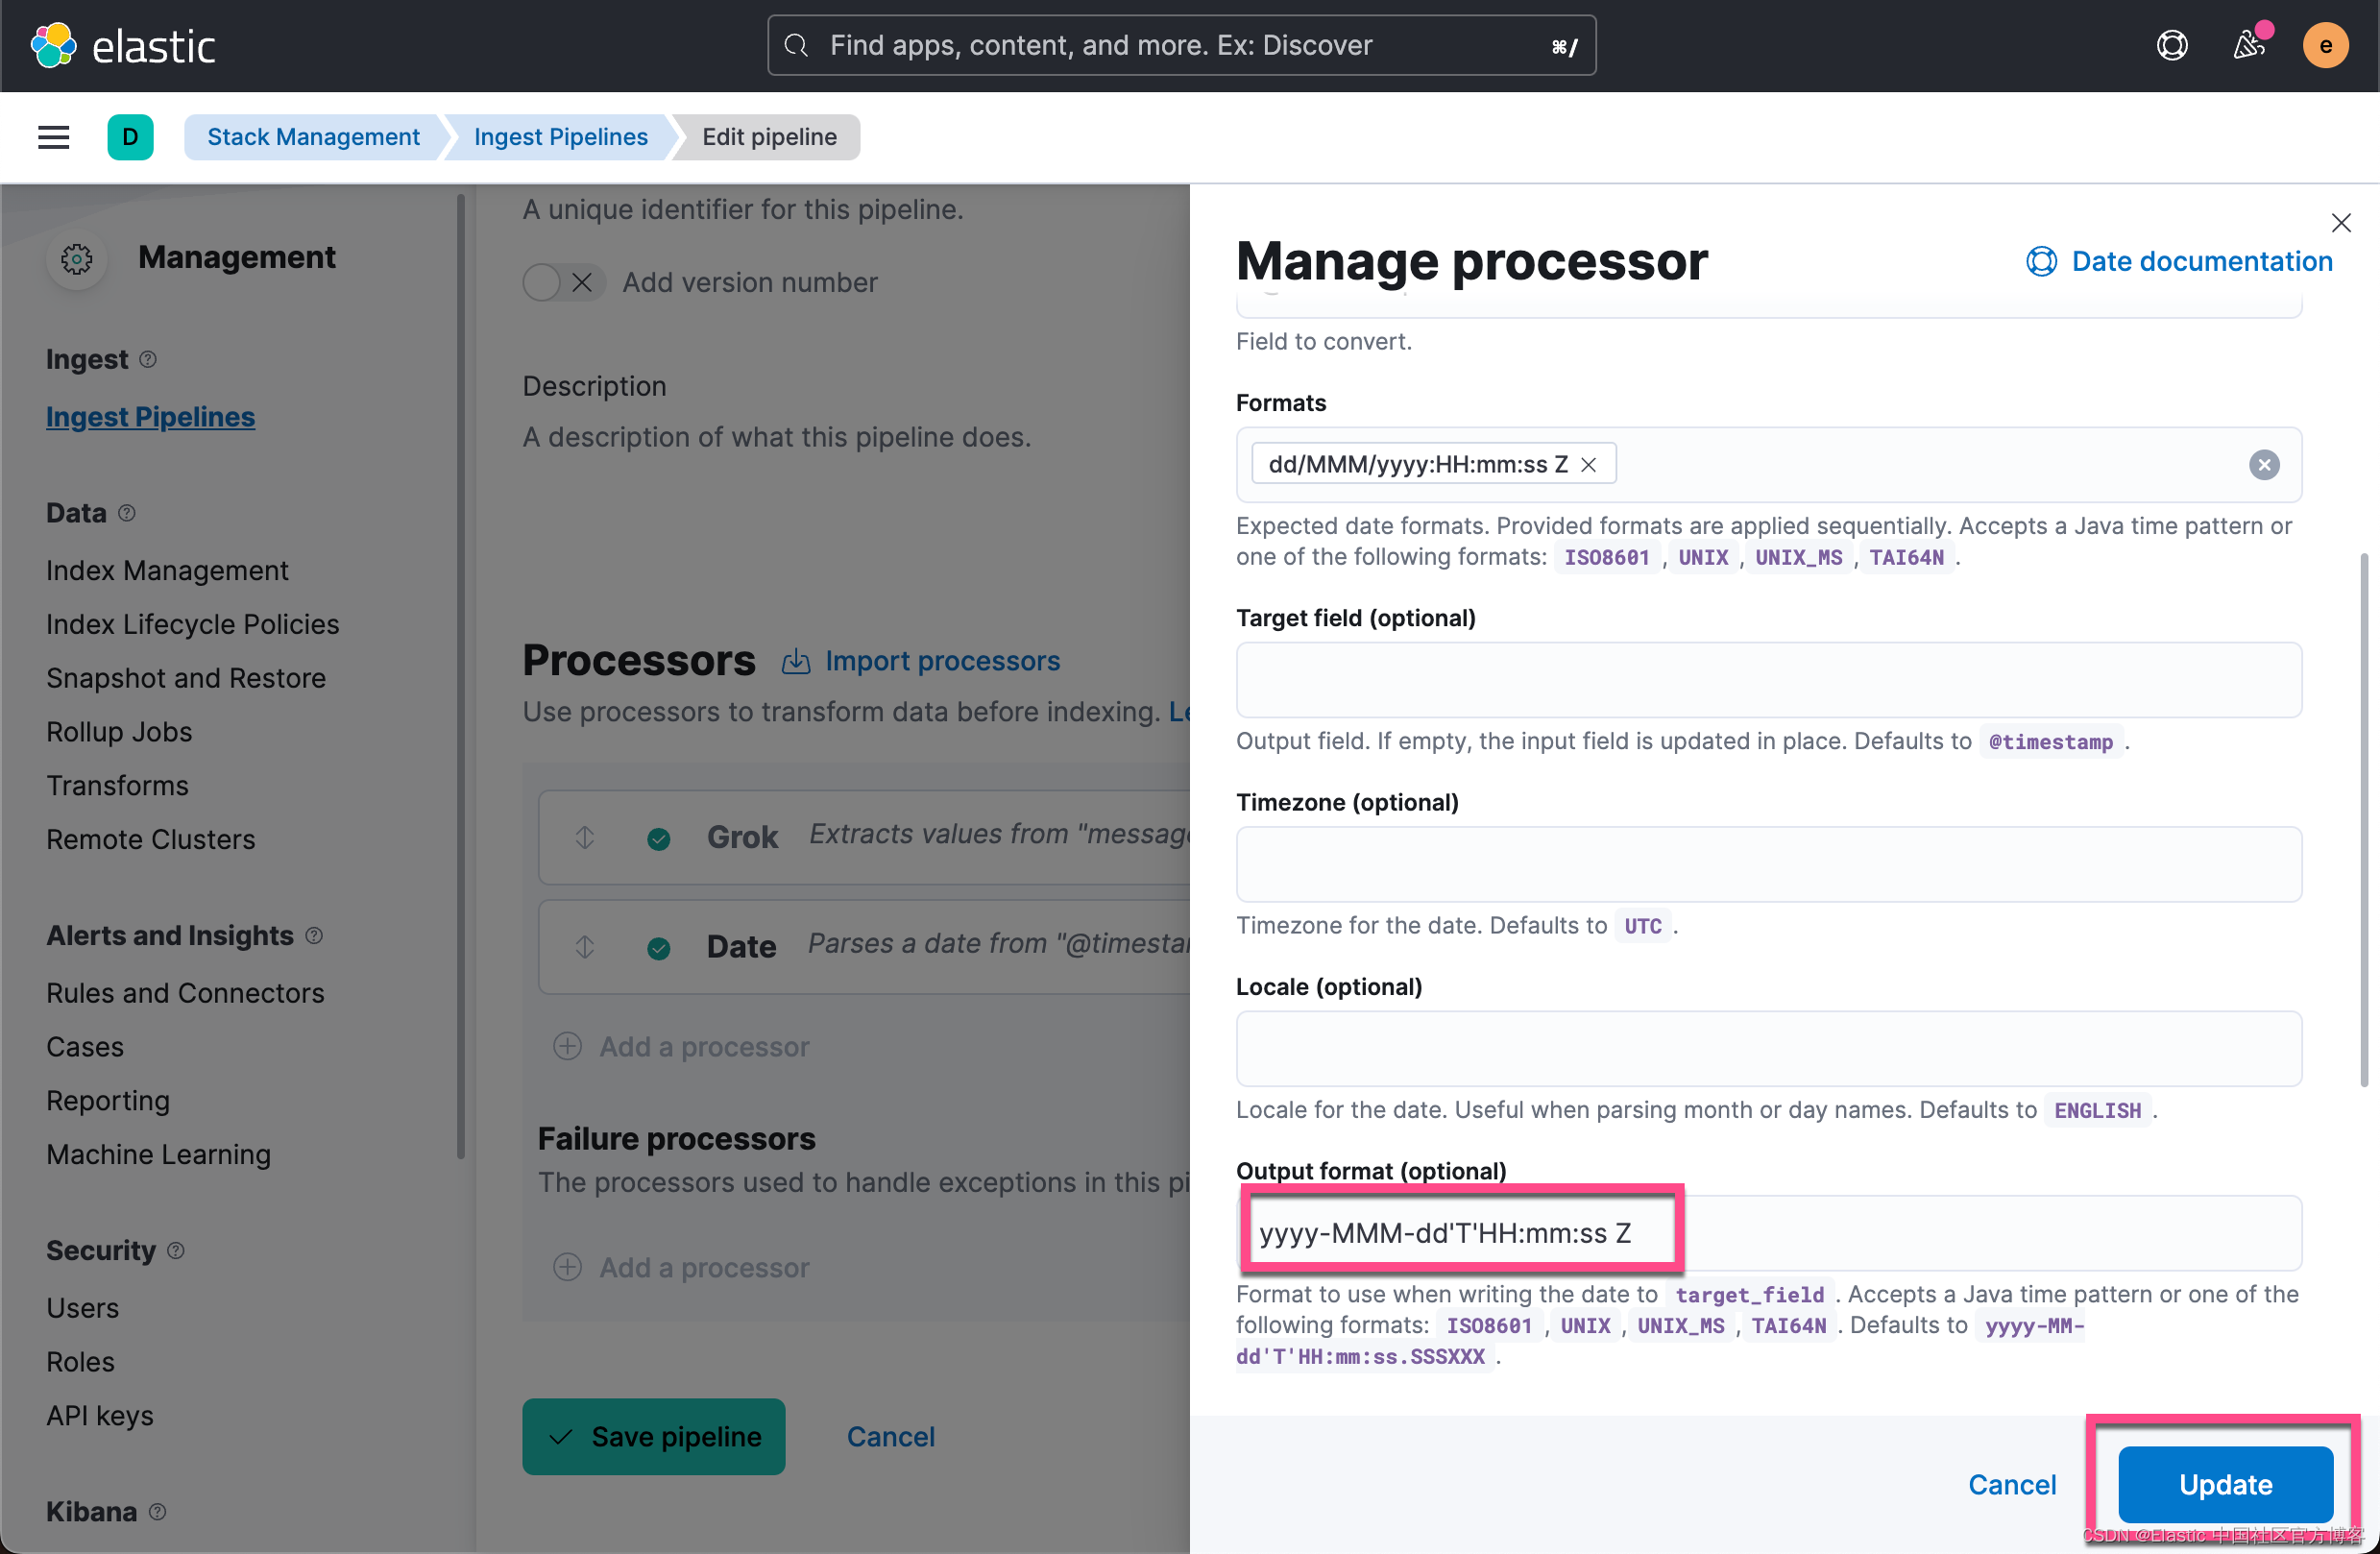
那么测试的结果是:

我们可以使用 GeoIP processor 来找到发生请求的地方在哪里。 我们仿照上面的步骤,添加 geoip processor。我们针对 source.ip 字段来操作:

点击上面的 Add 按钮:

点击上面的 View output:

从上面,我们可以看到新增加的字段。 这样我们就添加了 GeoIP processor。
我们可以按照同样的套路来添加针对 User agent 这个部分的解析。我们使用 user agent processor:

点击上面的 Add 按钮:

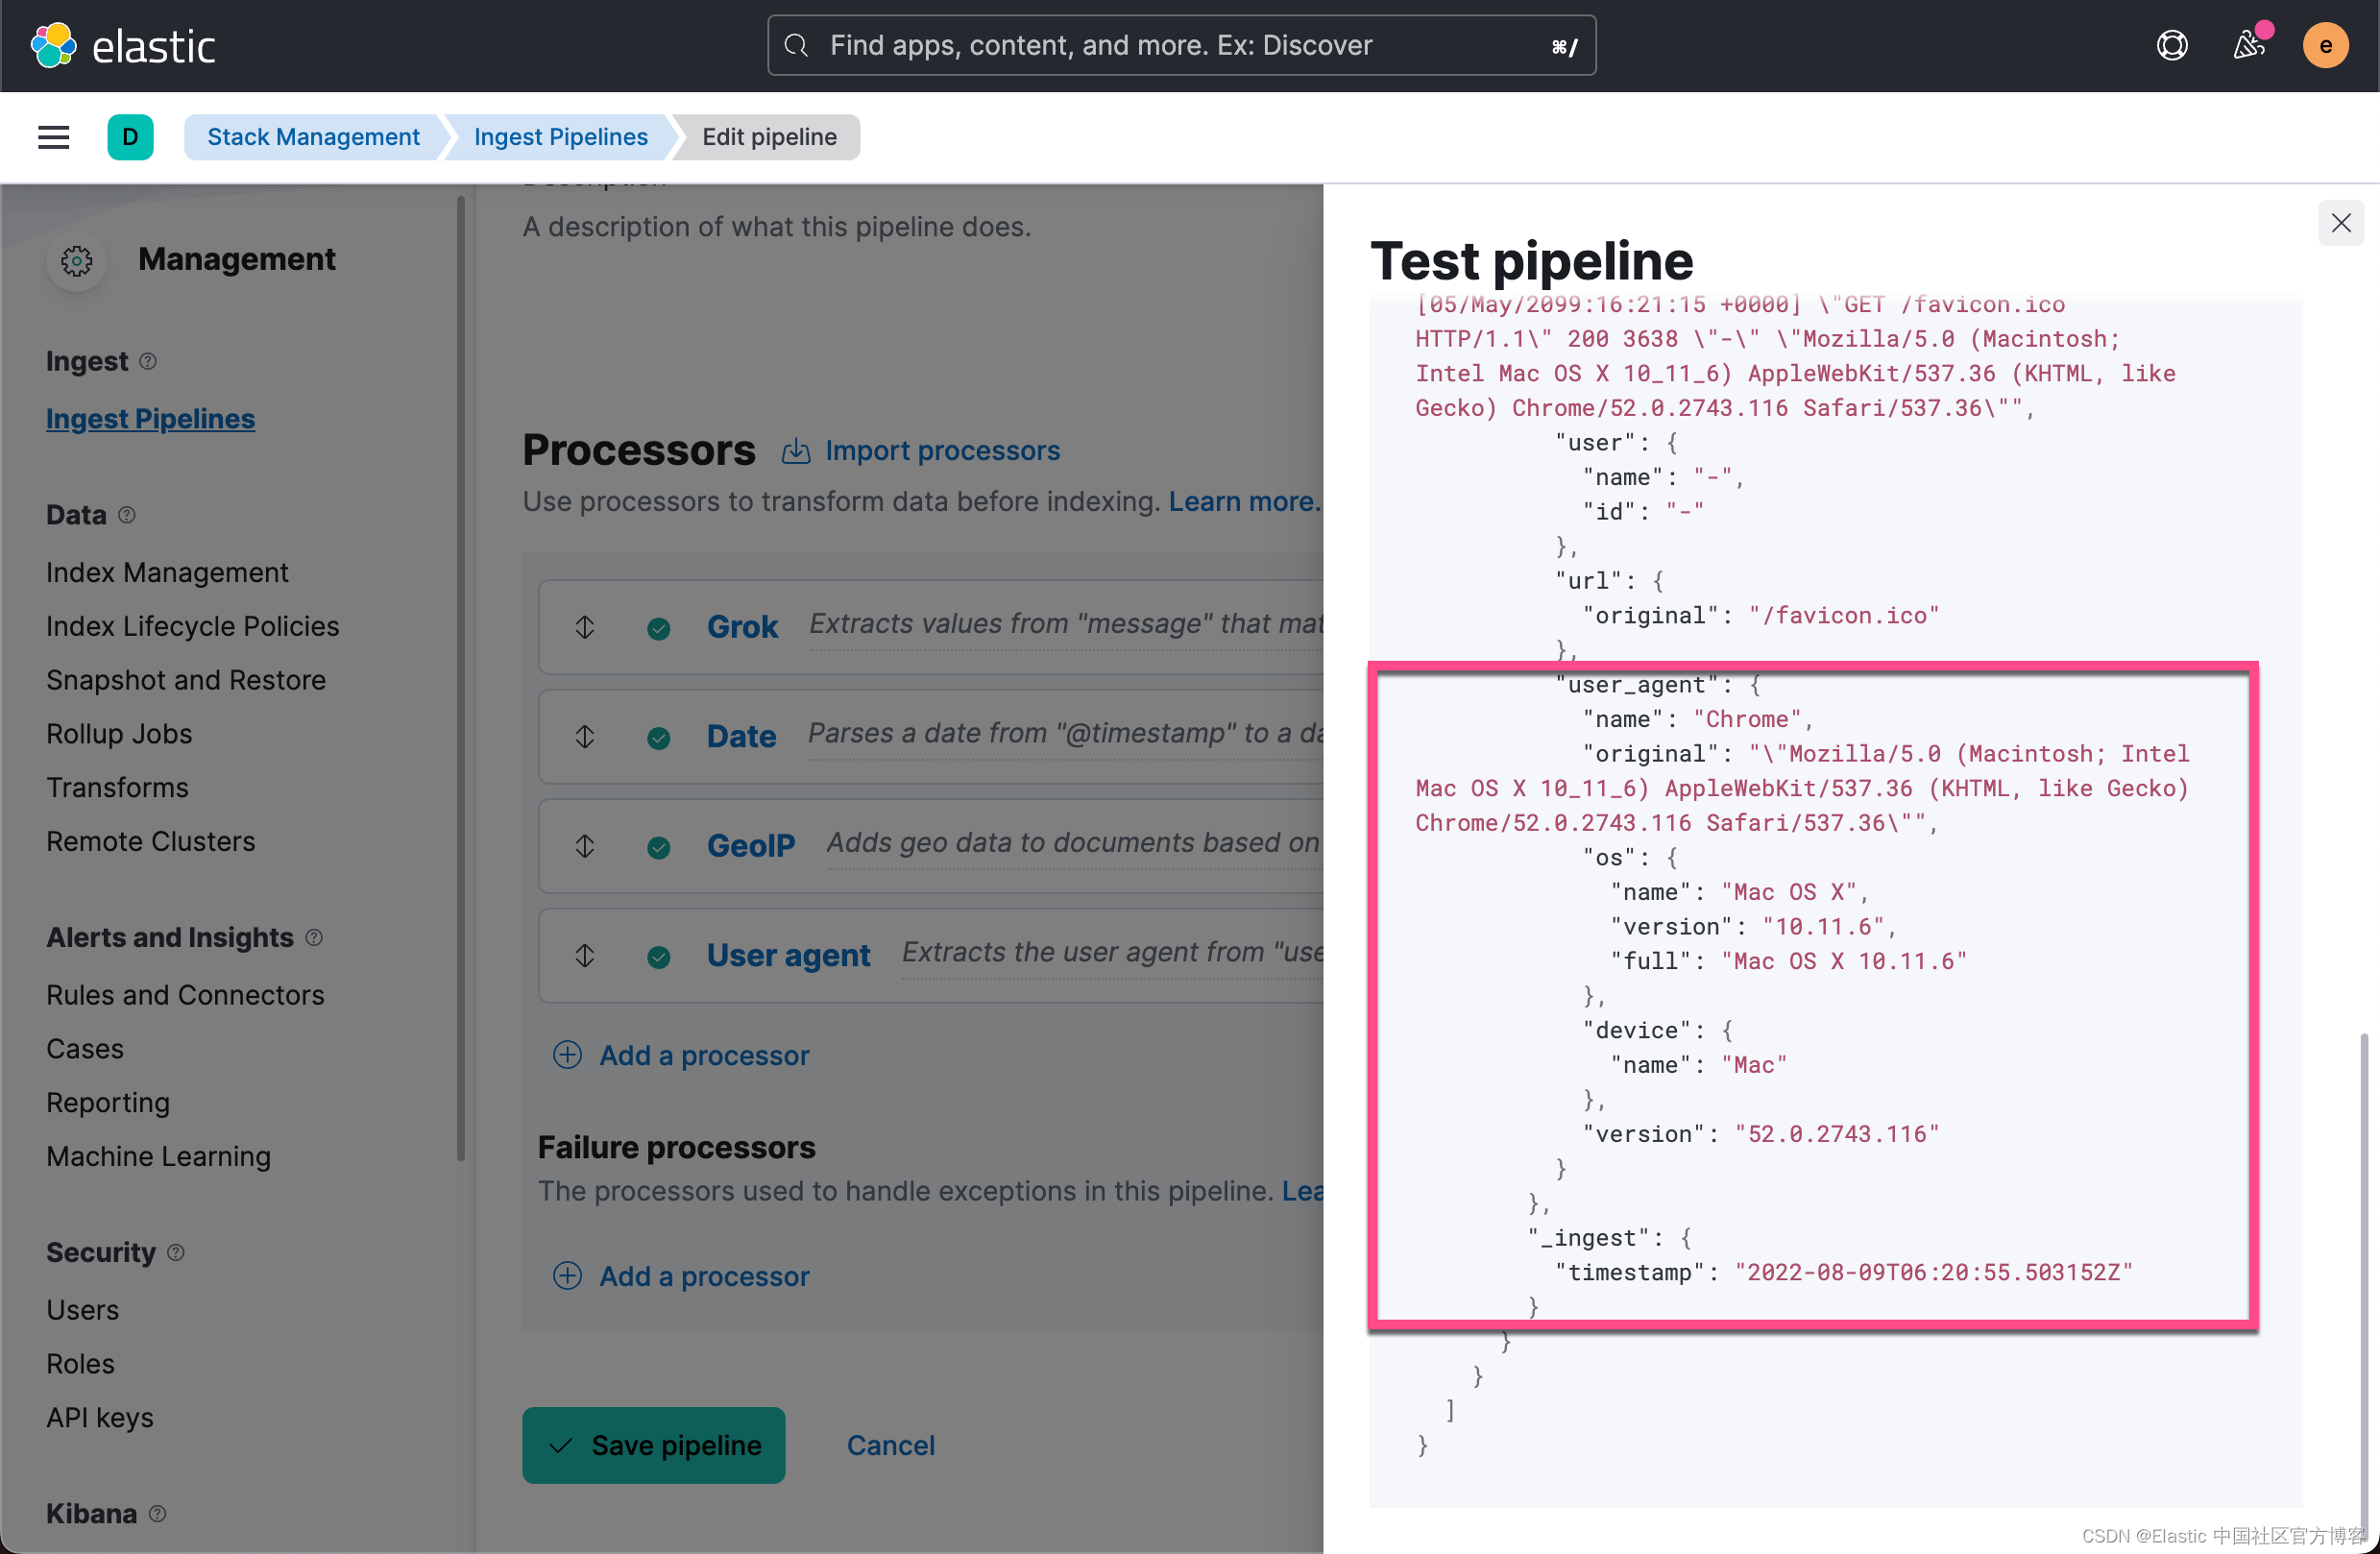
从上面,我可以看到新增加的 user_agent 字段。
最后我们点击 Create pipeline:

我们可以看到已经使用到的 processors。到目前为止,我们已经创建了一个叫做 common_log_format 的 ingest pipeline。 点击上面的拷贝按钮:
[
  {
    "grok": {
      "field": "message",
      "patterns": [
        "%{IPORHOST:source.ip} %{USER:user.id} %{USER:user.name} \[%{HTTPDATE:@timestamp}\] "%{WORD:http.request.method} %{DATA:url.original} HTTP/%{NUMBER:http.version}" %{NUMBER:http.response.status_code:int} (?:-|%{NUMBER:http.response.body.bytes:int}) %{QS:http.request.referrer} %{QS:user_agent}"
      ]
    }
  },
  {
    "date": {
      "field": "@timestamp",
      "formats": [
        "dd/MMM/yyyy:HH:mm:ss Z"
      ],
      "output_format": "yyyy-MMM-dd'T'HH:mm:ss Z"
    }
  },
  {
    "geoip": {
      "field": "source.ip",
      "target_field": "source.geo"
    }
  },
  {
    "user_agent": {
      "field": "user_agent"
    }
  }
]
上面显示我们已经使用到的 processors。
使用 ingest pipeline API
我们也可以使用 ingest pipeline API 来创建 ingest pipeline。事实上,我们在上面的步骤中也可以得到这个请求的格式:


点击上面的拷贝 copy to clipboard,我们粘贴如下:
PUT _ingest/pipeline/common_log_format
{
  "description": "A pipeline to structure common logs ",
  "processors": [
    {
      "grok": {
        "field": "message",
        "patterns": [
          "%{IPORHOST:source.ip} %{USER:user.id} %{USER:user.name} \[%{HTTPDATE:@timestamp}\] "%{WORD:http.request.method} %{DATA:url.original} HTTP/%{NUMBER:http.version}" %{NUMBER:http.response.status_code:int} (?:-|%{NUMBER:http.response.body.bytes:int}) %{QS:http.request.referrer} %{QS:user_agent}"
        ]
      }
    },
    {
      "date": {
        "field": "@timestamp",
        "formats": [
          "dd/MMM/yyyy:HH:mm:ss Z"
        ],
        "output_format": "yyyy-MMM-dd'T'HH:mm:ss Z"
      }
    },
    {
      "geoip": {
        "field": "source.ip",
        "target_field": "source.geo"
      }
    },
    {
      "user_agent": {
        "field": "user_agent"
      }
    }
  ]
}
这个就是我们使用的具体 API 来创建这个 ingest pipeline。在实际的书写过程中,我们通常并不直接创建一个 ingest pipeline,而是采用如下的格式来先测试一下是否正确与否:
POST _ingest/pipeline/_simulate
{
  "pipeline": {
    "processors": [
      {
        "grok": {
          "description": "Extract fields from 'message'",
          "field": "message",
          "patterns": [
            """%{IPORHOST:source.ip} %{USER:user.id} %{USER:user.name} [%{HTTPDATE:@timestamp}] "%{WORD:http.request.method} %{DATA:url.original} HTTP/%{NUMBER:http.version}" %{NUMBER:http.response.status_code:int} (?:-|%{NUMBER:http.response.body.bytes:int}) %{QS:http.request.referrer} %{QS:user_agent}"""
          ]
        }
      },
      {
        "date": {
          "description": "Format '@timestamp' as 'dd/MMM/yyyy:HH:mm:ss Z'",
          "field": "@timestamp",
          "formats": [
            "dd/MMM/yyyy:HH:mm:ss Z"
          ]
        }
      },
      {
        "geoip": {
          "description": "Add 'source.geo' GeoIP data for 'source.ip'",
          "field": "source.ip",
          "target_field": "source.geo"
        }
      },
      {
        "user_agent": {
          "description": "Extract fields from 'user_agent'",
          "field": "user_agent"
        }
      }
    ]
  },
  "docs": [
    {
      "_source": {
        "message": "212.87.37.154 - - [05/May/2099:16:21:15 +0000] "GET /favicon.ico HTTP/1.1" 200 3638 "-" "Mozilla/5.0 (Macintosh; Intel Mac OS X 10_11_6) AppleWebKit/537.36 (KHTML, like Gecko) Chrome/52.0.2743.116 Safari/537.36""
      }
    }
  ]
}
在上面,我们使用 _simulate 终点来进行测试。我们使用了一个测试文档,看看输出的结果:
{
  "docs": [
    {
      "doc": {
        "_index": "_index",
        "_id": "_id",
        "_source": {
          "@timestamp": "2099-05-05T16:21:15.000Z",
          "http": {
            "request": {
              "method": "GET",
              "referrer": ""-""
            },
            "version": "1.1",
            "response": {
              "body": {
                "bytes": 3638
              },
              "status_code": 200
            }
          },
          "source": {
            "geo": {
              "continent_name": "Europe",
              "region_iso_code": "DE-BE",
              "city_name": "Berlin",
              "country_iso_code": "DE",
              "country_name": "Germany",
              "region_name": "Land Berlin",
              "location": {
                "lon": 13.3878,
                "lat": 52.5312
              }
            },
            "ip": "212.87.37.154"
          },
          "message": "212.87.37.154 - - [05/May/2099:16:21:15 +0000] "GET /favicon.ico HTTP/1.1" 200 3638 "-" "Mozilla/5.0 (Macintosh; Intel Mac OS X 10_11_6) AppleWebKit/537.36 (KHTML, like Gecko) Chrome/52.0.2743.116 Safari/537.36"",
          "user": {
            "name": "-",
            "id": "-"
          },
          "url": {
            "original": "/favicon.ico"
          },
          "user_agent": {
            "name": "Chrome",
            "original": ""Mozilla/5.0 (Macintosh; Intel Mac OS X 10_11_6) AppleWebKit/537.36 (KHTML, like Gecko) Chrome/52.0.2743.116 Safari/537.36"",
            "os": {
              "name": "Mac OS X",
              "version": "10.11.6",
              "full": "Mac OS X 10.11.6"
            },
            "device": {
              "name": "Mac"
            },
            "version": "52.0.2743.116"
          }
        },
        "_ingest": {
          "timestamp": "2022-08-09T06:31:12.648918Z"
        }
      }
    }
  ]
}
显然,我们的输出结果是正确的。然后,我们再使用上面的 ingest pipeline API 来创建一个 pipeline。
一旦我们定义好一个 pipeline, 我们可以使用它。在文章 “Elasticsearch:Elastic可观测性 - 运用 pipeline 使数据结构化” 有比较详细的描述。我们使用如下的方法来写入一个文档:
PUT common_log/_doc/1?pipeline=common_log_format
{
  "message": "212.87.37.154 - - [05/May/2099:16:21:15 +0000] "GET /favicon.ico HTTP/1.1" 200 3638 "-" "Mozilla/5.0 (Macintosh; Intel Mac OS X 10_11_6) AppleWebKit/537.36 (KHTML, like Gecko) Chrome/52.0.2743.116 Safari/537.36""
}
我们也可以在使用 Beats 写入数据时调用:
output.elasticsearch:
   hosts: ["http://localhost:9200"]
   pipeline: common_log_format
或者在使用 reindex 时这么调用:
POST _reindex
{
  "source": {
    "index": "source"
  },
  "dest": {
    "index": "dest",
    "pipeline": "common_log_format"
  }
}
或者在使用 _bulk 命令时这么使用:
POST _bulk?pipeline=common_log_format
{"index":{"_index":"test","_id":"1"}}
{"message":"212.87.37.154 - - [05/May/2099:16:21:15 +0000] "GET /favicon.ico HTTP/1.1" 200 3638 "-" "Mozilla/5.0 (Macintosh; Intel Mac OS X 10_11_6) AppleWebKit/537.36 (KHTML, like Gecko) Chrome/52.0.2743.116 Safari/537.36""}
我们甚至可以直接在索引的设置中配置这个 pipeline:
PUT test1
{
  "settings": {
    "index.default_pipeline": "common_log_format"
  }
}

PUT test1/_doc/1
{
  "message": "212.87.37.154 - - [05/May/2099:16:21:15 +0000] "GET /favicon.ico HTTP/1.1" 200 3638 "-" "Mozilla/5.0 (Macintosh; Intel Mac OS X 10_11_6) AppleWebKit/537.36 (KHTML, like Gecko) Chrome/52.0.2743.116 Safari/537.36""
}
你还可以将 pipeline 参数与通过 update_by_query 一起使用,比如:
PUT test2/_doc/1
{
  "message": "212.87.37.154 - - [05/May/2099:16:21:15 +0000] "GET /favicon.ico HTTP/1.1" 200 3638 "-" "Mozilla/5.0 (Macintosh; Intel Mac OS X 10_11_6) AppleWebKit/537.36 (KHTML, like Gecko) Chrome/52.0.2743.116 Safari/537.36""
}

POST test2/_update_by_query?pipeline=common_log_format
把日志数据写入到 data stream
我们首先来创建一个 index template。这个 index template 含有 data stream。
PUT _index_template/my-data-stream-template
{
  "index_patterns": [ "my-data-stream*" ],
  "data_stream": { },
  "priority": 500
}
我们使用如下的命令来向 data stream 写入一个数据:
POST my-data-stream/_doc?pipeline=common_log_format
{
  "message": "89.160.20.128 - - [05/May/2099:16:21:15 +0000] "GET /favicon.ico HTTP/1.1" 200 3638 "-" "Mozilla/5.0 (Macintosh; Intel Mac OS X 10_11_6) AppleWebKit/537.36 (KHTML, like Gecko) Chrome/52.0.2743.116 Safari/537.36""
}
我们接下来验证一下 data stream 里的数据是否已经被结构化了。我们使用如下的命令来进行查看:
GET my-data-stream/_search?filter_path=hits.hits._source上面的命令显示的结果为:
{
  "hits": {
    "hits": [
      {
        "_source": {
          "@timestamp": "2099-May-05T16:21:15 +0000",
          "http": {
            "request": {
              "referrer": ""-"",
              "method": "GET"
            },
            "response": {
              "status_code": 200,
              "body": {
                "bytes": 3638
              }
            },
            "version": "1.1"
          },
          "source": {
            "geo": {
              "continent_name": "Europe",
              "region_iso_code": "SE-O",
              "city_name": "Trollhättan",
              "country_iso_code": "SE",
              "country_name": "Sweden",
              "region_name": "Västra Götaland County",
              "location": {
                "lon": 12.2816,
                "lat": 58.2854
              }
            },
            "ip": "89.160.20.128"
          },
          "message": "89.160.20.128 - - [05/May/2099:16:21:15 +0000] "GET /favicon.ico HTTP/1.1" 200 3638 "-" "Mozilla/5.0 (Macintosh; Intel Mac OS X 10_11_6) AppleWebKit/537.36 (KHTML, like Gecko) Chrome/52.0.2743.116 Safari/537.36"",
          "user": {
            "name": "-",
            "id": "-"
          },
          "url": {
            "original": "/favicon.ico"
          },
          "user_agent": {
            "original": ""Mozilla/5.0 (Macintosh; Intel Mac OS X 10_11_6) AppleWebKit/537.36 (KHTML, like Gecko) Chrome/52.0.2743.116 Safari/537.36"",
            "os": {
              "name": "Mac OS X",
              "version": "10.11.6",
              "full": "Mac OS X 10.11.6"
            },
            "name": "Chrome",
            "device": {
              "name": "Mac"
            },
            "version": "52.0.2743.116"
          }
        }
      }
    ]
  }
}
很显然我们的数据已经是结构化的数据。我们可以使用 Kibana 强悍的可视化来对数据进行可视化,并挖掘数据里的洞察,比如分析那个时段是高峰期,那个 IP 地址下载的数据最多,那个国家的访问最多,那个访问的次数最多,哪种操作系统访问的最多,浏览器访问网站的分布是咋样的?
最后
以上就是怕黑小猫咪最近收集整理的关于Elasticsearch:ingest pipeline 使用示例 - 解析常用日志格式设计 grok pattern创建 ingest pipeline把日志数据写入到 data stream的全部内容,更多相关Elasticsearch:ingest内容请搜索靠谱客的其他文章。


发表评论 取消回复